Posts with «software» label

ZeeClock - nice mod running on Wise Clock 4

Here we have the first "independent" mod running on Wise Clock 4, thanks to Mr. Jon S!


Jon shared the code (download it from here) and added this description:

This is an alarm clock for my toddler who can't tell time (of course). It uses colors to tell him when he should be sleeping and when he should get up.
I didn't need to, but I wrote all the code so it's self contained including setting multiple alarms, setting the time, and turning the audio on and off.
It's not perfect (I'm an artist not a programmer so the code is a bit of a mess), but it does the job.

I think it's a great job!
Thanks again Jon.


Wise Clock 4 - time synchronization with GPS

This is my first foray into the world of GPS, made possible by the GPS XBee kit.
With Wise Clock 4 offering support for XBee, this little GPS module from seeedstudio seemed like a nice fit. The purpose is, of course, to synchronize the clock with the accurate time received from satellites.

Note: Some time ago I tried the WWVB atomic clock radio receiver module CMMR-6. It comes with a 60mm ferrite rod, pretty inadequate for receiving the Colorado radio signal in Toronto, more than 2200km away. On top of the fact that it is finicky (never worked for me), it is also bulky (the ferrite rod) and fragile (the thin antenna wire).

First, I inserted the module into the XBee adapter from adafruit, which is connected (through the FTDI cable) to a terminal session (9600, 8, N, 1).


Messages started flowing in, right off the bat: wow!


Next, I moved the GPS module onto the Wise Clock 4 and uploaded a sketch that uses TinyGPS library (modified by Justin).


Here is the serial monitor output.


For those who require maximum accuracy on top of the one provided by the DS3231 RTC chip itself, this GPS solution should do it.

Homework
Make the "Doomsday clock", like the one by Wyolum team shown in the video below, with Wise Clock 4 and 2 displays.


Old projects revisited

I recently had to revisit the (original, glass domed) WiseClock and the SillyClock.

On WiseClock I streamlined the software (download from here) to only show the time and quotes. It also allows the time to be set from buttons as opposed to the Sony TV remote control (the Reset button on the 8x8 LED matrix shield was re-purposed/re-routed). As well, the character set is now defined in progmem as opposed to internal microcontroller EEPROM (font1.h contains the font definition).
The method I chose for setting the time is to show the hours in red and the minutes in green, and alternate between hours and minutes by pressing the left button (now named "Set"). The left button (the former "Reset") is now named "Inc" and connected to A2/D16 (a pull-up 10k resistor is also required), as shown in the photo.


This button is used for incrementing the hours or minutes. Once the right time is set, the clock will revert to displaying the scrolling quotes and time.

On SillyClock, the software (download from here) can now handle the tilt switch (on the "Dual RG bi-color LED matrix shield") and also sound the alarm.
Two hardware hacks are required:
  • addition of a pull-up 10k resistor on A0;
  • addition of a piezo buzzer between A1 and ground.


Optical Magnet, Arduino project next in a series Laser Tracking 3D

This blog considered to be next stage in the series published earlier, concentrated around the idea tracking object in the space. There are an enormous quantity of similar projects could be developed on this platform. I’ll name a few:

- star / rocket / vehicle tracking;
- follow me / robot / hands / cap etc;
- navigation to charging station / landing pad / around area;
- contact-less measurements rotational speed / angle to surface / shifting.

All of this on a few dollars micro-controller and cheap CMOS camera! Real-time, up to 60 Hz update rate!
Please, check on the first and second version, as I’d skip explanation basic design concept here.

  Most important features in this series of projects:

* 1. LOCALIZATION XY.
* 2. RANGE FINDER Z.
* 3. TRACKING 3-D.
* 4. TRACE TOOL.
* 5. TRACKING 6-D.
* 6. OPTICAL MAGNET.

Feature considered to be independent, so you can star  from  project 1:
http://fftarduino.blogspot.com/2011/12/arduino-laser-3d-tracking-range-finder.html
than move on next stage, and so on depends on a budget, parts availability or your interest!

This version of hardware/software system design capable to track object in

6 – D ++ space:

*   -  Linear motion along X, Y, Z coordinates (3D);
*   -  Rotation around fixed axis (6D);

I put two ++ plus signs, in order to underline capability of the hardware design to track Rotation of the object based not only on distance measurements, but also Reflectivity. As Power Control Loop strictly hold lasers radiation under control, simple calculation in periodicity of the emitted power would provide information about angular speed round / cylindrical object. Phase difference in 4 signals gives rotational center for Z. It’s also apply for linear motion, tracking of the object could be based on reflectivity or distance or BOTH simultaneously ,  which opens enormously great amount of possibilities.

Optical Magnet:
*  – Attract closest surface;
*  – Repel;
*  – Attract or repel surface with specific reflectivity (BLACK, WHITE, OR COLOR)!!!
*    * work in progress, Reflectivity math are not implemented yet       *
*    * algorithm to track rotation is not included, this is version for demonstration purposes  mainly.*

Link to download Arduino Uno sketch:  Optical_Magnet_6D

8 January, 2012.
Release notes of the version 3.2 software:

-  Video is De-interlaced, full image size 512 (active 492) lines;
-  digitalWrite, analogWrite functions of the arduino IDE were replaced by direct port manipulation, in order  to improve time performance of critical section of the code – interrupt subroutine and to avoid blocking interruption call (functions have locking mechanism in theirs body);
- minor changes in Power Control Loop algorithm, to prevent oscillation;

Link to download Arduino Uno sketch:  Optical_Magnet_6D_V3

 finished…


Wise Clock 4 - Using the RTC 1Hz "Heartbeat"

DS3231 can generate a square wave output signal through pin 3 (aptly named "SQW"). Same pin can be also activated (set low) when one of the two internal alarms is triggered (that's why this pin is also called "INT").

Wise Clock 4 has the INT/SQW pin connected to D2 through a jumper. Therefore, to be able to use this RTC signal, a jumper must connect the 2-header pins, as shown in the picture below (jumper is red, between processor and SD card socket).


Since I don't seem to get things perfect from the first try, I forgot to add the mandatory 10k pull-up resistor (this is fixed in the next iteration of the board, shipping as of mid Dec 2011). Here is how you need to connect the pull-up resistor, as shown in the next photo. Solder one terminal of the resistor in the via (it fits the hole) and the other terminal to the 2-pin header.


Once the hardware is ready, compile and upload this very simple sketch.

#include "WProgram.h"
#include "Wire.h"
#include "DS3231.h"


void rtc_interrupt()
{
  Serial.println(millis());
}


void setup()
{
  RTC.enableSQW();
  Serial.begin(57600);
  Serial.println("RTC square wave enabled");
  pinMode(2, INPUT);
  attachInterrupt(2, rtc_interrupt, RISING);
}


void loop()
{
}

The sketch (tested with Arduino IDE 22) enables the 1Hz square wave on the RTC and attaches an ISR ("interrupt service routine") that gets executed once every second. (You can see the output of the ISR function in the serial monitor.)

Notes:
  • The square wave is not enabled by default as DS3231 gets powered. To enable the square wave, bit 2 of the register 0x0E must be set to 0 (it is 1 by default).
  • The square wave frequency can be one of the 4 values: 1Hz, 1024Hz, 4096Hz and 9182Hz. This frequency is selected by setting 2 bits (3 and 4) in control register 0x0E (check page 13 of the datasheet).
  • The file DS3231.h (also required is DS3231.cpp) is the one included in the WiseClock3 library.

I see at least two applications where this square wave/interrupt line can be used:
  • RTC alarm waking up the clock from sleep mode;
  • chronometer.


Data logging with Wise Clock 3/4

If you ever tried to compile the SD library (packaged with Arduino IDE 22 and 23) targeting the Sanguino board (which also covers Wise Clock 3 and Wise Clock 4), you got compilation errors.

For example, compiling Datalogger.pde with the Sanguino file setup detailed here, will give these kinds of errors:

Datalogger:67: error: 'class File' has no member named 'println'
Datalogger:67: error: 'dataString' was not declared in this scope

The main cause for these errors is missing files (e.g. Stream.h, WString.h). Even if you fix these compilation errors, Datalogger.pde sketch will still not work, and this is because SPI pins are incorrectly defined for Sanguino. (Note that the Datalogger sketch compiles and works fine for Arduino.)


I know that Arduino IDE 22 and 23 are no longer supported, but I bet many out there are still using them, as I do. Until I upgrade to Arduino 1.0, I think it is worth fixing the issue in these older IDEs.


So here is the quick recipe for covering the Sanguino board in Arduino 22 and 23 IDEs:

1. add the following section to Arduino-0022/hardware/arduino/boards.txt file:


##############################
sanguino.name=Sanguino
sanguino.upload.protocol=stk500
sanguino.upload.maximum_size=63488
sanguino.upload.speed=38400
sanguino.bootloader.low_fuses=0xFF
sanguino.bootloader.high_fuses=0xDC
sanguino.bootloader.extended_fuses=0xFD
sanguino.bootloader.path=atmega644p
sanguino.bootloader.file=ATmegaBOOT_644P.hex
sanguino.bootloader.unlock_bits=0x3F
sanguino.bootloader.lock_bits=0x0F
sanguino.build.mcu=atmega644p
sanguino.build.f_cpu=16000000L
sanguino.build.core=sanguino
sanguino.verbose=false

2. Download file sanguino22.zip and expand its content into the folder Arduino-0022/hardware/arduino/cores/. This will create the folder "sanguino" under "cores".

Sanguino22.zip contains the following files, copied from Arduino-0022/hardware/arduino/cores/arduino/:


Only 2 4 of the original Arduino files have been modified specifically for Sanguino, and they are: pins_arduino.h
pins_arduino.c.
WInterrupts.c
wiring_private.h

Note (March 12/2012): I updated the zip file to include the last two files enumerated above. The original Arduino ones did not handle attachInterrupt() correctly, as the original Sanguino files (released a long time ago for version 18) did. So I just copied over the old files.

By following the 2 steps above, you should be able to compile sketches for the "Sanguino" target (selectable from the menu "Tools/Board" of the IDE). (A few extra steps are required to be able to burn the bootloader, but I will leave this out for now, for the sake of simplicity.)

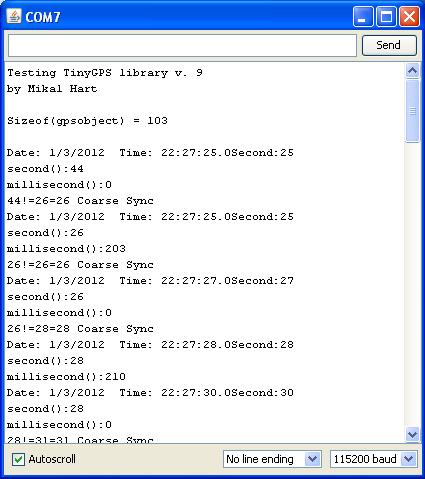
Now try compiling and uploading Datalogger.pde and see the results for yourself: data is appended to the file datalog.txt on SD card.

Note: The Wise Clock 3/4 software handles reading from SD card just fine even with the old Sanguino files because the SPI pins are defined in the file mmc.cpp, which is part of the Wise Clock 3/4 library. The SD library relies on externally-defined (in file pins_arduino.h) SPI pins.

Guess why am I bringing up data logging on Wise Clock 4? :)