Mind control might seem like something out of a sci-fi show, but like the tablet computer, universal translator, or virtual reality device, is actually a technology that has made it into the real world. While these devices often requires on advanced and expensive equipment to interpret brain waves properly, with the right machine learning system it’s possible to do things like this mind-controlled flame thrower on a much smaller budget. (Video, embedded below.)
[Nathaniel F] was already experimenting with using brain-computer interfaces and machine learning, and wanted to see if he could build something practical combining these two technologies. Instead of turning to an EEG machine to read brain patterns, he picked up a much less expensive Mindflex and paired it with a machine learning system running TensorFlow to make up for some of its shortcomings. The processing is done by a Raspberry Pi 4, which sends commands to an Arduino to fire the flamethrower when it detects the proper thought patterns. Don’t forget the flamethrower part of this build either: it was designed and built entirely by [Nathanial F] as well using gas and an arc lighter.
While the build took many hours of training to gather the proper amount of data to build the neural network and works as the proof of concept he was hoping for, [Nathaniel F] notes that it could be improved by replacing the outdated Mindflex with a better EEG. For now though, we appreciate seeing sci-fi in the real world in projects like this, or in other mind-controlled projects like this one which converts a prosthetic arm into a mind-controlled music synthesizer.
A red ball travels through a network of clear acrylic tubes using 3D printed Venturi air movers, gravity, and toys to help it travel. Spectators can change the ball’s path with their phones via a local website with a big picture of the installation. The ball triggers animations along its path using break beam detection and weaves a different story each time depending on the toys it interacts with.
Here’s how it works: a Raspberry Pi 4 is responsible for releasing the ball at the beginning of the track and for controlling the track switches. The Pi also hosts a server for smartphones and the 25 Arduino Nanos that control the LEDs and servos of the animatronics. As a bonus animatronic, there’s a giant whiteboard that rotates and switches between displaying the kids’ drawings and the team’s plans and schematics. Take a brief but up-close tour after the break.
This awesome art project was a huge collaborative effort that involved the people of Wolfsburg, Germany — families in the community donated their used and abandoned toys, groups of elementary school kids were brought in to create stories for the toys, and several high school kids and other collaborators realized these drawings with animatronics.
A wise senator once noted that democracy dies with thunderous applause. Similarly, it’s also how privacy dies, as we invite more and more smart devices willingly into our homes that are built by companies that don’t tend to have our best interests in mind. If you’re not willing to toss all of these admittedly useful devices out of the house but still want to keep an eye on what they’re doing, though, [Nick Bild] has a handy project that lets you keep an eye on them when they try to access the network.
The device is built on a Raspberry Pi that acts as a middle man for these devices on his home network. Any traffic they attempt to send gets sent through the Pi which sniffs the traffic via a Python script and is able to detect when they are accessing their cloud services. From there, the Pi sends an alert to an IoT Arduino connected to an LED which illuminates during the time in which the smart devices are active.
The build is an interesting one because many smart devices are known to listen in to day-to-day conversation even without speaking the code phrase (i.e. “Hey Google” etc.) and this is a great way to have some peace-of-mind that a device is inactive at any particular moment. However, it’s not a foolproof way of guaranteeing privacy, as plenty of devices might be accessing other services, and still other devices have even been known to ship with hidden hardware.
We are no stranger to peculiar and wonderful musical instruments here at Hackaday. [James Bruton] has long been fascinated with barcode scanners as an input source for music and now has a procedural barcode-powered synth to add to his growing collection of handmade instruments. We’ve previously covered his barcode guitar, which converts a string of numbers from the PS/2 output to pitches. This meant having a large number of barcodes printed as each pitch required a separate barcode. As you can imagine, this makes for a rather unwieldy and large instrument.
Rather than looking at the textual output of the reader, [James] cracked it open and put it to the oscilloscope. Once inside, he found a good source that outputs a square wave corresponding to the black and white lines that the barcode sees. Since the barcodes [James] is using don’t have the proper start and stop codes, the barcode reader continuously scans. Normally it would stop the laser to send the text over the USB or PS/2 connection. A simple 5v to 3.3v level shifter feeds that square wave into a Teensy board, which outputs the audio.
A video showcasing a similar technique inspired [James] with this project. The creators of that video have a huge wall of different patterns of black and white lines. [James’s] next stroke of brilliance was to have a small HDMI display to generate the barcodes on the fly. A Raspberry Pi 4 reads in various buttons via GPIO and displays the resulting barcode on the screen. A quick 3d printed shell rounds out the build nicely, keeping things small and compact. All the code and CAD files are up on GitHub.
Oh, sure, there have been a few cube-shaped PCs over the years, like the G4 and the NeXT cube. But can they really be called cubes when the display and the inputs were all external? We think not.
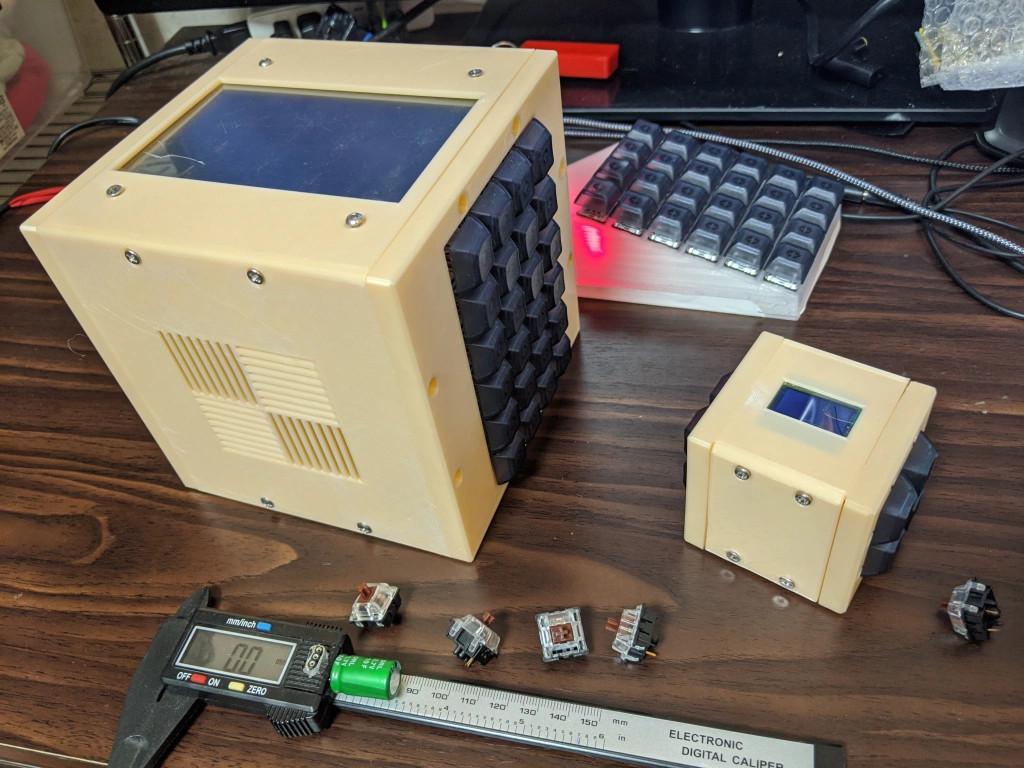
[ikeji] doesn’t think so either, and has created a cube PC that puts them all to shame. Every input and output is within the cube, including our favorite part — the 48-key ortholinear keyboard, which covers two sides of the cube and must be typed on vertically. (If you’ve ever had wrist pain from typing, you’ll understand why anyone would want to do that.) You can see a gif of [ikeji] typing on it after the break.
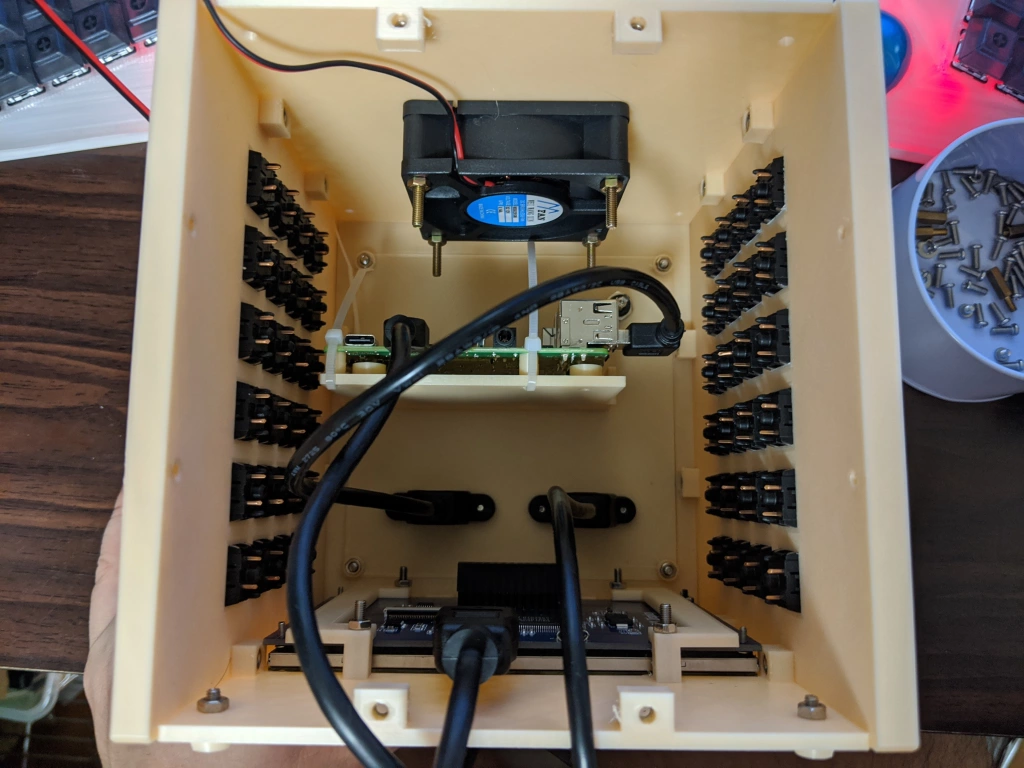
Inside the 3D printed cube is a Raspberry Pi 4 and a 5″ LCD. There’s also an Arduino Pro Micro for the keyboard matrix, which is really two 4×6 matrices — one for each half. There’s a 6cm fan to keep things cool, and one panel is devoted to a grille for heat output. Another panel is devoted to vertically mounting the microcontrollers and extending the USB ports.
Don’t type on me or my son ever again.
When we first looked at this project, we thought the tiny cube was a companion macro pad that could be stored inside the main cube. It’s really a test cube for trying everything out, which we think is a great idea and does not preclude its use as a macro pad one of these days. [ikeji] already has plenty of plans for the future, like cassette support, an internal printer, and a battery, among other things. We can’t wait to see the next iteration.
Sunrises and sunsets hardly ever disappoint. Still, it’s difficult to justify waking up early enough to catch one, or to stop what you’re doing in the evening just to watch the dying light. If there’s one good thing about CCTV cameras, it’s that some of them are positioned to catch a lovely view of one of the two, and a great many of them aren’t locked down at all.