Posts with «pwm» label

Controlling the heater and fan

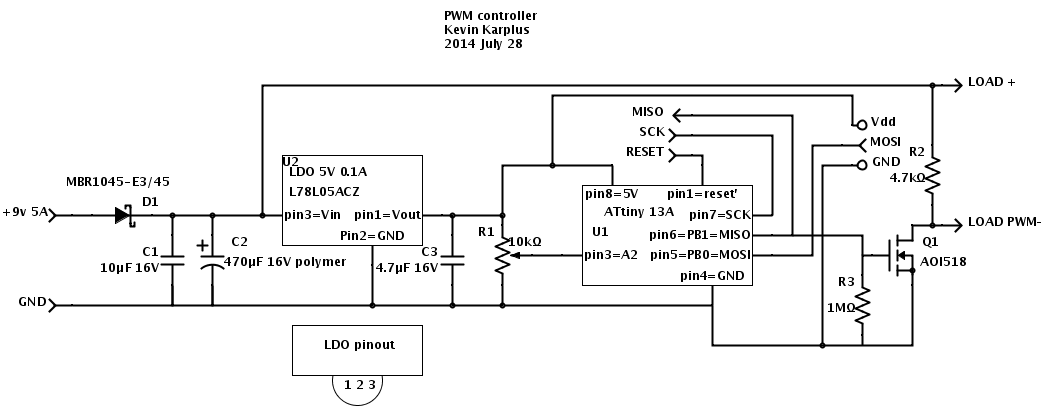
Here is the circuit for the heater and fan that I’ve been developing for incubator project for the freshman design course:

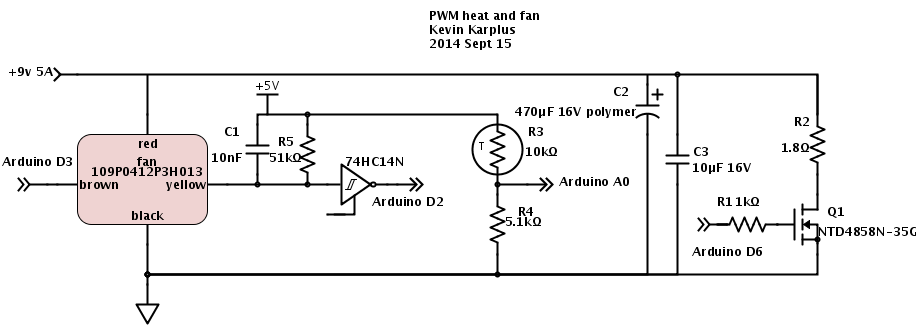
Here is the circuit I’ve been using for playing with control loops. (The 74HC14N Schmitt trigger inverter does not have an enable input, but SchemeIt has a very limited and idiosyncratic set of schematic symbols, so I used the closest one.)

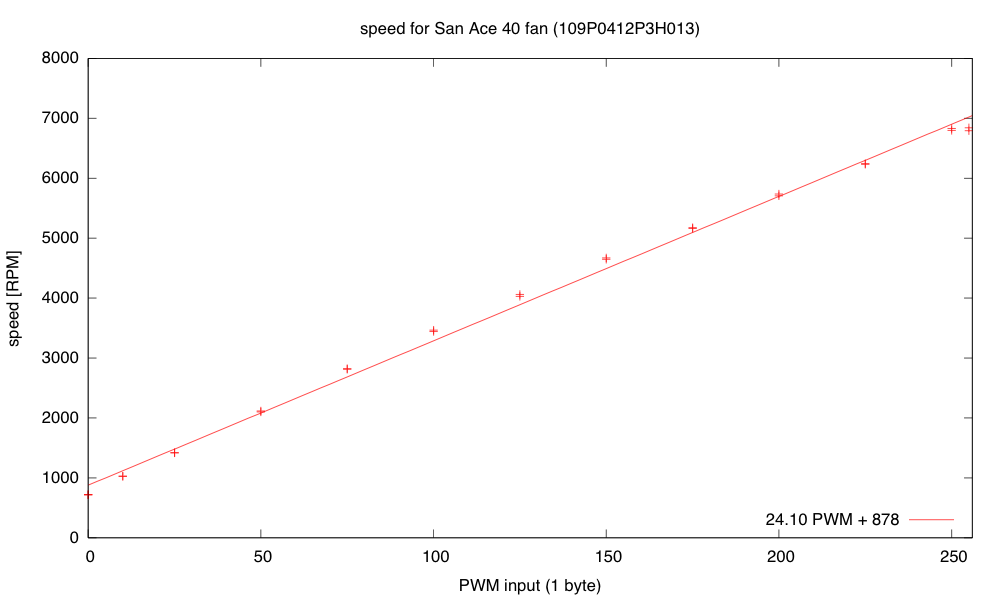
Yesterday and this morning, when I was developing the controller software for the fan and resistive heater, I ran into a lot of problems with overshoot when changing the setpoints. For the fan controller I wrote One thing that helped was not accumulating integral error when the PWM signal was pinned at the lowest or highest values.”  I also switched to using RPM rather than pulse duration as the measured variable, because RPM is nearly linear with the PWM input (RPM approximately 24.1 PWM + 878). Another thing “that helped was to make a guess at the target PWM setting when the setpoint was changed (using d RPM/ d PWM =24 and the current PWM setting and RPM value), then setting the cumulative error to what it would be in steady state at that PWM. I then set the PWM to five times as far from current PWM as the target PWM to make the transition as fast as possible without increasing overshoot, making sure to clip to the legal 0..255 range.”  Because I have a reasonable model for RPM as a function of PWM, it was easy to estimate what the target PWM should be so that the cumulative error from the integrator would set the PWM value correctly once the error dropped enough that the desired PWM value was no longer pinned at the limits.

Today I decided to do a little reading to find out what other people have done about the problem of the controller overshooting when the actuator hits its limits.  It turns out that the phenomenon is know as “integrator windup“, and the two solutions I came up with are standard solutions.  Turning off the error accumulation when the actuator is at its limit and more movement in that direction is desired is known as “conditional integration” and guessing the correct setting for the cumulative error on setpoint change is a form of “back calculation”.  There are more sophisticated forms of back calculation that I might want to try implementing.  (I found a better explanation of the anti-windup scheme, which I might base my next implementation on—basically it gradually reduces the cumulative error to 0 as long as the desired setting for the actuator is past its limits.)

The temperature controller has been harder for me to tune, for several reasons:

  • The response time is very long.  Instead of oscillating around 5Hz, the period seems to be more like 90 seconds.  This means that it takes a long time to see whether an adjustment to the parameters makes a difference.
  • The temperature at the thermistor is dependent on the temperature at the resistor.  The thermal mass and thermal resistance act like an RC circuit (with temperature analogous to voltage, and power dissipated analogous to current).  Adjusting the power to the resistor via PWM changes the rate at which the temperature increases.  It also changes the eventual equilibrium temperature, but the PWM control is more directly of the rate of temperature change.
  • The heatsink and resistor continue to warm the air and the measuring thermistor even after all power to the resistor is cut off, so there is a big danger of overshoot whenever the setpoint temperature is increased.
  • The control is asymmetric—dumping 40W of power into the resistor heats it up fairly fast, but heat is only slowly dissipated when power is turned off.  Running the fan fast helps a little here, slowing down the temperature rise and speeding up the cool down, but once I put the whole thing in a closed box, it will be very difficult to cool things off if the box gets too warm.  This makes overshoot in the positive direction  a serious problem.
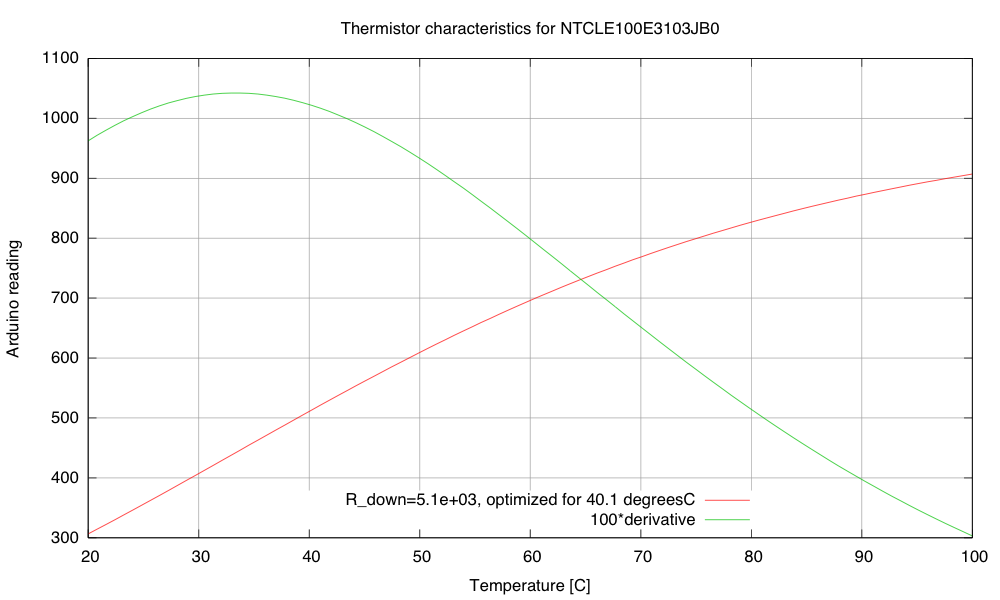
  • The temperature measurements are only about 0.1°C resolution, and the noise on the ADC is about ±4LSB, so it will be difficult to get tight temperature control, even with a perfectly tuned controller.
  • I don’t have a simple model of what the steady-state thermistor temperature will be given the PWM input, so I’ve had difficulty coming up with a guess about the eventual PWM value for resetting the cumulative error on a setpoint change.  I have a model for the resistor temperature in still air, but the fan makes a huge difference, both in the thermal resistance (and so both the equilibrium temperature and time constant of the resistor heating) and in the coupling between the resistor and the thermistor.

I still have a lot of things left over from a couple of days ago, and I’ve added some new things to the list.

  • Put the whole thing into a styrofoam box, to see whether extra venting is needed to allow things to cool down, and to see how tightly temperature can be controlled. I’ve put stuff in the box, but I can’t close the box with the stuff sticking out, so it doesn’t really count.
  • Design and build baffling for the fan to get better airflow in the box. I’ve made a little paper and wire baffle, to get better air flow over the resistor, but I’ve not done the full baffling to get good airflow in the box.
  • Figure out how to get students to come up with workable designs, when they are starting from knowing nothing. I don’t want to give them my designs, but I want to help them find doable subproblems.  Some of the subproblems they come up with may be well beyond the skills that they can pick up in the time frame of the course. The more I work on this project, the more I realize that I and the students will have to be happy with them having explored the options, without getting all the problems solved.
  • Find a smaller bread board or prototype board to put the controller on—my current bread boards are all 6.5″ long, and the box only has room for 6″, especially since I put the resistor in the center of the 6″×12″ aluminum plate, which just fits the box.  I suppose I could drill a couple more holes in the plate and mount the resistor off center, but I rather like the idea of building the controller as an Arduino shield, so that the Arduino + controller is a single unit.
  • Another possibility is to drill a hole in the styrofoam box and run cables through the box for the resistive heater, the fan, and the thermistor.  Even if the grounds are connected outside the box, this is only 8 wires. Putting the control electronics outside the box would reduce the clutter in the box and make tweaking easier.
  • Add some low-pass filtering to the temperature measurement to reduce noise.  Just adding 4 measurements in quick succession would reduce the noise and give the illusion of extra precision.
  • The fan controller occasionally has a little glitch where the tachometer either misses a pulse or provides an extra one (I think mainly an extra one due to ringing on the opposite edge).  I could try reducing this problem in three ways: 1) changing which edge I’m triggering on, 2) using more low-pass filtering before the Schmitt trigger in the edge detector, or 3) using median filtering to throw out any half-length or double-length pulses, unless they occur as a pair.  (Hmm, the half-length pulses would occur as a pair, so this might not help unless I go to median of 5, which would be a lot of trouble.)
  • Improve my modeling of the thermal system, so that I can do more reasonable back calculation on setpoint change.
  • Consider using a PID controller for the temperature to get faster response without overshoot.  (If I can reduce the noise problem.)
  • Improve my anti-windup methods for both thermal and fan controllers, to reduce overshoot.

Filed under: freshman design seminar Tagged: Arduino, control loop, fan, incubator, integrator windup, PID controller, power resistor, PWM, tachometer, thermistor

PWM heater and fan continued

Yesterday I gave myself the following to-do list:

  • Check the VDS voltage at 4A on the nFET. Is the on-resistance still much too high?

    Yes, with the 1.8Ω resistor I get 110mV across the FET with 8.372V across the resistor, so at 4.65A I’m seeing an on-resistance of 24mΩ, still much higher than the 10mΩ I was expecting, but closer than I was getting yesterday at 1A. The voltage across the nFET does go up as the nFET warms up, but the nFET does not get too hot (up to around 45°C).

  • Try adding a 1kΩ gate resistance to slow down the transitions on the PWM, to see if that reduces the inductive spikes and the noise-coupling through the 9V power supply.

    Slowing the transitions definitely reduced the spikes, from about 13V to about 1V.  The bypass capacitors absorbed the highest-frequency spikes, and the 470µF polymer electrolytic capacitor seems to be enough—the 10µF ceramic doesn’t seem to add any extra suppression.  At about 94% duty cycle the noise on the power supply is about the following:

    gate resistor bypass capacitor peak-to-peak noise
     0Ω  none  20V
     1kΩ  none  3V
     0Ω  10µF  2.5V
     1kΩ  10µF  2.5V
     0Ω  470µF  1V
     1kΩ  470µF  0.3V

    The slew rate for the drain voltage with the 1kΩ gate resistor is about +7V/µs and -5V/µs.

  • Write a simple control loop for the fan speed, so that the fan speed can be held constant even when the power-supply voltage changes.  This may be an opportunity to try the P/PI/PID tuning, since the control loop should be fairly fast.

    I wrote a simple PID controller with the control variable being the fan PWM and the measured variable being the time per pulse (in µsec).  I tried tuning the controller by adjusting the proportional gain until the control loop barely oscillated, then cutting the gain to 0.45 of that and setting the integration time to about period of the oscillation (very loosely estimated).  I then tweaked the parameters until it seemed to give good control without oscillation over the full range of fan speeds.I tried the differential control, but the noisiness of the speed measurement (which I was not filtering at all) makes the derivative far too touchy, even with tiny amounts of differential control, so I used a simple PI controller instead.  I don’t think that the optimal parameters are the same at the high speed and low speed for the fan, but it was not difficult to find parameters that worked fairly well across the range.  One thing that help was not accumulating integral error when the PWM signal was pinned at the lowest or highest values.

    The speed is almost linear with the PWM input, so I would probably get better control if I used speed (the reciprocal of the pulse duration) as the measured value in the controller.

    The fan speed is nearly linear with PWM, which is ideal for proportional control, but I had foolishly used the pulse duration as my measured value to control.

    I rewrote the controller as a simple PI controller, using 16*RPM as my measured variable, so that I could have an integer setpoint with sufficient resolution. I’m still using floating-point in the controller for simplicity of coding but I plan to switch to fixed-point soon. This controller was fairly easy to tune—I made the Kplarge enough that system oscillated, and counted how many samples were in the period, then set the integration time to about the period. I then reduced Kp until the oscillations went away. I ended up with Kp = 0.01 PWM/16RPM and TI= 1/0.15 samples (with a sampling rate of 30ms, so TI=0.2s).

    One thing that helped was to make a guess at the target PWM setting when the setpoint was changed (using d RPM/ d PWM =24 and the current PWM setting and RPM value), then setting the cumulative error to what it would be in steady state at that PWM. I then set the PWM to five times as far from current PWM as the target PWM to make the transition as fast as possible without increasing overshoot, making sure to clip to the legal 0..255 range.

  • Write a simple control loop for controlling the temperature at the thermistor, by adjusting the PWM for the resistor.  This might get messy, as the fan speed probably affects the rate of transfer from the resistor to the thermistor (the thermistor is in the air stream blown over the resistor, not touching the resistor).

    When I started working on this, my power supply failed. I’m afraid it might have shorted when I was rewiring things (though I never saw evidence for a short). I’ll leave it overnight (in case there is a resettable poly fuse) and check it in the morning. If there is still no power, I’ll open the case and see if there is a replaceable fuse inside. I’m afraid that this may have a soldered-in non-resettable fuse, which would be a terrible design—setting me back a couple of weeks as I either order a replacement fuse or a replacement power supply.

  • Put the whole thing into a styrofoam box, to see whether extra venting is needed to allow things to cool down, and to see how tightly temperature can be controlled.
  • Design and build baffling for the fan to get better airflow in the box.
  • Figure out how to get students to come up with workable designs, when they are starting from knowing nothing. I don’t want to give them my designs, but I want to help them find doable subproblems.  Some of the subproblems they come up with may be well beyond the skills that they can pick up in the time frame of the course.

Filed under: freshman design seminar Tagged: Arduino, fan, incubator, KL25Z, power resistor, PWM, tachometer, Teensy, thermistor

PWM heater and fan continued

Yesterday I gave myself the following to-do list:

  • Check the VDS voltage at 4A on the nFET. Is the on-resistance still much too high?

    Yes, with the 1.8Ω resistor I get 110mV across the FET with 8.372V across the resistor, so at 4.65A I’m seeing an on-resistance of 24mΩ, still much higher than the 10mΩ I was expecting, but closer than I was getting yesterday at 1A. The voltage across the nFET does go up as the nFET warms up, but the nFET does not get too hot (up to around 45°C).

  • Try adding a 1kΩ gate resistance to slow down the transitions on the PWM, to see if that reduces the inductive spikes and the noise-coupling through the 9V power supply.

    Slowing the transitions definitely reduced the spikes, from about 13V to about 1V.  The bypass capacitors absorbed the highest-frequency spikes, and the 470µF polymer electrolytic capacitor seems to be enough—the 10µF ceramic doesn’t seem to add any extra suppression.  At about 94% duty cycle the noise on the power supply is about the following:

    gate resistor bypass capacitor peak-to-peak noise
     0Ω  none  20V
     1kΩ  none  3V
     0Ω  10µF  2.5V
     1kΩ  10µF  2.5V
     0Ω  470µF  1V
     1kΩ  470µF  0.3V

    The slew rate for the drain voltage with the 1kΩ gate resistor is about +7V/µs and -5V/µs.

  • Write a simple control loop for the fan speed, so that the fan speed can be held constant even when the power-supply voltage changes.  This may be an opportunity to try the P/PI/PID tuning, since the control loop should be fairly fast.

    I wrote a simple PID controller with the control variable being the fan PWM and the measured variable being the time per pulse (in µsec).  I tried tuning the controller by adjusting the proportional gain until the control loop barely oscillated, then cutting the gain to 0.45 of that and setting the integration time to about period of the oscillation (very loosely estimated).  I then tweaked the parameters until it seemed to give good control without oscillation over the full range of fan speeds.I tried the differential control, but the noisiness of the speed measurement (which I was not filtering at all) makes the derivative far too touchy, even with tiny amounts of differential control, so I used a simple PI controller instead.  I don’t think that the optimal parameters are the same at the high speed and low speed for the fan, but it was not difficult to find parameters that worked fairly well across the range.  One thing that help was not accumulating integral error when the PWM signal was pinned at the lowest or highest values.

    The speed is almost linear with the PWM input, so I would probably get better control if I used speed (the reciprocal of the pulse duration) as the measured value in the controller.

    The fan speed is nearly linear with PWM, which is ideal for proportional control, but I had foolishly used the pulse duration as my measured value to control.

    I rewrote the controller as a simple PI controller, using 16*RPM as my measured variable, so that I could have an integer setpoint with sufficient resolution. I’m still using floating-point in the controller for simplicity of coding but I plan to switch to fixed-point soon. This controller was fairly easy to tune—I made the Kplarge enough that system oscillated, and counted how many samples were in the period, then set the integration time to about the period. I then reduced Kp until the oscillations went away. I ended up with Kp = 0.01 PWM/16RPM and TI= 1/0.15 samples (with a sampling rate of 30ms, so TI=0.2s).

    One thing that helped was to make a guess at the target PWM setting when the setpoint was changed (using d RPM/ d PWM =24 and the current PWM setting and RPM value), then setting the cumulative error to what it would be in steady state at that PWM. I then set the PWM to five times as far from current PWM as the target PWM to make the transition as fast as possible without increasing overshoot, making sure to clip to the legal 0..255 range.

  • Write a simple control loop for controlling the temperature at the thermistor, by adjusting the PWM for the resistor.  This might get messy, as the fan speed probably affects the rate of transfer from the resistor to the thermistor (the thermistor is in the air stream blown over the resistor, not touching the resistor).

    When I started working on this, my power supply failed. I’m afraid it might have shorted when I was rewiring things (though I never saw evidence for a short). I’ll leave it overnight (in case there is a resettable poly fuse) and check it in the morning. If there is still no power, I’ll open the case and see if there is a replaceable fuse inside. I’m afraid that this may have a soldered-in non-resettable fuse, which would be a terrible design—setting me back a couple of weeks as I either order a replacement fuse or a replacement power supply.

    Correction: the power supply was fine—I’d managed to blow a circuit breaker for the room. I’m not sure how I did that, but resetting the circuit breaker fixed the problem. I now have a temperature control sort of working—I still have to tune the control loop, but I was able to get the thermistor to about 30°C (400 as the Arduino reading) and hold it to within about 0.3°C. There was a pretty substantial overshoot at the beginning, which I’ll have to look into controlling—the temperature controller may need to be critically damped. Now it really is time for me to get some sleep.

  • Put the whole thing into a styrofoam box, to see whether extra venting is needed to allow things to cool down, and to see how tightly temperature can be controlled.
  • Design and build baffling for the fan to get better airflow in the box.
  • Figure out how to get students to come up with workable designs, when they are starting from knowing nothing. I don’t want to give them my designs, but I want to help them find doable subproblems.  Some of the subproblems they come up with may be well beyond the skills that they can pick up in the time frame of the course.

Filed under: freshman design seminar Tagged: Arduino, fan, incubator, power resistor, PWM, tachometer, thermistor

PWM heater and fan

Now that I have a power resistor and heatsink, and have verified that my power supply is capable of delivering 50W, I can try making a thermal control system for an incubator box as I hope to get the freshman design class to do.

Before building a complete control system and tuning a proportional, PI, or PID controller, I decided to check each of the components:

  • 1.8Ω resistor and heatsink (already characterized in still air in the previous post). Initially I was going to use the 8.2Ω resistor, but it heated so slowly once bolted to the heatsink that I wasn’t sure that students would have the patience to wait for it—they might conclude that things weren’t working.
  • NTD4858N-35G nFET for PWM control of the heater.
  • fan.  I bought a SanAce 40 109P0412P3H013 fan with PWM control and tachometer feedback, and I wanted to be sure that I could control the fan speed and read the tachometer.
  • thermistor. I had some NTCLE100E3103JB0 thermistors around that I had never used.  They’re not ideal for measuring temperature of resistors (they only go up to 125°C), but they should be find for measuring air temperature around 35°C, which is what the incubator will mainly be used at.
  • Arduino board (actually a SparkFun RedBoard, which is plug-compatible with the Uno R3, but has has a more reliable USB interface and is slightly cheaper.

I started out hooking up the nFET and the 1.8Ω resistor and making sure that the nFET did not get too hot.  It seems to be ok.  When I was using the 8.2Ω resistor, I measured the voltage drop across the resistor and the across the nFET, getting a 57.6mV drop from drain to source, with a current of about 9.024V/8.21ohm = 1.099A.  That’s about a 52mΩ on-resistance, and I was expecting more like 7mΩ–10mΩ.  My gate voltage was around 5V (bigger than the 4.5V of the data sheet), which should have given me lower on-resistance.  The only things I can think of are that I had more wiring resistance than I realized (quite likely, but not likely enough to add over 40mΩ), and that I was measuring around 1A, not around 10A, so perhaps there is a small-voltage effect that I don’t know about.

I should probably test the voltage drop again with 1.8Ω resistor, and see whether the on-resistance is still so high.  Better probe placement may get me more accurate voltage measurements also.

The fan runs fine at 9.212V at about 6850 RPM.  Setting the PWM input line of the fan to 0 drops the speed to about 710RPM, and setting the PWM duty cycle to a half sets the speed at about 4120RPM.  The fan is a bit noisy for such a tiny fan at the highest speed setting, but reasonably quiet at lower speeds.  I suspect that bolting the fan to a piece of masonite as a baffle would reduce the fan noise, as I think quite a bit of it was from vibration between the case of the fan and the metal plate it was sitting on.

The tachometer on the fan provides an open-collector output that I read with an interrupt input on the Arduino (pin 2, interrupt 0). I recorded the time between interrupts and converted it an RPM measurement.  The tachometer worked fine when I was just using the fan, or when the resistor was either completely off or completely on, but when I tried using PWM on the resistor, the tachometer readings became nonsense.

I looked at the tachometer signal with my oscilloscope and saw that the PWM transitions for the resistor resulted in huge spikes in the tachometer output that triggered extraneous interrupts.  I suspected noise coupled through the power supply. Adding a 10µF bypass capacitor to the 9V power supply to the fan reduced the problem considerably, and a 470µF aluminum polymer electrolytic cleaned up the power supply even more.  The 10µF alone was enough to eliminate the extraneous spikes in the middle.

I think that I should try adding some gate resistance to the nFET to slow down the rise and fall of the PWM signal a little, to reduce the inductive spikes and make the bypass capacitors more effective.

I noticed that I was still getting some readings that were half the duration that I was expecting.  These could have been caused by ringing at the other transition of the tachometer pulse, so I tried eliminating the ringing by adding some capacitance to the line and changing the pullup resistor.  These attempts were not very successful, so I decided that hysteresis was needed.  I put a Schmitt trigger between the open-collector output and the Arduino interrupt input, and the signal got a lot cleaner.  There were occasional double pulses at one edge, though, but I found that adding a 1nF to 10nF capacitor in parallel with the pullup resistor for the open collector output smoothed out the high frequency noise enough to get clean, single transitions out of the Schmitt trigger.

I hooked up the thermistor in a voltage divider with 5.1kΩ on the other leg (which maximizes the dV/dT sensitivity at 40.1°C). I used the parameters on the data sheet to plot a calibration curve for the thermistor:

Calibration and sensitivity curves for the thermistor, based on the data sheet and a 5.1kΩ pulldown resistor.

The maximum sensitivity of the thermistor circuit is around 33.3 degrees C (~10.4 Arduino LSB/°C).  That’s not a very high sensitivity, particularly given the noise of the ADC.  Note that maximizing the slope at 40.1 °C is not the same thing and having the maximum of the slope at 40.1°C.  If the maximum of the slope was at 40.1°C, the slope there would be less than it is in this plot.

My son wonders why I’m using the Arduino board for this project, rather than the FRDM-KL25Z board that I use for the circuits class or the Teensy 3.1 ARM development board. The ARM processors have more power, more memory, and much better analog-to-digital converters—and the KL25Z board is cheaper.  If I were doing this project for myself, I would certainly prefer the KL25Z board. But it is a little harder to get a beginner started on that board—just getting the first program onto the board is a pain if you don’t have a Windows machine (due to the broken bootloader the P&E Micro wrote).  There are instructions now for replacing the firmware from a Linux system, but I’ve not checked yet whether these instructions work from a Mac.  Even once you get working firmware onto the boards, the development environments are not beginner-friendly.  Well, that is certainly true of the MBED environment or bare-metal ARM environment for the KL25Z boards, but the Teensy 3.1 board supposedly can be programmed from a plugin for the Arduino IDE, which might be simple enough for beginners.  This is something for me to look into more.

Of course, one reason I’m using the Arduino Uno or Sparkfun RedBoard is that they are 5V processors, and most of the power nFETs I’ve looked at need 4.5V on the gate to turn on fully.  There are power nFETs now with lower gate voltages, but most of them are only available as surface-mount devices.  I don’t want to have to add an extra transistor or buffer chip as a level changer for the PWM circuit.

The problem is that these students will be brand new to programming, brand new to electronics, and brand new to engineering—and the course is only a 2-unit course, not a full 5-unit course, so the total time students are expected to spend on the course is only 60 hours. I want them to be able to design stuff quickly, without spending all their time learning to use tools or trying to find workarounds for limitations of the devices they are using. It already bothers me that they’ll probably need to use a Schmitt trigger to clean up the tachometer input, but at least hysteresis was a topic I was planning to cover! (The need for bypass capacitors bothers me less—they are so ubiquitous in electronics that I’ll have to cover them no matter what.)

It’s after midnight now, so I’m going to call it a day.  Here is my to-do list on this project:

  • Check the VDS voltage at 4A on the nFET. Is the on-resistance still much too high?
  • Try adding a 1kΩ gate resistance to slow down the transitions on the PWM, to see if that reduces the inductive spikes and the noise-coupling through the 9V power supply.
  • Write a simple control loop for the fan speed, so that the fan speed can be held constant even when the power-supply voltage changes.  This may be an opportunity to try the P/PI/PID tuning, since the control loop should be fairly fast.
  • Write a simple control loop for controlling the temperature at the thermistor, by adjusting the PWM for the resistor.  This might get messy, as the fan speed probably affects the rate of transfer from the resistor to the thermistor (the thermistor is in the air stream blown over the resistor, not touching the resistor).
  • Put the whole thing into a styrofoam box, to see whether extra venting is needed to allow things to cool down, and to see how tightly temperature can be controlled.
  • Design and build baffling for the fan to get better airflow in the box.
  • Figure out how to get students to come up with workable designs, when they are starting from knowing nothing. I don’t want to give them my designs, but I want to help them find doable subproblems.  Some of the subproblems they come up with may be well beyond the skills that they can pick up in the time frame of the course.


Filed under: freshman design seminar Tagged: Arduino, fan, incubator, KL25Z, power resistor, PWM, tachometer, Teensy, thermistor

PWM controller

For the last couple of days I’ve been working on designing and building a PWM controller capable of handling moderately large currents at modest voltages (5A @ 9V). I don’t need high PWM frequency (4kHz should be plenty), but some of the loads I’m thinking of are rather nonlinear (very little current at low voltages, large but constant current at higher voltages).

I decided to try using an ATtiny chip as the PWM controller, because they are very cheap and can be programmed from the Arduino IDE (using an Arduino board as the ISP programmer).  I first prototyped the design using a Arduino ProMini (so I could add debugging statements and not have to worry about the 1kByte flash limitation of the ATtiny13A).  Once that was working, I rewrote the code for the ATtiny, doing some hand optimization to reduce the code size. I got it down to 880 bytes, but I can see why C is more popular than C++ for the really tiny processors—the C++ and Arduino overhead accounts for about 150 of the 1k bytes of flash!  I could make my code much smaller if I made it more special purpose and did everything in C rather than C++, but once it fit in the 1024 bytes, I stopped worrying about the size.

PWM controller using ATtiny 13A

The design I came up with uses a low-dropout regulator to provide 5V for the ATtiny13A. A potentiometer provides analog input and a nFET provides a low-resistance switch for the output. I used the AOI518, because I have some on hand, but they are reaching the “end of life” so some other nFET may need to be used in a future design (perhaps one of the others in the series, such as the AOI516 which has a slightly lower on-resistance but a slightly higher gate capacitance).

The capacitors C1 and C2 are to keep the switching of the large load from propagating spikes into power supply.  The 470µF capacitor with a 5A current spike should limit the voltage slew to 10.6V/ms—with a 4.7kHz current square wave, this would be about a 1.1V triangle wave.  A polymer electrolytic is used (despite the price) to keep the effective series resistance small.  The one I’m using has an ESR of 9mΩ (@100kHz) and a ripple current up to 6.1A.  The leakage current could be as high as 1.5mA though.  C1 is a small ceramic capacitor to remove higher-frequency noise.  The big Schottky diode on the input is just to provide protection against accidentally hooking the circuit up backwards. I should probably add a 60¢ resettable fuse as well, to keep the current from getting excessive if there is a short.

When there is no load, the maximum current draw is 1.9mA for the pullup resistor R2, 0.9mA for the pot, 4–6mA for the ATtiny13A, and up to 1.5mA for C2, for a total of 8.3–10.3mA.  With a typically 80% efficient 9v switching power supply, this is a waste of about 100mW, or about 0.9kWh/year.

The pullup resistor R2 is not strictly necessary, but was added to keep the PWM pulses clean, turning all the way off even when the load had only tiny current draw—otherwise I could not get very low duty-cycle pulses to work well—the nFET acted as if it were a 1.3nF capacitor and kept a low voltage even when the nFET was off.  With the 4.7kΩ pullup, the voltage goes up appropriately, with a time constant of about 6µs.

So far, I’ve not tried the circuit with a large load—just with a small load that takes 13mA.  With that tiny a load, I don’t see any ripple in the power supply from the PWM.  With a 210mA load, the ripple on the power supply is noticeable: on top of the 20mV of ripple at about 20MHz with no load, I see 30mV of ripple synchronized with the switching of the PWM, when switching 210mA with a duty cycle of 1/2.  Without the 470µF polymer capacitor, the synchronized ripple is more like 200mV, indicating that the capacitor is indeed smoothing out the ripple.

The 30mV swing on 210mA implies that I should see about a 710mV swing if switching 5A.   That shouldn’t cause a problem in my design, but I do need to allow a little more voltage so that the swing isn’t a problem.  I could also use a bigger capacitor, but the polymer electrolytics are a bit expensive, and the regular wet electrolytics can’t handle a big ripple current—one with the same 6A ripple current rating would be 20 times the volume and 3 times the price of the polymer capacitor.

The high-frequency noise is almost certainly coming from the ATtiny, as it is synchronized with the PWM signal. The 5V power supply at the ATtiny is showing a 40mV ripple, which is large considering that there is a bypass capacitor on the Vdd pin.  There is a lot of inductance from the wiring on the board though, which could be increasing the propagation of the high-frequency noise.


Filed under: Uncategorized Tagged: Arduino, ATtiny, PWM

A solar charge controller made with Arduino

Instructables user deba168 is an electrical engineer based in India. He posted a tutorial to solve a common problem in his country:

In India most of the people are living in rural area where national grid transmission line is not reached till now.The existing electric grids are not capable of supplying the electricity need to those poor people. So renewable energy sources (photo voltaic panels and wind-generators) are the best option I think. I know better about the pain of village life as I am also from that area. So I designed this DIY solar charge controller to help others as well as for my home.You can’t believe, my home made solar lighting system helps a lot during the recent Cyclone Phailin.

He then  made a charge controller  running on the Arduino Uno and with an important task: to protect the rechargeable battery of photovoltaic systems. It regulates the voltage and current coming from the solar panels and it’s placed between a solar panel and its battery . It is used to maintain the proper charging voltage on the batteries so as the input voltage from the solar panel rises, the charge controller regulates it,  preventing any over charging. It works on the principle of PWM which improves efficiency of the solar PV systems.

You can follow all the steps on his page but first take a look at the video:

Sixteenth day: Arduino demo

Today’s class in the freshman design seminar went well. I started by returning the drafts of the design reports and giving some generic feedback. I realized on reading the reports that I had not given a good explanation of what I meant by describing the components of the system—two of the groups had given me long parts lists on the first page of their reports, something that would only really be appropriate in an appendix. I explained that what I wanted was what the main blocks in the block diagram were, and that they should use the block diagram to organize their report, writing a page for each block. I also suggested that they use the block diagram to partition the project among the group members, with each group member working on a different component, then getting back together to reconcile any discrepancies. Note that this is much more like real engineering group work than the usual K–12 group project, which is usually done most efficiently by turning the whole project over to the most competent member of the group.

After the feedback on design reports, I offered the students a chance to get a demo of building an Arduino program with sensing and motor control. This was a completely extemporaneous demo—I had gathered a number of possibly useful components, but had not tested anything ahead of time nor even figured out what order to do the demo in.  I asked the students if they wanted me to start with sensing or control—they asked for the motor control first.

I started by pulling a motor out of box of motors I had gotten when the elementary school my wife works at cleaned out their closets.  I told the students that I had no idea what the spec of the motor were, but since it came from an elementary school, it probably ran on 3v batteries.  I tested the motor by hooking it up first to the 3.3v, then to the 5v power on my Arduino Uno.  It spun just fine on 3.3v, but squealed a bit on 5v, so we decided to run it on 3.3v.

I then pulled out the Sainsmart 4-relay board that I had bought some time ago but never used.  I explained how a relay worked, what single-pole double-throw meant, and normally open (NO) and normally closed (NC) contacts. I used the board unpowered with the NC contacts to spin the motor, then moved the wire over to the NO contacts to turn the motor off.  I then hooked up power to the board and tried connecting input IN1 to power to activate the relay.  Nothing happened. I then tried connecting IN1 to ground, and the relay clicked and the motor spun.  The inputs to the Sainsmart board are active low, which I explained to the students (though I did not use the terminology “active low”—perhaps I should have).  I did make a point of establishing that the relay provides very good isolation between the control logic and the circuitry being controlled—you can hook up AC power from the walls to the relay contacts without interfering with the logic circuitry.

Having established that the relay worked, the next step was to get the class (as a group) to write an Arduino program to control the motor using the relay. With me taking notes on the whiteboard, they quickly came up with the pinMode command for the setup, the digitalWrite and delay for the loop, and with only a tiny bit of prompting with a second digitalWrite and delay to turn the motor back off.  They even realized the need to have different delays for the on and off, so we could tell whether we had the polarity right on the control.  Here is the program we came up with:

#define RELAY_PIN (3)

void setup()
{   pinMode(RELAY_PIN, OUTPUT);
}

void loop()
{
  digitalWrite(RELAY_PIN,LOW); // turn motor ON via relay (or off via transistor)
  delay(1000);  // on for 1 second
  digitalWrite(RELAY_PIN,HIGH); // turn motor OFF via relay (or on via transistor)
  delay(3000); // off for 3 seconds
}

I typed the code in and downloaded it to the Arduino Uno, and it worked as expected.  (It would be nice if the Arduino IDE would allow me to increase the font size, like almost every other program I use, so that students could have read the projection of what I was typing better.)

I then offered the students a choice of going on to sensing or looking at pulse-width modulation for proportional control.  They wanted PWM. I explained why PWM is not really doable with relays (the relays are too slow, and chattering them would wear them out after a while.  I did not have the specs on the relay handy, but I just looked up the specs for the SRD-05VDC-SL-C relays on the board: They have a mechanical life of 10,000,000 cycles, but an electrical life of only 100,000 cycles.  The relay takes about 7msec to make a contact and about 3msec to break a contact, so they can’t be operated much faster than about 60 times a second, which could wear them out in as little as half an hour.

So instead of a relay, I suggested an nFET (Field-Effect Transistor). I gave them a circuit with one side of the motor connected to 3.3V, the other to the drain of an nFET, with the source connected to ground.  I explained that the voltage between the gate and the source (VGS) controlled whether the transistor was on or off, and that putting 5v on the gate would turn it on fairly well. I then got out an AOI518 nFET and stuck it in my breadboard, explaining the orientation to allow using the other holes to connect to the source, gate, and drain.

I mentioned that different FETs have the order of the pins different, so one has to look up the pinout on data sheet. I pulled up the AOI518 data sheet, which has on the first page “RDS(ON) (at VGS = 4.5V) < 11.9mΩ”. I explained that if we were putting a whole amp through the FET (we’re not doing anywhere near that much current), the voltage drop would be 11.9mV, so the power dissipated in the transistor would be only 11.9mW, not enough to get it warm. I mentioned that more current would result in more power being dissipated (I2R), and that the FETs could get quite warm. I passed around my other breadboard which has six melted holes from FETs getting quite hot when I was trying to debug the class-D amplifier design. The students were surprised that the FETs still worked after getting that hot (I must admit that I was also).

I hooked up the AOI518 nFET using double-headed male header pins and female jumper cables, and the motor alternated on for 3 seconds, off for one second. We now had the transistor controlling the motor, so it was time to switch to PWM. I went to the Arduino reference page and looked around for PWM, finding it on analogWrite(). I clicked that link and we looked at the page, seeing that analog Write was like digitalWrite, except that we could put in a value from 0 to 255 that controlled what fraction of the time the pin was high.

I edited the code, changing the first digitalWrite() to analogWrite(nFET_GATE_PIN, 255), and commenting out the rest of the loop. We downloaded that, and it turned the motor on, as expected. I then tried writing 128, which still turned the motor on, but perhaps not as strongly (hard to tell with no load). Writing 50 resulted in the motor not starting. Writing 100 let the motor run if I started it by hand, but wouldn’t start the motor from a dead stop. I used this opportunity to point out that controlling the motor was not linear—1/5th didn’t run at 1/5th speed, but wouldn’t run the motor at all.

Next we switched over to doing sensors (with only 10 minutes left in the class). I got out the pressure sensor and instrumentation amp from the circuits course and hooked it up. The screwdriver I had packed in the box had too large a blade for the 0.1″ screw terminals, but luckily the tiny screwdriver on my Swiss Army knife (tucked away in the corkscrew) was small enough. After hooking up the pressure sensor to A0, I downloaded the Arduino Data Logger to the Uno, and started it from a terminal window. I set the triggering to every 100msec (which probably should be the default for the data logger), the input to A0, and convert to volts. I then demoed the pressure sensor by blowing into or sucking on the plastic tube hooked up to the sensor. With the low-gain output from the amplifier, the output swung about 0.5 v either way from the 2.5v center. Moving the A0 wire over to the high-gain output of the amplifier gave a more visible signal. I also turned off the “convert to volts” to show the students the values actually read by the Arduino (511 and 512, the middle of the range from 0 to 1023).

Because the class was over at that point, I offered to stay for another 10 minutes to show them how to use the pressure sensor to control the motor. One or two students had other classes to run to, but most stayed. I then wrote a program that would normally have the motor off, but would turn it full on if I got the pressure reading up to 512+255 and would turn it on partway (using PWM) between 512 and 512+255. I made several typos when entering the program (including messing up the braces and putting in an extraneous semicolon), but on the third compilation it downloaded successfully and controlled the motor as expected.

One student asked why the motor was off when I wasn’t blowing into the tube, so I explained about 512 being the pressure reading when nothing was happening (neither blowing into the tube nor sucking on it). I changed the zero point for the motor to a pressure reading of 300, so that the motor was normally most of the way on, but could be turned off by sucking on the tube. Here is the program we ended up with

#define nFET_GATE_PIN (3)

void setup()
{   pinMode(nFET_GATE_PIN, OUTPUT);
    pinMode(A0, INPUT);
}

void loop()
{ int pressure;
  pressure=analogRead(A0);
  if (pressure < 300)
  {    digitalWrite(nFET_GATE_PIN,LOW);  // turn motor off
  }
  else
  {   if (pressure>300+255)
      { digitalWrite(nFET_GATE_PIN,HIGH);  // turn motor on full
      }
      else
      {    analogWrite(nFET_GATE_PIN,pressure-300); // turn motor partway on
      }
  }
}

Note: this code is not an example of brilliant programming style. I can see several things that I would have done differently if I had had time to think about the code, but for this blog it is more useful to show the actual artifact that was developed in the demo, even if it makes me cringe a little.

Overall, I thought that the demo went well, despite being completely extemporaneous. Running over by 10 minutes might have been avoidable, but only by omitting something useful (like the feedback on the design reports). The demo itself lasted about 70 minutes, making the whole class run 80 minutes instead of 70. I think I compressed the demo about as much as was feasible for the level the students were at.

Based on how the students developed the first motor-control program quickly in class, I think that some of them are beginning to get some of the main ideas of programming: explicit instructions and sequential ordering. Because we were out of time by the point I got to using conditionals, I did not get a chance to probe their understanding there.


Filed under: freshman design seminar, Pressure gauge Tagged: Arduino, FET, motor, nMOS FET, pressure sensor, PWM, relay