Posts with «pcb» label

Where Arduinos are Born: Touring a PCB Factory

Bunnie Huang recently toured the Arduino production facilities and wrote a great post about what he saw (with lots of photos!):

Arduinos are made in Scarmagno, Italy, a small town near the Olivetti factories on the outskirts of Torino. All of the circuit board fabrication, board stuffing and distribution is handled out of that small town. I was really excited to see the factories, and I’d like to share some photos of them with you.


Filed under: Arduino
MAKE » Arduino 14 Aug 05:01
arduino  pcb  

XOrduino: an Arduino-compatible board for the OLPC XO laptop

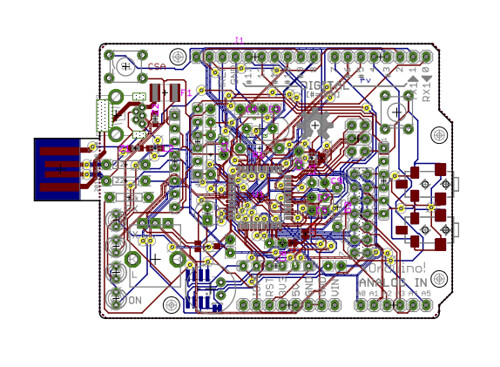
Dr. Scott Ananian, from the One Laptop Per Child (OLPC) project, conceived an Arduino Leonardo-compatible board especially designed for the OLPC XO laptop, with the goal to cut down its price as much as possible, to foster its adoption even in developing countries. From Scott’s blog:

The board uses mostly through-hole parts, with one exception, and there are only 20 required components for the basic Arduino functionality, costing about $5 (from digikey, quantity 100). It is reasonable for local labor or even older kids to assemble by hand.

The board, named XOrduino, is open hardware (schematics and pcb files can be found on github), and can be directly plugged into the XO’s USB ports, which allowed Scott to save the money required for the USB connector. Moreover, its design has been inspired by other open hardware projects, such as SparkFun’s ATmega32U4 breakout board and SparkFun’s Scratch Sensor Board-compatible PicoBoard.

Scott designed also a second board, which is even cheaper than the first one, called XO Stick:

It’s based on the AVR Stick using the ATtiny85 processor and costs only $1/student. It’s not quite as user-friendly as the Arduino-compatible board, but it can also be used to teach simple lessons in embedded electronics.

A longer description can be found here, while detailed release notes can be found on github.

It’s very exciting to see how open technologies, such as open hardware and open source software, contribute to the way education and creativity can take place around the world, especially regarding their promotion in developing countries.

[Via: Ossblog, OLPC blog, Scott Ananian's blog]

Arduino based Quadrotor on a PCB

There are many Quadrotor Projects out there. But, they require a hobbyist to deal with the Frame Designing (Mechanical), a bit of Microcontroller knowledge as well as dealing with the Motor Control (Power Electronics). You may purchase a commercial Radio and a readymade Kit for flying. But, to Do-It-Yourself, is an achievement in itself.

Here is a picture of a Quadrotor designed by Shane Colton using Arduino Pro mini as its flying brain. Shane is a Ph.D Student at Massachusetts Institute of Technology. On being asked about the Project, he replied:

I heard about Arduino some time in 2007/2008 and have used it for a few projects since then. I built the quadrotor for fun / hobby (not related to research). I wanted to build my own (quadrotor) from scratch because I could integrate all the parts onto a single circuit board, and because I like designing the control system myself.

When he says he build the quad from scratch, he literally did it. Neither did he use any commercially available Radio Control, nor did he use any Electronic Speed Controllers (ESCs). Instead he went for creating his own Brushless DC Motor Controller, that too, on the same PCB which acts as the Quadrotor’s Frame.

He spent a lot of time researching about propellor balancing as well as vibrations in the PCB. Here is a video:

Now, that is called a hobby. In a detailed Instructable, he shows how you too can build a Quadrotor on a PCB. He has a project blog at http://scolton.blogspot.com with documentation on most of his projects.

Enjoy the ride:

Arduino Blog 06 Jun 07:47

Creating a new Arduino PCB in the Arduino IDE - Trials and Tribble-ations

If someone can help me out then I will write a tip/walkthough on this subject.

Quite often DAGU products use the ATmega168 MCU rather than the ATmega328 because they are a bit cheaper and 16K of program memory is often enough.

The problem is that ATmel no longer produce the ATmega168 20-AU which we had been using. They now produce the ATmega168PA which is almost identical but has a different device signature ID.

read more

Let's Make Robots 22 Mar 07:22
arduino  avr  boards  bootloader  new  pcb  signature id  

Psychedelic Sphere of LEDs

The friend of a performer created this optical light display of 256 LEDs that can be programmed to create some fascinating displays.  The ball has 16 panels, which are not only the circuit boards, but the structural support of the ball as well. The central brain is provided by an Arduino powered by two AA batteries.  For more information, see the full project details (the site may be temporarily down).

Popular LED Projects:

Hack n Mod 07 Jan 16:31

n/a