Posts with «nfc» label

NFC Ring Lock Box

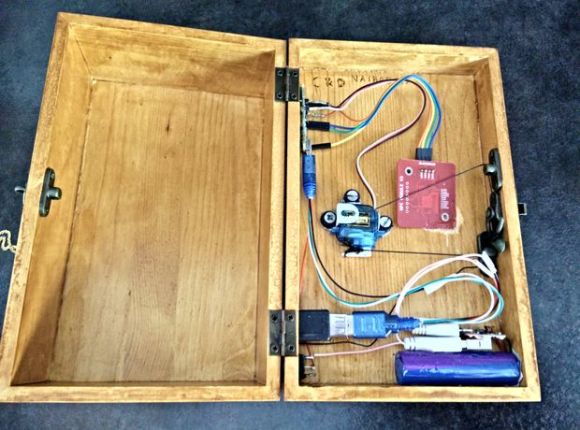
[Nairod785] wanted to build a lock box that would lock from the inside. He started with an inexpensive, plain wooden box. This kept the cost down but would also allow him to easily decorate the box later on using a wood burning tool.

To keep the box locked, he installed a simple latch on the inside. The latch is connected to a servo with string. When the servo rotates in one direction, it pulls the string and releases the latch. When the servo is rotated in the opposite direction, the latch closes and locks the box once again.

If you are going to have a locked box, then you are also going to need a key to open it. [Nairod785] used a ring with a built-in NFC tag, similar to the ring featured back in March. Inside of the box is a PN532 NFC module. The walls of the box were a little too thick for the reader to detect the ring, so [Nairod785] had to scratch the wall thickness down a bit. The NFC module is connected to an Arduino Nano. Communications are handled with I2C.

The NFC ring actually has two different NFC tags in it; one on each side. [Nairod785] had to program both of the tag ID’s into the Arduino to ensure that the ring would work no matter the orientation.

The system is powered by a small rechargeable 5V battery. [Nairod785] wired up a USB plug flush with the box wall so he can easily charge up the battery while the box is locked. It also allows him to reprogram the Arduino if he feels so inclined. There is also a power switch on the side to conserve energy.


Filed under: Arduino Hacks
Hack a Day 10 Aug 15:00
arduino  arduino hacks  lock box  nano  nfc  pn532  ring  servo  

The RC White House Robot

This remote controlled, Arduino-based robot was created by a young student named [Quin] who likes to teach electronics classes at hackerspaces. It is an adaptation of this awesome, fast, fully autonomous mini Roomba that has since driven its way into the Presidential building during the 1st ever White House Maker Faire.

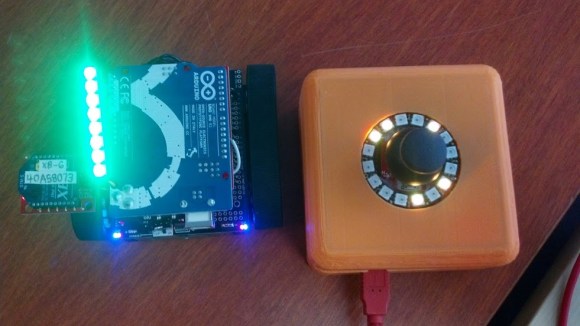
The quick, little device uses a robot chassis kit with an XBee wireless module so that the controller and the robot can be connected together. An NFC Shield was hacked and split in half so that the wires could be soldered in place.

[Quin]‘s goal was to develop a fun game that records the number of times the robot drives over NFC tags laid across a flat surface. Points are shown in the form of blinking lights that illuminate when the device goes over the sensors, keeping track of the score.

The controller container was made with an open source 3D printer called a Bukobot. The enclosure holds an Arduino and another XBee shield along with a joystick and a neopixel ring, giving it a nice polished look complete with a circle of beautiful, flashing LED’s.

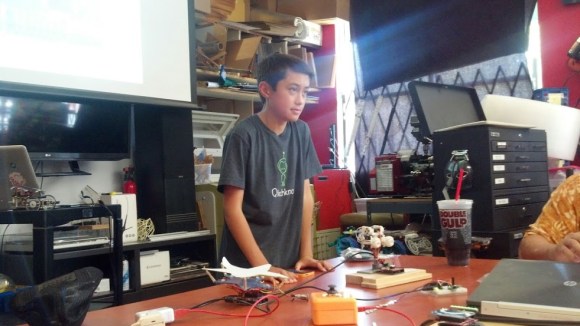
We saw the robot in action during an Arduino workshop at a local 3D printing store/makerspace in Pasadena called Deezmaker. [Quin] told us that will.i.am, the musician, tried it out during the Maker Faire in Washington DC. He also said that he met Bill Nye the Science Guy there as well.

This simple project, and more inventions of his, has opened up many doors in the maker community. And yet [Quin] seems unphased by all the attention, staying very focused on teaching his skills to anyone who is eager to learn.

Documentation of the project is on his website (Qtechknow) along with this color-changing Christmas star; which is perfect for sprucing up a holiday Christmas tree. Another project is this methane sensing fart cap. All 3 can be seen in the photo below.

A video with the robot being demoed comes next. In it, [Quin] talks about what it was like to be invited into the White House.

Also, check out this spectacular video about the Maker Movement with [Quin] in it.

In addition, here is a Popular Science article and this feature in Make Magazine about him.


Filed under: robots hacks

Upgrade Your Garage Door with Arduino and RFID

[Jason] really wanted to build an RFID controlled garage door opener and decided to turn to Arduino to get the job done. For someone who’s never worked with an Arduino before, he really seemed to know what he was doing.

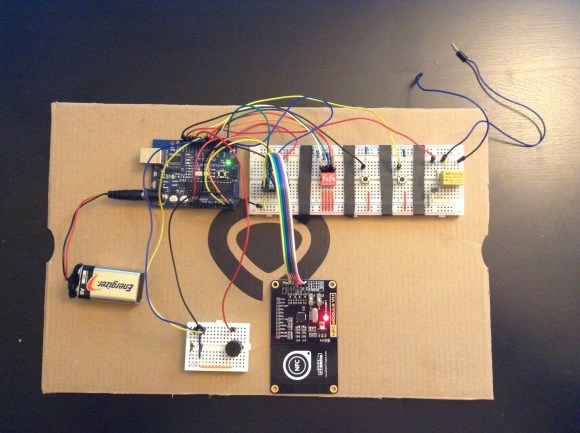
The Arduino acts as the brains of the operation while an off-the-shelf NFC/RFID reader module is used to read the RFID tags. To add new keys to the system, [Jason] simply swipes his “master” RFID key. An indicator LED lights up and a piezo speaker beeps, letting you know that the system is ready to read a new key. Once the new key is read, the address is stored on an EEPROM. From that point forward the new key is permitted to activate the system.

Whenever a valid key is swiped, the Arduino triggers a relay which can then be used to control just about anything. In this case, [Jason] plans to use it to control his garage door. The system also has a few manual controls. First is the reset button. If this button is held down for two seconds, all of the keys from the EEPROM are erased. This button would obviously only be available to people who are already inside the garage. There is also a DIP switch that allows the user to select how long the relay circuit should remain open. This is configurable in increments of 100ms.

For now the circuit is wired up on a couple of breadboards, but it might be a good idea to use something more permanent. [Jason] could always take it a step further and learn to etch his own PCB’s. Or he could even design a board in Eagle CAD and order a real printed board. Don’t miss the video description of the RFID system below.

[via Reddit]


Filed under: Arduino Hacks

New in the Maker Shed: NFC Shield and Tags

You’ve probably heard about NFC but what is it, you ask? NFC (Near Field Communication) is an extension of RFID (Radio Frequency Identification) but with a purposefully decreased range. I know, why would you want LESS range? Mostly for security. You see, it’s common to think that RFID tags need to be right next to a reader before they register. In lots of cases this is true, but you can “shoot” a radio signal at an RFID tag or purchase a long range scanner to read it if from a distance. Since NFC is limited to a maximum of around 4 inches, it’s much more difficult for anyone to get your information without you knowing. This makes it a great technology to use for touch-less payment, door entry, or anywhere else that security is a consideration.

This NFC Shield for Arduino (available in the Maker Shed) is a great way to experiment with NFC and other 13.56MHZ RFID applications. The shield can be used it to not only read tags, but to write them as well. It can even “act” as an NFC tag for bi-directional communication with NFC equipped cell phones and tablets. The NFC Shield uses I2C or SPI for communication to minimize pin usage, and the antenna design improves reception and allows you to stack shields on top of it. The kit includes header pins (a little soldering required) and one writable MiFare 1k 13.56 MHZ NFC card. Since one card isn’t too much fun, we also have an assortment pack of 6 writable, 1KB tags available.


Filed under: Arduino, Cellphones, Maker Shed
MAKE » Arduino 12 Sep 16:00

Babel Fish Language Toy


Fans of Douglas Adams will no doubt catch the reference to The Hitchhiker’s Guide to the Galaxy in the title of Becky Stern’s latest project, The Babel Fish Language Toy. This sound- and RFID-enabled Arduino project with a crafty enclosure helps you learn foreign languages with RFID flash cards. When you bring a flash card near the fish’s tongue, you’ll hear the pronunciation of the word, which comes from .WAV files that you pre-load onto the SD card. And naturally, a full how-to writeup and video will help you along the way should you decide to make your own. Xie xie Becky!


Filed under: Arduino, Education
MAKE » Arduino 04 Aug 14:00
arduino  education  fish  language  nfc  project  rfid  toy  

KegDroid dispenses beer with the help of a Xoom tablet and an Arduino board

Here's an instance of NFC technology that's more exciting than yet another tap-to-pay scenario. Google employee Paul Carff combined a Motorola Xoom running ICS with an Arduino microcontroller to create KegDroid, a friendly green beer dispenser. The Xoom acts as a gatekeeper to that brewed goodness, only letting the bot dispense drinks after users swipe an authorized badge. The badge is read by an NFC scanner on the bottom of the case and is then authenticated (or rejected) by the Arduino board. Once the system grants access, users can choose from two selections on tap via a custom Android application displayed on the Xoom's screen. As Android Community points out -- and as you'll see in the video below -- the KegDroid hasn't mastered a bartender-level pour (read: there's way too much foam). Still, this is oodles cooler than your average keg, wouldn't you agree?

Continue reading KegDroid dispenses beer with the help of a Xoom tablet and an Arduino board

KegDroid dispenses beer with the help of a Xoom tablet and an Arduino board originally appeared on Engadget on Mon, 30 Apr 2012 17:47:00 EST. Please see our terms for use of feeds.

Permalink | Email this | Comments