Posts with «nano» label

Draw on an oscilloscope with Arduino

If you’ve ever wanted to plot shapes using an oscilloscope, YouTuber Electronoobs reveals the tricks in his latest video. In it, he draws a Christmas tree, along with a few other shapes, and while that holiday is now past, there’s always the 2019. Of course, you don’t have to wait, as these concepts can be applied to anything you like throughout the year!

In the video, Electronoobs uses an Arduino Nano to produce PWM signals on two channels, filtering each of them with a capacitor and resistor. As he explains, shapes must be fairly simple, and end in the same place they started. Even with these restrictions, once the oscilloscope it turned to x/y plot mode and the signal is tuned in, the results are quite good.

In this tutorial we will use two pins from the Arduino to create fast PWM signals. With a small filter, we change the amplitude of that signal according to the width of the PWM pulse. By that, we can draw shapes on the oscilloscope when in XY mode.

Code for the project can be found in Electronoobs’ write-up here.

A multi-matrix scrolling text display for absolute beginners

For this build, YouTuber DIY Perspective goes through the process of constructing a scrolling text display with two 8×8 matrices. 

His instructions, along with an excellent video, go through the process from the very basics, including things that many would take for granted, like installing the Arduino IDE. For this reason, it could be a great introduction for those that are new to the maker electronics scene.

The device is controlled via an Arduino Nano and can be powered by an 18650 battery or wall charger. While relatively simple electronics-wise, what really sets this project apart is the beautifully finished wooden enclosure. It’s held together with glue, and nicely sealed with a single screw!

Drone morphs into the perfect shape in mid-air

Drones come in many shapes and sizes, but for the most part their motor pods are fixed during flight. Inspired by the way birds can fold their wings, researchers from the University of Zurich and EPFL have come up with a quadcopter capable of changing motor orientation dynamically in mid-air. This allows the nominally X-shaped drone to fold itself into tight spaces, and even configure itself for optimal handling.

Flight control is handled by an advanced Snapdragon quad-core computer, while the servos that actuate the motor arms are controlled using an Arduino Nano. 

An interview about the project is available on IEEE Spectrum, while the Foldable Drone’s research paper, along with several more videos, can be found here.

There’s no need to buy an electric screwdriver, just 3D print your own!

What do you do when you need to attach 400-500 screws for an upcoming project? If you’re “Progress Thailand” you simply create one yourself using a 9g micro servo modded for continuous rotation, an Arduino Nano, and some 3D printing!

The build uses a small thumb joystick for proportional control, and can accommodate a small hand driver in addition to a bit by itself. Impressively, a functional prototype of the tool was produced in a single day, with the final(?) version appearing a couple of days later. 

Hand and power tools are cheap, reliable, and easily accessible. But their production is still done in large centralized factories. 3D printing technology and cheap, open source electronics continue to improve bringing the decentralization of manufacturing one step closer.

We are experimenting with different designs to see how close current 3D printing technology can bring us to production-quality tools you can buy in the store. We’re also experimenting to see what modifications we can make to store-bought tools to enhance and customize their use.

While they note that the project isn’t meant to replace commercial screwdrivers at this point, it looks like a fun project with all the needed files available here to modify and improve things to your specifications!

A useful Christmas tree water level indicator

It’s that time of year again, when many the world over chop down a tree, then insert it into some sort of water dish to keep it green for a month or longer. This normally works out well, but means that someone has to keep it hydrated, climbing under sharp branches to intermittently check the water level.

As originally seen on Reddit, this is a perfect job for Arduino, and with some very simple wiring, maker “Boskovitch” created a clever setup that shows water levels with three blue, yellow, and red LEDs. A depth sensor in inserted into the water, which feeds analog readings to an Arduino Nano that is used for control.

Threw this together last night for my dad. He’s very anal about keeping his tree healthy, and he gets on his stomach and sticks his hand in the base to check the water level a couple of times a day. So I threw this together so he doesn’t have to crawl under the tree anymore. After the semester is over I might add an automatic watering system with a solenoid valve and gravity feed.

Want to recreate this setup for your own Christmas conifer? Check out Boskovitch’s write-up here.

Suspend particles in midair with this acoustic levitation setup

Of course Styrofoam floats on water, but have you ever seen it float in midair? That’s exactly what Julius Kramer’s 3D-printed acoustic levitator does, using an array of 72 40 kHz speakers to form standing waves of low and high pressure. When turned on, he’s able to simply insert a small foam particle which hovers like magic.

If this seems familiar, his Arduino Nano-powered device is based on work by Asier Marzo, Adrian Barnes, and Bruce W. Drinkwater. What’s interesting about Kramer’s build is that he does a great job illustrating how it works, starting at around 3:00 with an oscilloscope, and continuing on with diagrams, and even a visualization of the waves using steam. He also shows off a miniature version at around 6:00, which while less capable, could make this type of project approachable for those that don’t feel like soldering 72 speakers together!

Designing an omni wheel robot platform with Arduino

Omni wheels are devices that look like wheels with extra rollers positioned along their circumference. This allows robots to move forwards and backwards, as well as slide and spin depending on how the wheels are powered. Maker Jeremy S. Cook decided to create his own version, and after some consideration and careful design work, constructed a cylindrical frame out of MDF and PLA.

The Roomba-like unit features an Arduino Nano, which controls four NEMA 17 stepper motors via Easy Driver boards, while a Bluetooth module enables smartphone operation. Once a few intermittent motion issues are worked out, the stepper motors should provide precise positioning for further robotics experimentation.

Code for the build can be found here.

Stream weather conditions to the cloud!

Weather reports on the news, your computer, or smartphone are very good—something that people 100 years ago could only dream of—but what if you want to know the exact weather in a fixed location from anywhere in the world? One solution would be Jakub Nagy’s excellent cloud-connected station.

It uses an Arduino Uno to collect data from temperature, humidity, pressure, and UV index sensors, along with a Nano to read a rain gauge. The data, with images from a webcam, are passed along to a service called Weathercloud, where this report out of the Slovak Republic can be viewed remotely. 

If you’d like to assemble a similar device to measure conditions in your area, instructions are available in his write-up, including a parts list that will run around $130.

Rotary phone transformed into home automation device

While once an essential communication tool, rotary phones in the wild are quite a rarity today. Still, they do hold a certain charm, and hacker Kristiaan N. decided to turn one of these units into a clever home automation interface.

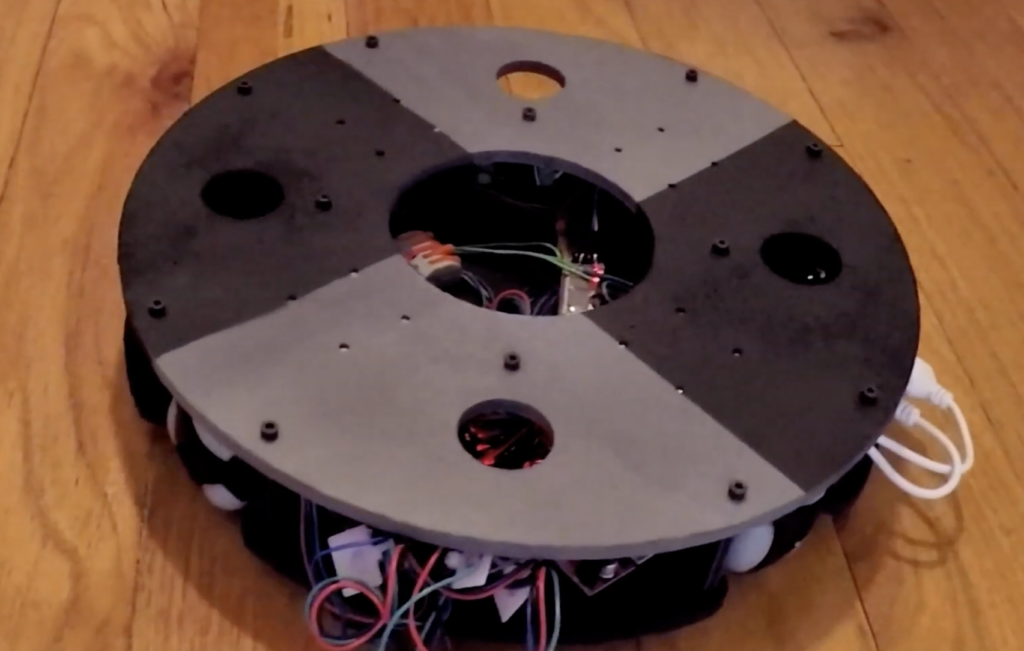
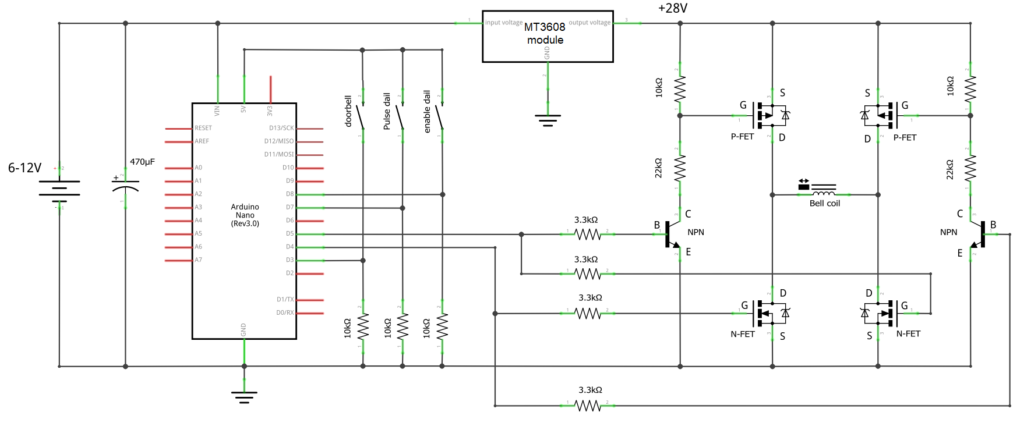
The original idea was to use the phone as a doorbell. Like many projects, this simple job turned into something much more involved, with an Arduino Nano and a bevy of complimentary electronics being installed in the housing. This allows it to respond to doorbell presses as intended, and it’s now also able to ring in different patterns via wireless input from a smartphone. 

Most impressively, the modified phone can signal up to 10 devices using the rotary input, using the MySensors Arduino library and a Domoticz setup. The system’s capabilities are demonstrated in the video below, switching lights, and showing off its multi-ring capability.

The current version features the following functions:

  • Doorbell function with simple button
  • MySensors integration with NRF24 radio
  • Wirelessly activate 5 different ringtones
  • Alarm signal
  • Working dial with 10 virtual switches

The idea is basically that it will ring just like a old phone when somebody presses the doorbell button. If you don’t want any wires for that, you can just sent a command from any button attached to your Domoticz controller. You can also set your Domoticz controller to ring different ringtones for any events like a door that has open, or a set timer that has passed.

The dial also acts like 10 virtual switches. Your Domitcz controller will see these as 10 different switches that will be turned on and immediately be turned off again. You can use this to trigger events like turning a light on, or set the heating to a different setpoint.

The wireless function is done by the incredible MySensors library. In my opinion its one of the best platforms for home build sensors and actors. Its cheap to build, very reliable, and the possibilities are endless. You will need a MySensors gateway attached to your Domiticz controller. I’m using the USB version. Building one is very easy and doesn’t require knowledge of MySensors, Arduino, or electronics. If you just want the doorbell, don’t worry about all the other functions. Just leave out the radio and the connections to the dial. The Arduino code will work fine without.

Customize your coffee cups with the Mug-O-Matic!

In order to inspire the next generation of scientists and engineers, Michael Graham (AKA EngineerDog) has come up with a robot that automatically draws on coffee mugs with a marker—and potentially much more. 

In its nominal configuration, the Mug-O-Matic is controlled by an Arduino Nano with a custom TinyCNC board, and uses a trio of small servo motors for cup plotting.

Additionally, the device can be reconfigured into a wide variety of robotic forms, and features 60+ compatible parts with which to do so. 

Mug-O-Matic is a 3-axis drawing robot that can customize coffee mugs! This capable little robot can draw anything you want via manual control, Bluetooth, calculated algorithms, or even g-code. So you can enjoy your custom mug creation, then wipe it clean. You could make it totally different every day for a year, and not make the same thing twice!

Its little buddy, the Desktop Sentry, is a pan-tilt turret that guards your desk! Also controlled via joystick, Bluetooth, algorithms, or G-code, this device can automatically guard your space with a laser or a rubber band launcher, or be used for light writing.

The intent of this project is to produce fun and accessible educational tools. We want to encourage people to engage in tinkering and making things, because the creative process is a powerful way to learn.

If you’d like to get to work on your own Mug-O-Matic, more info can be found here, including a parts list for the build. It is also slated for a release on Crowd Supply, which will likely make things easier and less expensive if you’re willing to wait!