Posts with «nano» label

(Almost) autonomous kids’ vehicle with Arduino

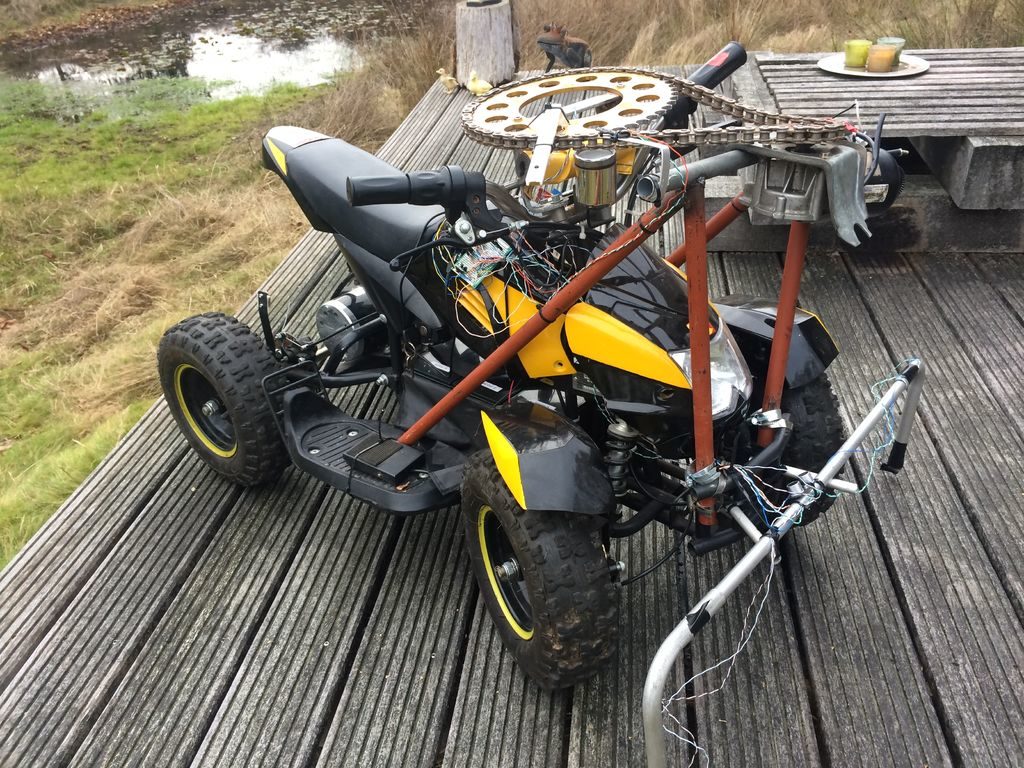
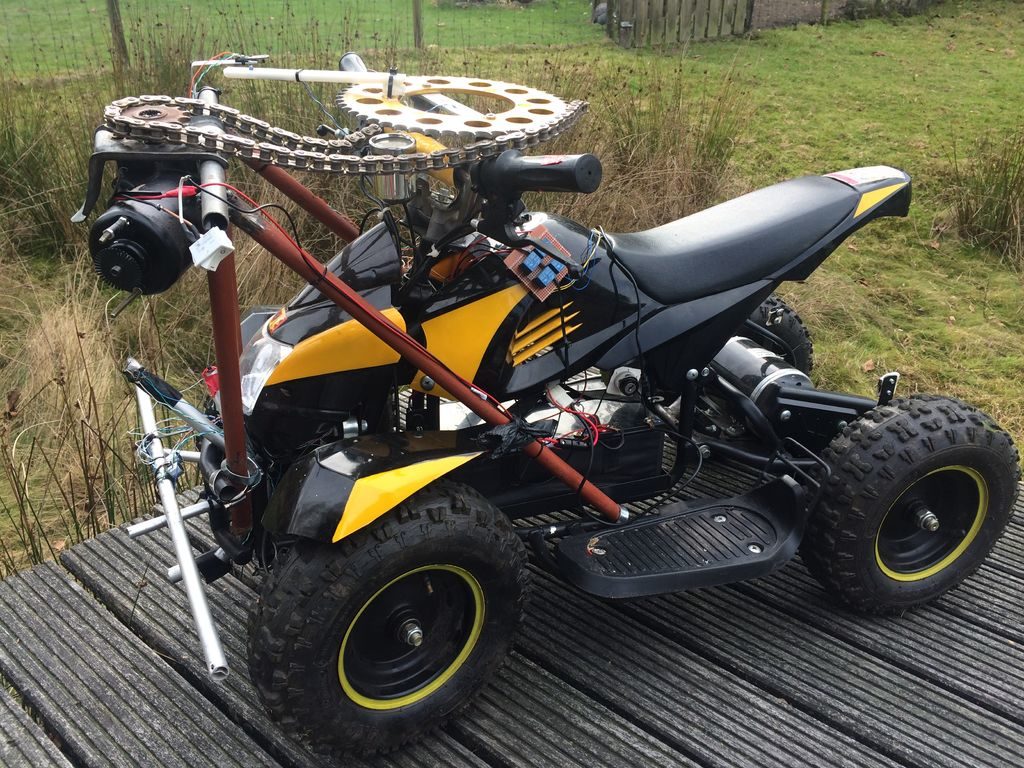
While the world seems to be focusing on self-driving cars, maker Sieuwe Elferink has instead turned his attention to creating a semi-autonomous kids’ four-wheeler. As of now, the modified device can steer itself within a set of lines, and stop for pedestrians and inanimate objects.

The augmented vehicle uses an Arduino Nano for control, plus a pair of TCRT5000 sensors attached to tubing on the sides to pick up boundary lines. Obstacle avoidance is via an ultrasonic sensor on the front. Four relays are used to activate a former windshield wiper motor for steering through a chain and sprocket system, along with the vehicle’s original motor for propulsion.

The build process is documented here, while code and an electrical schematic is available on GitHub.

Creep out guests with an Arduino-controlled teddy bear

Halloween has become something of a hacker holiday, giving creative people the world over a chance to show off their spooky animatronic inventions outside without neighborhood scrutiny. This year, Instructables user “gocivici” created a display inspired by the doll in a rocking chair featured in the movie Anabelle, but decided to use an Arduino-infused teddy bear instead. 

The setup is simple but effective, using an Arduino Nano and solenoid to rock the chair. The bear’s head rotates using another Arduino board—an Uno this time—along with a second solenoid and 3D-printed assembly stuffed inside. Control is accomplished via a small wireless remote, though a motion sensor could also be employed.

Dual Arduino “CNC” control

Generally when you work with CNC machinery, you program it on a computer, then allow a controller to automatically run through a cutting routine. Arduino boards have long been used for this kind of control through the grbl software package, but YouTuber Electronoobs decided to do things a bit differently.

His setup takes input from a potentiometer and several buttons, enabling manual control of his stepper motor-driven router. An Arduino Nano powers the motors through a pair of stepper drivers, while a second Nano is then used to output distance information on an LCD screen, letting him view exactly where his cutter is at a glance.

Why use 2 Arduinos? Well, if I use only one, the code would be very difficult with too much interruptions. We have to create pulses for the motors and print on the LCD at the same time. I’ve done that and each time I was printing on the LCD, there was a small pause in the motor rotation, and if the refresh rate is fast, the motors will have a pause each time and we don’t want that. That’s why I use 2 Arduinos. One will create the pulses for the motors and the other one will count the steps and print the distance and speed.

We have 2 step motors. I’ve used NEMA 17. Each with a A4988 driver. This driver needs 3 signals from the Arduino. Enable, direction and steps. The enable pin is connected to a toggle switch so we could start to stop the motors manually. The toggle switch is also connected to the Arduinos so we could know when the motors are enabled or not. To control speed we use a lineal potentiometer and to move axis and reset position, some push buttons with pulldowns. To print the distance, I’ve used an I2S LCD screen of 20×4 but you will have the code for the 16×2 version of LCD as well.

Besides adding a nice readout to the machine, this concept could certainly form the basis for all manner of other stepper-driven devices.

Vintage-style clock made from individual LEDs

If you’ve ever wanted a vintage-style timepiece, or to test your soldering abilities, this clock by YouTuber Electronoobs will let you do both at once. 

It features four display modules that resemble Nixie tubes, each made out of LED filaments soldered onto a steel wire frame. If you find soldering enjoyable and relaxing, this is likely a good project for you; though if not, there are of course other options. 

The device is controlled by an Arduino Nano, along with a MAX7219 display driver to power the LEDs as needed. An RTC module keeps things “ticking” at the correct pace, and a pair of buttons on top of the wooden enclose allow the time to be adjusted as needed.

I’ve made some “Nixie” tubes. These are actually 7-segment displays made with filament LEDs but placed in a plastic bottle so it will have a more vintage nixie look. To control the LEDs I’m using the MAX7219 driver that could control 4 x 7-segment displays. To get the real time, I’m using the DS3231 module that works with an I2C communication so it’s easy to use. The project also has 2 push buttons to set the hour and minute. All is inside a wood case painted with varnish so it will look more vintage.

Check it out in the video below, or see the build write-up for more info.

Dragon Ball Z head-mounted Scouter computer replica

Those familiar with the Dragon Ball Z franchise will recognize the head-mounted Scouter computer often seen adorning character faces. As part of his Goku costume, Marcin Poblocki made an impressive replica, featuring a see-through lens that shows the “strength” of the person he’s looking at, based on a distance measurement taken using a VL53L0X sensor. 

An Arduino Nano provides processing power for the headset, and light from a small OLED display is reflected on the lens for AR-style viewing.

It’s not exactly perfect copy but it’s actually working device. Inspired by Google virtual glasses I made virtual distance sensor.

I used Arduino Nano, OLED screen and laser distance sensor. Laser sensor takes readings (not calibrated yet) and displays number on OLED screen. Perspex mirror reflects the image (45 degrees) to the the lens (used from cheap Google Cardboard virtual glasses) and then it’s projected on clear Perspex screen.

So you will still see everything but in the clear Perspex you will also see distance to the object you looking at. On OLED screen I typed ‘Power’ instead distance because that’s what this device suppose to measure in DBZ.

Print files as well as code and the circuit diagram needed to hook this head-mounted device up are available on Thingiverse. For those that don’t have a DBZ costume in their immediate future, the concept could be expanded to a wide variety of other sci-fi and real world applications.

Constructing an hourglass lamp with Arduino

With the proliferation of all sorts of digital timers, the need for an hourglass to keep track of whatever activity you’re working on seems like a relic of the past. Still, the hourglass is an interesting form factor, so YouTuber Emiel Noorlander (aka The Practical Engineer) has decided to take it into the 21st century.

His device is about the size and shape of a rectangular picture frame, with the outline of an hourglass in wood attached to white polycarbonate. This diffuses programmable LEDs on the other side, controlled by Arduino Nano to simulate sand falling. The project is powered by a four AA battery pack, cleverly allowed to float in the internal structure, activating the on/off switch when positioned correctly.

In this week’s video I’m making an hourglass lamp with light effects that simulate the falling sand when you turn the lamp upside down.

Another cool feature I build into it is the on / off switch, this is hidden inside the lamp and turns on by putting the lamp on the right side. Turning it upside down then turns off the light.

The outside frame of the lamp is made of 40×6 mm metal strip that I cut to size and then welded as a frame. When this was done I went over to the bandsaw to cut the hourglass shape out of the wood. The semi-transparent panel where the light shines through is made from 3 mm opaque white polycarbonate sheet.

Turn an Atari 2600 into a MIDI drum machine

While not known for its musical prowess, John Sutley decided to turn an Atari 2600 into a simple four-note drum machine dubbed “SYNDRUM.”

While an interesting exercise in creating a custom cartridge out of repurposed components, pushing buttons to activate four tones and an onscreen VU meter can only keep one’s attention for so long.

To turn this project’s musical entertainment level up to 11, he programmed an Arduino Nano to take MIDI signals and translate them into the equivalent electrical signals that would normally come from a controller. 

The results, as seen in the video below, are spectacular. If you’d like to try something similar yourself, code for the SYNDRUM can be found here.

Animate a soda bottle structure with TrussFormer and Arduino

While you may not give soda bottles much thought beyond their intended use, researchers in Germany and the U.S. have been working on a way to turn empty bottles into kinetic art. 

The result of this work is a program called “TrussFormer,” which enables one to design a structure made out of soda bottles acting as structural beams. The structure can then be animated using an Arduino Nano to control a series of pneumatic actuators.

TrussFormer not only allows for animation design, but analyzes stresses on the moving assembly, and even generates 3D-printable files to form the proper joints.

TrussFormer is an integrated end-to-end system that allows users to 3D print large-scale kinetic structures, i.e., structures that involve motion and deal with dynamic forces.

TrussFormer builds on TrussFab, from which it inherits the ability to create large-scale static truss structures from 3D printed hubs and PET bottles. TrussFormer adds movement to these structures by placing linear actuators and hinges into them.

TrussFormer incorporates linear actuators into rigid truss structures in a way that they move “organically”, i.e., hinge around multiple points at the same time. These structures are also known as variable geometry trusses. This is illustrated on the on the example of a static tetrahedron that is converted into a moving structure by swapping one edge with a linear actuator. The only required change is to introduce connections at the nodes that enable rotation, i.e. hinges.

As for what you can build with it, be sure to check out the bottle-dinosaur in the video below! 

3D wire bending with Arduino!

If you thought that automatic wire bending was solely the purview of expensive industrial machinery, think again. How To Mechatronics has come up with a bender that not only twists wire left and right, but can rotate to create three-dimensional shapes.

The heart of the system is an Arduino Nano, which controls three stepper motors for wire manipulation via DRV8825 driver boards. A servo motor is also implemented in order to push a piece of copper tubing into place to physically bend the wire. 

As noted, the device does have some trouble moving the wire when its straightening rollers are tight, but this likely could be perfected with a little more work. If you’d like to take a crack at it, code and build files are available here.

Paper-cut light box replicates the Philadelphia skyline and its actual moon phases

Rich Nelson wanted to make a unique gift for his brother, and decided on a paper-cut light box of Philadelphia’s skyline, the city where he lives. 

The resulting device is controlled by an Arduino Nano, and not only features a trio of lights and layers to represent buildings and foliage, but also a moving sun and moon display that changes depending on the actual time and date.

Timing is accomplished via an RTC module, while the sun/moon is displayed on a small TFT screen that moves across the sky using a servo motor and extension arm. The build can be seen in the video below, and code as well as CAD info is on GitHub for your perusal.

Arduino Blog 16 Oct 14:32