Posts with «music» label

Horizontal laser harp is like none you’ve ever seen before

Apparently not content with a traditional laser harp, Jonathan Bumstead set out to take things in a different direction. What he came up with is a device whose laser strings are arranged horizontally, and loop though its boxy structure for an amazing audiovisual effect. 

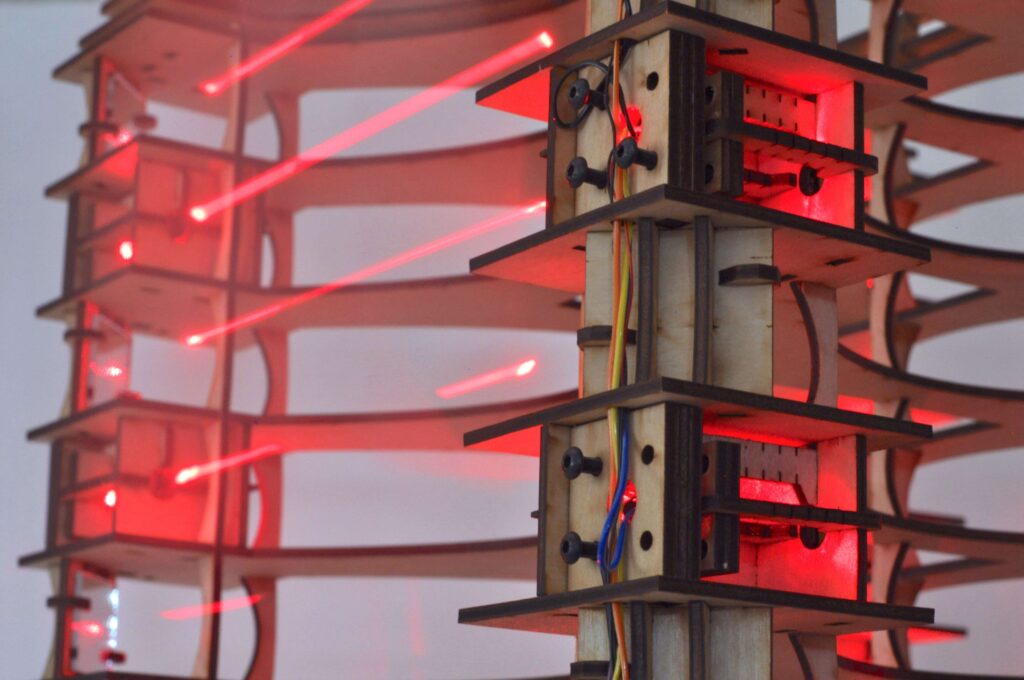
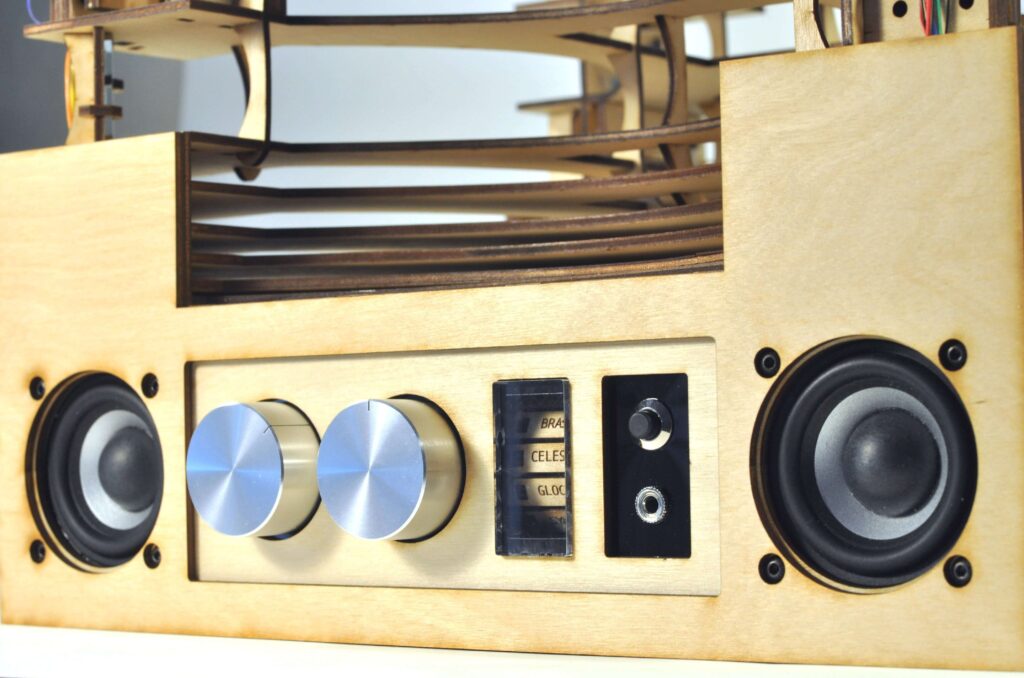
The aptly named Upright Laser Harp is divided up into six rows, which each contain two laser/photoresistor pairs for an instrument total of 12 notes. Each laser is reflected once before hitting its photoresistor to wrap the entire structure in light, and values are sensed by an Arduino Mega as note inputs. Sounds are then generated by an Adafruit Music Maker Shield, and different MIDI instruments are selected with a rotary switch and a stepper-based electromechanical display system. 

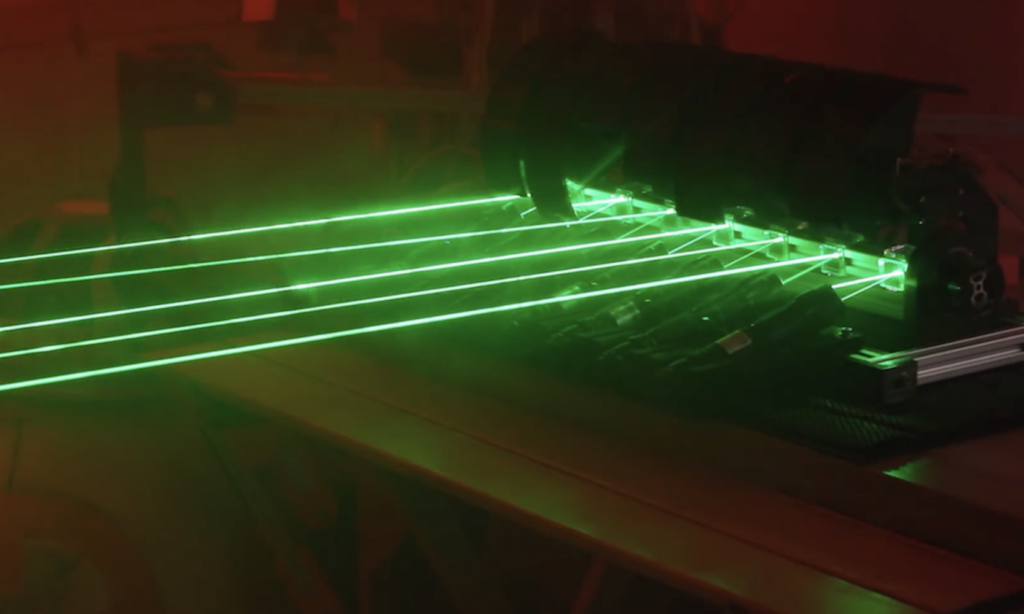
Laser harps are musical devices with laser beam “strings.” When the beam is blocked, a note is played by the instrument. Usually laser harps have the beams travel vertically in the shape of a fan or vertical lines. 

In this project, I built a laser harp with stacked laser beams that propagate horizontally. The beams reflect off mirrors to form square shaped beam paths. Instead of a MIDI output like my previous laser harp, this device has built-in MIDI player so the output is an audio signal. This means the device does not have to be connected to a computer or MIDI player (e.g. keyboard) to play sound. Both built-in speakers and audio output jack are available for playing music.

Be sure to check out the mini-concert and build details in the video below!

Probability-Based Drummer Leaves The Beats Up To Chance

Drum machines may seem like one of the many rites of passage for hardware makers, they’re a concept you can implement simply or take into the extreme making it as complex as you want. [Matt’s] DrumKid is one of them, and its long development history is wonderfully documented in the project logs.

[Matt’s] original intention was to use the automatic drummer as part of his band, wanting “the expressiveness of a good drummer but without the robotic tendencies of a simple drum machine”. For that, he created the first iteration of the DrumKid, a web-based project using the Web Audio API. The interface consisted of bars showing levels for different settings which could be intuitively tweaked, changing the probability of a drum sound being played. This gave the “drummer” its unpredictability, setting itself apart from any regular old drum machine.

Fast forward a few years, and [Matt] now wants to recreate his DrumKid as a proper piece of musical gear, porting the concept into a standalone hardware drum machine you can plug into your mixer. He decided to go with the Arduino framework for his project rather than the Teensy platform in order to make it cheaper to build. The controls are simplified down to a few buttons and potentiometers, and the whole thing runs off of three AAA batteries. Also, targeting the project for hardware like this allowed for new features to be added, such as a bit-crush filter.

We already saw the first prototype here on Hackaday when it was featured in a Hackaday Prize mentor session, and it’s nice to see how the project evolved since. After a number of revisions, the new prototype takes design cues from Teenage Engineering’s “Pocket Operator” drum machine, using the main PCB as its own faceplate rather than a 3D printed case in a familiar way we’ve seen before. Unfortunately, the latest board is non-functional due to a routing mistake, but you can see the previous working prototypes in his project logs.

The HackadayPrize2019 is Sponsored by:

This color wheel instrument lets you ‘hear’ the rainbow

How we see colors is an interesting concept, and as a conversation starter about the physics of color and sound, maker Marcin Poblocki created his own ‘Color Instrument.’

Poblocki’s device rotates a wheel of colors around under a TCS3200/TCS230 sensor via a continuous rotation-modded SG90 servo motor. An Arduino Nano then spits out the tone corresponding to the color it senses using a small speaker, allowing for simple songs to be produced according to hue arrangements. 

It’s a neat idea that could be taken in many different directions. At the very least, it would certainly spark conversation, perhaps questioning, as noted in the project write-up, why the color pink isn’t included in the natural light spectrum.

Arduino Blog 10 Jul 19:25

Creating A Sonic Landscape With Glitching CD Player

CDs were a great advancement in audio quality when they were first put on the market. There’s no vinyl-style degradation of the medium if it’s played over and over, and there’s no risk of turning them into a giant pile of ribbon while rewinding like a cassette tape. The one downside was that if you were to take them on the move you needed special hardware and software to prevent the inevitable skipping. If you look at the skipping not as a downside, though, but as a way to produce interesting music, you might end up with a pretty unique piece of hardware.

[Dmitry] is known for his interesting art installations, and the latest one uses parts from three 1988 Sony D2 CD players that have been reassembled in order to take advantage of a skipping and glitching CD. The modified equipment is able to play during pause or rewind thanks to a processor modification, and can also change the rotational speed of the disc. There are other pieces of hardware included for more fine control of glitching and skipping of the audio being read off of the CD.

The new device functions as a working musical instrument, although [Dmitry] says that it is more useful for deconstructing the information stored on the disc, and exploring the medium itself. Of course if you have enough motivation, you can find sounds from almost anywhere on (or in) the planet too.

Hack a Day 28 May 06:00

Bitty is a tiny Arduino-compatible drum machine/synth

There are a wide variety of ways to create electronic music. For a capable machine that fits in the palm of your hand and is loud enough to use outdoors, however, it’s hard to imagine a battery-powered device cooler than Bitty from Curious Sound Objects. 

The pocket-sized drum machine and synthesizer, currently on Kickstarter, was prototyped using an Arduino Nano and will be fully Arduino-compatible when released. This means that in addition to changing the sound and interface around with readily-available sound packs—which include Theremin Bitty, Techno Bitty, Basement Bitty, Trap Bitty, Lofi Bitty, and Beach Bitty—it can be programmed with the Arduino IDE. The device can even run sound software written for other Arduino boards.

Bitty features four sample trigger buttons, a pair of knobs, and a speaker. Designed for entry-level EDM enthusiasts and studio musicians alike, you can play the drums and melodies manually, as well as trigger patterns to produce dance music or hip hop beats. These can be chosen via the left knob, while the right knob handles pitch, note selection, and arpeggiation.

Check it out in action below!


The Blade is a dual Game Boy chiptune keytar

Keytars may have had their moment of popularity in the 1980s, but instruments of the day can’t hold a candle to “The Blade” by makers Sam Wray, Siddharth Vadgama, and Greig Stewart. 

The musical device feeds signals from a pair of Guitar Hero necks, along with a stripped down keytar from Rock Band, into an Arduino Mega. This data is then sent to a Raspberry Pi running PD Extended, and is used to control a pair of Game Boys to produce distinct 8-bit sounds. Audio output can be further modified with a Leap Motion sensor embedded in one of the two necks. 

What makes up The Blade?

– 3D-printed housing

We custom modeled and printed a housing for the instrument to ensure it would be ergonomic to wield, hold together with all the components, and also look badass.

– Two Guitar Hero necks

The necks, hacked off a couple of old Guitar Hero controllers, were totally rewired to output the button presses to jumper cables.

– Arduino Mega

All the wiring from the Guitar Hero necks fed into the Mega, which then registered the button presses and output appropriate MIDI signals over USB serial into the Raspberry Pi.

– Rock Band keytar

We stripped this down to the bare keyboard and had the MIDI also going into the Pi.

Raspberry Pi

Taking in all the MIDI, and running PD Extended we got this to manage and re-map all the button presses we needed. This then output to a MIDI thru box.

– Arduino Boy

This fed the MIDI signals from the thru box into the Game Boy.

Game Boy

These were heart. With MIDI fed in from a multitude of sources, the Game Boy, running mGB, was the synthesizing the signals into sound, output via a standard 3.5mm jack. 

Leap Motion
The Leap Motion was used for further sound modulation.

Arduino Blog 16 Apr 19:47
arduino  keytar  mega  midi  music  

Laser Light Show Turned Into Graphical Equalizer

The gold standard for laser light shows during rock concerts is Pink Floyd, with shows famous for visual effects as well as excellent music. Not all of us have the funding necessary to produce such epic tapestries of light and sound, but with a little bit of hardware we can get something close. [James]’s latest project is along these lines: he recently built a laser light graphical equalizer that can be used when his band is playing gigs.

To create the laser lines for the equalizer bands, [James] used a series of mirrors mounted on a spinning shaft. When a laser is projected on the spinning mirrors it creates a line. From there, he needed a way to manage the height of each of the seven lines. He used a series of shrouds with servo motors which can shutter the laser lines to their appropriate height.

The final part of the project came in getting the programming done. The brain of this project is an MSGEQ7 which  takes an audio input signal and splits it into seven frequencies for the equalizer. Each one of the seven frequencies is fed to one of the seven servo-controlled shutters which controls the height of each laser line using an Arduino. This is a great project, and [James] is perhaps well on his way to using lasers for other interesting musical purposes.

Hack a Day 14 Feb 03:00

Visualize tunes with James Bruton’s laser projector graphic EQ display

If you’d like to visualize your music, VU meters make an excellent tool. While they are generally built into audio equipment, maker James Bruton had the idea to construct his own using lasers. His setup features an MSGEQ7 module to separate sound frequencies, sending data on seven different ranges to an Arduino Mega board.

The Arduino then uses this information to selectively lower seven shutters via servos. When lowered, these shutters hide part of the lines formed by lasers and a spinning mirror assembly to indicate each sound frequency’s intensity.

The resulting machine not only effectively projects a visual of the music playing on a nearby wall, but also looks like some sort of mythical beast or contraption, progressively waving its appendages while emitting eerie green light!

Although this kind of project can be fun, be sure to wear the proper safety equipment when dealing with powerful lasers!


“Rare Candy” played on even more rare electronic instrument

According to musician/maker Ruben Dax, “Few things make him happier than being able to create things that create things.” As seen in the video below, what he’s created is a very strange cylindrical instrument with an array of buttons and what appears to be an auxiliary loop controller. 

What he creates with it is music that starts off as simple “plink-plonk” sounds, but builds up into something of an orchestral arrangement.

The DIY device utilizes an Arduino Mega for control, with a bunch of pushbuttons and a dual-axis joystick for inputs. Button info is then sent to his computer over Bluetooth, which takes care of actual MIDI generation. 

As cool as this is, a new gadget is in the works, which uses a Leonardo and other hardware for plug-and-play functionality. Whether this will interfere with the instrument’s unique rotating action remains to be seen!

Brandon’s Player Piano Took Patience, and A Whole Lot of Solenoids

Brandon Switzer had a grand image in mind when he set off to create this player piano. Like most of us, he had an arduino that had been sitting there doing nothing for quite some time. He needed a project to focus his attention and learn some things. He landed […]

Read more on MAKE

The post Brandon’s Player Piano Took Patience, and A Whole Lot of Solenoids appeared first on Make: DIY Projects and Ideas for Makers.