[Ryan Bates] loves arcade games, any arcade games. Which is why you can find claw machines, coin pushers, video games, and more on his website.
We’ve covered his work before with his Venduino project. We also really enjoyed his 3D printed arcade joystick based off the design of a commercial variant. His coin pushing machine could help some us finally live our dream of getting a big win out of the most insidious gambling machine at arcades meant for children.
Speaking of frustrating gambling machines for children, he also built his own claw machine. Nothing like enabling test mode and winning a fluffy teddy bear or an Arduino!
It’s quite a large site and there’s good content hidden in nooks and crannys, so explore. He also sells kits, but it’s well balanced against a lot of open source files if you’d like to do it yourself. If you’re wondering how he gets it all done, his energy drink review might provide a clue.
Servos are pretty basic fare for the seasoned hacker. But everyone has to start somewhere, and there’s sure to be someone who’ll benefit from this primer on servo internals. Who knows – maybe even the old hands will pick up something from a fresh perspective.
[GreatScott!] has been building a comprehensive library of basic electronics videos over the last few years that covers everything from using a multimeter to programming an Arduino. The last two installments delve into the electromechanical realm with a treatment of stepper motors along with the servo video below. He covers the essentials of the modern RC-type servo in a clear and engaging style that makes it easy for the newbie to understand how a PWM signal can translate into positional changes over a 180° sweep. He shows how to control a servo directly with an Arduino, with bonus points for including a simple 555-based controller circuit too. A quick look at the mods needed to convert any servo to continuous rotation wraps up the video.
If [GreatScott!]’s video whets your appetite for more, be sure to check out [Richard Baguley]’s deeper dive into servos. And when you’re ready to put your new-found knowledge into practice, maybe a nice project would be to convert a hobby servo into a linear actuator.
The “Navigation Thing“ was designed and built by [Jan Mrázek] as part of a night game activity for high school students during week-long seminar. A night-time path through a forest had stations with simple tasks, and the Navigation Thing used GPS, digital compass, a beeper, and a ring of RGB LEDs to provide a bit of “Wow factor” while guiding a group of students from one station to the next. The devices had a clear design direction:
“I wanted to build a device which a participant would find, insert batteries, and follow the beeping to find the next stop. Imagine the strong feeling of straying in the middle of the night in an unknown terrain far away from civilization trusting only a beeping thing you found. That was the feeling I wanted to achieve.”
The Navigation Things (there are six in total) guide users to fixed waypoints with GPS, a digital compass, and a ring of WS2812 LEDs — but the primary means of feedback to the user is a beeping that gets faster as you approach the destination. [Jan] had only four days to make all six units, which was doable. But as most of us know, delivering on a tight deadline is often less about doing the work you know about, and more about effectively handling the unexpected obstacles that inevitably pop up in the process.
The first real problem to solve was the beeping itself. “Beep faster as you get closer to the destination” seems like a simple task, but due to the way humans perceive things it’s more complex than it sounds. We perceive large changes easier than small incremental ones, so a straight linear change in beep frequency based on distance doesn’t work very well. Similar problems (and their solutions) exist whether you’re controlling volume, brightness, or just about anything else that humans perceive. Instead of encoding distance as a beep frequency, it’s much more effective to simply use beeps to signal overall changes: beep noticeably slower as you move away, but beep much faster as you get close.
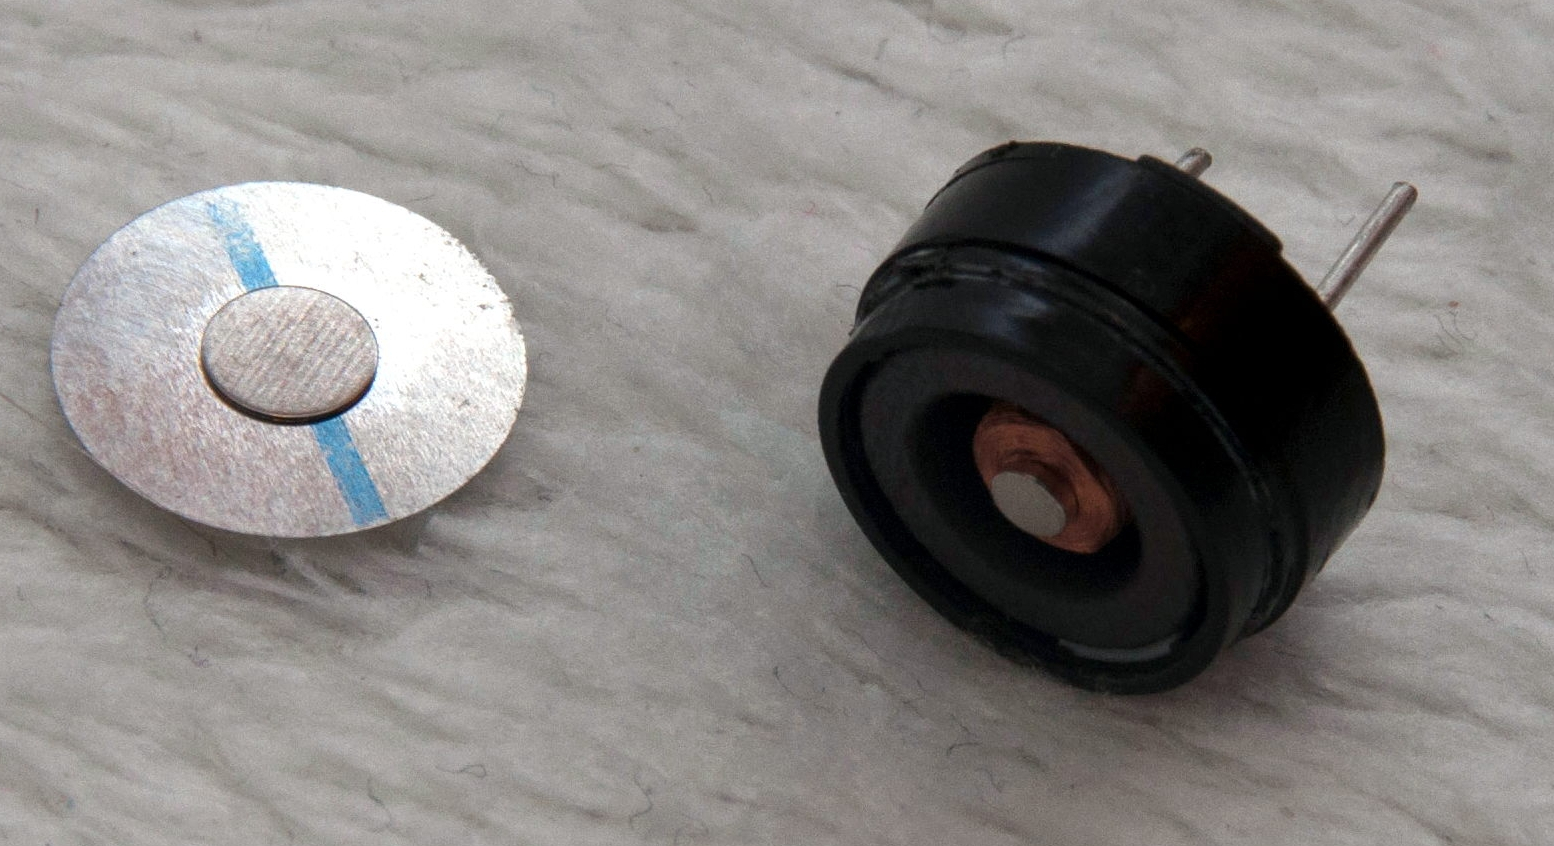
A “piezo” buzzer that was assumed to have no significant magnetic field, but in fact contained a magnet.
The other interesting problems were less straightforward and were related to the digital compass, or magnetometer. The first problem was that the piezo buzzers [Jan] sourced contained no actual piezo elements. They contained magnets – which interfered with the operation of the digital compass. After solving that, still more compass problems arose. When testing the final units in the field, the compass readings were not as expected and [Jan] had no idea why.
After careful troubleshooting, the culprit was found: the AA cells on the other side of the circuit board. Every AA cell has a faint (and slightly different) magnetic field, and the proximity and placement of the cells with respect to the magnetometer was causing the deviation. Happily, the fix was simple once the problem was understood: calibrate the compass every time new batteries are inserted.
If you’re interested in the Navigation Thing, check out the github repository. And on the topic of actual piezoelectric devices, piezos are implemented in a variety of clever ways. There are even piezo transformers and piezo vacuum pumps.
[Dr.Duino] recently completed the latest piece of what he calls “Interactive Furniture” – the GoonieBox. It took over 800 hours of design and assembly work and the result is fascinating. Part clock and part puzzle box, it’s loaded with symbols, moving parts, lights, riddles, sounds, switches, and locked compartments. It practically begs visitors to take a closer look.
The concept of Interactive Furniture led [Dr.Duino] to want to create a unique piece of decor that visitors could interact with. That alone wasn’t enough — he wanted something that wouldn’t require any explanation of how it worked; something that intrinsically invited attention, inspection, and exploration. This quest led to creating The GoonieBox, named for its twin inspirations of the 1985 film The Gooniesas well as puzzles from the game “The Room“.
Embedded below are two short videos: the first demonstrates the functions of the box, and the second covers the build process. There’s laser-cut wood, plenty of 3D printed parts, and a whole lot of careful planning and testing.
Puzzle boxes let people show off their creativity over a wide range of different executions, like these simpler laser-cut puzzle boxes and on the other end of the spectrum is this timed, multi-stage puzzle rigged to blow. Not only is this build one of the more complex ones we’ve seen, but I don’t think we’ve ever seen a puzzle box so carefully designed to also serve as a functional piece of decor. Great work!
Subatomic physics is pretty neat stuff, but not generally considered within the reach of the home-gamer. With cavernous labs filled with racks of expensive gears and miles-wide accelerators, playing with the subatomic menagerie has been firmly in the hands of the pros for pretty much as long as the field has been in existence. But that could change with this sub-$100 DIY muon detector.
[Spencer Axani] has been fiddling with the idea of a tiny muon detector since his undergrad days. Now as an MIT doctoral candidate, he’s making that dream a reality. Muons are particles that are similar to electrons but more massive and less likely to be affected by electromagnetic fields. Muons rain down on the Earth’s surface at the rate of 10,000 per square meter every minute after being created by cosmic rays interacting with the atmosphere and are capable of penetrating deep into the planet. [Spencer]’s detector is purposely kept as low-budget as possible, using cheap plastic scintillators and solid-state photomultipliers hooked up to an Arduino. The whole project is as much STEM outreach as it is a serious scientific effort; the online paper (PDF link) stresses the mechanical and electronics skills needed to complete the build. At the $100 price point, this build is well within the means of most high school STEM programs and allows for a large, distributed array of muon detectors that has the potential for some exciting science.
Well all know cellular automata from Conway’s Game of Life which simulates cellular evolution using rules based on the state of all eight adjacent cells. [Gavin] has been having fun playing with elementary cellular automata in his spare time. Unlike Conway’s Game, elementary automata uses just the left and right neighbors of a cell to determine the next cell ahead in the row. Despite this comparative simplicity, some really complex patterns emerge, including a Turing-complete one.
[Gavin] started off doing the calculations by hand for fun. He made some nice worksheets for this. As we can easily imagine, doing the calculations by hand got boring fast. It wasn’t long before his thoughts turned to automating his cellular automata. So, he put together an automatic cellular automator. (We admit, we are having a bit of fun with this.)
This could have been a quick software project but half the fun is seeing the simulations on a purpose-built ecosystem. The files to build the device are hosted on Thingiverse. Like other cellular automata projects, it uses LED matrices to display the data. An Arduino acts as the brain and some really cool retro switches from the world’s most ridiculously organized electronics collection finish the look of the project.
To use, enter the starting condition with the switches at the bottom. The code on the Arduino then computes and displays the pattern on the matrix. Pretty cool and way faster than doing it by hand.
You may recall [AlphaPhoenix]’s recent electroshock Settlers of Catan expeditor. The idea with this less shocking build is to estimate the value of pi using the ratio of the area of a square sensor to a circular one. Simple piezo transducers serve as impact sensors that feed an Arduino and count the relative number of raindrops hitting the sensors. In the first video below, we see that as more data accumulates, the Arduino’s estimate of pi eventually converges on the well-known 3.14159 value. The second video has details of the math behind the method, plus a discussion of the real-world problems that cropped up during testing — turns out that waterproofing and grounding were both key to noise-free data from the sensor pads.
In the end, [AlphaPhoenix] isn’t proving anything new, but we like the method here and can see applications for it. What about using such sensors to detect individual popcorn kernels popping to demonstrate the Gaussian distribution? We also can’t help but think of other ways to measure raindrops; how about strain gauges that weigh the rainwater as it accumulates differentially in square and circular containers? Share your ideas in the comments below.
[Philip Nicovich] has been building laser sequencers over at the University of New South Wales. His platform is used to sequence laser excitation on his fluorescence microscopy systems. In [Philip]’s case, these systems are used for super-resolution microscopy, that is breaking the diffraction limit allowing the imaging of structures of only a few nanometers (1 millionth of a millimeter) in size.
Using an Arduino shield he designed in Eagle, [Philip] was able to build the system for less than half the cost of a commercial platform.
The control system is build around the simple Arduino shield shown to the right, which uses simple 74 series logic to send TTL control signals to the laser diodes used in his rig. The Arduino runs code which allows laser firing sequences to be programmed and executed.
[Philip] also provides scripts which show how the Arduino can be interfaced with the open source micro manager control software.
As well as the schematics [Philip] has provided STEP files and drawings for the enclosure and mounts used in the system and a detailed BOM.
More useful than all this perhaps is the comprehensive write-up he provides. This describes the motivation for decisions such as the use of aluminum over steel due to its ability to transfer heat more effectively, and not to use thermal paste due to out-gassing.
While I can almost hear the cries of “not a hack”, the growing use of open source platforms and tool in academia fills us with joy. Thanks for the write-up [Philip] we look forward to hearing more about your laser systems in the future!
Back in the day, stoners were content to sit around, toke on a joint, mellow out, and listen to the Grateful Dead or something. Nowadays, they practically need a degree in electrical engineering just to get high. [Beiherhund] sent us his VapeBox build. Like so many projects on Hackaday, we’re not going to make one ourselves, but we appreciate a well-done project.
First off, there’s a home-built induction heater. A 30A current sensor and switch-mode power supply regulate the amount of juice going to the coil that surrounds the heating chamber. [Beiherhund] discovered that brass doesn’t have enough internal resistance to heat up in an induction heater, so he built a stainless steel insert into the chamber. Optimal temperature is monitored from outside the chamber by a MLX90614 IR thermometer.
Fans, controlled by PWM, keep the box cool. Lights, an LCD, an HC-05 Bluetooth unit, and everything else are all tied to the obligatory Arduino that serves as the brains. A cell-phone application lets [Beiherhund] control all the functions remotely. (We’re guessing, just because he could.) It’s wrapped up in a nice acrylic case. The video, embedded below, starts with real details at 4:28.
Before you loyal Hackaday commenteers get on your high horses (tee-hee!) bear in mind that smoking dope is legal in a number of states in the USA, and that Hackaday has an international readership. We don’t encourage drug abuse or soldering in shorts and flip-flops.