Posts with «mega» label

Visualizing “data visualization” with Leds and bubbles

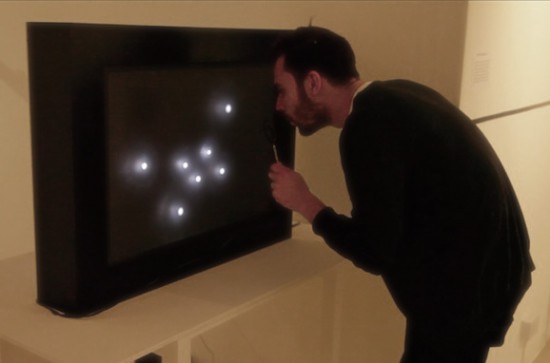
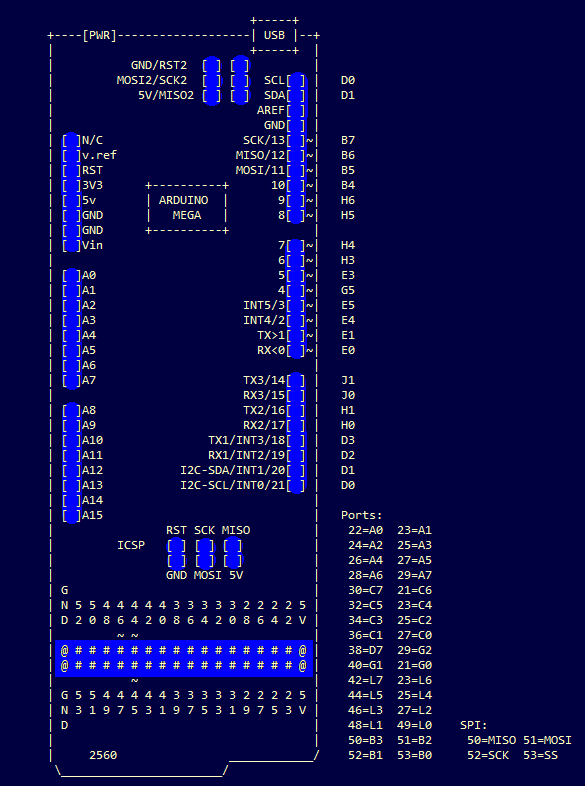
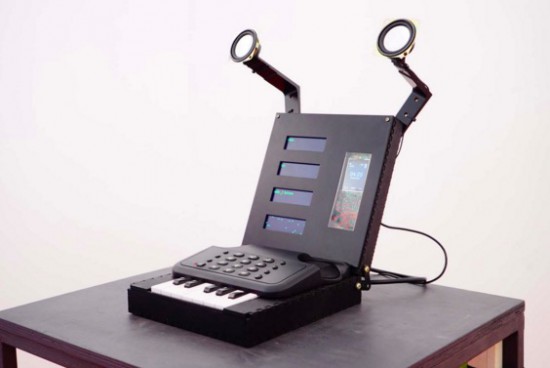
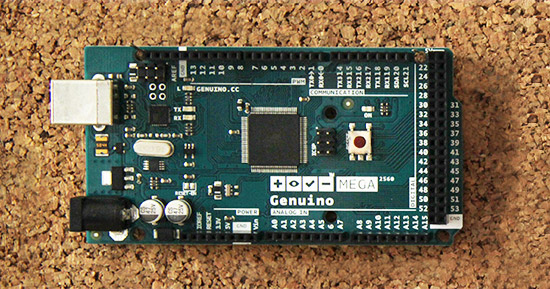
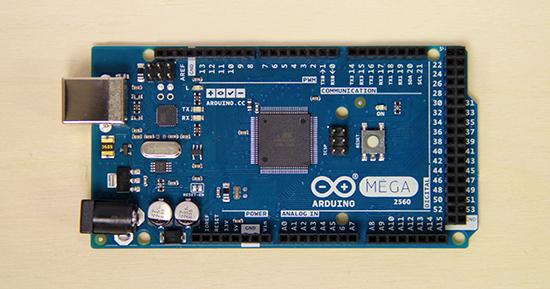
“Data transparency” is a project by Jiayu Liu, a designer and media artist, interested in physical data visualisation and interactive code. The installation runs on Arduino Mega: when the microphone senses a person’s blow, it transforms it in a Led animation and then activates the bubble machine for 8 seconds. The project is not aiming to visualize any specific data but “data visualization” itself:

In my point of view, data is not dissimilar to a conclusion of our past, and we need it for our future. When we see a data from a computer, it is something that has already happened. We use intelligent methods of computing science to analyze the data so that to predict the future. We are living in a world of data, and data is like a language objectively describing our past. In this work, I take more attention on rethinking and recalibrating the role of data in our lives, and the relationship between the virtual world we build as a main method of data storing, analyzing and visualization and ourselves.

Also, I am thinking of that it is better to make sense of the role of data visualization before really visualizing it. Finally, I found a good perspective to see how data connects with our lives, which is Time.
Therefore, the project is not aiming to visualize any specific data but what I am trying to visualize is the “data visualization” itself. I would like to bring a new experience to the viewer in different space. So I want to create a interesting play space and bubble game to the viewer . Let them have a really funny and relaxing experience.

Take a look at the “making of” video below to see it in action:

FogFinder turns foggy air into a reliable water source

Scientists in Chile are turning foggy air into a reliable water source for nearby residents using a new sensor connected to  Arduino Mega and XBee module. The project is called FogFinder and was developed by Richard LeBoeuf in collaboration with Juan Pablo Vargas and Jorge Gómez at the Universidad de los Andes. It’s a system to generate new renewable source of water for communities and reforestation through use of a probe and wireless communications technology to develop a liquid water flux map for fog harvesting.

Fog collectors are common in arid climates in Chile where rain runs scarce and are typically installed on hillsides and remote areas where fog is abundant. The innovative part of the project lies in determining where to install these collectors, how to orient them, and understanding how efficient they are at collecting water from the air. This can be done with a new type of sensor called the “Liquid Water Flux Probe” to measure the availability of water at current and potential fog collector sites. The sensor measures the liquid water content and speed of the fog and can be used to understand the optimal location and orientation for each of the collectors.

Matt Ahart  of Digi, the company producing Xbee modules , told us:

“The primary function of the Arduino Mega is to simplify data collection and processing. The development team also made use of software libraries that simplified the use of sensors and API mode configuration for the XBee radios.
Another important reason for using Arduino, is that the Fog Finder project was created by students with only a few months to complete the design and creation of the device. A great thing about Arduino is that the learning curve is very fast and students can quickly start making contributions instead of spending weeks or months trying to understand the software and hardware.”

The FogFinder project has received support from the Universidad de los Andes through its Fondo de Ayuda de Investigación, Andes Iron – Dominga, and the Pontificia Universidad Católica de Chile. In 2014 it was finalist in the Wireless Innovation Project sponsored by the Vodafone Americas Foundation.

Arduino Blog 21 Jan 21:06

Step inside a unique Electromechanical Lithophone

Bespoke Electromechanical Instrument was built by Jay Harrison as part of a dissertation undertaken on the Creative Music Technology degree course at Staffordshire University. The instrument, running on Arduino Mega 2560 is designed  to allow each note to be independently placed in a space:

The project involved the creation of an electromechanical system capable of autonomously playing a bespoke Lithophone musical instrument. The underlying idea was to create a Lithophone that allowed the audience to literally step inside it, giving a unique spatial and acoustic surround experience. Designing an autonomous electromechanical was the thought to be the most effective and reliable solution to achieving this.

The Arduino Mega 2560 was used to interface Max/MSP with the physical circuitry. Control messages/signals would be sent out of a Max/MSP patch using Maxuino, these signals would then be interpreted by the standard firmata sketch loaded onto the board and would go on to trigger and control the 24 rotary solenoids and 24 servo motors that work to produce the notes.

In the video below the instrument is arranged in a 24-foot surround configuration and the audience is invited to experience the instrument from within offering a unique spatial dimension to the Lithophone intended to completely envelop the listener:

Arduino Blog 18 Jan 21:13

Into the void with lights and shadows

Rodrigo Carvalho is a designer and interactive new media artist from Porto (Portugal) researching on real-time relations between sound, image and movement in audiovisual interactive spaces. He submitted to Arduino blog his latest project “Into the void” running on Arduino Mega:

First version of “Into the Void”, a series of audiovisual installations exploring physical structures creating light and shadows with immersive audiovisual spaces.
A array of triangles is placed on the floor, each one has a LED strip on the back which are connected to an Arduino. On MAX, series of random numbers generators and different probabilities trigger a signal to each triangle, making it turn on or off.
At the same time that a triangle is triggered a MIDI message is sent to Ableton Live and plays notes on a MIDI Instrument and an OSC message is sent to Processing for the Visual output.


The installation was created in collaboration with Ana Duarte, André Sousa and Daniel Correia and you can find more info at this link.

Arduino Blog 07 Jan 19:23

Farmbot and why documentation’s vital to open source projects

Farmbot is the first open source cnc farming machine with the aim to create an open and accessible technology aiding everyone to grow food and to grow food for everyone. It runs on open source hardware like Arduino Mega 2560 and  involves a community of contributors on the wiki and forum where you can find documentation, schematics, assembly guides, troubleshooting tips and many more on all currently supported and old FarmBots.

Documentation has been a key element of the project since the beginning and Farmbot founder, Rory Aronson at the 2015 Hackaday SuperConference, gave a talk about why great documentation is the key to building a community of hackers who continue to build upon open source technologies:


Arduino Blog 16 Dec 21:32

Arduino Pinout ASCII art ready to go

To enable easy documentation of pin assignments, BusyDuckMan created a couple of ASCII art of Arduino Uno and Mega boards marking ports, PWM and coms. You can now then simply copy and paste as a comment into your code and document in an easy way how the arduino is connected to other devices:

They can be pasted into code comments, (use /* and */ in the arduino IDE to create a block comment). They can also be useful in forums, when you need a quick arduino diagram, but don’t want to fire up an image editor.


Give me your number and get a unique micro-noise piece

Prankophone  is the new interactive installation by Dmitry Morozov (his amazing projects have been featured on this blog ).  This time he created  a sound object, a hybrid of synthesizer, telephone and logic module:

The main principle of the object’s functioning is as follows: depending on the current mode, the apparatus calls to random or pre-defined recipients and plays them algorithmic melodies created from their phone numbers. The speakers transmit both the synthesized sounds and the sound from answering person. The common sound layer is involving a random recipient who doesn’t suspect anything. The person who answers the phone can’t hear any other sounds except for the synthesized ones.

You can play with it in 4 different modes:

Autonomous mode –  it generates the numbers by itself and tries to reach them, and play them the sounds.
Manual mode – when you dial any number by pressing standard phone keys it gets automatically transformed into sounds.
Keyboard mode – mode of dialing the number on the one-octave keyboard where 10 keys correspond to 10 digits.
Live mode – the number is defined by any of the previous methods, but the sounds are reproduced not automatically but from the keyboard, thus the user may “communicate” through sound with the person who answered.
It runs on Arduino Mega and you can listen to its sounds on the following video:

Ready to go Mega? Arduino and Genuino Mega are in the store!

Starting today you can purchase Genuino Mega on the Arduino Store (35€ + tax) anywhere outside the USA,  and also Arduino Mega on the US Store (45.95$ + tax) USA only.


The Genuino MEGA 2560, like Arduino Mega 2560, is designed for more complex projects as it provides 54 digital I/O pins, 16 analog inputs and a larger space for your sketch. It’s the recommended board for 3D printers and robotics projects because it gives you plenty of room and opportunities and it’s compatible with most shields designed for the Uno and the older Diecimila or Duemilanove Arduino boards.

Genuino Mega and Arduino Mega share the same components, characteristics and quality of manufacturing. They are actually the same board under a different brand. Depending on the area of the world where you live you’ll be able to purchase an Arduino Mega or a Genuino Mega.

Explore inspiring projects made with the Mega.

Arduino Blog 27 Oct 17:25

Staging Beckett with 11 motors and Arduino Mega

Happy Days is an installation inspired by the work of the Irish avant-garde novelist Samuel Beckett who wrote the namesake play in two acts in the 60s. Designer and visual artist Irena Kukric created it in collaboration with Canny Sutanto and the aim of exploring narrative in the form of an installation. The five-minute play is staged using ten servo motors and a DC motor with an Arduino Mega and VVVV live programming environment:

We were beginners with Arduino and motors so we started out pretty basic, trying to move several motors at once. We decided to use VVVV platform in addition when we realized we needed a timeline for our script for the play. With this timeline, it was easier to deal with details such as when we want to move which motor under which angle and such. For beginners with coding, this visual programming environment is very approachable and the entrance level is much lower.

It is easier and faster to get to your desired outcome. What is great about VVVV and Arduino is that there is the Firmata library that enables you to work with both platforms in conjunction so even artists and designers with lower level coding skills are able to go from concept to realization quite easy. We used Arduino Mega which was very convenient considering the number of our motors and the pins that Mega has to offer. After we had our final order of cables and pins, we even made our own shield for it.

The play was staged without human actors or conventional (verbal) dialogue  as performing a ritual in the play overshadows the performer, the object of the ritual can survive on its own. Therefore, they used these objects or rather props from the play and made them actors, animating them with motors, as you can see in the video below:


A High altitude balloon sensing the earth’s atmosphere

The project Emanuel Bombasaro submitted to the Arduino blog is about a high altitude balloon he launched on August 21st over Denmark. The balloon, called Titan 1, is made of a helium-filled latex balloon,  a payload box holding the flight computer, sensors and a parachute (36” diameter). A GoPRO camcorder mounted inside the payload box and capturing an image every second.

The flight computer is an Arduino Mega which logs position (GPS), pressure, temperature, humidity, luminosity, earth magnetic field, acceleration and spin, measured by a variety of sensors:

At 1:10 we jump from cloud level (~3200m) towards reaching the peak altitude of 35393m. Immediately the moon appears on the right and is visibile again and again. 2:05 the fragments of the bursted balloon can be seen and up it goes back to earth. 3:00 we drop down to cloud level (~3200m) and soon after hit the ground.

This is the list of modules and sensors connected to the Arduino Mega:

  • MTX2 Radiometrix
  • MTX2 434 MHz Radio Module.
  • HX1 VHF Narrow Band FM 300 mW Transmitter, 144.800 MHz, used for APRS.
  • MAX-M8 GPS module used for position (longitude, latitude and altitude) and time acquisition.
  • DS18B20 Temperature sensor on HABuino showing the temperature of the flight computer compartment. This temperature should remain most near to 20 ” C. Any temperature variation will e?ect the transmission frequency of the radio module.
  • MCP9808 Maximum accuracy digital temperature sensor measuring air temperature.
  • HTU21DF Temperature and humidity sensor measuring air temperature and relative humidity of the air.
  • MPL3115A2 Precision altimeter mainly used for measuring atmospheric pressure, but also temperature and altitude is detected.
  • TSL2561 Light to digital converter BST-BMP180 Pressure sensor mainly used for measuring atmospheric pressure, but also temperature and altitude is detected.
  • L3GD20 3D gyroscope
  • LSM303DLHC 3D accelerometer and 3D magnetometer module
  • LSH20 Saft LSH 20 battery used as power supply with 3.6 V and 13.0 A h. The power feeds into the low input voltage synchronous boost converter TPS61201 on the HABuino shield.

Check the detailed documentation with Flight Computer Software sketch on this Design Mission PDF document.

You can also explore the Flight Data Report showing the collected mission data graphically on this PDF.

Arduino Blog 09 Sep 21:58