Posts with «infrared» label

Roomba, I Command Thee: Use Raspberry Pi for Voice Control

Take advantage of these open source resources to set up voice control with Raspberry Pi and bark orders at your home appliances.

Read more on MAKE

The post Roomba, I Command Thee: Use Raspberry Pi for Voice Control appeared first on Make: DIY Projects, How-Tos, Electronics, Crafts and Ideas for Makers.

New Project: Build Your Own Android-Powered Self Driving R/C Car

Learn how a team of students created the first Google Android-based autonomous R/C car, able to detect lanes, avoid obstacles, self-park, and more.

Read more on MAKE

The post Build Your Own Android-Powered Self Driving R/C Car appeared first on Make: DIY Projects, How-Tos, Electronics, Crafts and Ideas for Makers.

Mason Jar LED Tiki Torches Glow Any Color

Tiki torches are a fun summer lighting solution and this RGB LED version, that uses an Arduino, can be a great alternative to an open flame.

Read more on MAKE

The post Mason Jar LED Tiki Torches Glow Any Color appeared first on Make: DIY Projects, How-Tos, Electronics, Crafts and Ideas for Makers.

Control Anything with an Apple Remote

If you’re like us, you probably have more than one Apple Remote kicking around in a parts drawer, and if you’re even more like us, you’re probably really annoyed at Apple’s tendency to use proprietary hardware and software at every turn (lightning connector, anyone?). But there’s hope for the Apple Remote now: [Sourcery] has completed a project that allows an Apple Remote to control anything you wish.

The idea is fairly straightforward: A device interprets the IR signals from an Apple Remote, and then outputs another IR signal that can do something useful on a non-Apple product. [Sourcery] uses an Arduino to do the IR translation, along with a set of IR emitters and detectors, and now the Apple Remote can control anything, from stereos to TVs to anything you can imagine. It also doesn’t remove the Apple Remote’s capability to control Apple products, in case you need yours to do that as well.

[Sourcery] notes that sometimes working with RAW IR signals can be a little difficult, but the information on their project and in their 25-minute video discusses how to deal with that, so make sure to check that out after the break. Don’t have an Apple Remote? You can do a similar thing with a PS3 controller.


Filed under: wireless hacks

A Remote for CHDK Cameras Made Possible with Arduino

[AlxDroidDev] built himself a nice remote control box for CHDK-enabled cameras. If you haven’t heard of CHDK, it’s a pretty cool software modification for some Canon cameras. CHDK adds many new features to inexpensive cameras. In this case, [AlxDroidDev] is using a feature that allows the camera shutter to be activated via USB. CHDK can be run from the SD card, so no permanent modifications need to be made to the camera.

[AlxDroidDev’s] device runs off of an ATMega328p with Arduino. It operates from a 9V battery. The circuit contains an infrared receiver and also a Bluetooth module. This allows [AlxDroidDev] to control his camera using either method. The device interfaces to the camera using a standard USB connector and cable. It contains three LEDs, red, green, and blue. Each one indicates the status of a different function.

The Arduino uses Ken Shirrif’s IR Remote library to handle the infrared remote control functions. SoftwareSerial is used to connect to the Bluetooth module. The Arduino code has built-in functionality for both Canon and Nikon infrared remote controls. To control the camera via Bluetooth, [AlxDroidDev] built a custom Android application. The app can not only control the camera’s shutter, but it can also control the level of zoom.


Filed under: Arduino Hacks

Simple and Inexpensive Heartbeat Detector

There are many ways to detect a heartbeat electronically. One of the simpler ways is to take [Orlando’s] approach. He’s built a finger-mounted pulse detector using a few simple components and an Arduino.

This circuit uses a method known as photoplethysmography. As blood is pumped through your body, the volume of blood in your extremities increases and decreases with each heartbeat. This method uses a light source and a detector to determine changes in the amount of blood in your extremities. In this case, [Orlando] is using the finger.

[Orlando] built a finger cuff containing an infrared LED and a photodiode. These components reside on opposite sides of the finger. The IR LED shines light through the finger while the photodiode detects it on the other side. The photodiode detects changes in the amount of light as blood pumps in and out of the finger.

The sensor is hooked up to an op amp circuit in order to convert the varying current into a varying voltage. The signal is then filtered and amplified. An Arduino detects the voltage changes and transmits the information to a computer via serial. [Orlando] has written both a LabVIEW program as well as a Processing program to plot the data as a waveform. If you’d rather ditch the PC altogether, you might want to check out this standalone heartbeat sensor instead.


Filed under: Arduino Hacks

Smart Remote Control Doubles as Super Simple IR Sniffer

Want to sniff a remote control or other IR device's control codes? The Smart Remote Control will make quick work of that, combining an Arduino Yún with a simple solderless breadboard circuit.

Read more on MAKE

New Project: Smart Remote Control

Combine the Arduino Yún with a simple solderless breadboard circuit to create a homemade 'universal' remote control that you can navigate with your laptop or smartphone.

Read more on MAKE

Play the DIY arpeggiator with infrared detectors and Arduino Mega

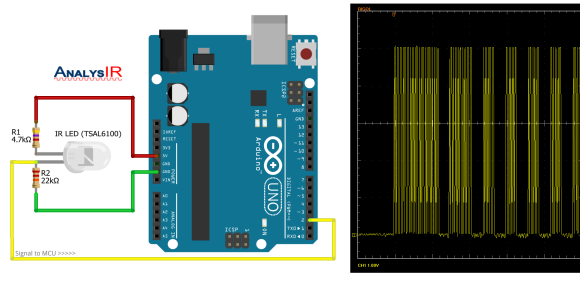
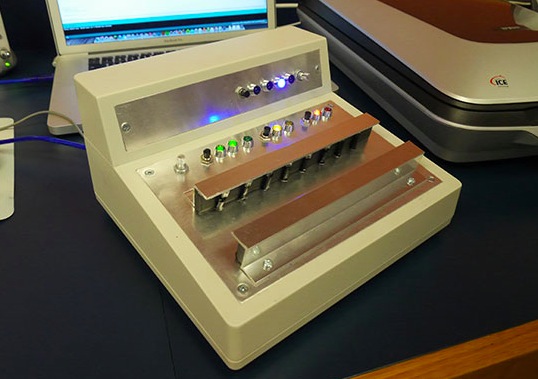
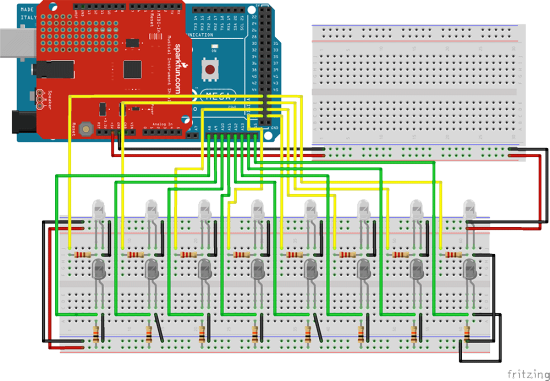
After spending some time on Arduino Forum and finding the right solutions for his project’s sketch, Connor Hubeny shared with us the infraHarp: an Arduino-powered eight-tone arpeggiator made with infrared emitters and detectors, Sparkfun’s Musical Instrument Shield, and an Arduino Mega 2560:

The InfraHarp was my first Arduino project. At first the project seemed daunting since I had no previous experience in programming and electrical engineering. Yet after spending some time with the Arduino I realized that electronics work very much the same, and by learning a few core components you are really right on the doorstep of exploring any technology you have the faintest interest in.

The InfraHarp can play in the keys of A, B, C, D, E, F, G in major, minor melodic and harmonic scales, with two octave choices. Listen to it in the video below:


The project requires basic soldering skills and Connor shared all the info and the sketch on this page.

Bare Bones Arduino IR Receiver

Old infrared remote controls can be a great way to interface with your projects. One of [AnalysIR's] latest blog posts goes over the simplest way to create an Arduino based IR receiver, making it easier than ever to put that old remote to good use.

Due to the popularity of their first IR receiver post, the silver bullet IR receiver, [AnalysIR] decided to write a quick post about using IR on the Arduino. The part list consists of one Arduino, two resistors, and one IR emitter. That’s right, an emitter. When an LED (IR or otherwise) is reverse biased it can act as a light sensor. The main difference when using this method is that the IR signal is not inverted as it would normally be when using a more common modulated IR receiver module. All of the Arduino code you need to get up and running is also provided. The main limitation when using this configuration, is that the remote control needs to be very close to the IR emitter in order for it to receive the signal.

What will you control with your old TV remote? It would be interesting to see this circuit hooked up so that a single IR emitter can act both as a transmitter and a receiver. Go ahead and give it a try, then let us know how it went!


Filed under: Arduino Hacks