Posts with «ide» label

The next steps of the Arduino Create Betatesting

A few months have passed from the launch of the internal betatesting of Arduino Create. We are finally ready to open up the number of people who can use and experiment with this online platform. Today each betatester currently in the program has received 5 invites to get other Arduino tinkerers on board, we have also added about 100 people who tried the platform during Maker Faires and other events, or expressed interest online.

Most importantly we have a public waiting list for anyone who wants to try Arduino Create before hand and give us feedback.
You can SIGN UP herethe first 100 people will receive an invite right away, we will add the other subscribers as the betatesting unfolds.

What’s new?

The Arduino Create Editor has most of the Arduino Desktop IDE features, it is a fully functional Editor, and you can start developing your projects on it right away. We are really close on having everything delivered in HTTPS, we are working hard to add the Library Manager and support for all the Certified and AtHeart boards. Next in our roadmap is including a Sharing feature and a Chrome OS plugin.
As already said in the past, we are always going to provide our community with a offline solution, so don’t worry

When you use Arduino Create for the first time you will be prompted to install a plugin (agent). While your Sketchbook and the apps are hosted in the Cloud, the plugin will locally check the USB ports on your computer. The plugin detects if any board has been connected, if you are uploading a sketch, or you are using the Serial Monitor. The Arduino Create agent is open-source, and available for Mac, Windows and Linux! If you find it interesting you can contribute to it or fork it to use it in your projects.

We are currently working on a brand-new tutorial platform, Arduino Create Projects, in collaboration with Hackster.io. We are planning to release it at the beginning of 2016. Arduino users will finally have a place where they can share their own projects and include step by step guides, schematics and layout references, pictures, videos, the code they wrote, and useful links and comments. We can’t wait to share it with you all so stay tuned!


Arduino Software Update Introduces Command-Line Tool, Serial Data Plotter

Arduino releases version 1.6.6 of their IDE software, adding new tools and features for programming Arduino-compatible microcontrollers.

Read more on MAKE

The post Arduino Software Update Introduces Command-Line Tool, Serial Data Plotter appeared first on Make: DIY Projects, How-Tos, Electronics, Crafts and Ideas for Makers.

Arduino IDE 1.6.6 released and available for download

Today we are very proud to release Arduino IDE 1.6.6 and updated cores for all supported platforms (AVR 1.6.9, SAM 1.6.5, SAMD 1.6.2)

This update brings an impressive 723 closed issues and 147 pull requests merged.

Most intriguing features are:

  • Long-awaited new arduino-builder: this is a pure command-line tool which takes care of mangling the code, resolving library dependencies and setting up the compilation units. It can also be used as a standalone program in a continuous-integration environment
  • Pluggable USB core: your Arduino can finally act as a lot of different USB devices without any need to change the core, thanks to the new modular architecture. Libraries based on the new subsystem are already being developed!
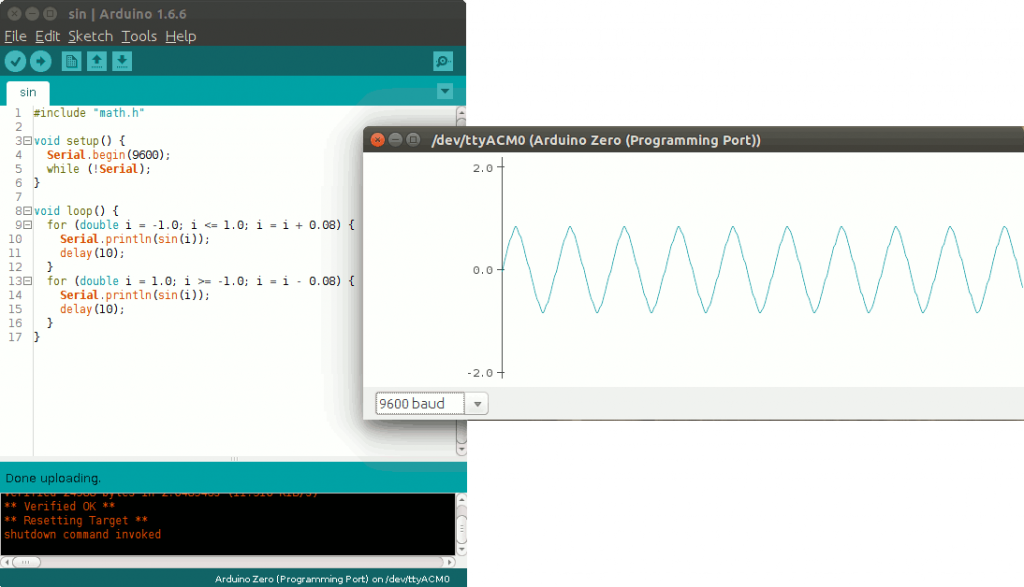
  • Serial plotter: you can now plot your data in realtime, as easy as writing Serial.println(analogRead(A0)) inside your loop


  • New goodies for library developers, like unlocked examples while developing and optional linkage into an archive
  • ArduinoISP example has been improved a lot and now you can flash your AVR chip using ANY other board (including third-party ones )
  • Both Libraries and Boards managers notify if a library/core can be updated with a simple popup – no more outdated code floating around!
  • A LOT of bug fixes, adjustments, documentation refinement thanks to our tireless users and contributors. The complete list of fixes and credits is available here.

Don’t forget to report any issue you find, either on Github or on the Arduino forum: your help is very much appreciated. It doesn’t matter if you are not a tech specialist: every feedback adds value.

Happy coding!


Installing Libraries and how to write a Library for Arduino

Libraries are files written in C or C++ which provide sketches with extra functionality, for example the ability to control an LED matrix, read an encoder, connect to a sensor, display, or module, etc. They are very useful to lower the barriers for creating amazing interactive projects and use a wide range of components.  Libraries can be created by everyone and shared with the open source community!

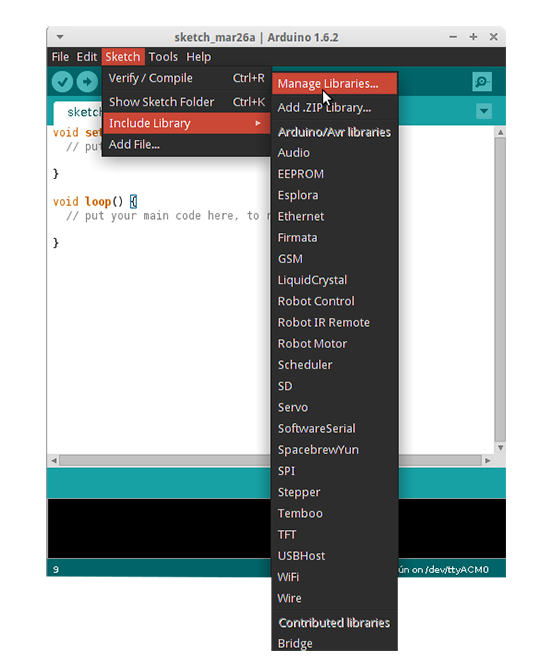
To use an existing library in a sketch you can use the Library Manager (available from IDE version 1.6.2), open the IDE and click to the “Sketch” menu and then Include Library > Manage Libraries and follow the Guide on this page.


If you want contribute with a new library for an Arduino or a Genuino board, you are welcome to do so. The best way to start is to learn how to turn a sketch into a library and when you are good at it, learn how to code with basic Arduino principles in mind in order to allow beginners to get started with Arduino easily. Follow the Guidelines at this page, here’s a preview of what you’ve find:

Be kind to the end user. Assume you are writing an API for an intelligent person who has not programmed before. Come up with a clear mental model of the concept you’re working with, and the terms and functions you will use.

Use full, everyday words. Don’t be terse with your function names or variables. Use everyday terms instead of technical ones. Pick terms that correspond to popular perception of the concept at hand. Don’t assume specialized knowledge. For example, this is why we used analogWrite() rather than pwm(). Abbreviations are acceptable, though, if they’re in common use or are the primary name for something.For example, “HTML” is relatively common and “SPI” is effectively the name of that protocol (“serial-peripheral interface” is probably too long). (“Wire” was probably a mistake, as the protocol it uses is typically called “TWI” or “I2C”.)

Avoid words that have different meanings to the general public. For example, to programmers, an error is a notification that something happened. To the general public, errors are bad things.

When you are ready, you can share your new library and documentation on this dedicated area of the Forum.

Arduino Blog 26 Oct 20:29
arduino  featured  forum  genuino  ide  libraries  

Keeping the Arduino website in motion

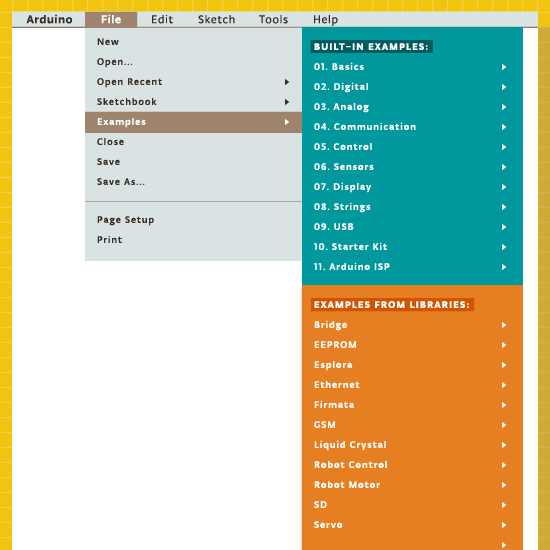
We never rest, even during summer, to serve our community and we announce today that we’ve refreshed over 150 example pages and redesigned the Examples area, offering an updated support to the current Arduino Software (IDE) Built-in and Libraries examples

Our website is a living entity that everyday hosts a huge number of visitors. They are looking for software, information, guidelines, ideas and also the right tutorial to start tinkering with their new board on a specific issue or project.

The Reference is the place where everything is documented and explained, with dry and essential information that is also included locally with every Arduino Software (IDE) installation.

Our software also includes a number of built-in sketches that help our users to quickly understand how the various functions and libraries may be used and applied to specific projects and tasks. We all started with the famous Blink and at the end of this tutorial we all felt the power and the excitement of having tamed our board with the upload of our first sketch. Keeping all these examples in good shape and updated is essential to keep you users safe from troubles or difficulties.

These examples evolve, as the libraries also evolve, therefore the sketches may be updated, amended or added. Each of these examples is commented and has an introductory part that gives a description of the purpose of the sketch and – if necessary – the instructions to put together the circuit. We know that the information provided inside the IDE and the sketches is not enough and therefore we made an area of our website where each sketch is explained and documented.

Year after year, board after board and library after library, many “hands” contributed to this area, filling gaps and amending things to reflect the Arduino Software (IDE) status. It has been an ongoing process that inevitably brought the Tutorials area in a state where many styles and ways of explaining things merged. We have big plans for our www.arduino.cc website and it is important to clean and fix the existing areas before we add new contents. This is why my first task – as editorial manager – has been the refresh and overall alignment of our Examples and Examples from Libraries pages.

We have roughly 150 pages documenting our Examples for the current products and libraries and going through them all wasn’t exactly a piece of cake: many things were checked for each example and sometimes things were outdated or missing. We also have our sister brand Genuino that got its space in all the relevant example pages. Now contents, style, look and feel and links in this area are ready for new and fresh developments.

I would like to end this post adding that this task was also a very good opportunity to refresh my knowledge about the powerful capabilities of Arduino programming language and its libraries. I had a few doubts on how to do a few things in my own sketches and going through all the examples gave me the hints I was missing.

The plain list of examples available in the Arduino Software (IDE) is just made of the sketch names, conversely in our pages you find a brief description of each of them. I suggest that you wander through these descriptions: let them excite your curiosity and inspire you!

Arduino Blog 11 Sep 10:00

Embed with Elliot: There is no Arduino “Language”

This installment of Embed with Elliot begins with a crazy rant. If you want to read the next couple of paragraphs out loud to yourself with something like an American-accented Dave-Jones-of-EEVBlog whine, it probably won’t hurt. Because, for all the good Arduino has done for the Hackaday audience, there’s two aspects that really get our goat.

(Rant-mode on!)

First off is the “sketch” thing. Listen up, Arduino people, you’re not writing “sketches”! It’s code. You’re not sketching, you’re coding, even if you’re an artist. If you continue to call C++ code a “sketch”, we get to refer to our next watercolor sloppings as “writing buggy COBOL”.

And you’re not writing “in Arduino”. You’re writing in C/C++, using a library of functions with a fairly consistent API. There is no “Arduino language” and your “.ino” files are three lines away from being standard C++. And this obfuscation hurts you as an Arduino user and artificially blocks your progress into a “real” programmer.

(End of rant.)

Let’s take that second rant a little bit seriously and dig into the Arduino libraries to see if it’s Arduinos all the way down, or if there’s terra firma just beneath. If you started out with Arduino and you’re looking for the next steps to take to push your programming chops forward, this is a gentle way to break out of the Arduino confines. Or maybe just to peek inside the black box.

Arduino is C/C++

Click on the “What is Arduino” box on the front page of arduino.cc, and you’ll see the following sentence:

“ARDUINO SOFTWARE: You can tell your Arduino what to do by writing code in the Arduino programming language…”

Navigate to the FAQ, and you’ll see

“the Arduino language is merely a set of C/C++ functions that can be called from your code”.

Where we come from, a bunch of functions written in a programming language is called a library. So which is it, Arduino?

(The Language Reference page is a total mess, combining parts of standard C with functions defined in the Arduino core library.)

Maybe that’s not as sexy or revolutionary as claiming to have come up with a new programming language, but the difference matters and it’s a damn good thing that it’s just a set of libraries. Because the beauty about the Arduino libraries is that you don’t have to use them, and that you can pick and choose among them. And since the libraries are written in real programming languages (C/C++), they’re a totally useful document if you understand those languages.

C and Assembly language, on the other hand, are different languages. If you’re writing assembler, you can easily specify exactly which of the chip’s native instructions to use for any particular operation — not so in C. Storing data in particular registers in the CPU is normal in assembler, but heroic in C. So if you start out writing your code in C, and then find out that you need some of the features of assembler, you’re hosed. You stop writing in C and port all your code over to assembler. You have to switch languages. You don’t get to pick and choose.

(Yes, there is inline assembler in GCC.  That’s cheating.)

This is not at all the case with Arduino: it’s not a programming language at all, and that’s a darned good thing. You’re writing in C/C++ with some extra convenience libraries on top, so where the libraries suck, or they’re just plain inconvenient, you don’t have to use them. It’s that simple.

A prime example is digitalWrite() in the Arduino’s core library, found in the “wiring_digital.c” file. It’s madness to use the ridiculously slow digitalWrite() functions when speed or timing matters. Compared to flipping bits in the output registers directly, digitalWrite() is 20-40x slower.

The scope shots here are from simply removing the delay statements from the Blink.ino example code that comes with Arduino — essentially toggling the LED pin at full speed. Upper left is using digitalWrite() to flip the pin state. Upper right is using direct bit manipulation in C: PORTB ^= (1 << LED_BIT); Because Arduino’s digitalWrite() command has a bunch of if...then statements in it that aren’t optimized away by the compiler, it runs 28 times slower.

(And worse, as you can see in the lower left, the Arduino code runs with occasional timing glitches, because an interrupt service routine gets periodically called to update the millisecond timer. That’s not a problem with digitalWrite() per say, but it’s a warning when attempting tight timing using the Arduino defaults.)

OK, so digitalWrite() is no good for timing-critical coding. If Arduino were a real language, and you were stuck with digitalWrite(), you wouldn’t be able to use the language for anything particularly sophisticated. But it’s just a convenience function. So you can feel free to use digitalWrite() in the setup() portion of your code where it’s not likely to be time critical. That doesn’t mean that you have to use it in the loop() portion when timing does matter.

And what this also means is that you’re no longer allowed to say “Arduino sucks”. Arduino is C/C++, and at least C doesn’t suck. (Zing! Take that, C++ lovers. De gustibus non disputandem est.) If you think that some of the Arduino libraries suck, you’re really going to have to specify which libraries in particular you mean, or we’ll call you out on it, because nobody’s forcing you to use them wholesale. Indeed, if you’re coding on an AVR-based Arduino, you’ve got the entire avr-libc project baked in. And it doesn’t suck.

The “.ino” is a Lie

So if Arduino is just C/C++, what’s up with the “.ino” filetype? Why is it not “.c” or “.cpp” like you’d expect? According to the Arduino build process documentation,

“The Arduino environment performs a few transformations to your main sketch file (the concatenation of all the tabs in the sketch without extensions) before passing it to the avr-gcc compiler.”

True C/C++ style requires you to declare (prototype) all functions that you’re going to use before you define them, and this is usually done in a separate header “.h” file. When C compiles your code, it simply takes each function and turns it into machine code. In a philosophically (and often practically) distinct step, references to a function are linked up with the compiled machine code representing them. The linker, then, only needs to know the names of each function and what types of variables it needs and returns — exactly the data in the function declaration.

Long story short: functions need prior declaration in C, and your “.ino” code defines setup() and loop() but never declares them. So that’s one thing that the Arduino IDE does for you. It adds two (or more, if you define more functions in your “.inos”) function prototypes for you.

The other thing the IDE’s preprocessor does is to add #include "Arduino.h" to the top of your code, which pulls in the core Arduino libraries.

(And then, for some mysterious reason, it also deletes all comments from your code, making it harder to debug later on. Does anyone out there know why the Arduino IDE does this?)

So that’s it. Three lines (or maybe a few more) of very simple boilerplate separate a “sketch” from valid C/C++ code. This was presumably done in the interest of streamlining the coding experience for newbies, but given that almost every newb is going to start off with the template project anyway, it’s not clear that this buys much.

On the other hand, the harm done to the microcontroller newbie is reasonably large. The newb doesn’t know that it’s actually C/C++ underneath the covers and doesn’t learn anything about one of the most introductory, although mindless, requirements of the language(s): function declarations.

When the newb eventually does want to include outside code, the newb will need to learn about #include statements anyway, so hiding #include "Arduino.h" is inconsistent and sets up future confusion. In short, the newb is blinded from a couple of helpful learning opportunities, just to avoid some boilerplate that’s templated out anyway.

Write C++ Directly in the Arduino IDE

And if you don’t believe that Arduino is C/C++, try the following experiment:

  1. Save a copy of the example Blink project.
  2. Go into the “sketch’s” directory and copy Blink.ino to Blink.cpp.
  3. Re-open the project in Arduino and delete everything from Blink.ino
  4. Add the required boilerplate to Blink.cpp. (One include and two function declarations.)
  5. Verify, flash, and whatever else you want.

You’ve just learned to write C/C++ directly from within the Arduino IDE.

(Note: for some reason, the Arduino IDE requires a Blink.ino file to be present, even if it’s entirely empty. Don’t ask us.)

main.cpp

So if Blink.ino turns into Blink.cpp, what’s up with the setup() and loop() functions? When do they ever get called? And wait a minute, don’t all C and C++ programs need a main() function to start off? You are on the path to enlightenment.

Have a look at the main.cpp file in hardware/arduino/avr/cores/arduino.

There’s your main() function! And although we’ve streamlined the file a little bit for presentation, it’s just about this straightforward.

The init() function is called before any of your code runs. It is defined in “wiring.c” and sets up some of the microcontroller’s hardware peripherals. Included among these tasks on the AVR platform is configuring the hardware timers for the milliseconds tick and PWM (analogOut()) functions, and initializing the ADC section. Read through the init() function and the corresponding sections of the AVR datasheet if you’ve never done any low-level initializations of an AVR chip; that’s how it’s done without Arduino.

And then we get to the meat. The setup() function is called, and in an endless for loop, the loop() function is continually called. That’s it, and it’s the same code you’d write in C/C++ for any other microcontroller on the planet. That’s the magic Arduino setup() and loop(). The emperor has no clothes, and the Wizard of Oz is just a pathetic little man behind a curtain.

If you want to dig around more into the internals of the Arduino core library, search for “Arduino.h” on your local install, or hit up the core library on Github.

The Arduino Compile Phase

So we’ve got C/C++ code. Compiling it into an Arduino project is surprisingly straightforward, and it’s well-documented in the Arduino docs wiki. But if you just want to see for yourself, go into Preferences and enable verbose logging during compilation. Now the entire build process will flash by you in that little window when you click “Verify”.

It’s a lot to take in, but it’s almost all repetitive. The compiler isn’t doing anything strange or unique at all. It’s compiling all of the functions in the Arduino core files, and putting the resulting functions into a big (static) library file. Then it’s taking your code and this library and linking them all together. That’s all you’d do if you were writing your own C/C++ code. It’s just that you don’t know it’s happening because you’re pressing something that looks like a play button on an old Walkman. But it’s not rocket science.

There is one more detail here. If you include a library file through the menu, and it’s not part of the core Arduino libraries, the IDE locates its source code and compiles and links it in to the core library for you. It also types the #include line into your “.ino” file. That’s nice, but hardly a deal-breaker.

If you’d like to see this build process in the form of a Makefile, here’s (our) primitive version that’s more aimed at understanding, and this version is more appropriate for production use.

Next Steps

If the Arduino is the embedded electronics world’s gateway drug, what are the next steps that the Arduino programmer should take to become a “real” embedded programmer slash oil-burning heroin junkie? That depends on you.

Are you already good at coding in a lower-level language like C/C++? Then you need to focus on the microcontroller-specific side of things. You’re in great shape to just dive into the Arduino codebase. Try to take a few of the example pieces, or even some of your own “sketches” and look through the included Arduino library’s source code. Re-write some simple code outside the IDE and make sure that you can link to the Arduino core code. Then replace bits of the core with your own code and make sure it still works. You’ll spend half of your time looking into the relevant micro’s datasheet, but that’s good for you.

Are you comfy with electronics but bewildered by coding? You might spend a bit of time learning something like C. Learn C the Hard Way is phenomenal, and although it’s aimed at folks working on bigger computers, it’s got a lot of the background that you’ll need to progress through and beyond the Arduino codebase. You’re going to need to learn about the (relatively trivial) language conventions and boilerplatey stuff to get comfortable in straight C/C++, and then you can dig in to the Arduino source.

Wherever you are, remember that Arduino isn’t a language: it’s a set of libraries written in C/C++, some of them really quite good, and some of them (we’re looking at you EEPROM) simply C++ wrappers on the existant avr-libc EEPROM library. And that means that for every Arduino project you’ve written, you’ve got the equivalent source code sitting around in C/C++, ready for you to dig into. Thank goodness they didn’t invent their own programming language!


Filed under: Hackaday Columns

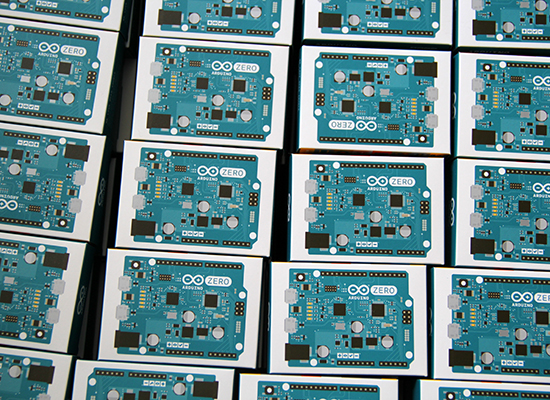
Arduino Zero now available for purchase!

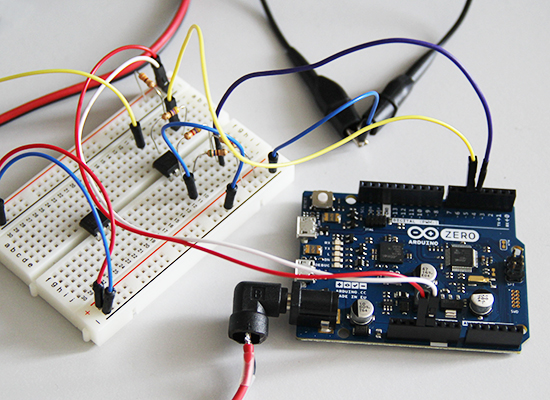
One year ago Arduino and Atmel unveiled the new Arduino Zero. Today, after some months of beta-testing, we are happy to have the board finally available for purchase on the US Store.

Arduino Zero is a simple and powerful 32-bit extension of the well-known Arduino UNO. It allows creative individuals to realize truly innovative ideas especially in areas like smart IoT devices, wearable technology, high-tech automation, and robotics. Arduino Zero acts also as a great educational tool for learning 32-bit application development.

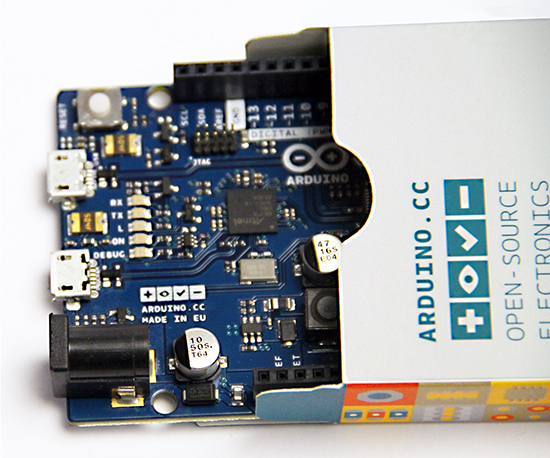
Powered by Atmel SAMD21 MCU, Arduino Zero features a 32-bit ARM Cortex® M0+ core. One of its “most wanted” features is the Atmel Embedded Debugger (EDBG), which provides a full debug interface without the need for additional hardware.

Arduino Zero’s silk has an additional graphic element: the Genuino logo. Genuino is the Arduino sister brand from the Arduino founders (M. Banzi, D. Cuartielles, T. Igoe, D. Mellis), team and community. We added the Genuino logo to the Arduino Zero to stress its authenticity, and to make it easier for the Arduino community to spot original boards. We are going to include this logo to all genuine Arduino boards from now on.

To start using the board you need to download the latest version of the IDE (1.6.5), which comes with a set of great improvements:

  • a new modern editor (thanks @ricardojlrufino)
  • serial monitor stays open while you upload a new sketch (thanks @avishorp and @Wackerbarth)
  • File > Open Recent menu shows the last 5 opened sketches
  • Tons of fixes and improvements: the list is available here. They are 470 issues closed since previous version, 1.6.4: massive!

Learn more about the Arduino Zero and get started with it at the following links:

Updated Arduino Zero product page

Getting Started Page

Github repository

Interact in the Arduino Forum

And if you are one of the lucky ones and have Arduino Zero in your hands, start practicing its features with the following tutorials:

- Arduino Zero Low Power Overview

It shows the low power characteristics of the Arduino Zero thanks to a low power microcontroller using the 32 bit ARM Cortex M0+ architecture.

Simple Audio Feature

It shows how to experiment with sound starting to play a wave file stored on the SD card.


Arduino IDE Becomes More Open, Less Snarky

Version 1.6.4 of the Arduino IDE has been out for a little while now, and it has a couple of notable changes. To our eyes, the most interesting change makes adding support for non-standard boards and their configurations within the Arduino IDE a lot simpler. We’ll get into details below.

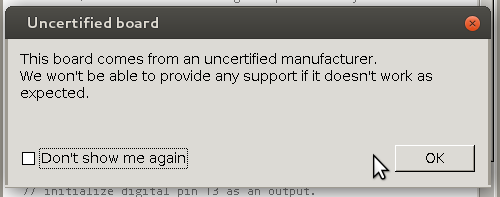
But before that, it’s time to bid farewell to the cheeky little popup window that would deliver a warning message when using a board bearing the USB IDs of their former-partner-turned-competitor. We absolutely agree with [Massimo] that the issues between Arduino SRL / Smart Projects and Arduino LLC are well-enough known in the community, and that it’s time for the popup to fade away.

Now on to the meat of this post. The new “Board Manager” functionality makes it significantly easier for other non-Arduino products to be programmed within the Arduino IDE. Adafruit has a tutorial on using the Board Manager functionality with their products, and it basically boils down to “enter the right URL, click on the boards you want, download, restart Arduino, bam!”

The list of unofficially supported third-party boards is still a bit short, but it includes some stellar entries. For instance, Adafruit has provided the files needed for the ESP8266, which recently received the Arduino treatment. This means that you can simply point your IDE at Adafruit’s URL, and it’ll set you up with everything needed to develop for the ESP8266 from within the comfy Arduino IDE.

Another standout, from our perspective, is this link that simplifies programming bare AVR chips from the Arduino IDE. While programming your Arduino code into a simple AVR ATmega168 has always been possible, it’s never been as easy as it is now.

How it Works

Under the hood, the new board manager system is pretty straightforward. Clicking on one of the links leads to a JSON file with any number of board architecture definitions. Each entry provides text descriptions of the target board that are used for generating menu entries in the Arduino IDE’s pulldown menus, and a link to a zip file. This zip file contains everything necessary to adapt the Arduino libraries to the target board or chip.

For instance, with something simple like the bare-AVR modifications, the zip file simply includes the boards.txt and platform.txt files that the Arduino IDE uses to fill in a lot of board-specific parameters like the CPU clock speed, fuse bit settings, and AVRDUDE command options for flashing new code. For something more involved, like porting Arduino to the ESP8266, the zip file additionally includes the ported Arduino core and library functions, as well as the uploader tools that make Arduino work on that target.

It’s a very interesting experiment to open up the Arduino IDE so transparently to third-party devices. It’ll surely win points with both hackers and retailers of *duinos, and we’re guessing it’ll only encourage porting the Arduino libraries to more platforms. Let’s see where the community takes this one. What do you want to see Arduino ported to next?


Filed under: Arduino Hacks
Hack a Day 13 May 18:01

Arduino IDE 1.6.4 released and available for download

Following our previous announcement, we are happy to inform you that Arduino IDE 1.6.4 is now available for download.

Here is a brief list of important changes:

  • Added support to the new Arduino Gemma
  • Tools submenu shows selected subentry. Thanks Paul Stoffregen
  • We added a command line interface to Boards and Libraries Managers: see –install-boards and –install-library actions in the documentation
  • We restored line highlighting when the sketch contains an error. This was actually a regression, something that stopped working since 1.5.7
  • Fixed an error that left the Tools > Port menu greyed out

And the most important feature: you can add additional, non official, boards to the Boards Manager by just adding a url in the preferences.
Click on File menu, then click Preferences. At the bottom of the page, you’ll find this new text field:

Fill the text field with the urls provided by your board manufacturer, separating each with a comma. Here you can find some example URLs.

There also are many other fixes and improvements. The complete list of fixes and credits is available here.

We are also happy to see the list of available libraries growing day after day: today we reached 190.