Posts with «how-to» label

DIY Dungeon Crawler Game Plays on Single LED Strip

A delightful version of a clever one-dimensional game has been made by [Critters] which he calls TWANG! because the joystick is made from a spring doorstop with an accelerometer in the tip. The game itself is played out on an RGB LED strip. As a result, the game world, the player, goal, and enemies are all represented on a single line of LEDs.

How can a dungeon crawler game be represented in 1D, and how is this unusual game played? The goal is for the player (a green dot) to reach the goal (a blue dot) to advance to the next level. Making this more difficult are enemies (red dots) which move in different ways. The joystick is moved left or right to advance the player’s blue dot left or right, and the player can attack with a “twang” motion of the joystick, which eliminates nearby enemies. By playing with brightness and color, a surprising amount of gameplay can be jammed into a one-dimensional display!

Code for TWANG! is on github and models for 3D printing the physical pieces are on Thingiverse. The video (embedded below) focuses mainly on the development process, but does have the gameplay elements explained as well and demonstrates some slick animations and sharp feedback.

Using a spring doorstop as a controller is neat as heck as well as intuitive, but possibly not quite as intuitive as using an actual car as a video game controller.

Afroman Teaches Intro to Servos, Builds Laser Turret

After a longish hiatus, we were pleased to see a new video from [Afroman], one of the most accessible and well-spoken teachers the internet has to offer. If you’re new to electronics, see the previous sentence and resolve to check out his excellent videos. The new one is all about servos, and it culminates in a simple build that provides a foundation for exploring robotics.

[Afroman] leaves no gear unturned in his tour de servo, which is embedded after the break. He explains the differences between open vs. closed loop motor systems, discusses the different sizes and types of servos available, and walks through the horns and pigtails of using them in projects. Finally, he puts this knowledge to use by building a laser turret based on a pan-tilt platform.

The Arduino-driven turret uses two micro servos controlled with pots to move by degrees in X/Y space. Interestingly, [Afroman] doesn’t program the board in the Arduino IDE using wiring. Instead, he uses an open-source microcontroller language/IDE called XOD that lets you code by building a smart sort of schematic from drag-and-drop components and logic nodes. Draw the connections, assign your I/O pin numbers, and XOD will compile the code and upload it directly to the board.

XOD seems like a good tool for beginners to do rapid prototyping. On the other hand, a look into the generated code reveals a whole lot of wrappers that obfuscate the bits of code that actually do stuff. There doesn’t seem to be a way to shed them, either, so once you design something in XOD, you’re kind of stuck using it to iterate. That said, the generated code is well documented, and someone who knows what they’re looking at could find, for instance, the I/O pin assigned to the blink sketch LED.

Once the novelty of the double laser cat tormentor has subsided, use the other servos in that 5-pack you bought to flip a light switch, control a knob, or play the glockenspiel.


Filed under: how-to, Laser Hacks

Stop Motion with the Time Glove

What do you get when you put an ultra-bright LED in the palm of a glove, and strobe it controlled by an accelerometer? A Time Control Glove! In creator [MadGyver]’s own words, it’s “just a stroboscope with frequency adjustment” but the effect is where all the fun is.

The Time Control Glove uses the stroboscopic effect, which many of us have seen used in timeless water drop fountains where the strobe rate makes drops appear to change speed, freeze in place, and even change direction. [MadGyver] made the entire assembly portable by putting it into a glove. An on-board accelerometer toggles the strobe in response to a shake, and the frequency is changed by twisting the glove left or right. The immediate visual feedback to the physical motions is great. The whole effect is really striking on the video, which is embedded below.

Schematics and bill of materials are available on GitHub. Brilliant work! And while we’re discussing the stroboscopic effect, find out how it can be used to tune guitar strings.

[via Arduino Blog]


Filed under: Arduino Hacks, how-to, led hacks

SimpleSumo Bots Teach More than Fighting

[MechEngineerMike] wrote in to share the enthusiasm over SimpleSumo, a series of open source, customizable robots he designed for mini-sumo battling and much more. For the unfamiliar, mini-sumo is a sport where two robots try to push each other out of a ring. [Mike]’s bots are simplified versions designed for education.

[Mike] was inspired by a video of some kids building mini-sumo bots who were doing anything and everything to personalize them. He vowed to make his own affordable, easy-to-build bots with education firmly in mind. His other major requirement? They had to be as easily customizable as that one potato-based toy that eventually came with a bucket of parts. As of this writing, there are 34 interchangeable accessories.

[Mike]’s first idea was to build the bots out of custom 3D-printed building blocks. He soon found it was too much work to print consistent blocks and switched to a modular cube-like design instead. SimpleSumo bots can do much more than just fight each other. [Mike] has written programs to make them flee from objects, follow lines, find objects and push them out of the ring, and beep with increasing frequency when an object is detected.

The bots are completely open source, but [Mike] sells kits for people who can’t print the parts themselves. He’s made a wealth of information available on his website including links to outside resources about mini-sumo, Arduino, programming, and 3D design. How about a complete series of assembly videos? First one is after the break.  Don’t know how to build a battle ring? He’s got that covered, too.

For a sumo bot that’s more brains than brawn, check out Zumo Red, the smart sumo.


Filed under: how-to, robots hacks

Mouse Mis-Clicking? We Got You.

A mouse with malfunctioning buttons can be a frustrating to deal with — and usually a short leap to percussive maintenance. Standard fixes may not always last due to inferior build quality of the components, or when the microswitch won’t close at all. But, for mice that double/triple-click, will release when dragging, or mis-click on release, this Arduino-based hack may be the good medicine you’re after.

Instructables user [themoreyouknow]’s method cancels click malfunctions by latching the mouse’s controller switch trace to ‘on’ when pressed, keeping it there until the button normally closed contact closes again completely. Due to the confined spaces, you’ll want to use the smallest Arduino you can find, some insulating tape to prevent any shorts, and care to prevent damaging the wires this process adds to the mouse when you cram it all back together.

Before you take [themoreyouknow]’s guide as dogma, the are a few caveats to this hack; they are quick to point out that this won’t work on mice that share two pins between three buttons — without doing it the extra hard way, and that this might be trickier on gaming or other high-end mice, so attempt at your own peril.

Speaking of gaming mice, we recently featured a way to add some extra functionality to your mouse — cheating optional — as well as how to stash a PC inside an old Logitech model.


Filed under: hardware, how-to
Hack a Day 30 Aug 09:00
arduino  click  debounce  hardware  how-to  mouse  nano  repair  

Revealed: Homebrew Controller Working in Steam VR

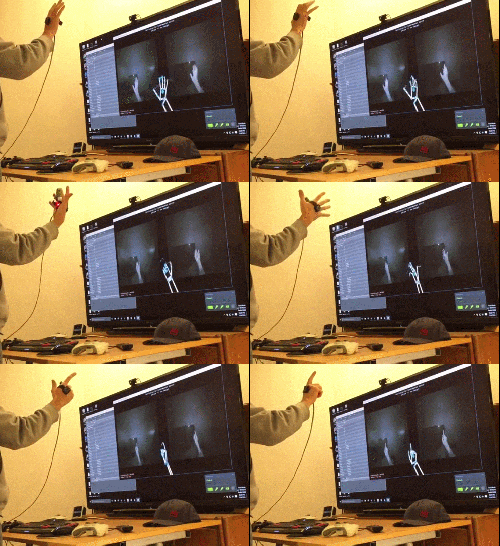
[Florian] has been putting a lot of work into VR controllers that can be used without interfering with a regular mouse + keyboard combination, and his most recent work has opened the door to successfully emulating a Vive VR controller in Steam VR. He uses Arduino-based custom hardware on the hand, a Leap Motion controller, and fuses the data in software.

We’ve seen [Florian]’s work before in successfully combining a Leap Motion with additional hardware sensors. The idea is to compensate for the fact that the Leap Motion sensor is not very good at detecting some types of movement, such as tilting a fist towards or away from yourself — a movement similar to aiming a gun up or down. At the same time, an important goal is for any added hardware to leave fingers and hands free.

[Florian]’s DIY VR hand controls emulate the HTC Vive controllers in Valve’s Steam VR Tracking with a software chain that works with his custom hardware. His DIY controller doesn’t need to be actively held because by design it grips the hand, leaving fingers free to do other tasks like typing or gesturing.

Last time we saw [Florian]’s work, development was still heavy and there wasn’t any source code shared, but there’s now a git repository for the project with everything you’d need to join the fun. He adds that “I see a lot of people with Wii nunchucks looking to do this. With a few edits to my FreePIE script, they should be easily be able to enable whatever buttons/orientation data they want.”

We have DIY hardware emulating Vive controllers in software, and we’ve seen interfacing to the Vive’s Lighthouse hardware with DIY electronics. There’s a lot of hacking around going on in this area, and it’s exciting to see what comes next.


Filed under: Arduino Hacks, Virtual Reality

Using an IR remote with your Arduino

If you’ve ever needed a short-range remote control for a project, [firestorm] is here to help you out. He put up a great tutorial on using an IR remote to do just about anything with everyone’s favorite microcontroller platform.

[firestorm] used the Arduino IRremote library to decode the button presses on his remote. After uploading the IR receive demo included in the library, the Arduino spit out hex codes of what the IR receiver was seeing. [firestorm] wrote these down, and was able to program his Arduino to respond to each individual button press.

After figuring out the IR codes for his remote, [firestorm] threw a shift register into his bread board and attached a seven-segment LED. Since [firestorm] knows the codes for the number buttons on his remote, it’s very easy to have the LED display flash a number when the corresponding button on the remote is pressed.

A single seven-segment display might not be extremely useful, but with [firestorm]‘s tutorial, it’s easy to give your Arduino some remote control capabilities with a simple IR receiver. Not bad for a few dollars in parts.


Filed under: arduino hacks, how-to