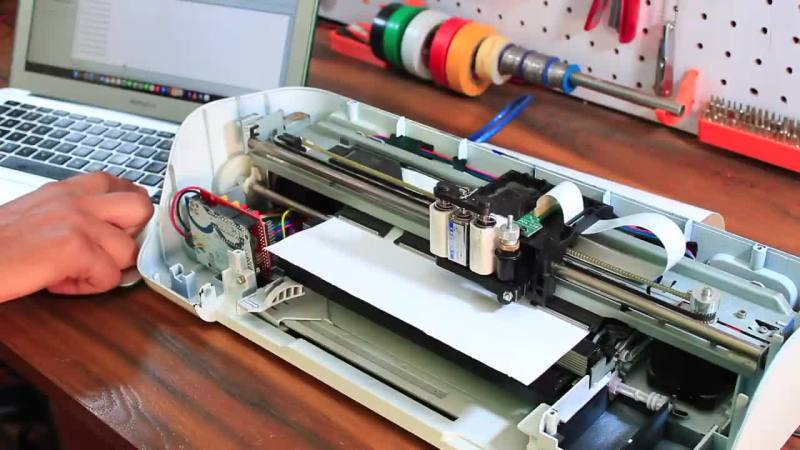
Some might look at a cheap inkjet printer and see a clunky device that costs more to replace the ink than to buy a new one. [Abhishek Verma] saw an old inkjet printer and instead saw a smooth gantry and feed mechanism, the perfect platform to build his own DIY vinyl cutter.
The printer was carefully disassembled. The feed mechanism was reworked to be driven by a stepper motor with some 3D printed adapter plates. A solenoid-based push/pull mechanism for the cutting blade was added with a 3D printed housing along with a relay module. An Arduino Uno takes in commands from a computer with the help of a CNC GRBL shield.
What we love about this build is the ingenuity and reuse of parts inside the old printer. For example, the old PCB was cut and connectors were re-used. From the outside, it’s hard to believe that HP didn’t manufacture this as a vinyl cutter.
Step sequencers are fantastic instruments, but they can be a little, well, repetitive. At it’s core, the step sequencer is a pretty simple device: it loops through a series of notes or phrases that are, well, sequentially ordered into steps. The operator can change the steps while the sequencer is looping, but it generally has a repetitive feel, as the musician isn’t likely to erase all of the steps and enter in an entirely new set between phrases.
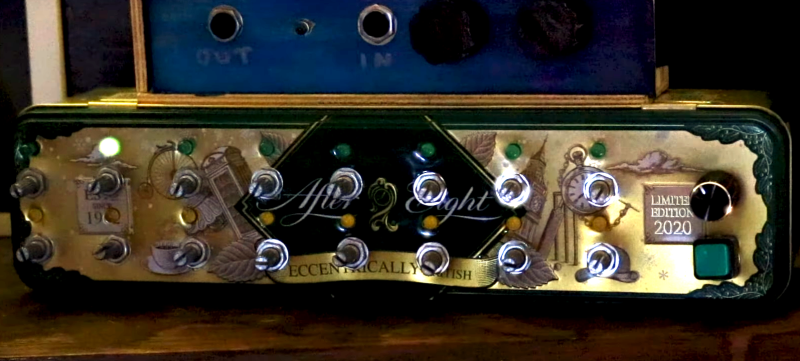
Enter our old friend machine learning. If we introduce a certain variability on each step of the loop, the instrument can help the musician out a bit here, making the final product a bit more interesting. Such an instrument is exactly what [Charis Cat] set out to make when she created the After Eight Step Sequencer.
The After Eight is an eight-step sequencer that allows the artist to set each note with a series of potentiometers (which are, of course, housed in an After Eight mint tin). The potentiometers are read by an Arduino, which passes MIDI information to a computer running the popular music-oriented visual programming language Max MSP. The software uses a series of Markov Chains to augment the musician’s inputted series of notes, effectively working with the artist to create music. The result is a fantastic piece of music that’s different every time it’s performed. Make sure to check out the video at the end for a fantastic overview of the project (and to hear the After Eight in action, of course)!
[Charis Cat]’s wonderful creation reminds us of some the work [Sara Adkins] has done, blending human performance with complex algorithms. It’s exactly the kind of thing we love to see at Hackaday- the fusion of a musician’s artistic intent with the stochastic unpredictability of a machine learning system to produce something unique.
It’s a little known secret that when the Hackaday writers gather in their secret underground bunker to work on our plans for world domination, we often take breaks to play our version of the corporate “Buzzword Bingo”, where paradigms are leveraged and meetings circle back to loop in offline stakeholders, or something like that. Our version, however, is “Comment Line Bingo”, and right in the middle of the card is the seemingly most common comment of all: “You should have used a 555,” or variations thereof.
So it was with vicious glee that we came across the Trollduino V1.0 by the deliciously named [Mild Lee Interested]. It’s the hardware answer to the common complaint, which we’ll grant is often justified. The beautiful part of this is that Trollduino occupies the same footprint as an Arduino Uno and is even pin-compatible with the microcontroller board, or at least sort of. The familiar line of components and connectors sprout from the left edge of the board, and headers for shields line the top and bottom edges too. “Sketches” are implemented in hardware, with jumpers and resistors and capacitors of various values plugged in to achieve all the marvelous configurations the indispensable timer chip can be used for. And extra points for the deliberately provocative use of Comic Sans in the silkscreen.
USB-C Power Delivery 3.0 (PD3.0) introduces a new Programmable Power Supply (PPS) mode, which allows a device to negotiate any supply of 3.3-21 V in 20 mV steps, and up to 5 A of current in 50 mA steps. To make use of this new standard, [Ryan Ma] create the PD Micro, an Arduino-compatible development board, and a self-contained software library to allow easy integration of PD3.0 and the older PD2.0 into projects.
The dev board is built around an ATMega32U4 microcontroller and FUSB302 USB-C PHY. The four-layer PCB is densely packed on both sides to fit in the Arduino Pro Micro Form factor. The board can deliver up to 100W (20 V at 5 A) from an appropriate power source and shows visual feedback on the PD status through a set of LEDs.
The primary goal of the project is actually in the software. [Ryan] found that existing software libraries for PD take up a lot of memory, and are difficult to integrate into small projects. Working from the PD specifications and PD PHY chip data sheet, he created a lighter weight and self-contained software library which consumes less than 8 K of flash and 1 K of RAM. This is less than half the Flash and RAM available on the ATmega32U4.
[Ryan] is running a Crowd Supply campaign (video after the break) to get some of these powerful boards out in the wild, and has released all the source code and schematics on GitHub. The PCB design files will be released during the last week of the campaign, around 25 January 2021.
Learning a new language is hard work, but they say that the best way to learn something is to teach it. [Angeliki Beyko] is learning Greek, and what better way to teach than to build a vocabulary flash-card game from Arduinos, color screens, 1602 text screens, and arcade buttons? After the break, we have a video from the creator talking about how to play, the hardware she chose, and what to expect in the next version.
Pegboard holds most of the hardware except the color screens, which are finicky when it comes to their power source. The project is like someone raided our collective junk drawers and picked out the coolest bits to make a game. Around the perimeter are over one hundred NeoPixels to display the game progress and draw people like a midway game. Once invested, you select a category on the four colored arcade buttons by looking at the adjacent LCD screens’ titles. An onboard MP3 shield reads a pseudo-random Greek word and displays it on the top-right 1602 screen in English phonetics. After that, it is multiple choice with your options displaying in full-color on four TFT monitors. A correct choice awards you a point and moves to the next word, but any excuse to mash on arcade buttons is good enough for us.
[Angeliki] does something we see more often than before, she’s covering what she learned, struggled with, would do differently, and how she wants to improve. We think this is a vital sign that the hacker community is showcasing what we already knew; hackers love to share their knowledge and improve themselves.
Typing Greek with a modern keyboard will have you reaching for an alt-code table unless you make a shortcut keyboard, and if you learn Greek, maybe you can figure out what armor they wore to battle.
The Consumer Electronics Show in Las Vegas is traditionally where the big names in tech show off their upcoming products, and the 2020 show was no different. There were new smartphones, TVs, and home automation devices from all the usual suspects. Even a few electric vehicles snuck in there. But mixed in among flashy presentations from the electronics giants was a considerably more restrained announcement from a company near and dear to the readers of Hackaday: Arduino is going pro.
While Arduino has been focused on the DIY and educational market since their inception, the newly unveiled Portenta H7 is designed for professional users who want to rapidly develop robust hardware suitable for industrial applications. With built-in wireless hardware and the ability to run Python and JavaScript out of the box, the powerful dual-core board comes with a similarly professional price tag; currently for preorder at $99 USD a pop, the Portenta is priced well outside of the company’s traditional DIY and educational markets. With increased competition from other low-cost microcontrollers, it seems that Arduino is looking to expand out of its comfort zone and find new revenue streams.
That’s a Lot of Pins
The Portenta H7 is obviously a far cry from the relatively dinky 8-bit Arduinos that we’ve all got filling up our parts drawers. Developed for high performance edge computing applications, the new board is powered by a 32-bit STM32H747XI that utilizes both an ARM Cortex M7 and an M4 running at 480 MHz and 240 MHz respectively. The two cores can work independently, allowing for example one core to run interpreted Python while the other runs code compiled in the Arduino IDE. When they need to work together, the cores can communicate with each other via a Remote Procedure Call (RPC) mechanism.
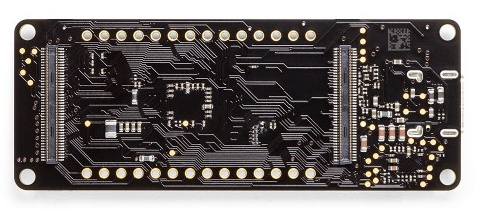
The new 80-pin connectors on the Portenta
Outwardly, the new board doesn’t look far removed from the modern Arduino form factor we’re used to. The USB connector has been upgraded to a Type-C, but the Portenta still retains the dual rows of pads ready for hand-soldered headers — that’s their more recent pinout that they call the Arduino MKR form factor.
If you look on the back of the board however, you’ll see that they’ve added two 80-pin high density connectors. According to the product page, these are intended to allow the Portenta to simply be plugged into a device as a removable module. The idea being that devices in the field can easily have their Portenta swapped out for an upgraded model. Some digging into the product page documentation section turns up a schematic that lists the connectors as Hirose DF40C-80DP-0.4V(51).
The base model Portenta features 8 MB SDRAM and 16 MB NOR flash, but it can be custom ordered with up to 64 MB of memory and 128 MB of flash should you need it. It’s also possible to delete various interfaces from the board when ordering, so if you don’t want network connectivity or the NXP SE050C2 crypto chip, they can simply be left off. However as of this writing it is unclear as to what minimum order quantity is necessary to unlock this level of customization, or or how much these modifications will change the unit cost.
Year of the Arduino Desktop?
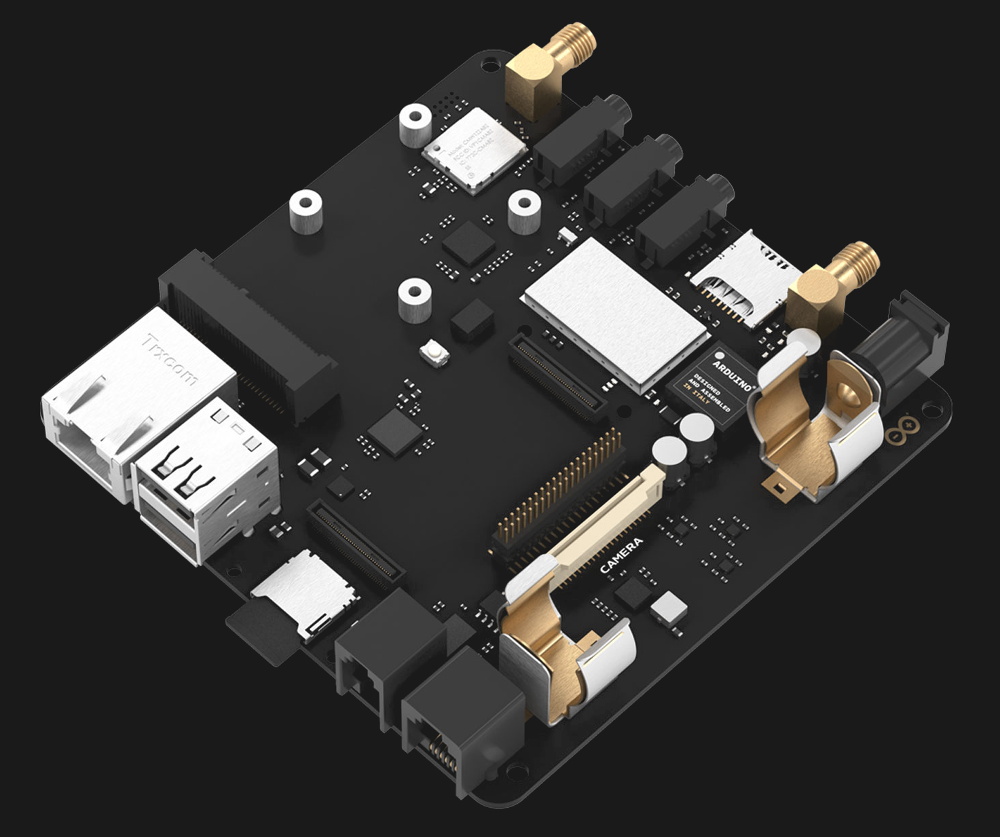
The Portenta Carrier Board
The Portenta H7 is an impressive enough piece of hardware on its own, but when it’s plugged into the optional Carrier Board, things really start to get interesting. The Carrier Board provides full size connectors for all of the onboard peripherals, and according to documentation, turns the Portenta into an eNUC-class embedded computer. There’s even support for DisplayPort to connect a monitor, and miniPCI for expansion cards.
With a fully loaded Portenta H7 slotted into the Carrier Board, it would seem you have the makings of a low-power ARM “desktop” computer. Albeit one that wouldn’t outperform the Raspberry Pi Zero, and which costs several times more.
The Arduino press release and product page doesn’t make any mention of what kind of software or operating system said computer would run, so presumably that’s left as an exercise for the customer. While not particularly well suited to it, the ARM Cortex-M family of processors is capable of running the Linux kernel, so spinning up a “real” OS image for it should be possible. Of course with a maximum of just 64 MB of RAM, you’ll want to keep your performance expectations fairly low.
Where Does Portenta Fit?
We can’t even speculate what a maxed out Portenta would cost, and there’s no pricing or release date for the Carrier Board. But even at $99, the base model Portenta H7 would be a tough sell for hackers and makers who are used to buying dual-core ESP32 boards at 1/10 of the price, or the Teensy 4.0 which has a 600 MHz Cortex-M7 at 1/4 of the price. Which is fine, since this board isn’t intended for the traditional core Arduino audience.
Seeing the carrier board, we can’t help but notice some parallels here with the Raspberry Pi Compute Module. With connections broken out to a SODIMM header, the idea of the Computer Module was to help bridge the gap between the DIY community and the commercial one by offering up a Raspberry Pi in a more rugged form factor that would be easier to integrate into end-user products. But since it wasn’t any cheaper than the stock Pi, there wasn’t a whole lot of incentive to switch over. We haven’t seen consumer products advertising “Raspberry Pi Inside!” so it’s hard to tell if there has been any meaningful adoption from industry.
One has to wonder why any company that has the resources to integrate such an expensive board into their products wouldn’t just come up with their own custom design around the Portenta’s STM32H747XI chip, which even in single quantities, can currently be had for less than $15. The difference may end up coming down to the world-renowned community that surrounds the Arduino brand, and the company’s efforts to modernize their toolchain.
The Open Source Hardware Association (OSHWA) runs a free program that allows creators to certify that their hardware complies with the community definition of open source hardware. Whenever you see the certification logo, you know that the certified hardware meets this standard. The certification site includes a full list of […]
Due to pedalboard size, complicated guitar pedals sometimes reduce the number of buttons to the bare minimum. Many of these pedals are capable of being controlled with an external MIDI controller, however, and necessity being the mother of invention and all, this is a great opportunity to build something and learn some new skills at the same time. In need of a MIDI controller, Reddit user [Earthwin] built an Arduino powered one to control his Boss DD500 Looper pedal and the result is great looking.
Five 16×2 LCD screens, one for each button, show the functionality that that button currently has. They are attached (through some neat wiring) to a custom-built PCB which holds the Arduino that controls everything. The screens are mounted to an acrylic backplate which holds the screens in place while the laser-cut acrylic covers are mounted to the same plate through the chassis. The chassis is a standard Hammond aluminum box that was sanded down, primed and then filler was used to make the corners nice and smooth. Flat-top LEDs and custom 3D printed washers finish off the project.
[Earthwin] admits that this build might be overkill for the looper that he’s using, but he had fun building the controller and learning to use an Arduino. He’s already well on his way to building another, using the lessons learned in this build. If you want to build your own MIDI controller, this article should help you out. And then you’re ready to build your controller into a guitar if you want to.
Spending an hour or two around any consumer-level padlock or house deadbolt lock with a simple lockpicking kit will typically instil a good amount of panic and concern about security. While it’s true that any lock can be defeated, it’s almost comically easy to pick basic locks like this. So, if you’re looking for a level of security that can’t be defeated in two minutes with a tiny piece of metal, you might want to try something a little more advanced.
This project stemmed from an idea to use a YubiKey, a USB hardware token typically used for two-factor authentication, for physical locks instead. The prototype was built around an Arduino UNO, and all of the code and build instructions are available on the project’s site. The creator, [rprinz08], does not have one built inside of a secure enclosure so that would remain an exercise for the reader, but the proof-of-concept is interesting and certainly useful.
While digital keys like this can have their own set of problems (as all locks do), this would be a great solution for anyone needing to lock up anything where physical keys are a liability or a nuisance, where logging is important, or where many people need access to the same lock. The open source code and well-known platform make it easy for anyone to build, too.
There are many reasons why one would want to measure voltage and current in a project, some applications requiring one to measure mains and even three-phase voltage to analyze the characteristics of a device under test, or in a production environment. This led [Michael Klopfer] at the University of California, Irvine along with a group of students to develop a fully isolated board to analyze both single and three-phase mains systems.
Each of these boards consists out of two sections: one is the high-voltage side, with the single phase board using the Analog Devices ADE7953 and the three-phase board the ADE9708. The other side is the low-voltage, isolated side to which the microcontroller or equivalent connects to using either SPI or I2C. Each board type comes in either SPI or I2C flavor.
Each board can be used to measure line voltage and current, and the Analog Devices IC calculates active, reactive, and apparent energy, as well as instantaneous RMS voltage and current. All of this data can then be read out using the provided software for the Arduino platform.
The goal of this project is to make it easy for anyone to reproduce their efforts, with board schematics (in Eagle format) and the aforementioned software libraries provided. Here it is somewhat unfortunate that the documentation can be somewhat incomplete, with basic information such as input and measurement ranges missing. Hopefully this will improve over the coming months as it does seem like a genuinely useful project for the community.
We’ve covered the work coming out of [Michael]’s lab before, including this great rundown on Lattice FPGAs. They’re doing machine vision, work on RISC-Vchips, and more. A stroll through the lab’s GitHub is worth your time.