Posts with «hacks» label

Intel's NUC mini-desktop said to cost around $400

Intel's Next Unit of Computing mini-desktop is reportedly going to cost around $400 when it arrives in the third quarter of the year. Designed for kiosks and digital signage setups, the weeny box has attracted so much interest from solder-wielding modders that the company expects it to go on general sale. The initial unit will include a Sandy Bridge Core i3, 4GB RAM and a 40GB SSD, while on the outside it'll come with three USB 2.0 ports and dual HDMI outputs. That high price might dampen the spirits of those hoping for an Intel-powered Arduino / Raspberry Pi, but we still expect to see it crop up in plenty of brilliant mods next year.

Intel's NUC mini-desktop said to cost around $400 originally appeared on Engadget on Mon, 11 Jun 2012 09:34:00 EST. Please see our terms for use of feeds.

Permalink | Email this | Comments

How Arduino helped him win a hackathon: Locksmasher

While browsing Hacker News, I came across this interesting account of Andrei Pop [blog, twitter] which tells about how he won a recent Facebook hackathon using an arduino hack.

It is a recent trend that hardware too has entered the hackathon scenario. Here are interesting excerpts from his honest account!

A few months ago 3 friends and I participated in the facebook hackathon at UBC. It was a 36 hour, redbull-fueled affair in which quite a few teams participated. We won. I’m not telling you this story to brag, I want to share with you what I learned. In all honesty, I was shocked we won, but I think that sticking to a couple of principles helped:

1. Don’t compete with your second best arsenal

2. Solve a real problem

3. Breadth instead of depth can pay off

Yes, you’ve heard this advice before and there are exceptions to every rule… I’m just sharing my personal experience.

Our team consisted of a designer, a biomedical engineer (who didn’t write a single line of code), a CS student (without a doubt the most “qualified” of all of us), and myself (a Political Science grad). I was the only non-engineering-educated person in the room. One essential lesson I have learned over and over in life is that it is futile to compete on a metric that you cannot possibly be the best at. Don’t compete with your second best arsenal. You need to find the edge that nobody else will think of, or where nobody else can be. If the competition can outspend you, outmanouever them. If the guy at the bar is better looking, be funnier. And if most of the guys in the room have PhDs in CS, go for hardware?

The night before the hackathon I picked up an arduino microcontroller, a few LEDs, some alligator clips, and a breadboard. I didn’t really know how things would come together, but I had spent some time hardware hacking and I was really interested in physical computing. I also figured that most of the guys in the room wouldn’t be thinking about hardware (this was a facebook hackathon, most people were looking up the Open Graph API). I hoped hardware would be our edge, and as it turns out, it was.

After a bit of brainstorming and chinese food we agreed to build Locksmasher – an arduino powered unlocking mechanism that would handle authentication through the Open Graph API. We wanted to create a way to grant one-time access to facebook friends that need to get into your house.

Half an hour into our brainstorming, one of my team members had to leave the hackathon to let a friend into his house. This event sparked the idea of locksmasher and outlines my second point – solve a real problem. A craft for a craft’s sake can often be futile. There are definitely exceptions to this, but most of the time, start with a defined problem and apply your craft, instead of the other way around. The judges loved that they could personally relate to the problem of needing to let someone into their house when they weren’t home.

Our hack was very simple – it was nothing more than a glorified switch that talked to facebook. Graeham (our biomedical engineer) hooked up an old door lock to the arduino for our demo. Yazad (the CS student) and I wrote a NodeJS server to talk to facebook. We spent most of our time dealing with authentication, a problem that could have been solved in a few hours by a better hacker who knows the facebook API well. In the meantime Vince (our designer) made everything look very beautiful. This brings me to my last point point, sometimes breadth is better than depth. I want to credit a tremendous amount of our success to Vince’s design work and Graeham’s hardware. By the end of the 36 hours, we had addressed a little bit of everything.

Most of the hackers in the room built some very elegant projects; machine learning algorithms, recommendation algorithms based on your friends likes, data parsing applications. However many of the projects were elegant for elegance sake and didn’t solve a pain point that the judges could relate to. Furthermore, they didn’t look at the whole package (arguably not necessary for a hackathon but I certainly think our sleek UI helped win over the crowd).

It easily highlights arduino’s adaptability to hooking with various technologies. It truly comes out as the bridge between hardware and software.

The project demo lies here.

Any hackathons worldwide in which our readers have used their Arduino? Please do link the demo or your blog We would love to read!

Via:[dedigncodelearn,HackerNews]

Music + Floppy = Moppy

Moppy is a musical floppy controller program. By using an Arduino UNO as a translator, you can command an array of floppy drives with a musical keyboard. The head on each floppy drive is controlled by a stepper motor which will put out sounds when driven at the right frequency.


Here is a link to the Moppy project page.

Enjoy your musical floppy drives!


Via:[Hackaday]


Arduino Blog 29 May 12:40
arduino  floppy  hacks  keyboard  music  stepper  

How rough your last mountain bike ride was?

Using an Arduino board with a data logging shield that holds an SD card for storage, an accelerometer on the front fork and some method of recording wheel speed, it’s possible to collect data about your bike ride. Then, when at home, a Python script captures the data dump and graphs it.


Wdm006 also says:

I’m in the process of building an ABS and active suspension system for mountain bikes. The first task after initial modeling and design work was to gather a lot of data for more specific design.

Original post can be read here.

Via:[Hackaday]


Portable and cloud-based heart rate tracker

In his blog, Charalampos describes his experience with SeeedStudio’s Grove Ear-clip Heart Rate sensor and Cosm (former Pachube) cloud service. The employed sensor is quite cheap and can detect heart pulses from the ear lobe, by measuring the infra-red light reflected by the tissue and by checking for intensity variations.

By connecting this sensor with an ADK board and, in turn, with an Android smartphone, Charalampos implemented a portable heart-rate tracker, which is used to send the recorded data to Cosm cloud service.

For more information and sample code, see here.

[Via: Building Internet of Things]


Ben Heck's Android-controlled pot-stirrer does (most of) the cooking for you

Ben Heck is always thinking up gadgets that make life easier, from completely hands-free luggage to a sensor system for improved cycling safety. His latest mod is meant for those of us who have burnt Ramen a few too many times. His so-called Ben-Stur Remote Control Android app works with a pot-stirring device, freeing users to stray from the kitchen while their meal is cooking. The app works via Bluetooth, and the pot-stirrer consists of an actuator arm, a chip clip, a timing belt and, of course, a wooden spoon. Heck used a Google ADK and an Arduino Uno for the control mechanism that communicates between the app and the stirrer. In the tablet app, users can check their food's temperature and control the speed of the the spoon's stirring. If that whets your appetite, click the source link for more info -- and check out our Maker Faire interview with Mr. Heckendorn himself.

Ben Heck's Android-controlled pot-stirrer does (most of) the cooking for you originally appeared on Engadget on Tue, 22 May 2012 05:54:00 EST. Please see our terms for use of feeds.

Permalink | Email this | Comments

[Save The Date] Arduino Camp 2012 a Torino

Il 16-17 Giugno prossimi si tiene a Torino, presso le Officine Arduino, l’ArduinoCamp 2012 (leggi post di Massimo sul Forum di Arduino)

La partecipazione è gratuita ma i posti saranno limitati dalla capienza del luogo dell’incontro.

  • Vuoi partecipare all’ArduinoCamp e/o HackDay? Inserisci i tuoi dati qui   http://bit.ly/JFqWxP
  • Hai  fatto un progetto con Arduino o stai usando Arduino nella tua azienda, faccelo sapere inserendolo qui:  http://bit.ly/Lwm6BW
    Saremmo contenti di vedervi raccontarlo nel nostro tradizionale pecha-kucha
  • Vuoi essere volontario? ne stiamo cercando 6  http://bit.ly/K82OkU

Due giorni di Arduino, il primo dedicato a presentazioni sui vari utilizzi di Arduino (con il tradizionale pecha-kucha), il secondo con l’HackDay a premi. Per trovare indirizzo e programma consulta la pagina creata sul playground di Arduino.


Arduino Blog 18 May 16:18

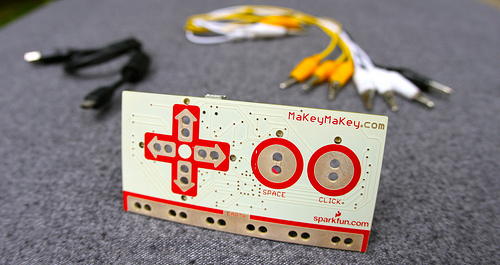
MaKey MaKey: how to turn anything into an input-device controller

Jay Silver from SparkFun and Eric Rosenbaum from MIT kickstarted a very nice project, which lets you to convert almost everything into an input-device for your computer.

According to SparkFun:

MaKey MaKey allows you to turn almost any common object into an input-device for your computer. The front side of the MaKey MaKey board has six inputs: up/down/left/right arrow keys, spacebar and a mouse left-click. Using alligator clips you can hook those inputs up to anything that’s even slightly conductive – fruit, play-dough, water, pencil drawings, whatever you can dream up – which becomes a keyboard or mouse input to your computer. So you can play a banana piano, play-dough Mario, or even create custom webcam triggers.

As for the technical side, MaKey MaKey is based on Arduino Leonardo’s bootloader and on ATMega 32u4. From its kickstarter page:

It uses the Human Interface Device (HID) protocol to communicate with your computer, and it can send keypresses, mouse clicks, and mouse movements. For sensing closed switches on the digital input pins, we use high resistance switching to make it so you can close a switch even through materials like your skin, leaves, and play-doh.

A longer introduction to MaKey MaKey can be found on SparkFun, while a more comprehensive description can be found here, together with some funny videos about its use.

[Via: Sparkfun and Kickstarter]

DIY safety-goggles for every maker

Not using an Arduino, yet a very useful must-have on every maker’s table. Of course not as awesome as a real safety glass, but then, it is a nice start.

Materials required: An empty, washed 2 liter soda bottle, an elastic band, a pair of scissors, a permanent marker.

All you have to do is cut off the top and bottom of the soda bottle, then cut through the remaining plastic to turn it into a single plastic sheet. Then hold the plastic sheet around your face and draw the goggles with a plastic marker. Cut them out, attach the elastic band to both sides, and you’re done!

For detailed instructions, please proceed to the original post at Make.

Via:[Make, Lifehacker]

Arduino Blog 15 May 22:18

Alarma DIY con Módulo 3G, Cámara, Ultrasonidos, Teclado Matricial & Led RGB


Arduteka lanza su último tutorial!

En él nos descubre el nuevo módulo 3G para Arduino de Cooking Hacks con el que podremos construir una divertida alarma que nos enviará la foto de nuestro intruso directamente a nuestro correo, además de avisarnos por un mensaje sms a nuestro teléfono móvil sin necesidad de tener conectado nuestro Arduino a internet constantemente, pues lo hace todo a través de la red móvil.

Vamos a construirnos una alarma totalmente casera, a través del sensor de ultrasonidos, escanearemos continuamente el espacio situado enfrente suyo con un radio aproximado de 30º, cuando algún objeto o persona se sitúe en su campo de actuación a una distancia inferior a la que establezcamos, haremos sonar una alarma, tomaremos una fotografía, el Led RGB que antes estaba verde, pasará a color azul y daremos 10 segundos para poder desactivar la alarma a través de nuestro teclado matricial, si la desactivamos, volverá de nuevo a escanear el campo, pero si no!! Reproducirá un sonido contundente y se dispondrá a mandarnos un sms a nuestro teléfono móvil y la fotografía a nuestro correo electrónico.

Via:[Arduteka]


Arduino Blog 15 May 13:16
3g  audio  cooking hacks  education  gps  gsm  hacks  hardware  home hacks  iphone  keyboard  keypad  led(s)  mms  mp3  ping  rgb  sms  urban hacks