Posts with «google» label

Modern Wizard Summons Familiar Spirit

In European medieval folklore, a practitioner of magic may call for assistance from a familiar spirit who takes an animal form disguise. [Alex Glow] is our modern-day Merlin who invoked the magical incantations of 3D printing, Arduino, and Raspberry Pi to summon her familiar Archimedes: The AI Robot Owl.

The key attraction in this build is Google’s AIY Vision kit. Specifically the vision processing unit that tremendously accelerates image classification tasks running on an attached Raspberry Pi Zero W. It no longer consumes several seconds to analyze each image, classification can now run several times per second, all performed locally. No connection to Google cloud required. (See our earlier coverage for more technical details.) The default demo application of a Google AIY Vision kit is a “joy detector” that looks for faces and attempts to determine if a face is happy or sad. We’ve previously seen this functionality mounted on a robot dog.

[Alex] aimed to go beyond the default app (and default box) to create Archimedes, who was to reward happy people with a sticker. As a moving robotic owl, Archimedes had far more crowd appeal than the vision kit’s default cardboard box. All the kit components have been integrated into Archimedes’ head. One eye is the expected Pi camera, the other eye is actually the kit’s piezo buzzer. The vision kit’s LED-illuminated button now tops the dapper owl’s hat.

Archimedes was created to join in Google’s promotion efforts. Their presence at this Maker Faire consisted of two tents: one introductory “Learn to Solder” tent where people can create a blinky LED badge, and the other tent is focused on their line of AIY kits like this vision kit. Filled with demos of what the kits can do aside from really cool robot owls.

Hopefully these promotional efforts helped many AIY kits find new homes in the hands of creative makers. It’s pretty exciting that such a powerful and inexpensive neural net processor is now widely available, and we look forward to many more AI-powered hacks to come.

ICYMI: CERNs robotic inspectors ride a monorail

Today on In Case You Missed It: Pairing an Arduino with a skateboard produces the Sick Ollie Machine, capable of measuring angular and X-,Y- or Z-axis accelerations to measure who is hitting their tricks the hardest. Courtesy of Josh Sheldon, the ollie machine uses an Arduino beneath the trucks of the board paired with a relay to measure the stats of each trick. Those who are producing truly sick ollies are rewarded with a chime from the attached cowbell.

Meanwhile, over at CERN a set of robot twins have been enlisted to provide live video feeds and environmental measurements for the massive underground complex. The robots, called TIM twins for Train Inspection Monorail, move along a -- you guessed it -- overhead rail that runs throughout the facility in order to monitor stats like oxygen concentration and radiation emissions.

Also, don't forget to check out what happens when a frog is run through Google's Deep Dream project (which is easily the weirdest sentence I've written yet today). As always, please share any interesting tech or science videos you find by using the #ICYMI hashtag on Twitter for @mskerryd.

Sorting cucumbers using AI, Raspberry Pi + Arduino

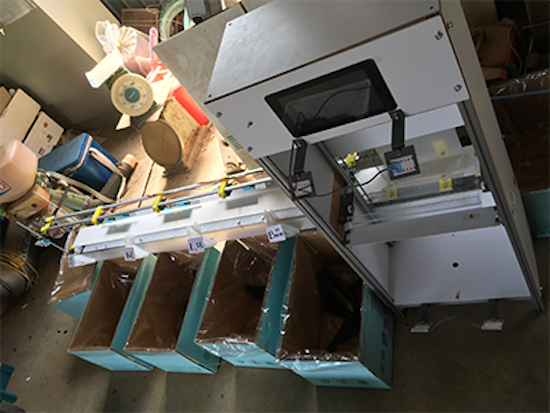
When it comes to farming veggies like cucumbers, the sorting process can often be just as hard and tricky as actually growing them. That’s why Makoto Koike is using Google’s TensorFlow machine learning technology to categorize the cucumbers on his family’s farm by size, shape and color, enabling them to focus on more important and less tedious work.

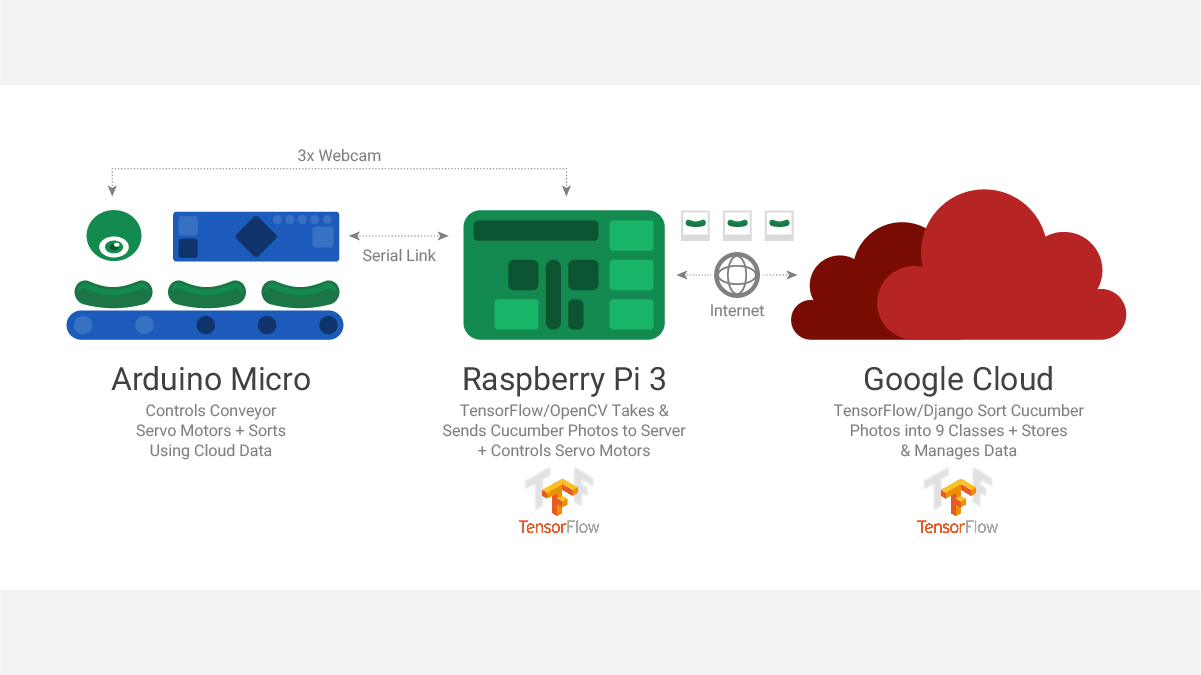
A camera-equipped Raspberry Pi 3 is used to take images of the cucumbers and send them to a small-scale TensorFlow neural network. The pictures are then forwarded to a larger network running on a Linux server to perform a more detailed classification. From there, the commands are fed to an Arduino Micro that controls a conveyor belt system that handles the actual sorting, dropping them into their respective container.

You can read all about the Google AI project here, as well as see it in action below!

Google Science Journal studies the world through your phone

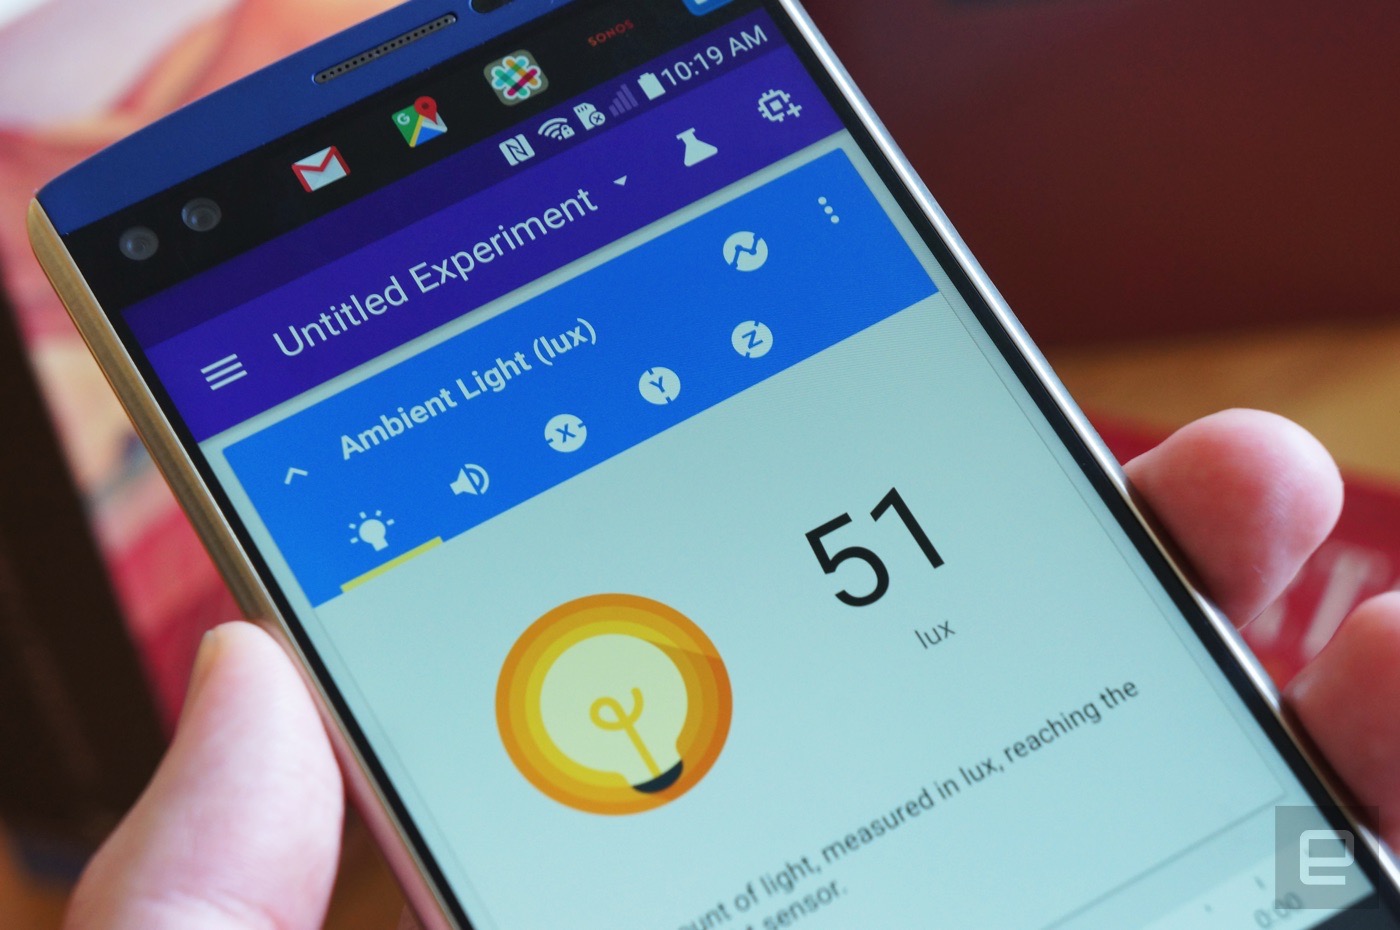
Are you (or your kid) curious about the world around you? Google wants to help. It just launched Science Journal, an Android app that helps you perform (and comment on) simple science experiments. The app can record light, motion and sound levels using only your phone's sensors, letting you study everything from a light bulb's brightness to the acceleration in a jump. It's easy to kick things up a notch, though. You can connect Arduino-powered sensors, and Google is partnering with Exploratorium to offer starter kits to help budding scientists. Science Journal is free, so there's no harm in giving it a try -- even if you're a full-fledged adult, you might learn something.

Via: Android Police

Source: Google Play, Google for Education

Google Science Journal studies the world through your phone

Are you (or your kid) curious about the world around you? Google wants to help. It just launched Science Journal, an Android app that helps you perform (and comment on) simple science experiments. The app can record light, motion and sound levels using only your phone's sensors, letting you study everything from a light bulb's brightness to the acceleration in a jump. It's easy to kick things up a notch, though. You can connect Arduino-powered sensors, and Google is partnering with Exploratorium to offer starter kits to help budding scientists. Science Journal is free, so there's no harm in giving it a try -- even if you're a full-fledged adult, you might learn something.

Via: Android Police

Source: Google Play, Google for Education

NES Reborn as Nexus Player and NES

Anyone who has a Raspberry Pi and an old Nintendo has had the same thought. “Maybe I could shove the Pi in here?” This ran through [Adam’s] head, but instead of doing the same old Raspberry Pi build he decided to put a Nexus Player inside of this old video game console, with great success. Not only does it bring the power of a modern media player, it still works as an NES.

If you haven’t seen the Nexus Player yet, it’s Google’s venture into the low-cost home media center craze. It has some of the same features of the original Chromecast, but runs Android and is generally much more powerful. Knowing this, [Adam] realized it would surpass the capabilities of the Pi and would even be able to run NES emulators.

[Adam] went a little beyond a simple case mod. He used a custom PCB and an Arduino Pro Micro to interface the original controllers to the Nexus Player. 3D printed brackets make sure everything fits inside the NES case perfectly, rather than using zip ties and hot glue. He then details how to install all of the peripherals and how to set up the Player to run your favorite game ROMs. The end result is exceptionally professional, and brings to mind some other classic case mods we’ve seen before.


Filed under: Android Hacks

Tutorial – Send email with the Arduino Yún

Introduction

This is the third in a series of tutorials examining various uses of the Arduino Yún. In this article we’ll examine how your Arduino Yún can send email from a Google email account. Doing so gives you a neat and simple method of sending data captured by the Arduino Yún or other notifications.

Getting Started

If you haven’t already done so, ensure your Arduino Yún can connect to your network via WiFi or cable – and get a Temboo account (we run through this here). And you need (at the time of writing) IDE version 1.5.4 which can be downloaded from the Arduino website.

Finally, you will need a Google account to send email from, so if you don’t have one – sign up here. You might want to give your Arduino Yún an email address of its very own.

Testing the Arduino Yún-Gmail connection

In this first example we’ll run through the sketch provided by Temboo so you can confirm everything works as it should. This will send a simple email from your Arduino Yún to another email address. First, copy the following sketch into the IDE but don’t upload it yet:

/*
  SendAnEmail

  Demonstrates sending an email via a Google Gmail account using the Temboo Arduino Yun SDK.

  This example code is in the public domain.
*/

#include <Bridge.h>
#include <Temboo.h>
#include "TembooAccount.h" // contains Temboo account information

/*** SUBSTITUTE YOUR VALUES BELOW: ***/

// Note that for additional security and reusability, you could
// use #define statements to specify these values in a .h file.

// your Gmail username, formatted as a complete email address, eg "bob.smith@gmail.com"
const String GMAIL_USER_NAME = "sender@gmail.com";

// your Gmail password
const String GMAIL_PASSWORD = "gmailpassword";

// the email address you want to send the email to, eg "jane.doe@temboo.com"
const String TO_EMAIL_ADDRESS = "recipient@email.com";

boolean success = false; // a flag to indicate whether we've sent the email yet or not

void setup() {
  Serial.begin(9600);

  // for debugging, wait until a serial console is connected
  delay(4000);
  while(!Serial);

  Bridge.begin();
}

void loop()
{
  // only try to send the email if we haven't already sent it successfully
  if (!success) {

    Serial.println("Running SendAnEmail...");

    TembooChoreo SendEmailChoreo;

    // invoke the Temboo client
    // NOTE that the client must be reinvoked, and repopulated with
    // appropriate arguments, each time its run() method is called.
    SendEmailChoreo.begin();

    // set Temboo account credentials
    SendEmailChoreo.setAccountName(TEMBOO_ACCOUNT);
    SendEmailChoreo.setAppKeyName(TEMBOO_APP_KEY_NAME);
    SendEmailChoreo.setAppKey(TEMBOO_APP_KEY);

    // identify the Temboo Library choreo to run (Google > Gmail > SendEmail)
    SendEmailChoreo.setChoreo("/Library/Google/Gmail/SendEmail");

    // set the required choreo inputs
    // see https://www.temboo.com/library/Library/Google/Gmail/SendEmail/ 
    // for complete details about the inputs for this Choreo

    // the first input is your Gmail email address
    SendEmailChoreo.addInput("Username", GMAIL_USER_NAME);
    // next is your Gmail password.
    SendEmailChoreo.addInput("Password", GMAIL_PASSWORD);
    // who to send the email to
    SendEmailChoreo.addInput("ToAddress", TO_EMAIL_ADDRESS);
    // then a subject line
    SendEmailChoreo.addInput("Subject", "Email subject line here");

     // next comes the message body, the main content of the email   
    SendEmailChoreo.addInput("MessageBody", "Email content");

    // tell the Choreo to run and wait for the results. The 
    // return code (returnCode) will tell us whether the Temboo client 
    // was able to send our request to the Temboo servers
    unsigned int returnCode = SendEmailChoreo.run();

    // a return code of zero (0) means everything worked
    if (returnCode == 0) {
        Serial.println("Success! Email sent!");
        success = true;
    } else {
      // a non-zero return code means there was an error
      // read and print the error message
      while (SendEmailChoreo.available()) {
        char c = SendEmailChoreo.read();
        Serial.print(c);
      }
    } 
    SendEmailChoreo.close();

    // do nothing for the next 60 seconds
    delay(60000);
  }
}

Before uploading you need to enter five parameters – the email address to send the email with, the password for that account, the recipient’s email address, and the email’s subject line and content. These can be found in the following lines in the sketch – for example:

const String GMAIL_USER_NAME = "sender@gmail.com";
const String GMAIL_PASSWORD = "emailpassword";
const String TO_EMAIL_ADDRESS = "recipient@email.com";
SendEmailChoreo.addInput("Subject", "This is the subject line of the email");
SendEmailChoreo.addInput("MessageBody", "And this is the content of the email");

So enter the required data in the fields above. If you’re sending from a Google Apps account instead of a Gmail account – that’s ok, just enter in the sending email address as normal. Temboo and Google will take care of the rest.

Finally, create your header file by copying the the header file data from here (after logging to Temboo) into a text file and saving it with the name TembooAccount.h in the same folder as your sketch from above. You know this has been successful when opening the sketch, as you will see the header file in a second tab, for example:

Now you can upload the sketch, and after a few moments check the recipient’s email account. If all goes well you will be informed by the IDE serial monitor as well (if your Yún is connected via USB). It’s satisfying to see an email come from your Arduino Yún, for example in this short video.

If your email is not coming through, connect your Arduino Yún via USB (if not already done so) and open the serial monitor. It will let you know if there’s a problem in relatively plain English – for example:

Error
A Step Error has occurred: “An SMTP error has occurred. Make sure that your credentials are correct and that you’ve provided a fully qualified Gmail
username (e.g., john.smith@gmail.com) for the Username input. When using Google 2-Step Verification, make sure to
provide an application-specific password. If this problem persists, Google may be restricting access to your account, and you’ll need to
explicitly allow access via gmail.com.”. The error occurred in the Stop (Authentication error) step.
HTTP_CODE
500


So if this happens, check your email account details in the sketch, and try again.

Sending email with customisable subject and content data

The example sketch above is fine if you want to send a fixed message. However what if you need to send some data? That can be easily done. For our example we’ll generate some random numbers, and integrate them into the email subject line and content. This will give you the framework to add your own sensor data to emails from your Arduino Yún. Consider the following sketch:

/*
  SendAnEmail

  Demonstrates sending an email via a Google Gmail account using the Temboo Arduino Yun SDK.

  This example code is in the public domain.
*/

#include <Bridge.h>
#include <Temboo.h>
#include "TembooAccount.h" // contains Temboo account information

/*** SUBSTITUTE YOUR VALUES BELOW: ***/

// Note that for additional security and reusability, you could
// use #define statements to specify these values in a .h file.

// your Gmail username, formatted as a complete email address, eg "bob.smith@gmail.com"
const String GMAIL_USER_NAME = "sender@gmail.com";

// your Gmail password
const String GMAIL_PASSWORD = "gmailpassword";

// the email address you want to send the email to, eg "jane.doe@temboo.com"
const String TO_EMAIL_ADDRESS = "recipient@email.com";

int a,b; // used to store our random numbers
boolean success = false; // a flag to indicate whether we've sent the email yet or not

void setup() 
{
  Serial.begin(9600);
  // for debugging, wait until a serial console is connected
  delay(4000);
  while(!Serial);
  Bridge.begin();
  randomSeed(analogRead(0)); // fire up random number generation
}

void loop()
{
  // generate some random numbers to send in the email
  a = random(1000);
  b = random(1000);
  // compose email subject line into a String called "emailSubject"
  String emailSubject("The random value of a is: ");
  emailSubject += a;
  emailSubject += " and b is: ";
  emailSubject += b;  
  // compose email content into a String called "emailContent"
  String emailContent("This is an automated email from your Arduino Yun. The random value of a is: ");
  emailContent += a;
  emailContent += " and b is: ";
  emailContent += b;  
  emailContent += ". I hope that was of some use for you. Bye for now.";  

  // only try to send the email if we haven't already sent it successfully
  if (!success) {

    Serial.println("Running SendAnEmail...");

    TembooChoreo SendEmailChoreo;

    // invoke the Temboo client
    // NOTE that the client must be reinvoked, and repopulated with
    // appropriate arguments, each time its run() method is called.
    SendEmailChoreo.begin();

    // set Temboo account credentials
    SendEmailChoreo.setAccountName(TEMBOO_ACCOUNT);
    SendEmailChoreo.setAppKeyName(TEMBOO_APP_KEY_NAME);
    SendEmailChoreo.setAppKey(TEMBOO_APP_KEY);

    // identify the Temboo Library choreo to run (Google > Gmail > SendEmail)
    SendEmailChoreo.setChoreo("/Library/Google/Gmail/SendEmail");

    // set the required choreo inputs
    // see https://www.temboo.com/library/Library/Google/Gmail/SendEmail/ 
    // for complete details about the inputs for this Choreo

    // the first input is your Gmail email address
    SendEmailChoreo.addInput("Username", GMAIL_USER_NAME);
    // next is your Gmail password.
    SendEmailChoreo.addInput("Password", GMAIL_PASSWORD);
    // who to send the email to
    SendEmailChoreo.addInput("ToAddress", TO_EMAIL_ADDRESS);
    // then a subject line
    SendEmailChoreo.addInput("Subject", emailSubject); // here we send the emailSubject string as the email subject

     // next comes the message body, the main content of the email   
    SendEmailChoreo.addInput("MessageBody", emailContent); // and here we send the emailContent string

    // tell the Choreo to run and wait for the results. The 
    // return code (returnCode) will tell us whether the Temboo client 
    // was able to send our request to the Temboo servers
    unsigned int returnCode = SendEmailChoreo.run();

    // a return code of zero (0) means everything worked
    if (returnCode == 0) {
        Serial.println("Success! Email sent!");
        success = true;
    } else {
      // a non-zero return code means there was an error
      // read and print the error message
      while (SendEmailChoreo.available()) {
        char c = SendEmailChoreo.read();
        Serial.print(c);
      }
    } 
    SendEmailChoreo.close();

    // do nothing for the next 60 seconds
    delay(60000);
  }
}

Review the first section at the start of void loop(). We have generated two random numbers, and then appended some text and the numbers into two Strings – emailContent and emailSubject.

These are then inserted into the SendEmailChoreo.addInput lines to be the email subject and content. With a little effort you can make a neat email notification, such as shown in this video and the following image from a mobile phone:

Conclusion

It’s no secret that the Yún isn’t the cheapest development board around, however the ease of use as demonstrated in this tutorial shows that the time saved in setup and application is more than worth the purchase price of the board and extra Temboo credits if required.

And if you’re interested in learning more about Arduino, or want to introduce someone else to the interesting world of Arduino – check out my book (now in a third printing!) “Arduino Workshop” from No Starch Press.

In the meanwhile have fun and keep checking into tronixstuff.com. Why not follow things on twitterGoogle+, subscribe  for email updates or RSS using the links on the right-hand column? And join our friendly Google Group – dedicated to the projects and related items on this website. Sign up – it’s free, helpful to each other –  and we can all learn something.

The post Tutorial – Send email with the Arduino Yún appeared first on tronixstuff.

Tronixstuff 23 Nov 01:40
arduino  email  gmail  google  iot  lesson  mail  review  send  temboo  tronixstuff  tutorial  wifi  yún  

Tutorial – Google Docs and the Arduino Yún

Introduction

This is the second in a series of tutorials examining various uses of the Arduino Yún. In this article we’ll examine how your Arduino Yún can send data that it captures from the analogue and digital inputs and a real-time clock IC to an online Google Docs spreadsheet. Doing so gives you a neat and inexpensive method of capturing data in real-time and having the ability to analyse the data from almost anywhere, and export it with very little effort.

Getting Started

If you haven’t already done so, ensure your Arduino Yún can connect to your network via WiFi or cable – and get a Temboo account (we run through this here). And you need (at the time of writing) IDE version 1.5.4 which can be downloaded from the Arduino website. Finally, you will need a Google account, so if you don’t have one – sign up here.

Testing the Arduino Yún-Google Docs connection

In this first example we’ll run through the sketch provided by Temboo so you can confirm everything works as it should. First of all, create a spreadsheet in Google Docs. Call it “ArduinoData” and label the first two columns as “time” and “sensor”, as shown in the screen shot below:

Always label the required columns. You can call them whatever you need. For new Google users, the URL shown in my example will be different to yours. Next, copy the following sketch to the IDE:

/*
  SendDataToGoogleSpreadsheet

  Demonstrates appending a row of data to a Google spreadsheet from the Arduino Yun 
  using the Temboo Arduino Yun SDK.  

  This example code is in the public domain.

*/

#include <Bridge.h>
#include <Temboo.h>
#include "TembooAccount.h" // contains Temboo account information

/*** SUBSTITUTE YOUR VALUES BELOW: ***/

// Note that for additional security and reusability, you could
// use #define statements to specify these values in a .h file.

const String GOOGLE_USERNAME = "your-google-username";
const String GOOGLE_PASSWORD = "your-google-password";

// the title of the spreadsheet you want to send data to
// (Note that this must actually be the title of a Google spreadsheet
// that exists in your Google Drive/Docs account, and is configured
// as described above.)
const String SPREADSHEET_TITLE = "your-spreadsheet-title";

const unsigned long RUN_INTERVAL_MILLIS = 60000; // how often to run the Choreo (in milliseconds)

// the last time we ran the Choreo 
// (initialized to 60 seconds ago so the
// Choreo is run immediately when we start up)
unsigned long lastRun = (unsigned long)-60000;

void setup() {

  // for debugging, wait until a serial console is connected
  Serial.begin(9600);
  delay(4000);
  while(!Serial);

  Serial.print("Initializing the bridge...");
  Bridge.begin();
  Serial.println("Done");
}

void loop()
{
  // get the number of milliseconds this sketch has been running
  unsigned long now = millis();

  // run again if it's been 60 seconds since we last ran
  if (now - lastRun >= RUN_INTERVAL_MILLIS) {

    // remember 'now' as the last time we ran the choreo
    lastRun = now;

    Serial.println("Getting sensor value...");

    // get the value we want to append to our spreadsheet
    unsigned long sensorValue = getSensorValue();

    Serial.println("Appending value to spreadsheet...");

    // we need a Process object to send a Choreo request to Temboo
    TembooChoreo AppendRowChoreo;

    // invoke the Temboo client
    // NOTE that the client must be reinvoked and repopulated with
    // appropriate arguments each time its run() method is called.
    AppendRowChoreo.begin();

    // set Temboo account credentials
    AppendRowChoreo.setAccountName(TEMBOO_ACCOUNT);
    AppendRowChoreo.setAppKeyName(TEMBOO_APP_KEY_NAME);
    AppendRowChoreo.setAppKey(TEMBOO_APP_KEY);

    // identify the Temboo Library choreo to run (Google > Spreadsheets > AppendRow)
    AppendRowChoreo.setChoreo("/Library/Google/Spreadsheets/AppendRow");

    // set the required Choreo inputs
    // see https://www.temboo.com/library/Library/Google/Spreadsheets/AppendRow/ 
    // for complete details about the inputs for this Choreo

    // your Google username (usually your email address)
    AppendRowChoreo.addInput("Username", GOOGLE_USERNAME);

    // your Google account password
    AppendRowChoreo.addInput("Password", GOOGLE_PASSWORD);

    // the title of the spreadsheet you want to append to
    AppendRowChoreo.addInput("SpreadsheetTitle", SPREADSHEET_TITLE);

    // convert the time and sensor values to a comma separated string
    String rowData(now);
    rowData += ",";
    rowData += sensorValue;

    // add the RowData input item
    AppendRowChoreo.addInput("RowData", rowData);

    // run the Choreo and wait for the results
    // The return code (returnCode) will indicate success or failure 
    unsigned int returnCode = AppendRowChoreo.run();

    // return code of zero (0) means success
    if (returnCode == 0) {
      Serial.println("Success! Appended " + rowData);
      Serial.println("");
    } else {
      // return code of anything other than zero means failure  
      // read and display any error messages
      while (AppendRowChoreo.available()) {
        char c = AppendRowChoreo.read();
        Serial.print(c);
      }
    }

    AppendRowChoreo.close();
  }
}

// this function simulates reading the value of a sensor 
unsigned long getSensorValue() {
  return analogRead(A0);
}

Now look for the following two lines in the sketch:

const String GOOGLE_USERNAME = "your-google-username";
const String GOOGLE_PASSWORD = "your-google-password";

This is where you put your Google account username and password. For example, if your Google account is “CI5@gmail.com” and password “RS2000Escort” the two lines will be:

const String GOOGLE_USERNAME = "CI5@gmail.com";
const String GOOGLE_PASSWORD = "RS2000Escort";

Next, you need to insert the spreadsheet name in the sketch. Look for the following line:

const String SPREADSHEET_TITLE = "your-spreadsheet-title";

and change your-spreadsheet-title to ArduinoData. 

Finally, create your header file by copying the the header file data from here (after logging to Temboo) into a text file and saving it with the name TembooAccount.h in the same folder as your sketch from above. You know this has been successful when opening the sketch, as you will see the header file in a second tab, for example:

Finally, save and upload your sketch to the Arduino Yún. After a moment or two it will send values to the spreadsheet, and repeat this every sixty seconds – for example:

If your Yún is connected via USB you can also watch the status via the serial monitor.

 One really super-cool and convenient feature of using Google Docs is that you can access it from almost anywhere. Desktop, tablet, mobile… and it updates in real-time:

So with your Yún you can capture data and view it from anywhere you can access the Internet. Now let’s do just that.

Sending your own data from the Arduino Yún to a Google Docs Spreadsheet

In this example we’ll demonstrate sending three types of data:

With these types of data you should be able to represent all manner of things. We use the RTC as the time and date from it will match when the data was captured, not when the data was written to the spreadsheet. If you don’t have a DS3232 you can also use a DS1307.

If you’re not familiar with these parts and the required code please review this tutorial. When connecting your RTC – please note that SDA (data) is D2 and SCL (clock) is D3 on the Yún.

The sketch for this example is a modified version of the previous sketch, except we have more data to send. The data is captured into variables from the line:

// get the values from A0 to A3 and D7, D8

You can send whatever data you like, as long as it is all appended to a String by the name of rowdata. When you want to use a new column in the spreadsheet, simply append a comma “,” between the data in the string. In other words, you’re creating a string of CSV (comma-separated values) data. You can see this process happen from the line that has the comment:

// CSV creation starts here!

in the example sketch that follows shortly. Finally, you can alter the update rate of the sketch – it’s set to every 60 seconds, however you can change this by altering the 60000 (milliseconds) in the following line:

const unsigned long RUN_INTERVAL_MILLIS = 60000;

Don’t forget that each update costs you a call and some data from your Temboo account – you only get so many for free then you have to pay for more. Check your Temboo account for more details.

So without further ado, the following sketch will write the values read from A0~A3, the status of D7 and D8 (1 for HIGH, 0 for LOW) along with the current date and time to the spreadsheet. Don’t forget to update the password, username and so on as you did for the first example sketch:

#include <Bridge.h>
#include <Temboo.h>
#include "TembooAccount.h" // contains Temboo account information
#include "Wire.h"
#define DS3232_I2C_ADDRESS 0x68

unsigned long analog0, analog1, analog2, analog3;
int digital7 = 7;
int digital8 = 8;
boolean d7, d8;
byte second, minute, hour, dayOfWeek, dayOfMonth, month, year; // for RTC

const String GOOGLE_USERNAME = "your-google-username";
const String GOOGLE_PASSWORD = "your-google-password";
const String SPREADSHEET_TITLE = "your-spreadsheet-title";

// update interval in milliseconds (every minute would be 60000)
const unsigned long RUN_INTERVAL_MILLIS = 60000; 
unsigned long lastRun = (unsigned long)-60000;

void setup() 
{
  // activate I2C bus
  Wire.begin();  
  // for debugging, wait until a serial console is connected
  Serial.begin(9600);
  delay(4000);
  while(!Serial);
  Serial.print("Initializing the bridge...");
  Bridge.begin();
  Serial.println("Done");
  // Set up digital inputs to monitor
  pinMode(digital7, INPUT);
  pinMode(digital8, INPUT);
}

// for RTC
// Convert normal decimal numbers to binary coded decimal
byte decToBcd(byte val)
{
  return ( (val/10*16) + (val%10) );
}

// Convert binary coded decimal to normal decimal numbers
byte bcdToDec(byte val)
{
  return ( (val/16*10) + (val%16) );
}

void readDS3232time(byte *second, 
byte *minute, 
byte *hour, 
byte *dayOfWeek, 
byte *dayOfMonth, 
byte *month, 
byte *year)
{
  Wire.beginTransmission(DS3232_I2C_ADDRESS);
  Wire.write(0); // set DS3232 register pointer to 00h
  Wire.endTransmission();  
  Wire.requestFrom(DS3232_I2C_ADDRESS, 7); // request 7 bytes of data from DS3232 starting from register 00h
  // A few of these need masks because certain bits are control bits
  *second     = bcdToDec(Wire.read() & 0x7f);
  *minute     = bcdToDec(Wire.read());
  *hour       = bcdToDec(Wire.read() & 0x3f);  // Need to change this if 12 hour am/pm
  *dayOfWeek  = bcdToDec(Wire.read());
  *dayOfMonth = bcdToDec(Wire.read());
  *month      = bcdToDec(Wire.read());
  *year       = bcdToDec(Wire.read());
}

void setDS3232time(byte second, byte minute, byte hour, byte dayOfWeek, byte dayOfMonth, byte month, byte year)
// sets time and date data to DS3232
{
  Wire.beginTransmission(DS3232_I2C_ADDRESS);  
  Wire.write(0); // sends 00h - seconds register
  Wire.write(decToBcd(second));     // set seconds
  Wire.write(decToBcd(minute));     // set minutes
  Wire.write(decToBcd(hour));       // set hours
  Wire.write(decToBcd(dayOfWeek));  // set day of week (1=Sunday, 7=Saturday)
  Wire.write(decToBcd(dayOfMonth)); // set date (1~31)
  Wire.write(decToBcd(month));      // set month
  Wire.write(decToBcd(year));       // set year (0~99)
  Wire.endTransmission();
}

void loop()
{
  // get the number of milliseconds this sketch has been running
  unsigned long now = millis();

  // run again if it's been 60 seconds since we last ran
  if (now - lastRun >= RUN_INTERVAL_MILLIS) {

    // remember 'now' as the last time we ran the choreo
    lastRun = now;
    Serial.println("Getting sensor values...");
    // get the values from A0 to A3 and D7, D8
    analog0 = analogRead(0);
    analog1 = analogRead(1);
    analog2 = analogRead(2);
    analog3 = analogRead(3);
    d7 = digitalRead(digital7);
    d8 = digitalRead(digital8);

    Serial.println("Appending value to spreadsheet...");
    // we need a Process object to send a Choreo request to Temboo
    TembooChoreo AppendRowChoreo;

    // invoke the Temboo client
    // NOTE that the client must be reinvoked and repopulated with
    // appropriate arguments each time its run() method is called.
    AppendRowChoreo.begin();

    // set Temboo account credentials
    AppendRowChoreo.setAccountName(TEMBOO_ACCOUNT);
    AppendRowChoreo.setAppKeyName(TEMBOO_APP_KEY_NAME);
    AppendRowChoreo.setAppKey(TEMBOO_APP_KEY);

    // identify the Temboo Library choreo to run (Google > Spreadsheets > AppendRow)
    AppendRowChoreo.setChoreo("/Library/Google/Spreadsheets/AppendRow");
    // your Google username (usually your email address)
    AppendRowChoreo.addInput("Username", GOOGLE_USERNAME);
    // your Google account password
    AppendRowChoreo.addInput("Password", GOOGLE_PASSWORD);
    // the title of the spreadsheet you want to append to
    AppendRowChoreo.addInput("SpreadsheetTitle", SPREADSHEET_TITLE);

    // get time and date from RTC
    readDS3232time(&second, &minute, &hour, &dayOfWeek, &dayOfMonth, &month, &year);

    // smoosh all the sensor, date and time data into a String
    // CSV creation starts here!
    String rowData(analog0);
    rowData += ",";
    rowData += analog1;
    rowData += ",";
    rowData += analog2;
    rowData += ",";
    rowData += analog3;
    rowData += ",";
    rowData += d7;
    rowData += ",";
    rowData += d8;    
    rowData += ",";
    // insert date
    rowData += dayOfMonth; 
    rowData += "/";
    rowData += month; 
    rowData += "/20";
    rowData += year; 
    rowData += ",";    
    // insert time    
    rowData += hour;  
    if (minute<10)
    {
        rowData += "0";  
    }    
    rowData += minute; 
    rowData += "."; 
    if (second<10)
    {
        rowData += "0";  
    }    
    rowData += second; 
    rowData += "h";     

    // add the RowData input item
    AppendRowChoreo.addInput("RowData", rowData);

    // run the Choreo and wait for the results
    // The return code (returnCode) will indicate success or failure 
    unsigned int returnCode = AppendRowChoreo.run();

    // return code of zero (0) means success
    if (returnCode == 0) {
      Serial.println("Success! Appended " + rowData);
      Serial.println("");
    } else {
      // return code of anything other than zero means failure  
      // read and display any error messages
      while (AppendRowChoreo.available()) {
        char c = AppendRowChoreo.read();
        Serial.print(c);
      }
    }
    AppendRowChoreo.close();
  }
}

… which in our example resulted with the following:

… and here is a video that shows how the spreadsheet updates in real time across multiple devices:

 Conclusion

It’s no secret that the Yún isn’t the cheapest devleopment board around, however the ease of use as demonstrated in this tutorial shows that the time saved in setup and application is more than worth the purchase price of the board and extra Temboo credits if required.

And if you’re interested in learning more about Arduino, or want to introduce someone else to the interesting world of Arduino – check out my book (now in a third printing!) “Arduino Workshop” from No Starch Press.

In the meanwhile have fun and keep checking into tronixstuff.com. Why not follow things on twitterGoogle+, subscribe  for email updates or RSS using the links on the right-hand column? And join our friendly Google Group – dedicated to the projects and related items on this website. Sign up – it’s free, helpful to each other –  and we can all learn something.

The post Tutorial – Google Docs and the Arduino Yún appeared first on tronixstuff.

Tronixstuff 11 Nov 06:35