Posts with «ethernet» label

Traffic lights tell you when your Xbox Live friends are gaming

It sounds like [Andrew] is trying to build a Pavlovian response into his behavior when it comes to online gaming. He wants to make sure he doesn’t miss out when all his friends are online, so he built this traffic signal to monitor Xbox Live activity. It will illuminate the lights, and drive the meters differently based on which of his friends are currently online. When the light’s green, he drops everything a grabs a controller.

The base of the light is a black project box. Inside you’ll find the Arduino compatible chip which drives the device mounted on a piece of protoboard. A WIZnet W5100 adds network connectivity at the low price of around $25. There is one problem with the setup. The API which [Andrew] found doesn’t use any authentication. This means that he can only see the public status of his friends; anyone who has set their online status set to private will always register as ‘online’. If you know of an existing Xbox Live API that would solve this issue we’d love to hear from you in the comments.


Filed under: xbox hacks

Cheap as chips Arduino Ethernet shield

It’s no secret that Ethernet shields for the Arduino are a little expensive. With the official Ethernet shield selling for about $50 and other options not much cheaper, there’s a lot of room for improvement for Arduinofied Ethernet. [Boris] over at Open Electronics has a solution to this problem: his Ethercard powered by a $3 Ethernet controller.

The Ethercard uses the Microchip ENC28J60, a through-hole Ethernet controller. There isn’t much else on the board apart from an RJ45 jack, caps, resistors, and a cheap buffer chip. This board was designed to be easily produced, and we’re thinking it might be possible to etch this board at home.

There are a few drawbacks to this ENC28J60 Ethernet shield – the official Arduino Ethernet shield has a 10/100 Mbps connection where the Microchip-powered shield is limited to 10 Mbps. Given the reduced cost, ease of assembly, and the fact that it’s pretty hard to saturate a 100Mbps connection with an Arduino this flaw can be easily ignored.

Pretty neat, especially considering how much you can do with an Ethernet connection on your Arduino. Files and code available in the git.


Filed under: arduino hacks, hardware
Hack a Day 10 Jul 23:02

Low cost Ethernet shield with ENC28J60

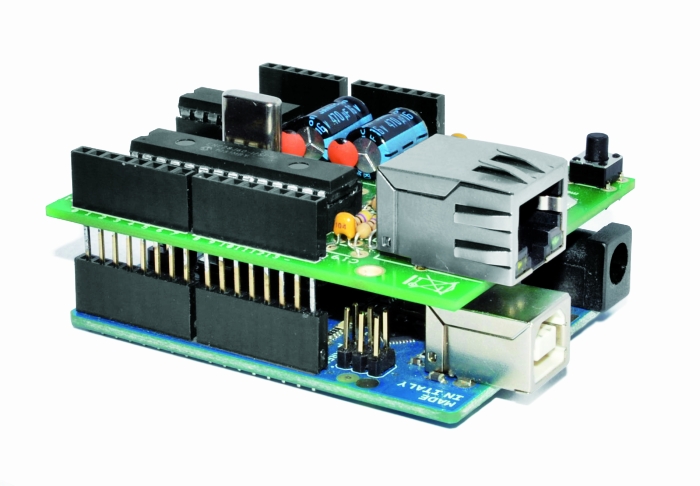
Economical alternative to original Arduino ethernet shields, allows data rates up to 10 Mbps and is achieved with a traditional assembly components.

One of the most interesting shield that you can mount on the Arduino platform is certainly the ethernet shield, because enable numerous networking applications such as remote control of systems and users, web access and publication of data, and more yet, the simplicity of finding and integrating open-source libraries on Arduino IDE does the rest. The usefulness of LAN connectivity has meant that the market would respond by offering different ethernet shield, first of all the original Arduino Ethernet Shield, which was accompanied by the good shield by Seeed Studio, both of these circuits are based on the chipset WIZnet W5100, allow multiple socket connections and can work at 100 Mbps

This ethernet shield is low-cost thanks to components used: all traditional mounting (THT). This feature makes the circuit accessible to those who haven’t the equipment to assemble SMD components. The data-rate is limited to 10 Mbps.
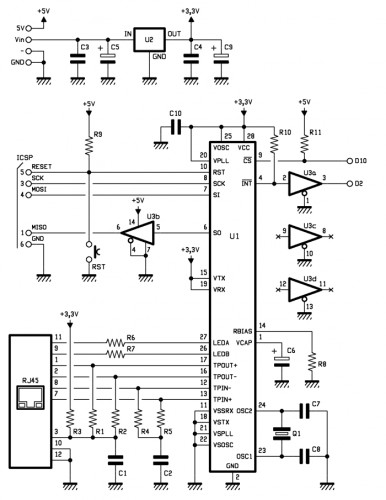
 

Wiring diagram

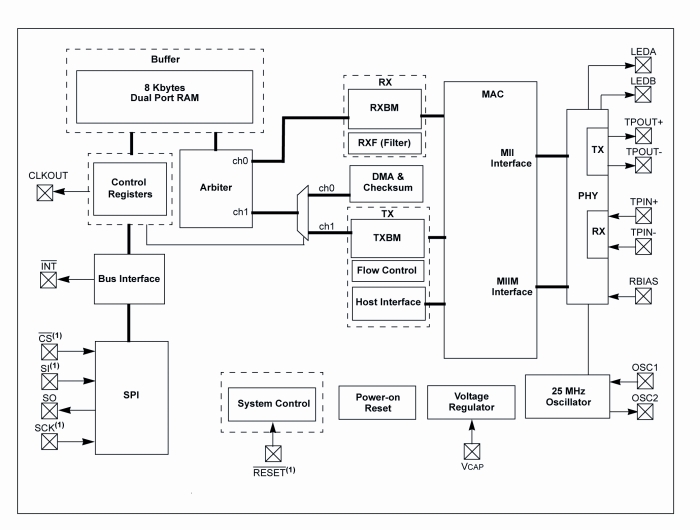
The shield is based on a Microchip ENC28J60 chip that interfaces with Arduino and data conversion according to the ethernet protocol. It integrates the MAC controller, an 8 KB Transmit / Receive Packet Dual Port Buffer and a circular FIFO managed at the hardware level, allows the programming of data retransmission in case of collision.
The MAC controller supports both Unicast, Multicast and Broadcast packets, has a programmable 64-byte pattern within a margin allowed to the user and programmable wake-up on multiple packet formats (Magic Packet, Unicast, Multicast, Broadcast, specific packet match or any packet).


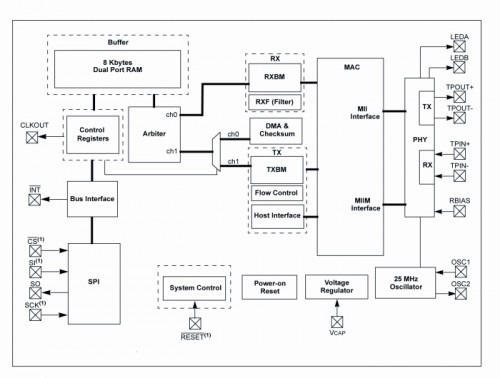
In the circuit we see that over all’ENC28J60 there are a standard RJ45 jack with integrated LEDs, filters and line transformers, and a voltage level shifter for the SPI interface to communicate with the Arduino.

MISO is the output data of the slave device and the input of Arduino, while MOSI is the opposite; SCK is the clock that marks the two-way communication on the SPI bus and RESET the reset line, which is also connected to a button that allows you to reset the Ethernet interface, if necessary, manually. The digital D10 and D2 lines of Arduino are used, respectively, for the control of CS (Chip Select, active logic zero) and the reading of INT. U3B is used to adapt the logic levels 0/3, 3 V to those of Arduino 0/5 V.

The ENC28J60 operates with a clock of 25 MHz, defined by the quartz Q1 connected between the pins 23 and 24; the capacitor connected to pin VCAP filters the output voltage (2.5 V) of the internal controller and should preferably be of the type low ESR (low series resistance parasite). The resistor connected to RBIAS is used to bias the LAN transceiver that is part of the pin TPIN + / – and TPOUT + / -.

We conclude the analysis of the circuit diagram of the shield with the power that is drawn by Arduino 5V and Vin through the strip: the first provides the 5 volts continuous stabilized points of the circuit that require them (basically the 74HC125 and the resistance of pull Line-up reset and Chip Select) and the second give power to the integrated regulator U2, which creates the 3.3 volts needed to power the microcontroller and circuits contained in the RJ45 jack.


The library for ENC28J60


The original library from which we derived can be downloaded from the site https://github.com/jcw/ethercard ; from our site you can download the library itself but with a higher number of application examples.

Here you will find a sketch example to build a Web Server, in particular, in the current web page you will see the hours: minutes: seconds elapsed from the ignition of Arduino.


// This is a demo of the RBBB running as webserver 
// with the Ether Card
// 2010-05-28 
// http://opensource.org/licenses/mit-license.php

#include

// ethernet interface mac address
static byte mymac[] = { 0x74,0x69,0x69,0x2D,0x30,0x31 };
// ethernet interface ip address
static byte myip[] = { 192,168,0,188 };
// gateway ip address
static byte gwip[] = { 192,168,0,1 };

byte Ethernet::buffer[500];
BufferFiller bfill;

void setup () {
  if (ether.begin(sizeof Ethernet::buffer, mymac) == 0)
    Serial.println( "Failed to access Ethernet controller");
  ether.staticSetup(myip);
}

static word homePage() {
  long t = millis() / 1000;
  word h = t / 3600;
  byte m = (t / 60) % 60;
  byte s = t % 60;
  bfill = ether.tcpOffset();
  bfill.emit_p(PSTR(
    "HTTP/1.0 200 OK\r\n"
    "Content-Type: text/html\r\n"
    "Pragma: no-cache\r\n"
    "\r\n"
    "<meta http-equiv='refresh' content='1'/>"
    "<title>RBBB server</title>" 
    "<h1>$D$D:$D$D:$D$D</h1>"),
      h/10, h%10, m/10, m%10, s/10, s%10);
  return bfill.position();
}

void loop () {
  word len = ether.packetReceive();
  word pos = ether.packetLoop(len);

  if (pos)  // check if valid tcp data is received
    ether.httpServerReply(homePage()); // send web page data
}


Library Ethernet shild with ENC28J60 

Store

Using the Raspi as an Ethernet shield

[Alexandre] wanted to set up a web-based temperature logger with his Arduino, but found the Arduino Ethernet shield a little finicky. Since his Raspberry pi was just delivered, he figured he could use the Raspi as an Ethernet shield with just a little bit of coding.

After [Alexandre] set up his Arduino to send a thermocouple through the USB, the only thing left to do was to add node.js to the Raspi’s Debian installation. Every five minutes, the Arduino wakes up, takes a temperature reading, and sends it over to the Raspberry pi. From there, it’s easy parse the Arduino’s JSON output and serve it up on the web.

In the end, [Alexandre] successfully set up his Raspberry pi as an Ethernet shield to serve a web page displaying the current temperature (don’t F5 that link, btw). One interesting thing we have to point out is the cost of setting up this online temperature logger: the Arduino Ethernet shield sells for $45 USD, while the Raspberry pi is available for $35. Yes, it’s actually less expensive to use a Raspberry pi as an Ethernet shield than the current Arduino offerings. There you have it, just in case you were still on the fence about this whole Raspi thing.


Filed under: arduino hacks, Rasberry pi

Doorbell Alert System That Sends You a Text and a Photo

What do you do when you have an arduino, a camera, an ethernet shield and a doorbell? You make your own intelligent security system.

The system is actually pretty simple. When the doorbell rings an Arduino sends a request to a notification service called PushingBox which then grabs a picture from web camera located outside. Then PushingBox sends a notification to an iPhone (it looks like this can be modded slightly with PushingBox to include Android and Windows Phone as well) and an email with a picture attached.

Via:[Lifehacker]

Arduino Blog 13 May 18:36
arduino  doorbell  ethernet  text  

Dial-click-photo-share!

The next time you wish to take a random photoshoot with one of these phones, do make a note that they are Arduino powered! The makers Chris Bell, Liangjie Xia, and Mike Kelberman built the Rotobooth as part of Twilio’s Photohack Day 2 event designed to showcase Twilio’s cloud computing capabilities.

When users lift the handset and dial their digits, an Arduino (you just knew there’d be one involved didn’t you?) takes in the information and then initiates the camera.

Four photos are taken — just like a photo booth — and they are sent to a Mac Mini. The photos are resized, watermarked and uploaded to Flickr. The photo links are then texted to your phone using Twilio.

If you decide not to enter your number just dial “0″ and one photo is taken and is uploaded to Rotobooth.com

Now just dial your number on the Rotobooth’s rotary dial and once your photo is taken, the shot is uploaded to Flickr and you are texted with the link.

Via:[Dvice]

Arduino Blog 09 May 22:35

Nanode: Arduino-compatible with Ethernet

The Nanode project from (the?) London Hackspace has been on my radar but didn't make the spreadsheet since I was waiting for it to become available. Well, it's out ($40 kit), and it seems to be a hit!

Unlike the Arduino Ethernet and shield and other boards with built-in ethernet, the Nanode does not use the Wiznet W5100, instead using the Microchip ENC28J60 found in JeeLabs EtherCard, and you can even program it over ethernet!

Ethernet Arduinos (and Compatibles)

Also on the spreadsheet, three boards with built-in ethernet:
  • There's finally an official Arduino Ethernet ($60), complete with RJ45 port. It has an FTDI cable header for programming (no USB), a microSD card slot for storage, and there's an optional PoE daughter card.
  • SparkFun also released an Arduino-compatible board with ethernet, the Ethernet Pro ($55), but without the SD card slot. It's less cluttered than the official board, hopefully the price will come down as more people build projects around them.
  • Additionally, the Freetronics EtherTen ($70) includes a microSD slot and (mini) USB interface.
All of these are compatible with an Arduino (or Arduino-compatible) board with the ethernet shield ($40) on top, but I wonder: will shields fit on any of these without hitting the magjack? Or do they use taller female pin sockets? They're also equivalent to an Arduino hooked up to a Wiznet W5100, eg. with a WIZ811MJ module ($20!). Too bad Adafruit doesn't sell the ethernet module breakout shield anymore, but at least the design files are still available.

Call me cheap, but these all seem overpriced, being based around a $4 microcontroller! With a basic Arduino board at $20 and WIZ811MJ module at $20, why isn't the SparkFun Ethernet Pro $40 or $45?