Posts with «electronics» label
Smarter Serial Communications with WiSer
Cheap stereo line out I2S DAC for CircuitPython / Arduino synths
Continue reading "Cheap stereo line out I2S DAC for CircuitPython / Arduino synths"
Mega Arduino announcement has GIGA impact
This Sun Tracking CNC Machine Uses The Sun Instead of a Laser

We’ve all seen people goof around with a magnifying glass in the sun, but this project takes it to a new level. Cranktown City has uploaded this fantastically amusing project that is sure to impress. He built a cnc controlled engraving machine that uses the sun instead of a laser tube. As he explains in […]
The post This Sun Tracking CNC Machine Uses The Sun Instead of a Laser appeared first on Make: DIY Projects and Ideas for Makers.
Core Memory: Why We Used 60-Year-Old Tech in an Arduino Shield

About ten years ago, we designed and made an Arduino shield implementing “core memory,” a technology that was sixty years old even then. Our shield stored 32 individual 1s or 0s using magnetic fields going either clockwise or anticlockwise around 32 tiny doughnuts of magnetisable ‘ferrite’ material. This kind of memory, invented in the 1950s, […]
The post Core Memory: Why We Used 60-Year-Old Tech in an Arduino Shield appeared first on Make: DIY Projects and Ideas for Makers.
Portrait of a Digital Weapon

Over the years, artists have been creating art depicting weapons of mass destruction, war and human conflict. But the weapons of war, and the theatres of operation are changing in the 21st century. The outcome of many future conflicts will surely depend on digital warriors, huddled over their computer screens, punching on their keyboards and maneuvering joysticks, or using devious methods to infect computers to disable or destroy infrastructure. How does an artist give physical form to an unseen, virtual digital weapon? That is the question which inspired [Mac Pierce] to create his latest Portrait of a Digital Weapon.
[Mac]’s art piece is a physical depiction of a virtual digital weapon, a nation-state cyber attack. When activated, this piece displays the full code of the Stuxnet virus, a worm that partially disabled Iran’s nuclear fuel production facility at Natanz around 2008.
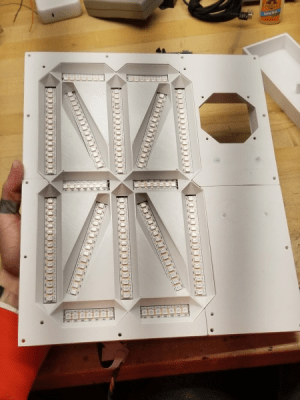
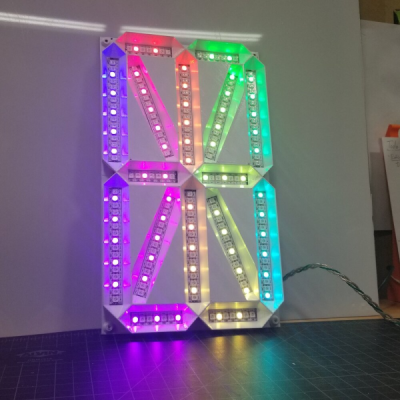
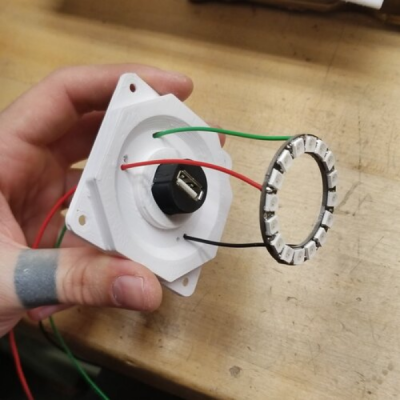
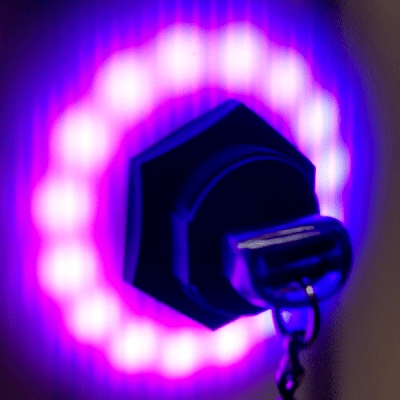
It took a while for [Mac] to finalize the plan for his design. He obtained a high resolution satellite image of the Iranian Natanz facility via the Sentinel Hub satellite imagery service. This was printed on a transparent vinyl and glued to a translucent poly-carbonate sheet. Behind the poly-carbonate layer, he built a large, single digit 16-segment display using WS2812 addressable LED strips, which would be used to display the Stuxnet code. A bulkhead USB socket was added over the centrifuge facility, with a ring of WS2812 LEDs surrounding the main complex. When a USB stick is plugged in, the Stuxnet code is displayed on the 16-segment display, one character at a time. At random intervals, the LED ring around the centrifuge building lights up spinning in a red color to indicate centrifuge failure.
The 16-segment display was built on an aluminum base plate, with 3D printed baffles to hold the LED strips. To hold the rest of the electronics, he built a separate 3D printed frame which could be added to the main art frame. Since this was too large to be printed in one piece on the 3D printer, it was split in parts, which were then joined together using embedded metal stud reinforcement to hold the parts together. Quite a nice trick to make large, rigid parts.


An Adafruit Feather M0 micro-controller board, with micro SD-card slot was the brains of the project. To derive the 5 V logic data signal from the 3.3 V GPIO output of the Feather, [Mac] used two extra WS2812 LEDs as level shifters before sending the data to the LED strips. Driving all the LEDs required almost 20 W, so he powered it using USB-C, adding a power delivery negotiation board to derive the required juice.
The Arduino code is straightforward. It reads the characters stored on the SD-card, and sends them sequentially to the 16-segment display. The circular ring around the USB bulkhead also lights up white, but at random intervals it turns red to simulate the speeding up of the centrifuges. Detecting when the USB stick gets plugged in is another nice hack that [Mac] figured out. When a USB stick is plugged in, the continuity between the shell (shield) and the GND terminal was used to trigger a GPIO input.
Cyber warfare is here to stay. We are already seeing increasing attacks on key infrastructure installations by state as well as non-state actors around the world. Stuxnet was one of the first in this growing category of malicious, weaponized code. Acknowledging its presence using such a physical representation can offer a reminder on how a few lines of software can wreak havoc just as much as any other physical weapon. Check out the brief project video after the break.
Live Updates From Maker Faire Bay Area 2018
 Maker Faire Bay Area is here! Get a sneak peek at all the must-see exhibits and creators. We'll be updating this post regularly throughout the weekend, so check back regularly.
The post Live Updates From Maker Faire Bay Area 2018 appeared first on Make: DIY Projects and Ideas for Makers.
This Unique Take on LED Cubes Uses Glass
 LED cubes, while fascinating, aren't particularly new. We've seen quite a few of them. However, this one, made by Instructibles user mosivers, adds a new twist.
The post This Unique Take on LED Cubes Uses Glass appeared first on Make: DIY Projects and Ideas for Makers.
Development Boards Galore at Maker Faire Bay Area
 If you come to Maker Faire Bay Area 2018, you'll get the chance to learn about and see plenty of different development boards in action.
The post Development Boards Galore at Maker Faire Bay Area appeared first on Make: DIY Projects and Ideas for Makers.

