Posts with «clock hacks» label

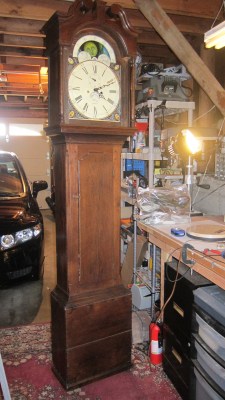
Modernizing a 170 year old Antique Grandfather Clock

Frankly, we let out a yelp of despair when we read this in the tip line “Antique Grandfather clock with Arduino insides“! But before you too roll your eyes, groan, or post snark, do check out [David Henshaw]’s amazing blog post on how he spent almost eight months working on the conversion.

Before you jump to any conclusions about his credentials, we must point out that [David] is an ace hacker who has been building electronic clocks for a long time. In this project, he takes the antique grandfather clock from 1847, and puts inside it a new movement built from Meccano pieces, stepper motors, hall sensors, LEDs, an Arduino and lots of breadboard and jumper wires while making sure that it still looks and sounds as close to the original as possible.

He starts off by building a custom electro-mechanical clock movement, and since he’s planning as he progresses, meccano, breadboard and jumper wires were the way to go. Hot glue helps preserve sanity by keeping all the jumper wires in place. To interface with all of the peripherals in the clock, he decided to use a bank of shift registers driven from a regular Arduino Uno. The more expensive DS3231 RTC module ensures better accuracy compared to the cheaper DS1307 or similar clones. A bank of RGB LEDs acts as an annunciator panel inside the clock to help provide various status indications. The mechanical movement itself went through several iterations to get the time display working with a smooth movement of the hands. Besides displaying time, [David] also added a moon phase indicator dial. A five-rod chime is struck using a stepper motor driven cam and a separate solenoid is used to pull and release three chime hammers simultaneously to generate the loud gong sounds.

And here’s the amazing part – he did all of this before laying his hands on the actual grandfather clock – which was shipped to him in California from an antique clock specialist in England and took two months to arrive. [David] ordered just the clock housing, dial/face and external parts, with none of the original inner mechanism. Once he received it, his custom clock-work assembly needed some more tweaking to get all the positions right for the various hands and dials. A clock like this without its typical “ticktock” sound would be pretty lame, so [David] used a pair of solenoids to provide the sound effect, with each one being turned on for a different duration to produce the characteristic ticktock.

At the end of eight months, the result – christened Judge – was pretty satisfying. Check the video below to judge the Judge for yourself. If you would like to see some more of [David]’s clockwork, check out Dottie the Flip Dot Clock and A Reel to Reel Clock.


Filed under: Arduino Hacks, clock hacks

Disco Flashlight Binary Analog Clock?

As multitools have lots of different functions in one case, so [Shadwan’s] clock design incorporates a multitude of features. He started the design as a binary clock using a Fibonacci spiral for the shape. However, the finished clock has four modes. The original binary clock, an analog clock, a flashlight (all lights on), and a disco mode that strobes multiple lights.

[Shadwan] used Rhino to model the case and then produced it using a laser cutter. The brains are — small wonder — an Arduino. A 3D-printed bracket holds everything together. You can see the result in the video below.

The clock was a school project and used a Neopixel ring. The students had a 16 position ring, which is not enough to do a 24-hour clock so they settled on a 12-hour design. The LED color, however, changes between AM and PM.

The paper included with the design said that research didn’t turn up any other binary clocks using Neopixels. We found that hard to believe, but it might be true. We certainly didn’t find any in our archives, although there are plenty of non-binary clocks out there.


Filed under: Arduino Hacks, clock hacks

Linear Clock Slows the Fugit of the Tempus

We feature a lot of clocks here on Hackaday, and lately most of them seem to be Nixie clocks. Not that there’s anything wrong with that, but every once in a while it’s nice to see something different. And this electromechanical rack and pinion clock is certainly different.

[JON-A-TRON] calls his clock a “perpetual clock,” perhaps in a nod to perpetual calendars. But in our opinion, all clocks are perpetual, so we’ll stick with “linear clock.” Whatever you call it, it’s pretty neat. The hour and minute indicators are laser cut and engraved plywood, each riding on a rack and pinion. Two steppers advance each rack incrementally, so the resolution of the clock is five minutes. [JON-A-TRON] hints that this was a design decision, in part to slow the perceived pace of time, an idea we can get behind. But as a practical matter, it greatly simplified the gear train; it would have taken a horologist like [Chris] at ClickSpring to figure out how to gear this with only one prime mover.

In the end, we really like the look of this clock, and the selection of materials adds to the aesthetic. And if you’re going to do a Nixie clock build, do us a favor and at least make it levitate.


Filed under: clock hacks
Hack a Day 02 Apr 03:00

Well Engineered Radio Clock Aces Form and Function

Clocks that read time via received radio signals have several advantages over their Internet-connected, NTP-synchronised brethren. The radio signal is ubiquitous and available over a fairly large footprint extending to thousands of kilometres from the transmitting antennae. This allows such clocks to work reliably in areas where there is no Internet service. And compared to GPS clocks, their front-end electronics and antenna requirements are much simpler. [Erik de Ruiter]’s DCF77 Analyzer/Clock is synchronised to the German DCF77 radio signal, which is derived from the atomic clocks at PTB headquarters. It features a ton of bells and whistles, while still being simple to build. It’s a slick piece of German hacker engineering that leaves us amazed.

Among the clock functions, it shows time, day of the week, date, CET/CEST modes, leap year indications and week numbers. The last is not part of the DCF77 protocol but is calculated via software. The DCF77 analyzer part has all of the useful information gleaned from the radio signals. There are displays for time period, pulse width, a bit counter, bit value indicator (0/1) and an error counter. There are two rings of 59 LEDs each that provide additional information about the DCF77 signal. A PIR sensor on the front panel helps put the clock in power save mode. Finally, there is a whole bunch of indicator LEDs and a bank of switches to control the various functions. On the rear panel, there are RJ45 sockets for the DCF77 receiver antenna board, temperature sensor and FTDI serial, a bunch of audio sound board controls, reset switches and a mode control switch.

His build starts with the design and layout of the enclosure. The front panel layout had to go through a couple of iterations before he was satisfied with the result. The final version was made from aluminium-coated sandwich-panel. He used an online service to photo-etch the markings, and then a milling machine to carve out the various windows and mounting holes. The rear panel is a tinted acrylic with laser engraving, which makes the neatly laid out innards visible for viewers to appreciate. The wooden frame is made from 40-year-old Mahogany, sourced from an old family heirloom desk. All of this hard work results in a really professional looking product.

The electronics are mostly off the shelf modules, except for the custom built LED driver boards. The heart of the device is an Arduino Mega because of the large number of outputs it provides. There are seven LED driver boards based around the Maxim 7221 (PDF) serial interface LED drivers – two to drive the inner and outer ring LEDs, and the others for the various seven-segment displays. The numerous annunciator LEDs are driven directly from the Arduino Mega. His build really comes together by incorporating a noise resilient DCF77 decoder library by [Udo Klein] which is running on a separate Arduino Uno. All of his design source files are posted on his GitHub repository and he hopes to publish an Instructable soon for those who would like to build one of their own.

In the first video below, he walks through the various functions of the clock, and in the second one, gives us a peek in to its inside. Watch, and be amazed.

Thanks for the tip, [Nick]


Filed under: clock hacks

A Wordsearch Twist on the Word Clock

We love seeing new takes on existing ideas, and [Danny] certainly took the word clock concept in an unusual direction with his Wordsearch Clock. Instead of lighting up words to spell out the time, [Danny] decided to embrace the fact that the apparent jumble of letters on the clock face resembles a word search puzzle.

In a word search puzzle, words can be found spelled forward or backward with letters lined up horizontally, diagonally, or vertically. All that matters is that the correct letters are in a line and sequentially adjacent to one another. [Danny]’s clock lights up the correct letters and words one after the other, just as if it were solving a word search puzzle for words that just happen to tell the correct time. You can see it in action in the video, embedded below.

[Danny] went the extra mile in the planning phase. After using a word search puzzle generator tool to assist in designing the layout, he wrote a Processing sketch to simulate the clock’s operation. Visually simulating the clock allowed him to make tweaks to the layout, identify edge cases to address, and gain insight into the whole process. If you’re interested in making your own, there is a GitHub repository for the project.

Word Clocks are a great place to see innovation; you can go small like this micro word clock, you can push the concept for all it’s worth by adding heaps of weather data, or just go the extra mile on presentation like this walnut-finish clock.


Filed under: clock hacks
Hack a Day 17 Mar 03:00

The Smartest Smart Watch is the One You Make Yourself

If you’re building a smart watch these days (yawn!), you’ve got to have some special sauce to impress the jaded Hackaday community. [Dominic]’s NeoPixel SmartWatch delivers, with his own take on what’s important to have on your wrist, and just as importantly, what isn’t.

There’s no fancy screen. Instead, the watch gets by with a ring of NeoPixels for all its notification needs. But notification is what it does right. It tells [Dominic] when he’s got an incoming call of course, but also has different flashing color modes for SMS, Snapchat, and e-mail. Oh yeah, and it tells time and even has a flashlight mode. Great functionality for a minimalistic display.

But that’s not all! It’s also got a light sensor that works from the UV all the way down to IR. At the moment, it’s being used to automatically adjust the LED brightness and to display current UV levels. (We imagine turning this into a sunburn alarm mode.) Also planned is a TV-B-Gone style IR transmitter.

The hardware is the tough part of this build, and [Dominic] ended up using a custom PCB to help in cramming so many off-the-shelf modules into a tiny space. Making it look good is icing on the cake.

Thanks [Marcello] for the tip!


Filed under: clock hacks
Hack a Day 13 Mar 09:01
arduino  clock  clock hacks  ir  neopixel  uv  watch  ws2812  

Beautiful Linear RGB Clock

Yup, another clock project. But here, [Jan] builds something that would be more at home in a modern art museum than in the dark recesses of a hacker cave. It’s not hard to read the time at all, it’s accurate, and it’s beautiful. It’s a linear RGB LED wall clock.

You won’t have to learn the resistor color codes or bizarre binary encodings to tell what time it is. There are no glitzy graphics here, or modified classic timepieces. This project is minimal, clean, and elegant. Twelve LEDs display the hours, six and nine LEDs take care of the minutes in add-em-up-coded decimal. (It’s 3:12 in the banner image.)

The technical details are straightforward: WS2812 LEDs, an Arduino, three buttons, and a RTC. You could figure that out by yourself. But go look through the log about building the nice diffusing plexi and a very clean wall-mounting solution. It’s the details that separate this build from what’s hanging on our office wall. Nice job, [Jan].


Filed under: clock hacks
Hack a Day 19 Feb 03:00
arduino  clock  clock hacks  diy  rgb led  rtc  ws2812b  

X Marks the Clock

There’s no shortage of Arduino-based clocks around. [Mr_fid’s] clock, though, gets a second look because it is very unique looking. Then it gets a third look because it would be very difficult to read for the uninitiated.

The clock uses three Xs made of LEDs. There is one X for the hours (this is a 24-hour clock), another for the minutes, and one for the seconds. The left side of each X represents the tens’ digit of the number, while the right-side is the units.

But wait… even with two segments on each side of the X, that only allows for numbers from 0 to 3 in binary, right? [Mr_fid] uses another dimension–color–to get around that limitation. Although he calls this a binary clock, it is more accurately a binary-coded-decimal (BCD) clock. Red LEDs represent the numbers one to three. Green LEDs are four to six. Two blue segments represent seven to nine. It sounds complicated, but if you watch the video, below, it will make sense.

This isn’t [Mr_fid’s] first clock. He is using a DS1307 real time clock module to make up for the Arduino’s tendency to drift. Even if you aren’t interested in the clock, the mounting of the LEDs with plastic–and the issues he had isolating them from each other–might come in handy in other displays.

We’ve seen a lot of Arduino clocks over the years, including some that talk. We’ve even seen some that qualify as interactive furniture, whatever that is.


Filed under: Arduino Hacks, clock hacks
Hack a Day 13 Jan 03:00

Arduino Clock Is HAL 1000

In the movie 2001: A Space Odyssey, HAL 9000 — the neurotic computer — had a birthday in 1992 (for some reason, in the book it is 1997). In the late 1960s, that date sounded impossibly far away, but now it seems like a distant memory. The only thing is, we are only now starting to get computers with voice I/O that are practical and even they are a far cry from HAL.

[GeraldF6] built an Arduino-based clock. That’s nothing new but thanks to a MOVI board (ok, shield), this clock has voice input and output as you can see in the video below. Unlike most modern speech-enabled devices, the MOVI board (and, thus, the clock, does not use an external server in the cloud or any remote processing at all. On the other hand, the speech quality isn’t what you might expect from any of the modern smartphone assistants that talk. We estimate it might be about 1/9 the power of the HAL 9000.

You might wonder what you have to say to a clock. You’ll see in the video you can do things like set and query timers. Unlike HAL, the device works like a Star Trek computer. You address it as Arduino. Then it beeps and you can speak a command. There’s also a real-time clock module.

Setting up the MOVI is simple:

 recognizer.init(); // Initialize MOVI (waits for it to boot)
 recognizer.callSign("Arduino"); // Train callsign Arduino (may take 20 seconds)
 recognizer.addSentence(F("What time is it ?")); // Add sentence 1
 recognizer.addSentence(F("What is the time ?")); // Add sentence 2
 recognizer.addSentence(F("What is the date ?")); // Add sentence 3
...

Then a call to recognizer.poll will return a numeric code for anything it hears. Here is a snippet:

// Get result from MOVI, 0 denotes nothing happened, negative values denote events (see docs)

 signed int res = recognizer.poll(); 

// Tell current time
 if (res==1 | res==2) { // Sentence 1 & 2
 if ( now.hour() > 12) 
 recognizer.say("It's " + String(now.hour()-12) + " " + ( now.minute() < 10 ? "O" : "" ) +
     String(now.minute()) + "P M" ); // Speak the time
...

Fairly easy.

HAL being a NASA project (USSC, not NASA, and HAL was a product of a lab at University of Illinois Urbana-Champaign – ed.) probably cost millions, but the MOVI board is $70-$90. It also isn’t likely to go crazy and try to kill you, so that’s another bonus. Maybe we’ll build one in a different casing. We recently talked about neural networks improving speech recognition and synthesis. This is a long way from that.


Filed under: Arduino Hacks, clock hacks

A Different Sort of Word Clock

Our wonderfully creative community has a penchant for clocks. We have seen so many timepieces over the years that one might suppose that there would be nothing new, no instrument of horology that would not elicit a yawn as we are presented with something we’ve seen many times before.

Every once in a while though along comes a project that is different. A clock that takes the basic idea of a timepiece and manages to present something new, proving that this particular well of projects has not yet quite run dry.

Such a project is the circular word clock made by [Roald Hendriks]. Take a conventional circular wall clock and remove the hands and mechanism, then place LEDs behind the numbers. Add the words for “Quarter”, “Half”, etc. in an inner ring, and place LEDs behind them. Hook all these LEDs up to a microcontroller with a real-time clock, and away you go with a refreshingly novel timepiece.

[Roald]’s clock has the wording in Dutch, and the brain behind it is an Arduino Uno with the relevant driver ICs. He’s provided a video which we’ve put below the break, showing the clock in operation with its various demo modes.

We’ve seen so many word clocks over the years it’s best to give you a stream of them through our word clock tag. It’s good of this one to come along and refresh the genre.


Filed under: clock hacks
Hack a Day 28 Nov 06:01