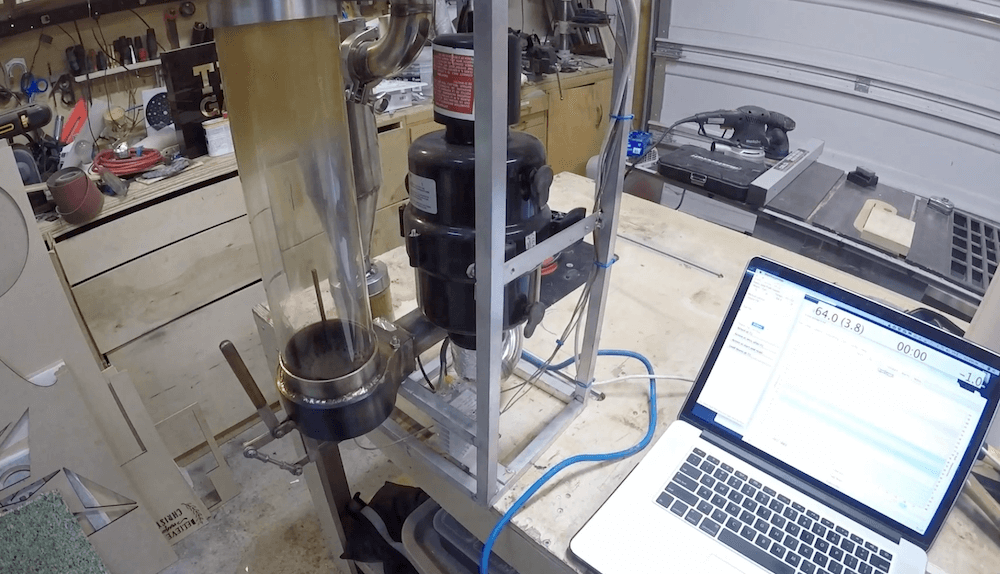
Apparently not content with simply brewing his coffee to perfection, Alex Campbell can actually take control of the roast itself thanks to his beautiful fluid bed roasting rig.
His DIY device is constructed using a variety of stainless steel and aluminum components, along with a transparent roasting chamber. A spa blower is employed to suck waste out and agitate beans during the process.
The machine’s heating element is driven by a solid-state relay and a thermocouple provides feedback. An Arduino board is tasked with controlling the system, while user interface and higher-level control are handled via a laptop linked to it over serial.
It’s an amazing design as seen in the two videos below — all to get that perfect cup!
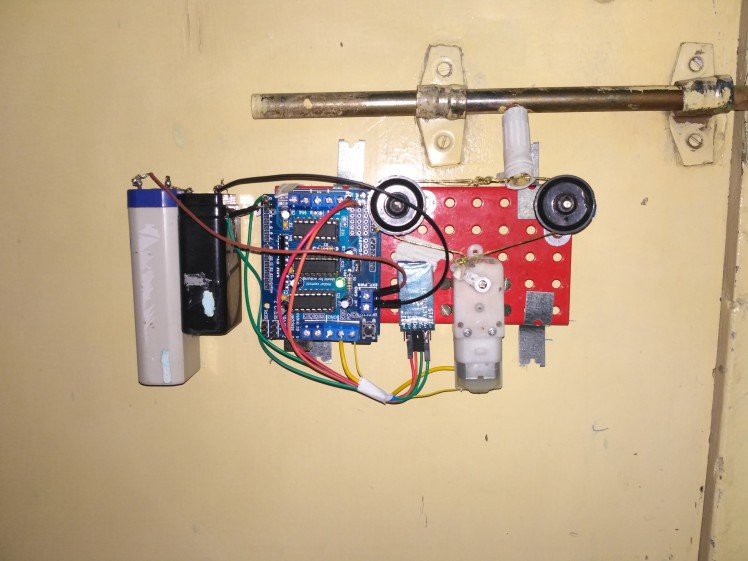
Adnan.R.Khan recently decided to give his room’s sliding door latch an upgrade by designing a mechanism to open and close it, using little more than an Arduino Uno and Bluetooth module.
His automated device is operated via a smartphone app written in MIT App Inventor, and it employs a shield to control a small DC motor. The motor then pulls a cable wrapped around two pulleys in order to move the simple barrel latch in or out.
It’s an amazing display of what can be done with parts at hand and basic tools, and could certainly inspire other home security hacks. Be sure to check out the build process and the setup in action below!
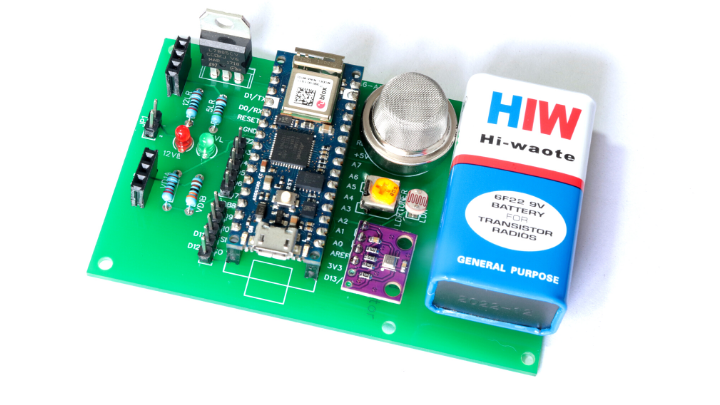
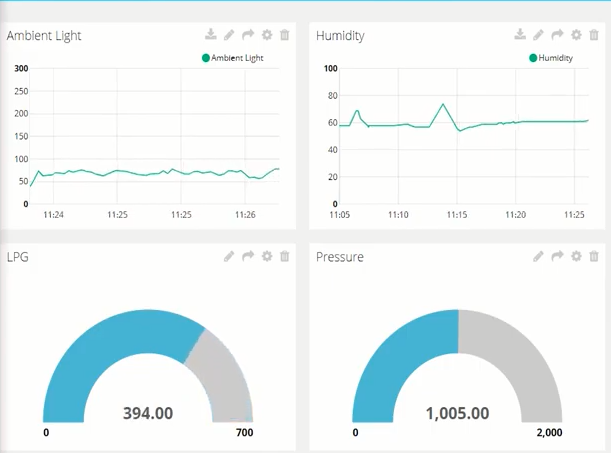
Using an Arduino Nano 33 IoT, Jithin Sanal designed a home monitoring system capable of detecting noxious gases with an MQ2 sensor as well as sensing temperature, pressure, humidity, and ambient light via a BME280 sensor and an LDR. All of this is mounted onto a custom PCB that’s powered by a 9V battery, or one could also use a 9-12V adapter if more convenient.
Data is passed on to Ubidots over WiFi, which provides a configurable dashboard for viewing the readings anywhere in the world. The system can also send notifications via SMS, email, or Telegram to let you know if anything is awry.
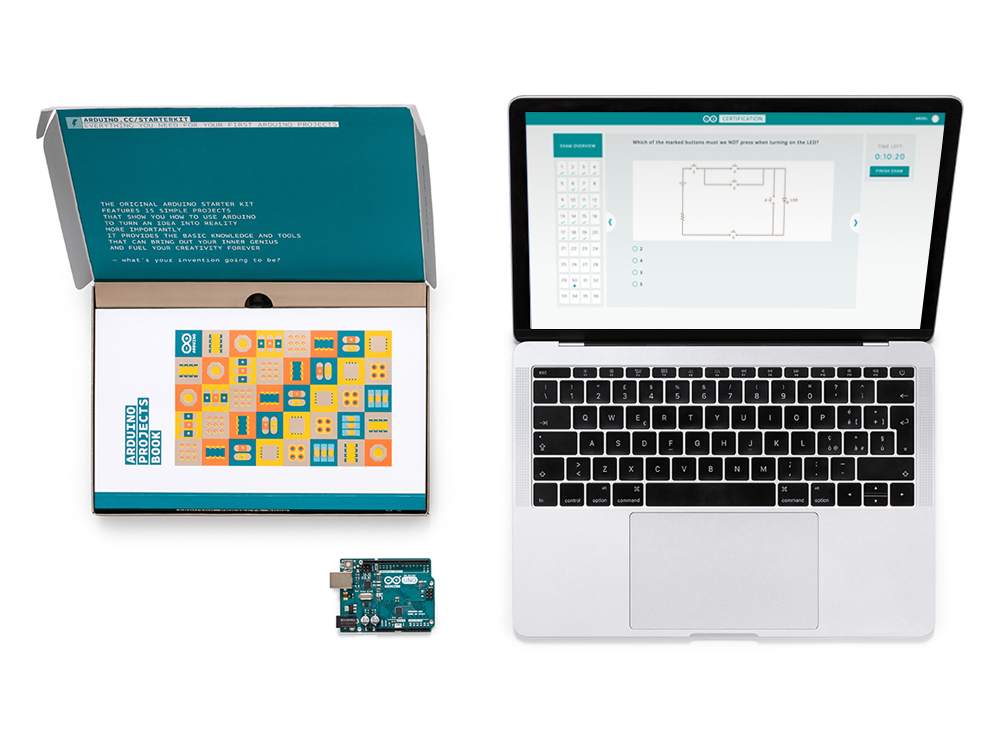
For enthusiasts, the Fundamentals Exam is the first tier in the Arduino Certification Program (ACP), designed to test entrants knowledge in Arduino-related electronics, programming, and physical computing.
The exam is available for everyone interested in officially certifying their skills and knowledge on Arduino, that could, for example, be referred to in a resume for academic or professional purposes.
Get your students, colleagues and friends certified!
The Fundamentals Exam is now also open to schools, academic institutions, universities, and companies that are interested in getting their students and employees officially certified!
The Fundamentals Certification offers the right balance of academic excellence and real world skills to give students the confidence and motivation they need to succeed both in educational and professional environments.
It is a great opportunity for companies who are interested in certifying their employees to refresh and add new skills to their repertoire.
El examen de Certificación Fundamentals, está ahora disponible en Español e Italiano
Para entusiastas, el examen de Certificación Fundamentals, es el primer nivel del Programa de certificación Arduino (ACP), diseñado para evaluar el conocimiento de los participantes en electrónica, programación y computación física relacionadas con Arduino.
El examen está disponible para todos los interesados ??en certificar oficialmente sus habilidades y conocimientos en Arduino, que podrían, por ejemplo, mencionarse en un currículum con fines académicos o profesionales.
¡Certifica a tus estudiantes, colegas y equipo de trabajo!
La certificación también está disponible para escuelas, instituciones académicas, universidades y empresas que estén interesadas en certificar oficialmente a sus estudiantes y equipo de trabajo.
La Certificación Fundamentals ofrece el equilibrio adecuado entre excelencia académica y habilidades del mundo real, para brindar a los estudiantes la confianza y la motivación que necesitan para tener éxito tanto en entornos académicos como profesionales.
También es una gran posibilidad para compañías que están interesadas en certificar a su equipo de trabajo para actualizar y agregar nuevas habilidades a su repertorio.
Siamo lieti di annunciare che l’esame per la certificazione Arduino Fundamentals è da adesso disponibile anche in spagnolo e italiano!
Desideriamo rendere accessibile la Certificazione alle scuole, alle istitutuzioni, università e aziende che siano interessate a certificare ufficialmente i propri studenti e dipendenti! La certificazione Arduino Fundamentals offre il giusto equilibrio fra l’acquisizione di abilità accademiche e lavorative, fornendo agli studenti la sicurezza e la motivazione necessarie per riuscire nel mondo accademico e professionale. E’ inoltre un increndibile possibilità per le aziende interessate ad aggionarne, migliorare e/o accrescere le capacità dei propri dipendenti.
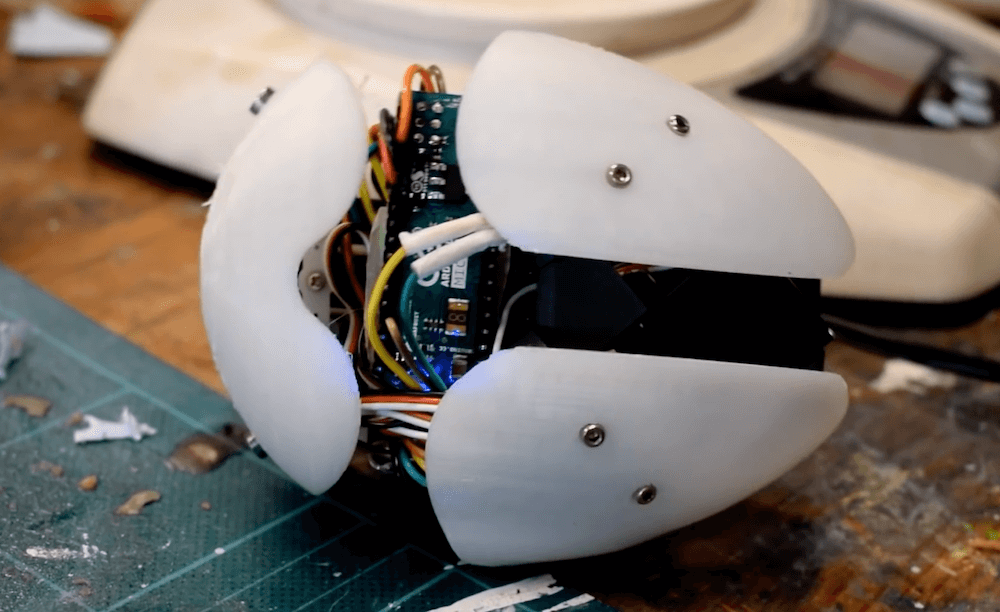
Fair warning for the squeamish: some versions of [Will Cogley]’s animatronic heart are realistic enough that you might not want to watch the video below. That’d be a shame though, because he really put a lot of effort into the build, and the results have a lot to teach about mimicking the movements of living things.
As for why one would need an animatronic heart, we’re not sure. [Will] mentions no specific use case for it, although we can think of a few. With the Day of Compulsory Romance fast approaching, the fabric-wrapped version would make a great gift for the one who stole your heart, while the silicone-enrobed one could be used as a movie prop or an awesome prank. Whatever the reason, [Will]’s build is a case study in incremental development. He started with a design using a single continuous-rotation servo, which powered four 3D-printed paddles from a common crank. The four paddles somewhat mimicked the movements of the four chambers of the heart, but the effect wasn’t quite convincing. The next design used two servos and complex parallelogram linkages to expand each side of the heart in turn. It was closer, but still not quite right.
After carefully watching footage of a beating heart, [Will] decided that his mechanism needed to imitate the rapid systolic contraction and slow diastolic expansion characteristic of a real heart. To achieve this, his final design has three servos plus an Arduino for motion control. Slipped into a detailed silicone jacket, the look is very realistic. Check out the video below if you dare.
We’ve seen plenty of animatronic body parts before, from eyes to hands to entire faces. This might be the first time we’ve seen an animatronic version of an internal organ, though.
Home automation is a popular project to undertake but its complexity can quickly become daunting, especially if you go further than controlling a few lights (or if you’re a renter). To test the waters you may want to start with something like this home safety monitor, which is an IoT device based on an Arduino. It allows remote monitoring of a home for things such as temperature, toxic gasses, light, and other variables, which is valuable even if you don’t need or want to control anything.
The device is built around an Arduino Nano 33 IOT which has WiFi and Bluetooth capabilities as well as some integrated security features. This build features a number of sensors including pressure/humidity, a gas/smoke detector, and a light sensor. To report all of the information it gathers around the home, an interface with Ubidots is configured to allow easy (and secure) access to the data gathered by the device.
The PCB and code for the project are all provided on the project page, and there are a number of other options available if Ubidots isn’t your preferred method of interfacing with the Internet of Things. You might even give Mozilla’s WebThings a shot if you’re so inclined.
In his latest video, Will Cogley has created an animatronic heart so realistic that you might wonder if it’s the actual thing.
The device is made out of molded silicon with fake blood poured on top to enhance the effect, and inside a trio of servo motors push the lower and upper sections of the prop out in a very lifelike pattern.
Control is via an Arduino Micro along with an I2C servo controller, while power is provided by an external tether. A potentiometer on the back is used to vary heartbeat speed.
He also made a simpler — and less potentially terrifying — version with a cloth exterior. This one is battery-operated and runs on a motor and linkage system, perhaps making it good for a nice portable joke!
Mechanically the lock consists of a Solarbotics GM3 motor, some Meccano, and a servo arm. A string is tied between two pulleys and looped around the slide of a barrel latch. When the motor moves back and forth it’s enough to slide the lock in and out. Electronically an Arduino and a Bluetooth module provide the electronics. The system runs from a 9V battery, and we’re interested to know whether there were any tricks pulled to make the battery last.
The system’s software is a simple program built in MIT App Inventor. Still, it’s pretty cool that you can get functionally close to a production product with parts that are very much lying around. It also makes us think of maybe keeping our childhood Meccano sets a little closer to the bench!
The Consumer Electronics Show in Las Vegas is traditionally where the big names in tech show off their upcoming products, and the 2020 show was no different. There were new smartphones, TVs, and home automation devices from all the usual suspects. Even a few electric vehicles snuck in there. But mixed in among flashy presentations from the electronics giants was a considerably more restrained announcement from a company near and dear to the readers of Hackaday: Arduino is going pro.
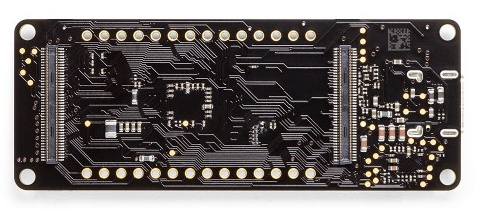
While Arduino has been focused on the DIY and educational market since their inception, the newly unveiled Portenta H7 is designed for professional users who want to rapidly develop robust hardware suitable for industrial applications. With built-in wireless hardware and the ability to run Python and JavaScript out of the box, the powerful dual-core board comes with a similarly professional price tag; currently for preorder at $99 USD a pop, the Portenta is priced well outside of the company’s traditional DIY and educational markets. With increased competition from other low-cost microcontrollers, it seems that Arduino is looking to expand out of its comfort zone and find new revenue streams.
That’s a Lot of Pins
The Portenta H7 is obviously a far cry from the relatively dinky 8-bit Arduinos that we’ve all got filling up our parts drawers. Developed for high performance edge computing applications, the new board is powered by a 32-bit STM32H747XI that utilizes both an ARM Cortex M7 and an M4 running at 480 MHz and 240 MHz respectively. The two cores can work independently, allowing for example one core to run interpreted Python while the other runs code compiled in the Arduino IDE. When they need to work together, the cores can communicate with each other via a Remote Procedure Call (RPC) mechanism.
The new 80-pin connectors on the Portenta
Outwardly, the new board doesn’t look far removed from the modern Arduino form factor we’re used to. The USB connector has been upgraded to a Type-C, but the Portenta still retains the dual rows of pads ready for hand-soldered headers — that’s their more recent pinout that they call the Arduino MKR form factor.
If you look on the back of the board however, you’ll see that they’ve added two 80-pin high density connectors. According to the product page, these are intended to allow the Portenta to simply be plugged into a device as a removable module. The idea being that devices in the field can easily have their Portenta swapped out for an upgraded model. Some digging into the product page documentation section turns up a schematic that lists the connectors as Hirose DF40C-80DP-0.4V(51).
The base model Portenta features 8 MB SDRAM and 16 MB NOR flash, but it can be custom ordered with up to 64 MB of memory and 128 MB of flash should you need it. It’s also possible to delete various interfaces from the board when ordering, so if you don’t want network connectivity or the NXP SE050C2 crypto chip, they can simply be left off. However as of this writing it is unclear as to what minimum order quantity is necessary to unlock this level of customization, or or how much these modifications will change the unit cost.
Year of the Arduino Desktop?
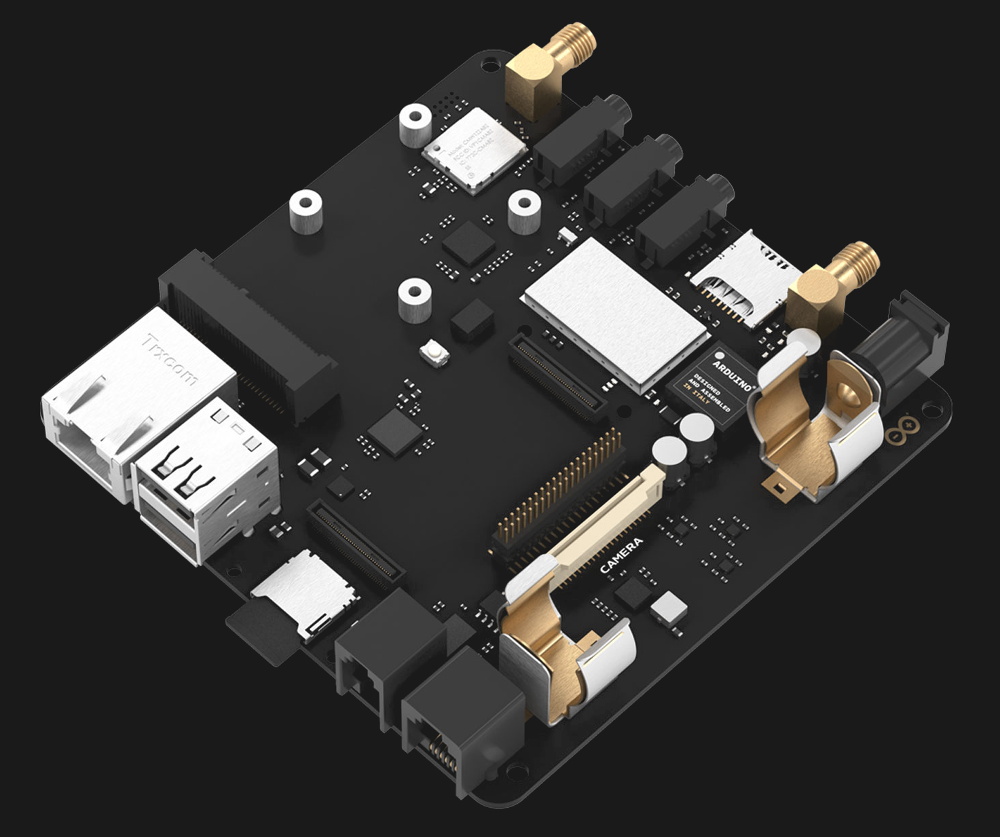
The Portenta Carrier Board
The Portenta H7 is an impressive enough piece of hardware on its own, but when it’s plugged into the optional Carrier Board, things really start to get interesting. The Carrier Board provides full size connectors for all of the onboard peripherals, and according to documentation, turns the Portenta into an eNUC-class embedded computer. There’s even support for DisplayPort to connect a monitor, and miniPCI for expansion cards.
With a fully loaded Portenta H7 slotted into the Carrier Board, it would seem you have the makings of a low-power ARM “desktop” computer. Albeit one that wouldn’t outperform the Raspberry Pi Zero, and which costs several times more.
The Arduino press release and product page doesn’t make any mention of what kind of software or operating system said computer would run, so presumably that’s left as an exercise for the customer. While not particularly well suited to it, the ARM Cortex-M family of processors is capable of running the Linux kernel, so spinning up a “real” OS image for it should be possible. Of course with a maximum of just 64 MB of RAM, you’ll want to keep your performance expectations fairly low.
Where Does Portenta Fit?
We can’t even speculate what a maxed out Portenta would cost, and there’s no pricing or release date for the Carrier Board. But even at $99, the base model Portenta H7 would be a tough sell for hackers and makers who are used to buying dual-core ESP32 boards at 1/10 of the price, or the Teensy 4.0 which has a 600 MHz Cortex-M7 at 1/4 of the price. Which is fine, since this board isn’t intended for the traditional core Arduino audience.
Seeing the carrier board, we can’t help but notice some parallels here with the Raspberry Pi Compute Module. With connections broken out to a SODIMM header, the idea of the Computer Module was to help bridge the gap between the DIY community and the commercial one by offering up a Raspberry Pi in a more rugged form factor that would be easier to integrate into end-user products. But since it wasn’t any cheaper than the stock Pi, there wasn’t a whole lot of incentive to switch over. We haven’t seen consumer products advertising “Raspberry Pi Inside!” so it’s hard to tell if there has been any meaningful adoption from industry.
One has to wonder why any company that has the resources to integrate such an expensive board into their products wouldn’t just come up with their own custom design around the Portenta’s STM32H747XI chip, which even in single quantities, can currently be had for less than $15. The difference may end up coming down to the world-renowned community that surrounds the Arduino brand, and the company’s efforts to modernize their toolchain.
If you want a red piece of paper, or a blue pen, what does that really mean? If you’d like to get more specific, Michael Klements’ Arduino-based scanner lets you quantify colors in numerical RGB values via a TCS34725 sensor.
User interface for the handheld device is extremely simple, with a single button to trigger the sensor and measure colors, along with a 16×2 panel. An optional RGB LED attempts to copy the shade of whatever object you’re aiming at, providing a handy reference to verify it’s working correctly.
You can see the build process in the video below, first constructed on a breadboard and then placed in a more permanent soldered configuration with a 3D-printed case.