Posts with «arduino» label

Pressure sensor with air pump

I’ve been thinking of expanding the pressure sensor lab for the Applied Circuits Course to do something more than just measure breath pressure.  Perhaps something that conveys another physics or engineering concept.

One thing I thought of doing was measuring the back pressure and air flow on an aquarium air pump bubbling air into an aquarium. Looking at the tradeoff of flow-rate and back pressure would be a good characterization of an air pump (something I wish was clearly shown in advertisements for aquarium air pumps and air stones).  Measuring flow rate is a bit of a pain—about the best I could think of was to bubble air into an inverted soda bottle (or other known volume) and time it.

This would be a good physics experiment and might even make a decent middle-school product-science science fair project (using a cheap mechanical low-pressure gauge, rather than an electronic pressure sensor), but setting up tanks of water in an electronics lab is a logistic nightmare, and I don’t think I want to go there.

I can generate back pressure with just a simple clamp on the hose, though, and without a flow rate measurement we could do everything completely dry.

Setup for measuring the back pressure for an aquarium air pump (needs USB connection for data logger and power).

Using the Arduino data loggger my son wrote, I recorded the air pressure while adjusting the clamp (to get the y-axis scale correct, I had to use the estimated gain of the amplifier based on resistor sizes used in the amplifier).

The peak pressure, with the clamp sealing the hose shut, seems to be about 14.5 kPa (2.1psi).

I was interested in the fluctuation in the pressure, so I set the clamp to get about half the maximum back pressure, then recorded with the Arduino data logger set to its highest sampling frequency (1ms/sample).

The fluctuation in back pressure seems to have both a 60Hz and a 420Hz component with back pressure at about half maximum.

Because the Arduino data logger has trouble dealing with audio frequency signals, I decided to take another look at the signals using the Bitscope pocket analyzer.

The waveform for the pressure fluctuations from the AQT3001 air pump, with the back pressure about 7.5kPa (half the maximum).

One advantage of using the Bitscope is that it has FFT analysis:

Spectrum for the back pressure fluctuation. One can see many of the multiples of 60Hz, with the particularly strong peak at 420Hz.

I was also interested in testing a Whisper40 air pump (a more powerful, but quieter, pump). When I clamped the hose shut for that air pump, the hi-gain output of the amplifier for the pressure sensor saturated, so I had to use the low gain output to determine the maximum pressure (24.8kPA, or about 3.6psi). The cheap Grafco clamp that I used is a bit hard to get complete shutoff with (I needed to adjust the position of the tubing and use pliers to turn the knob).  It is easy to get complete shutoff if the tube is folded over, but then modulation of less than complete shutoff is difficult.

The fluctuation in pressure shows a different waveform from the AQT3001:

The Whisper40 air pump, with the clamp set to get a bit less than half the maximum back pressure, produces a 60Hz sawtooth pressure waveform, without the strong 420Hz component seen from the AQT3001. The peak-to-peak fluctuation in pressure seems to be largest around this back pressure. The 3kPa fluctuation is larger than for the AQT3001, but the pump seems quieter.

The main noise from the pump is not from the fluctuation in the pressure in the air hose, but radiation from the case of the pump. That noise seems to be least when the back pressure is about 1.1kPa (not at zero, surprisingly). The fluctuation is then all positive pressure, ranging from 0 to 2.2kPa and is nearly sinusoidal, with some 2nd and 3rd harmonic.

As the back pressure increases for the Whisper40, the 2nd, 3rd, and 4th harmonics get larger, but the 60Hz fundamental gets smaller. The 4th harmonic is maximized (with the 1st through 4th harmonics almost equal) at about 22.8kPa, above which all harmonics get smaller, until the air hose is completely pinched off and there is no pressure variation.

When driving the large airstone in our aquarium, the Whisper40 has a back pressure of about 7.50kPa (1.1psi) with a peak-to-peak fluctuation of about 2.6kPa.

I’m not sure whether this air-pump back-pressure experiment is worth adding to the pressure sensor lab.  If I decide to do it, we would need to get a dozen cheap air pumps.  The Tetra 77853 Whisper 40 air pump is $11.83 each from Amazon, but the smaller one for 10-gallon aquariums is only $6.88.  With 12 Ts and 12 clamps, this would cost about $108, which is not a significant cost for the lab.


Filed under: Circuits course, Data acquisition, Pressure gauge Tagged: air pump, Arduino, BitScope, circuits, data acquisition, data logger, instrumentation amp, oscilloscope, pressure sensor, science fair, USB oscilloscope

Tutorial – Arduino and the TI ADS1110 16-bit ADC

Learn how to use the TI ADS1110 16-bit ADC with Arduino in chapter fifty-three of my Arduino Tutorials. The first chapter is here, the complete series is detailed here.

Updated 02/07/2013

Introduction

Moving on from the last chapter where we explained an 8-bit ADC, in this instalment we have the Texas Instruments ADS1110 – an incredibly tiny but useful 16-bit analogue-to-digital converter IC.  It can operate between 2.7 and 5.5 V so it’s also fine for Arduino Due and other lower-voltage development boards. This is a quick guide to get you going with the ADS1110 ready for further applications. Before continuing any further, please download the data sheet (pdf) as it will be useful and referred to during this tutorial. The ADS1110 gives you the option of a more accurate ADC than offered by the Arduino’s 10-bit ADCs – and it’s relatively easy to use. The only block for some is the package type – it’s only available in SOT23-6:

So unless you’re making a customised PCB, some sort of breakout will be required. One useful example is the Schmartboard we reviewed earlier:

The ADS1110 uses the I2C bus for communication, so if this is new to you – please review the I2C tutorials before continuing. And as there’s only six pins you can’t set the bus address – instead, you can select from six variants of the ADS1110 – each with their own address (see page two of the data sheet). As you can see the in the photo above, ours is marked “EDO” which matches to the bus address 1001000 or 0x48h. And with the example circuits we’ve used 10kΩ pull-up resistors on the I2C bus. You can use the ADS1110 as either a single-ended or differential ADC –  But first we need to examine the configuration register which is used to control various attributes, and the data register.

Configuration register

Turn to page eleven of the data sheet. The configuration register is one byte in size, and as the ADS1110 resets on a power-cycle – you need to reset the register if your needs are different to the defaults. The data sheet spells it out quite neatly… bits 0 and 1 determine the gain setting for the PGA (programmable gain amplifier). If you’re just measuring voltages or experimenting, leave these as zero for a gain of 1V/V. Next, the data rate for the ADS1110 is controlled with bits 2 and 3. If you have continuous sampling turned on, this determines the number of samples per second taken by the ADC.

After some experimenting with an Arduino Uno we found the values returned from the ADC were a bit off when using the fastest rate, so leave it as 15 SPS unless required otherwise. Bit 4 sets either continuous sampling (0) or one-off sampling (1). Ignore bits 5 and 6, however they’re always set as 0. Finally bit 7 – if you’re in one-off sampling mode, setting it to 1 requests a sample – and reading it will tell you if the returned data is new (0) or old (1). You can check that the value measured is a new value – if the first bit of the configuration byte that comes after the data is 0, it’s new. If it returns 1 the ADC conversion hasn’t finished.

Data register

As the ADS1110 is a 16-bit ADC, it returns the data over two bytes – and then follows with the value of the configuration register. So if you request three bytes the whole lot comes back. The data is in “two’s complement” form, which is a method of using signed numbers with binary. Converting those two bytes is done by some simple maths. When sampling at 15 SPS, the value returned by the ADS1110 (not the voltage)  falls between -32768 and 32767. The higher byte of the value is multiplied by 256, then added to the lower byte – which is then multiplied by 2.048 and finally divided by 32768. Don’t panic, as we do this in the example sketch below.

Single-ended ADC mode

In this mode you can read a voltage that falls between zero and 2.048 V (which also happens to be the inbuilt reference voltage for the ADS1110). The example circuit is simple (from the data sheet):

Don’t forget the 10kΩ pull-up resistors on the I2C bus. The following sketch uses the ADS1110 in the default mode, and simply returns the voltage measured:

// Example 53.1 - ADS1110 single-sided voltmeter (0~2.048VDC)

#include "Wire.h"
#define ads1110 0x48
float voltage, data;
byte highbyte, lowbyte, configRegister;
void setup()
{
 Serial.begin(9600);
 Wire.begin();
}
void loop()
{
 Wire.requestFrom(ads1110, 3);
 while(Wire.available()) // ensure all the data comes in
 {
 highbyte = Wire.read(); // high byte * B11111111
 lowbyte = Wire.read(); // low byte
 configRegister = Wire.read();
 }

 data = highbyte * 256;
 data = data + lowbyte;
 Serial.print("Data >> ");
 Serial.println(data, DEC);
 Serial.print("Voltage >> ");
 voltage = data * 2.048 ;
 voltage = voltage / 32768.0;
 Serial.print(voltage, DEC);
 Serial.println(" V");
 delay(1000);
}

Once uploaded, connect the signal to measure and open the serial monitor – you’ll be presented with something similar to:

If you need to alter the gain of the internal programmable gain amplifier of the ADC – you’ll need to write a new byte into the configuration register using:

Wire.beginTransmission(ads1110);
Wire.write(configuration byte); 
Wire.endTransmission();

before requesting the ADC data. This would be 0x8D, 0x8E or 0x8F for gain values of 2, 4 and 8 respectively – and use 0x8C to reset the ADS1110 back to default.

Differential ADC mode

In this mode you can read the difference between two voltages that each fall between zero and 5 V. The example circuit is simple (from the data sheet):

We must note here (and in the data sheet) that the ADS1110 can’t accept negative voltages on either of the inputs. You can use the previous sketch for the same results – and the resulting voltage will be the value of Vin- subtracted from Vin+. For example, if you had 2 V on Vin+ and 1 V on Vin- the resulting voltage would be 1 V (with the gain set to 1).

Conclusion

Once again I hope you found this of interest, and possibly useful. And if you enjoy my tutorials, or want to introduce someone else to the interesting world of Arduino – check out my new book “Arduino Workshop” from No Starch Press.

In the meanwhile have fun and keep checking into tronixstuff.com. Why not follow things on twitterGoogle+, subscribe  for email updates or RSS using the links on the right-hand column? And join our friendly Google Group – dedicated to the projects and related items on this website. Sign up – it’s free, helpful to each other –  and we can all learn something.

The post Tutorial – Arduino and the TI ADS1110 16-bit ADC appeared first on tronixstuff.

Tronixstuff 02 Jul 09:06

Homebrew 8-bit computer packs in 16 cores, multitasks like a champ

It looks like Jack Eisenmann has done it again. A couple of years after the hobbyist hacker built his first 8-bit computer, he's cobbled together yet another one, but this time with a whopping 16 cores. Appropriately dubbed the DUO Mega, the multicore wonder is made with 16 ATMega328p microcontrollers, each connected to an 8-bit data bus and designed to interpret a custom bytecode that runs the software. Compiled inside a nondescript plastic bin, the machine is also comprised of 16MHz crystal oscillators attached to each of the aforementioned cores, three Arduino UNO boards, 32kb of SRAM, 512kb of flash memory, eight breadboards, an Ethernet shield, a VGA out port and a multitude of components that combine to look like that mess of wires seen above. Because of all that processing power, this relatively primitive machine multitasks beautifully and can perform complicated calculations at an impressive clip. To get a demo of what this marvelous feat of DIY computing can do, have a peek at Eisenmann's video, complete with an 8-bit soundtrack, after the break.

Filed under: Desktops

Comments

Via: Hackaday

Source: DUO Mega

EMW kick-starts JuiceBox, a $99 Level 2 DIY charging station

Electric vehicle charging stations aren't cheap: one of the most affordable Level 2 (240V) units sells for $450 and only supplies 16A. Electric Motor Works (EMW) -- which is best known for its electric conversion kits -- wants to change this with JuiceBox, a 15kW Level 2 EV charger that costs just $99 in kit form (plus $10 shipping). The device, which is launching on Kickstarter today, supplies up to 62A and operates on both 120V and 240V. It's built around an Arduino microcontroller and EMW is making both the hardware and software open source.

But wait, there's more! The company is also crowdfunding a Premium Edition of JuiceBox ($199 in kit form) which adds time-of-day charging, a color LCD, ground-fault plus output protection (for outdoor use) and a unique enclosure (hopefully as funky as the one in the picture above). While the DIY kits only require basic assembly and soldering skills, you'll be able to buy fully assembled versions for $100 more. At $329 (shipped), a ready-to-use JuiceBox Premium Edition undercuts other similar charging stations by several hundred dollars. The catch? You'll have to supply your own cables (or buy them separately from EMW), including one with a standard J1772 EV connector. Hit the source link below to check out the campaign, and take a look at the PR after the break.

Filed under: Transportation

Comments

Source: EMW (Kickstarter)

Custom-built Katamari controller is made from yoga ball, DualShock 2 pad, power of the cosmos (video)

Conventional wisdom would suggest that making a for-real Katamari Damacy ball would be tricky, but that didn't stop Chris McInnis, Ron LeBlanc and Tom Gwozdz from taking up the challenge. As part of the Nuit Blanche festival in London, Canada (which also included some building-projected gaming), they were able to fashion their very own Katamari ball from a yoga ball, some stickers, wood, an Arduino microcontroller, several optical mice and a dissected DualShock 2 controller. See how it steers after the break.

Filed under: Gaming, Peripherals, Science, Alt

Comments

Via: UbercoolStuffldnont (YouTube)

Engadget 24 Jun 15:34

HackEDA hits Kickstarter, makes Arduino board design a drag-and-drop affair (video)

Writing code for an Arduino-friendly board is relatively easy; creating the board is the hard part, unless you live and breathe electrical engineering. If HackEDA has its way, however, the design process could be almost as easy as window shopping. Its new Kickstarter-backed project lets tinkerers choose from a list of parts and get a made-to-order board without knowing a lick about PCB assembly -- algorithms sort out the finer details. While the initial effort includes just 36 combos based around an Atmega328 processor, contributors who want tangible hardware can pay anything from $30 for a bare board through to $10,000 for the first stages of mass production. The truly committed will have to wait until December for the finished goods, but those willing to try HackEDA can use its existing web tool for free.

Filed under: Misc

Comments

Source: Kickstarter, HackEDA

Engadget 20 Jun 13:00

Adafruit smart helmet guides bike riders with Arduino-based light shows (video)

Bike sharing systems like New York's Citi Bike may be taking off, but it's doubtful that many participants can find every station without checking a map. Thankfully, Adafruit has unveiled a smart helmet project that could help at least a few of those riders get to their destinations while keeping their eyes on the road. The DIY effort feeds locations to an Arduino-based Flora board and its positioning add-ons, which in turn use a string of NeoPixel LEDs on the helmet as turn indicators. Commuters just have to watch for blinking lights to know where to go next. While the system isn't easy to set up when cyclists have to manually enter coordinates, it is flexible: the open-source code lets it adapt to most any bike sharing system or headpiece. As long as you can get over looking like a Christmas tree on wheels while you navigate, you can build a smart helmet of your own using the instructions at the source link.

Filed under: GPS, Transportation, Alt

Comments

Source: Adafruit

Engadget 20 Jun 08:04

Tutorial – Arduino and PCF8591 ADC DAC IC

Learn how to use the NXP PCF 8591 8-bit A/D and D/A IC with Arduino in chapter fifty-two of my Arduino Tutorials. The first chapter is here, the complete series is detailed here.

Updated 17/06/2013

Introduction

Have you ever wanted more analogue input pins on your Arduino project, but not wanted to fork out for a Mega? Or would you like to generate analogue signals? Then check out the subject of our tutorial – the NXP PCF8591 IC. It solves both these problems as it has a single DAC (digital to analogue) converter as well as four ADCs (analogue to digital converters) – all accessible via the I2C bus. If the I2C bus is new to you, please familiarise yourself with the readings here before moving forward.

The PCF8591 is available in DIP form, which makes it easy to experiment with:

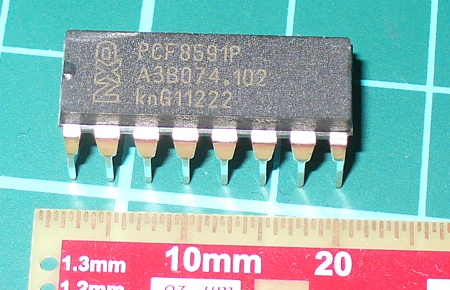
You can get them from the usual retailers. Before moving on, download the data sheet. The PCF8591 can operate on both 5V and 3.3V so if you’re using an Arduino Due, Raspberry Pi or other 3.3 V development board you’re fine. Now we’ll first explain the DAC, then the ADCs.

Using the DAC (digital-to-analogue converter)

The DAC on the PCF8591 has a resolution of 8-bits – so it can generate a theoretical signal of between zero volts and the reference voltage (Vref) in 255 steps. For demonstration purposes we’ll use a Vref of 5V, and you can use a lower Vref such as 3.3V or whatever you wish the maximum value to be … however it must be less than the supply voltage. Note that when there is a load on the analogue output (a real-world situation), the maximum output voltage will drop – the data sheet (which you downloaded) shows a 10% drop for a 10kΩ load. Now for our demonstration circuit:

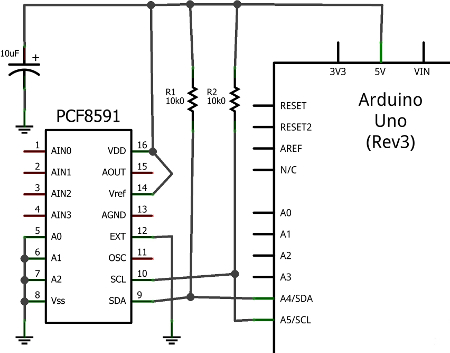
Note the use of 10kΩ pull-up resistors on the I2C bus, and the 10μF capacitor between 5V and GND. The I2C bus address is set by a combination of pins A0~A2, and with them all to GND the address is 0x90. The analogue output can be taken from pin 15 (and there’s a seperate analogue GND on pin 13. Also, connect pin 13 to GND, and circuit GND to Arduino GND.

To control the DAC we need to send two bytes of data. The first is the control byte, which simply activates the DAC and is 1000000 (or 0x40) and the next byte is the value between 0 and 255 (the output level). This is demonstrated in the following sketch:

// Example 52.1 PCF8591 DAC demo
// http://tronixstuff.com/tutorials Chapter 52
// John Boxall June 2013
#include "Wire.h"
#define PCF8591 (0x90 >> 1) // I2C bus address
void setup()
{
 Wire.begin();
}
void loop()
{
 for (int i=0; i<256; i++)
 {
 Wire.beginTransmission(PCF8591); // wake up PCF8591
 Wire.write(0x40); // control byte - turn on DAC (binary 1000000)
 Wire.write(i); // value to send to DAC
 Wire.endTransmission(); // end tranmission
 }

 for (int i=255; i>=0; --i)
 {
 Wire.beginTransmission(PCF8591); // wake up PCF8591
 Wire.write(0x40); // control byte - turn on DAC (binary 1000000)
 Wire.write(i); // value to send to DAC
 Wire.endTransmission(); // end tranmission
 }
}

Did you notice the bit shift of the bus address in the #define statement? Arduino sends 7-bit addresses but the PCF8591 wants an 8-bit, so we shift the byte over by one bit. 

The results of the sketch are shown below, we’ve connected the Vref to 5V and the oscilloscope probe and GND to the analogue output and GND respectively:

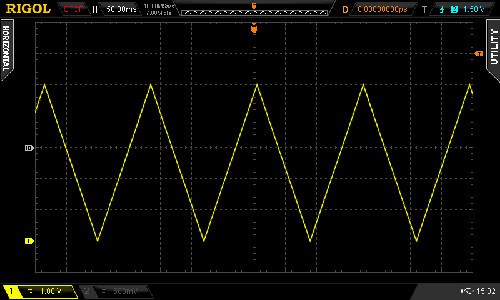
If you like curves you can generate sine waves with the sketch below. It uses a lookup table in an array which contains the necessary pre-calculated data points:

// Example 52.2 PCF8591 DAC demo - sine wave
// http://tronixstuff.com/tutorials Chapter 52
// John Boxall June 2013

#include "Wire.h"
#define PCF8591 (0x90 >> 1) // I2C bus address

uint8_t sine_wave[256] = {
 0x80, 0x83, 0x86, 0x89, 0x8C, 0x90, 0x93, 0x96,
 0x99, 0x9C, 0x9F, 0xA2, 0xA5, 0xA8, 0xAB, 0xAE,
 0xB1, 0xB3, 0xB6, 0xB9, 0xBC, 0xBF, 0xC1, 0xC4,
 0xC7, 0xC9, 0xCC, 0xCE, 0xD1, 0xD3, 0xD5, 0xD8,
 0xDA, 0xDC, 0xDE, 0xE0, 0xE2, 0xE4, 0xE6, 0xE8,
 0xEA, 0xEB, 0xED, 0xEF, 0xF0, 0xF1, 0xF3, 0xF4,
 0xF5, 0xF6, 0xF8, 0xF9, 0xFA, 0xFA, 0xFB, 0xFC,
 0xFD, 0xFD, 0xFE, 0xFE, 0xFE, 0xFF, 0xFF, 0xFF,
 0xFF, 0xFF, 0xFF, 0xFF, 0xFE, 0xFE, 0xFE, 0xFD,
 0xFD, 0xFC, 0xFB, 0xFA, 0xFA, 0xF9, 0xF8, 0xF6,
 0xF5, 0xF4, 0xF3, 0xF1, 0xF0, 0xEF, 0xED, 0xEB,
 0xEA, 0xE8, 0xE6, 0xE4, 0xE2, 0xE0, 0xDE, 0xDC,
 0xDA, 0xD8, 0xD5, 0xD3, 0xD1, 0xCE, 0xCC, 0xC9,
 0xC7, 0xC4, 0xC1, 0xBF, 0xBC, 0xB9, 0xB6, 0xB3,
 0xB1, 0xAE, 0xAB, 0xA8, 0xA5, 0xA2, 0x9F, 0x9C,
 0x99, 0x96, 0x93, 0x90, 0x8C, 0x89, 0x86, 0x83,
 0x80, 0x7D, 0x7A, 0x77, 0x74, 0x70, 0x6D, 0x6A,
 0x67, 0x64, 0x61, 0x5E, 0x5B, 0x58, 0x55, 0x52,
 0x4F, 0x4D, 0x4A, 0x47, 0x44, 0x41, 0x3F, 0x3C,
 0x39, 0x37, 0x34, 0x32, 0x2F, 0x2D, 0x2B, 0x28,
 0x26, 0x24, 0x22, 0x20, 0x1E, 0x1C, 0x1A, 0x18,
 0x16, 0x15, 0x13, 0x11, 0x10, 0x0F, 0x0D, 0x0C,
 0x0B, 0x0A, 0x08, 0x07, 0x06, 0x06, 0x05, 0x04,
 0x03, 0x03, 0x02, 0x02, 0x02, 0x01, 0x01, 0x01,
 0x01, 0x01, 0x01, 0x01, 0x02, 0x02, 0x02, 0x03,
 0x03, 0x04, 0x05, 0x06, 0x06, 0x07, 0x08, 0x0A,
 0x0B, 0x0C, 0x0D, 0x0F, 0x10, 0x11, 0x13, 0x15,
 0x16, 0x18, 0x1A, 0x1C, 0x1E, 0x20, 0x22, 0x24,
 0x26, 0x28, 0x2B, 0x2D, 0x2F, 0x32, 0x34, 0x37,
 0x39, 0x3C, 0x3F, 0x41, 0x44, 0x47, 0x4A, 0x4D,
 0x4F, 0x52, 0x55, 0x58, 0x5B, 0x5E, 0x61, 0x64,
 0x67, 0x6A, 0x6D, 0x70, 0x74, 0x77, 0x7A, 0x7D
};
void setup()
{
 Wire.begin();
}
void loop()
{
 for (int i=0; i<256; i++)
 {
 Wire.beginTransmission(PCF8591); // wake up PCF8591
 Wire.write(0x40); // control byte - turn on DAC (binary 1000000)
 Wire.write(sine_wave[i]); // value to send to DAC
 Wire.endTransmission(); // end tranmission
 }
}

And the results:

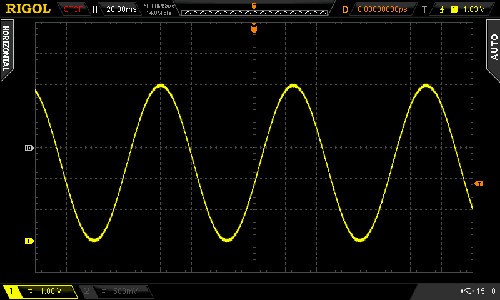
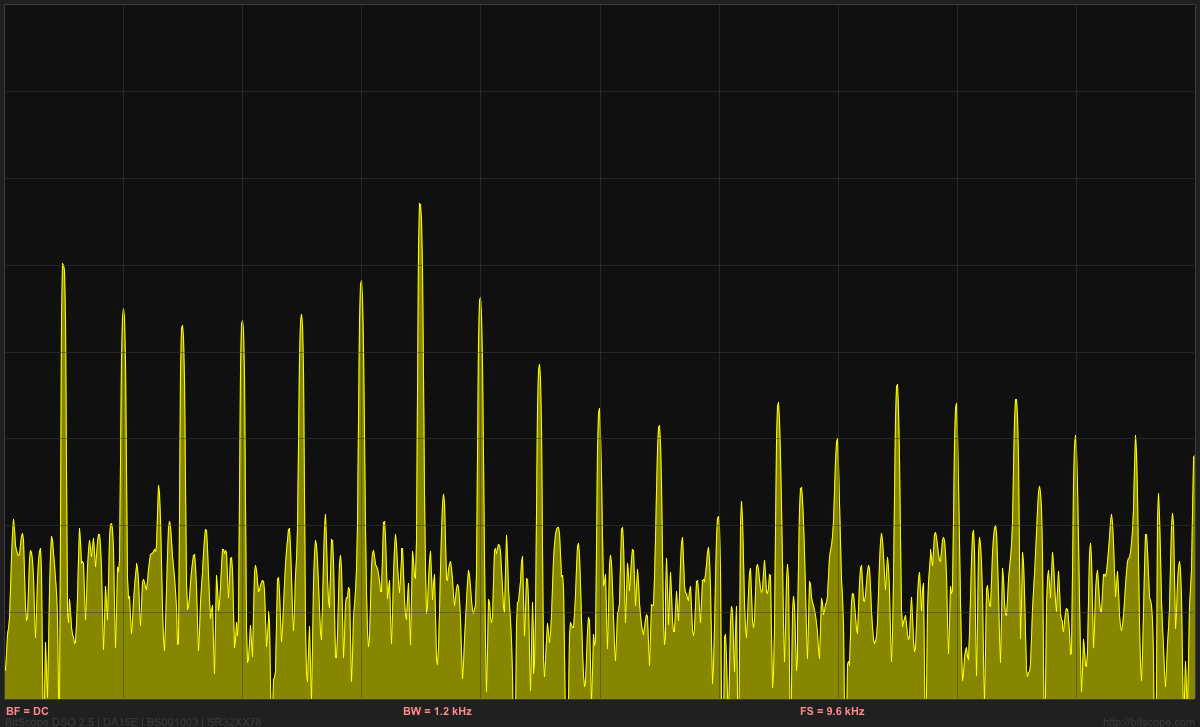
For the following DSO image dump, we changed the Vref to 3.3V – note the change in the maxima on the sine wave:

Now you can experiment with the DAC to make sound effects, signals or control other analogue circuits.

Using the ADCs (analogue-to-digital converters)

If you’ve used the analogRead() function on your Arduino (way back in Chapter One) then you’re already familiar with an ADC. With out PCF8591 we can read a voltage between zero and the Vref and it will return a value of between zero and 255 which is directly proportional to zero and the Vref. For example, measuring 3.3V should return 168. The resolution (8-bit) of the ADC is lower than the onboard Arduino (10-bit) however the PCF8591 can do something the Arduino’s ADC cannot. But we’ll get to that in a moment.

First, to simply read the values of each ADC pin we send a control byte to tell the PCF8591 which ADC we want to read. For ADCs zero to three the control byte is 0x00, 0x01, ox02 and 0x03 respectively. Then we ask for two bytes of data back from the ADC, and store the second byte for use. Why two bytes? The PCF8591 returns the previously measured value first – then the current byte. (See Figure 8 in the data sheet). Finally, if you’re not using all the ADC pins, connect the unused ones to GND.

The following example sketch simply retrieves values from each ADC pin one at a time, then displays them in the serial monitor:

// Example 52.3 PCF8591 ADC demo
// http://tronixstuff.com/tutorials Chapter 52
// John Boxall June 2013
#include "Wire.h"
#define PCF8591 (0x90 >> 1) // I2C bus address
#define ADC0 0x00 // control bytes for reading individual ADCs
#define ADC1 0x01
#define ADC2 0x02
#define ADC3 0x03
byte value0, value1, value2, value3;
void setup()
{
 Wire.begin();
 Serial.begin(9600);
}
void loop()
{
 Wire.beginTransmission(PCF8591); // wake up PCF8591
 Wire.write(ADC0); // control byte - read ADC0
 Wire.endTransmission(); // end tranmission
 Wire.requestFrom(PCF8591, 2);
 value0=Wire.read();
 value0=Wire.read();
 Wire.beginTransmission(PCF8591); // wake up PCF8591
 Wire.write(ADC1); // control byte - read ADC1
 Wire.endTransmission(); // end tranmission
 Wire.requestFrom(PCF8591, 2);
 value1=Wire.read();
 value1=Wire.read();
 Wire.beginTransmission(PCF8591); // wake up PCF8591
 Wire.write(ADC2); // control byte - read ADC2
 Wire.endTransmission(); // end tranmission
 Wire.requestFrom(PCF8591, 2);
 value2=Wire.read();
 value2=Wire.read();
 Wire.beginTransmission(PCF8591); // wake up PCF8591
 Wire.write(ADC3); // control byte - read ADC3
 Wire.endTransmission(); // end tranmission
 Wire.requestFrom(PCF8591, 2);
 value3=Wire.read();
 value3=Wire.read();
 Serial.print(value0); Serial.print(" ");
 Serial.print(value1); Serial.print(" ");
 Serial.print(value2); Serial.print(" ");
 Serial.print(value3); Serial.print(" ");
 Serial.println();
}

Upon running the sketch you’ll be presented with the values of each ADC in the serial monitor. Although it was a simple demonstration to show you how to individually read each ADC, it is a cumbersome method of getting more than one byte at a time from a particular ADC.

To do this, change the control byte to request auto-increment, which is done by setting bit 2 of the control byte to 1. So to start from ADC0 we use a new control byte of binary 00000100 or hexadecimal 0x04. Then request five bytes of data (once again we ignore the first byte) which will cause the PCF8591 to return all values in one chain of bytes. This process is demonstrated in the following sketch:

// Example 52.4 PCF8591 ADC demo
// http://tronixstuff.com/tutorials Chapter 52
// John Boxall June 2013
#include "Wire.h"
#define PCF8591 (0x90 >> 1) // I2C bus address
byte value0, value1, value2, value3;
void setup()
{
 Wire.begin();
 Serial.begin(9600);
}
void loop()
{
 Wire.beginTransmission(PCF8591); // wake up PCF8591
 Wire.write(0x04); // control byte - read ADC0 then auto-increment
 Wire.endTransmission(); // end tranmission
 Wire.requestFrom(PCF8591, 5);
 value0=Wire.read();
 value0=Wire.read();
 value1=Wire.read();
 value2=Wire.read();
 value3=Wire.read();
 Serial.print(value0); Serial.print(" ");
 Serial.print(value1); Serial.print(" ");
 Serial.print(value2); Serial.print(" ");
 Serial.print(value3); Serial.print(" ");
 Serial.println();
}

Previously we mentioned that the PCF8591 can do something that the Arduino’s ADC cannot, and this is offer a differential ADC. As opposed to the Arduino’s single-ended (i.e. it returns the difference between the positive signal voltage and GND, the differential ADC accepts two signals (that don’t necessarily have to be referenced to ground), and returns the difference between the two signals. This can be convenient for measuring small changes in voltages for load cells and so on.

Setting up the PCF8591 for differential ADC is a simple matter of changing the control byte. If you turn to page seven of the data sheet, then consider the different types of analogue input programming. Previously we used mode ’00’ for four inputs, however you can select the others which are clearly illustrated, for example:

So to set the control byte for two differential inputs, use binary 00110000 or 0x30. Then it’s a simple matter of requesting the bytes of data and working with them. As you can see there’s also combination single/differential and a complex three-differential input. However we’ll leave them for the time being.

Conclusion

Hopefully you found this of interest, whether adding a DAC to your experiments or learning a bit more about ADCs. We’ll have some more analogue to digital articles coming up soon, so stay tuned. And if you enjoy my tutorials, or want to introduce someone else to the interesting world of Arduino – check out my new book “Arduino Workshop” from No Starch Press.

In the meanwhile have fun and keep checking into tronixstuff.com. Why not follow things on twitterGoogle+, subscribe  for email updates or RSS using the links on the right-hand column? And join our friendly Google Group – dedicated to the projects and related items on this website. Sign up – it’s free, helpful to each other –  and we can all learn something.

The post Tutorial – Arduino and PCF8591 ADC DAC IC appeared first on tronixstuff.

New freshman design seminar

This week I filed paperwork for yet another new course for bioengineering majors: a freshman design seminar.  The course idea was started by the Biomedical Engineering Society (BMES), a student club at UCSC.  They were seeing a lack of engineering in the first couple of years of the bioengineering major.  The first two years at UCSC usually have 12 technical courses and 6 general-education courses, but the bioengineering major has 16 required lower-division courses, mostly science and math.  That means that most students don’t get any engineering design courses in their first two years.

The BMES officers brought the idea of a lower-division project first to the dean of the School of Engineering, who encouraged them to get it created as a permanent course in the department.  They then brought the idea to David Bernick and me, and we brainstormed how to convert the project idea into a workable course that has no prerequisites.  We decided to go with a 2-unit course (about 60 hours total work) rather than a standard 5-unit course (about 150 hours) or a 7-unit lecture plus lab (about 210 hours), because bioengineering students can’t really afford to delay any of their technical coursework, so the design seminar has to be handled as overload.

We decided on winter quarter to offer the seminar.  Fall quarter was rejected, since students will need to be advised to take it and summer advising sessions do not really provide much opportunity for peer advising by fellow engineering students. Spring quarter was rejected, because I’ll have the circuits course (with 12 hours a week in lab, plus 3.5 hours a week in lecture, plus grading), so won’t have the time to do the freshman seminar as well.  David could probably do it in Spring, but it would be best if there were more than one possible instructor available.  It’s not clear who would teach the course the first year—I would have to take it on as overload if I did it, and money would have to be found to hire David to do it, as the course wasn’t even thought of when the curriculum leave plan was written for the next fiscal year.

The class is limited to freshmen and sophomore bioengineering majors (or premajors), but upper-division bioengineers will be encouraged to volunteer as mentors (and some may be paid as group tutors).

Here is the catalog copy I submitted (limited to 40 words):

A first course in engineering design for bioengineers. In co-operation with the Biomedical Engineering Society (BMES).  Students choose a design project and work on it in competitive and cooperative teams. Covers team building, design, prototyping, and report writing.

And here is the more detailed “supplemental sheet” that has the actual course description:

Undergraduate Supplemental Sheet

Information to accompany Request for Course Approval


Sponsoring Agency: Biomolecular Engineering
Course #: 88A
Catalog Title: BMES freshman design seminar
Please answer all of the following questions using a separate sheet for your response.


1. Are you proposing a revision to an existing course? If so give the name, number, and GE designations (if applicable) currently held.
This is not a revision to any existing course.

2. In concrete, substantive terms explain how the course will proceed. List the major topics to be covered, preferably by week.
This course is a project course for freshmen, done in conjunction with the Biomedical Engineering Society (BMES), a student organization on campus.

  1. The class will choose a project for the quarter, with advice from BMES and the instructor.  Lab and fabrication facilities will be toured.
  2. Instructor and reference librarians will introduce students to finding detailed information in the library and on the web relevant to the course (finding data sheets for parts, finding tutorials on relevant theory, searching for survey articles and application notes, using EndNote or BibTeX to maintain a bibliography, …).  Students will choose topics relevant to the project to research.
  3. Students will present the results of background research and brainstorm approaches to the design problem.  Students will be assigned the task of finding and reading data sheets for components they might need.  Students will write a clear set of design goals for the project.
  4. Teams will be formed to prototype different approaches. Dynamics of team formation and functioning will be discussed.  Procedures will be determined for abandoning unpromising approaches, merging teams, and starting new ones.
  5. Weeks 5–8 will involve prototyping projects, with instruction in prototyping technologies and tools (laser cutter, soldering, drill press, glass bending, … ) as needed.  Written drafts of design reports will be required every 2 weeks—these are cumulative reports, not just what has been done since last time.
  6. Weeks 9 and 10 will involve testing and comparison of the different design approaches and a collaborative final design report from the entire class that includes an analysis of all the different designs—their strengths and their weaknesses.  The final design report will be given as a public oral presentation, as well as in a written report.

3. Systemwide Senate Regulation 760 specifies that 1 academic credit corresponds to 3 hours of work per week for the student in a 10-week quarter. Please briefly explain how the course will lead to sufficient work with reference to e.g., lectures, sections, amount of homework, field trips, etc. [Please note that if significant changes are proposed to the format of the course after its initial approval, you will need to submit new course approval paperwork to answer this question in light of the new course format.]
Students will spend 3.5 hours a week in lab/lecture and about 3–6 hours a week in reading, writing, and group design meetings, depending on level of commitment to the course, making this course 2–3 units of effort.

4. Include a complete reading list or its equivalent in other media.
The students will be reading primarily about the background and components for the particular project they are doing, which will most likely be different each year.  For example, if students do a project on building a device to continuously monitor optical density in a liquid culture, they will be reading about the theory of optical density measurements, how liquid cultures are grown, light sources (LEDs, laser diodes, and incandescent lights), photo detectors (photodiodes, phototransistors, and photoresistors), and whatever other knowledge they need to design and build their prototypes.  Most of this reading will be from the internet and books or journal articles from the library.
Discussions on team formation may be based on a book like Teamwork and Project Management, 3rd edition by Karl A. Smith and P.K. Imbrie, but a shorter, more readable presentation is probably needed.  Short articles like http://www.mindtools.com/pages/article/newLDR_86.htm (“Forming, Storming, Norming, and Performing”) or http://www.clemson.edu/OTEI/documents/teamwork-handbook.pdf‎ (“Successful Strategies for Teams”) may be more appropriate.

5. State the basis on which evaluation of individual students’ achievements in this course will be made by the instructor (e.g., class participation, examinations, papers, projects).
Students will be evaluated primarily on design reports and participation in project design.

6. List other UCSC courses covering similar material, if known.
This course is similar to capstone design courses and senior theses, but on a much smaller scale.  It is intended to be a first introduction to engineering design for bioengineering majors.

7. List expected resource requirements including course support and specialized facilities or equipment for divisional review. (This information must also be reported to the scheduling office each quarter the course is offered.)
Students will need access to a lab where they can use both electronic equipment and standard molecular biology equipment.  Baskin 287 has all the molecular biology equipment, but lacks a multimeter, bench power supply, oscilloscope, function generator, and soldering station.  Several of the electronics labs have the electronics equipment, but lack water, sinks, and biomolecular lab equipment.  A Bunsen burner for shaping glass tubes would be useful for some projects.
Students may also need access to the laser cutter and other fabrication tools in Baskin Engineering 138.

8. If applicable, justify any pre-requisites or enrollment restrictions proposed for this course. For pre-requisites sponsored by other departments/programs, please provide evidence of consultation.
There are no prerequisites for the course, as it is intended as a freshman seminar.  Enrollment is limited to bioengineering majors and pre-majors who are freshman or sophomores, to keep the freshmen from being overwhelmed by upper-division students.  A small number of upper-division students are expected to participate as group tutors.

9. Proposals for new or revised Disciplinary Communication courses will be considered within the context of the approved DC plan for the relevant major(s). If applicable, please complete and submit the new proposal form (http://reg.ucsc.edu/forms/DC_statement_form.doc or http://reg.ucsc.edu/forms/DC_statement_form.pdf) or the revisions to approved plans form (http://reg.ucsc.edu/forms/DC_approval_revision.doc or http://reg.ucsc.edu/forms/DC_approval_revision.pdf).
This course is not expected to contribute to any major’s disciplinary communication requirement, though it will include feedback on writing design reports so that students are better prepared for writing in upper-division technical courses.

10. If you are requesting a GE designation for the proposed course, please justify your request making reference to the attached guidelines.
This course is a group design effort, in which students agree on an overall design project, split into teams to prototype different approaches to the design, and work cooperatively both within the teams and in the class as a whole.  The course matches the Practice: Collaborative Endeavor (PR-E code): “Students learn and practice strategies and techniques for working effectively in pairs or larger groups to produce a finished product. For example, students might learn specialized practical information such as how to use change-management software to monitor and manage changes initiated by multiple group members. Alternatively, they might learn basic information about leadership, teamwork, and group functioning, which they can incorporate into their own group process. What is common to all courses is that some instruction regarding the process of collaboration is provided, in addition to instruction specific to the academic discipline and the products being produced.”

11. If this is a new course and you requesting a new GE, do you think an old GE designation(s) is also appropriate? (CEP would like to maintain as many old GE offerings as is possible for the time being.)
As this is a 2-unit course, the old GE designations, which were reserved for 5-unit courses, are not applicable.

Yesterday (Friday), BMES met with me to discuss whether the course description met their goals and how to get sufficient enrollment in the course. (I’d had to file the paperwork in a hurry, hoping to catch the last Committee on Educational Policy meeting of the year—we may still have missed it, in which case the course won’t be approved until the fall.)  The students who read the course description seemed to think that the course was what they were looking for.  I’m a bit worried about whether it can be kept to the workload of a 2-unit course.

We also talked a bit about possible projects for the first offering.  Two have been discussed so far:

  • A low-cost optical density meter for continuous monitoring of OD 600 (with an LED light source) or OD 650 (with a narrower-spectrum laser-diode light source) of cultures on a shaker table.
  • A pulse oximeter for measuring blood oxygenation.

Both of these projects have minimal analog electronics (basically just an LED or two and a phototransistor, with associated resistors).  The challenging parts are the mechanical design for the density meter (how do the sensor and shaker flask interact?  submersible sensor? culture pumped through a tube? waterproofing? autoclavable?) and the programming for the pulse oximeter (I think that most of the usual analog electronics can and should be replaced by programming, but is the Arduino powerful enough?  do we need a Raspberry Pi instead?).

We’ll be encouraging the members of BMES to come up with other project ideas, so that there can be a different project every year.  Another possibility that was mentioned is to build a thermal cycler for PCR, like the OpenPCR project, but the design work there has already been done, and the parts are more expensive.

The two projects we’ve been thinking of so far use only a few dollars worth of parts and a re-usable $22 Arduino board, so I don’t see any problem in just having students buy the components themselves.  It would be good for them to learn how to find and order parts from companies like DigiKey (though they are an expensive source for 650nm laser diodes: $9 vs. 5 for $10 at other suppliers).

Unless we get some corporate sponsorship, we’ll have to run this design seminar on a shoestring, as the School of Engineering relies on student lab fees for consumable parts, and those fees have to be approved about a year in advance. Anyone know a company interested in making a small donation to support such a freshman design seminar?  (It is not worth my time to go looking for a sponsor, but I’d be glad to put anyone who wants to make a donation in touch with the University Development people working with the School of Engineering.)


Filed under: freshman design seminar Tagged: Arduino, Biomedical Engineering Society (BMES), curriculum design, design project course, engineering education, prototype