Posts with «arduino» label

Make your cat behave when you are away using Arduino

The goal of this project was to create a small device, which detects movement in protected areas (e.g. tables) and allows you to speak usual phrases in your voice to the cat to control its behaviour when you are away. It’s called Cat Protector and prototyped on Arduino Uno  by Lucky Resistor, a creative guy who enjoys software development and electrical engineering:

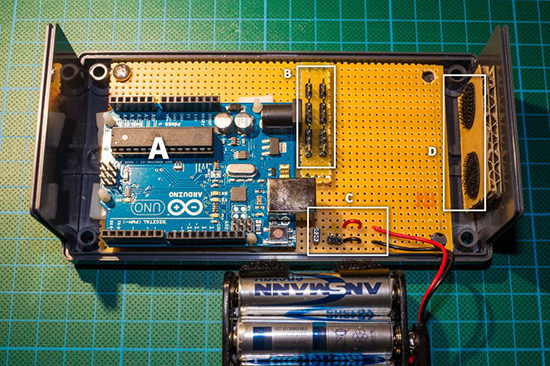
I started with a prototype, using an Arduino Uno and a large breadboard. The first step was to realize an acceptable sound output. To realize this I added a shield with SD card adapter and wrote some optimized code to stream sound from the SD card in 22.1kHz using a 12bit DAC. The amplification to a speaker completed this part of the project where I have two solutions. Next I experimented with different motion sensors to detect the motion of the cat and finished the hardware part using a dual color LED for a simple status display.

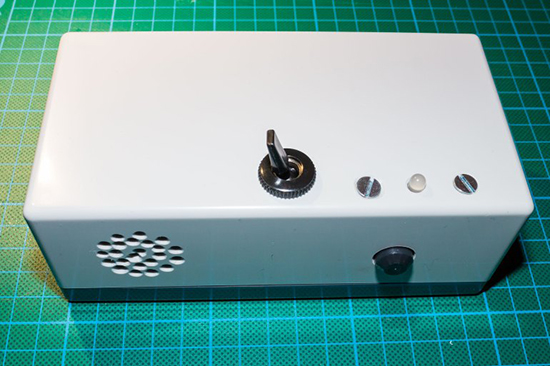
Creating a compact device from the prototype was the next challenge, I could place the whole circuit I used on a small prototyping area and squeezed everything in a small casing. From outside, the device looks simple and tidy.
He documented everything in details on his website, especially the software part:

I read so many Arduino related articles and tutorials, but most of them stop when the prototype is running. I hope this documentation helps people to see how to structure Arduino software to make it extensible and keep it readable. This is especially necessary to write more complex logic than just to blink some LEDs. Also I hope to give some inspiration how to develop the prototype to a final device.
Check the full  documentation here.

Arduino Blog 11 Nov 21:06

Arduino Gets Physical With The Materia 101 3D Printer

We take an early look at the Materia 101, Arduino’s first foray into 3D printers

Read more on MAKE

Arduino Gets Physical With The Materia 101 3D Printer

We take an early look at the Materia 101, Arduino’s first foray into 3D printers

Read more on MAKE

Bringing makers back to the Lab

Scientists working in a lab are just folks. Like motor heads with cars, we have our favourite makes and models—except with scientists, it's all about the lab equipment.

Read more on MAKE

Smart Remote Control Doubles as Super Simple IR Sniffer

Want to sniff a remote control or other IR device's control codes? The Smart Remote Control will make quick work of that, combining an Arduino Yún with a simple solderless breadboard circuit.

Read more on MAKE

A simple light follower with Analog 180° Micro Servo

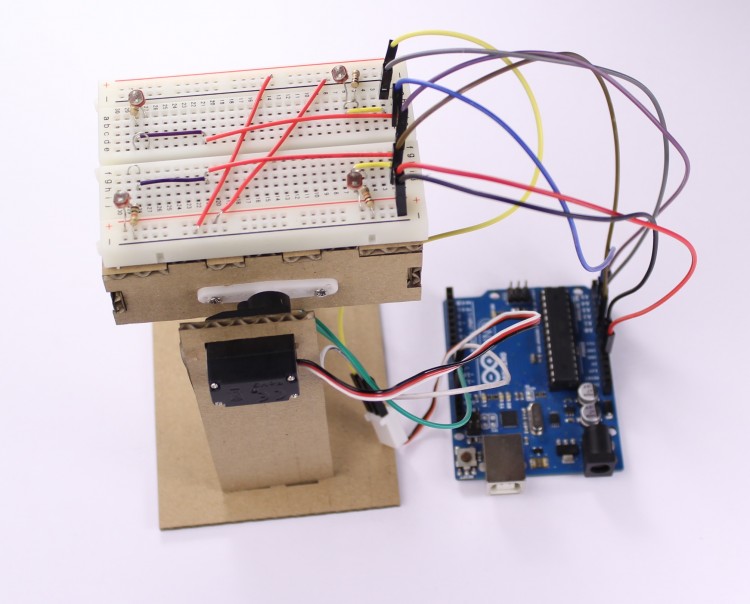
Servos are composed of an electric motor mechanically linked to a potentiometer and they are able to translate the width of the pulse into a position. When you command the servo  to rotate, the motor is powered until the potentiometer reaches the value corresponding to the commanded position.

Today we’d like to share with you a tutorial with the aim of showing how to make a simple light follower made of cardboard using Arduino Uno and a microservo, in this case the Analog 180° Micro Servo.

Follow the step by step lesson to build one yourself.


Arduino Blog 10 Nov 22:18

Arduino sensors let ballerinas 'paint' with their pointes

What if you could paint with your shoes? Electronic Traces is a pair ballet pointe shoes that sends a dancer's movements to a nearby smartphone. Using Lilypad Arduinos, they record pressure and movement whenever they touch the ground. This data can then be visualized by an accompanying app, allowing dancers to view their performances after the fact, or compare them to others'.

Filed under: Wearables

Comments

Via: Prosthetic Knowledge, Make

Source: Lesia Trubat

MOMA Adds Arduino, Makey Makey, And More

I've always said that one day I'd wake up and the Arduino would be in a museum. However, I'd sort of expected it to take a bit longer.

Read more on MAKE

MAKE » Arduino 09 Nov 15:01

Medical Tricorder Mark I

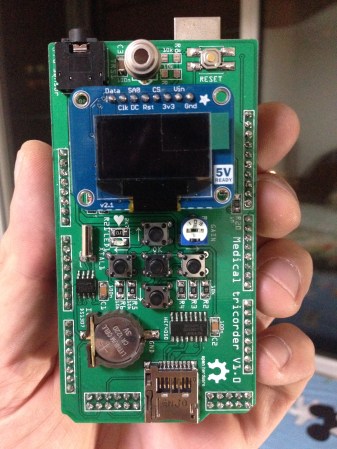
A handheld tricorder is as good a reason as any to start a project. The science-fiction-derived form factor provides an opportunity to work on a lot of different areas of hardware development like portable power, charging, communications between sensor and microcontroller. And of course you need a user interface so that the values being returned will have some meaning for the user.

[Marcus B] has done a great job with all of this in his first version of a medical tricorder. The current design hosts two sensors, one measures skin temperature using infrared, the other is a pulse sensor.

For us it’s not the number of sensors that makes something a “tricorder” but the ability of the device to use those sensors to make a diagnosis (or to give the user enough hints to come to their own conclusion). [Marcus] shares similar views and with that in mind has designed in a real-time clock and an SD card slot. These can be used to log sensor data over time which may then be able to suggest ailments based on a known set of common diagnosis parameters.

Looking at the image above you may be wondering which chip is the microcontroller. This build is actually a shield for an Arduino hiding underneath.

There’s a demonstration video after the break. And if you find this impressive you won’t want to miss the Open Source Science Tricorder which is one of the finalists for the 2014 Hackaday Prize.


Filed under: Medical hacks
Hack a Day 08 Nov 03:01

The KIM-1 Computer Minified

The KIM-1 wasn’t the firs microcomputer available to computer hobbyists and other electron aficionados, but it was the first one that was cheap. It was also exceedingly simple, with just a 6502 CPU, a little more than 1k of RAM, 2k of ROM, a hexadecimal keypad and a few seven-segment displays. Still, a lot of software was written for this machine, and one of these boards can be found in every computer history museum.

[Oscar] thought the KIM-1 was far too cool to be relegated to the history books so he made his own. It’s not a direct copy – this one uses an Arduino for the brains, only breaking out some buttons, a pair of four-digit seven-segment displays, and the I2C and SPI pins on the ‘duino. The KIM-1 is emulated by the Arduino, allowing for the same interface as an original connected up to an old teletype, and [Oscar] got his hands on the original code for Microchess and the first 6502 disassembler from [Woz] and [Baum].

[Oscar] put the schematics for his version of the KIM-1 up, and has the PCBs up on SeeedStudio. If you’re looking for an awesome replica of a vintage computer and a nice weekend project, here ‘ya go.


Filed under: classic hacks