Posts with «arduino» label

Audio Effects on the Intel Edison

With the ability to run a full Linux operating system, the Intel Edison board has more than enough computing power for real-time digital audio processing. [Navin] used the Atom based module to build Effecter: a digital effects processor.

Effecter is written in C, and makes use of two libraries. The MRAA library from Intel provides an API for accessing the I/O ports on the Edison module. PortAudio is the library used for capturing and playing back audio samples.

To allow for audio input and output, a sound card is needed. A cheap USB sound card takes care of this, since the Edison does not have built-in hardware for audio. The Edison itself is mounted on the Edison Arduino Breakout Board, and combined with a Grove shield from Seeed. Using the Grove system, a button, potentiometer, and LCD were added for control.

The code is available on Github, and is pretty easy to follow. PortAudio calls the audioCallback function in effecter.cc when it needs samples to play. This function takes samples from the input buffer, runs them through an effect’s function, and spits the resulting samples into the output buffer. All of the effect code can be found in the ‘effects’ folder.

You can check out a demo Effecter applying effects to a keyboard after the break. If you want to build your own, an Instructable gives all the steps.


Filed under: digital audio hacks

The Biggest Super Hexagon Fan

For those who haven’t addicted themselves to Super Hexagon yet, it’s pretty… addicting, to say the least. Normally this 80’s arcade-style game would run in a browser but some of the people at Club de Jaqueo in Buenos Aires decided to cram all of that into an Arduino. They didn’t stop there, though, and thought that it would work best with a POV display.

To navigate the intricate maze of blending a POV display with a fast-paced game like this, the group turned to the trusty Arduino Micro. After some frustration in the original idea, they realized that the game is perfectly suited for a POV display since it’s almost circular. The POV shouldn’t take up too much of the processing power of the Arduino, so most of the clock cycles can be used for playing the game. They couldn’t keep the original name anymore due to the lack of hexagon shape (and presumably copyrights and other legal hurdles), but the style of the original is well-preserved.

The group demonstrated their setup this past weekend, and the results are impressive judging by the video below. They’ve also released their source code and schematics as well, in case you have an old fan (or maybe even a bicycle?) lying around that is just begging to be turned into a mini-arcade game.


Filed under: Arduino Hacks
Hack a Day 02 Dec 06:00

UV Laser Projector Shines With Glow-in-the-Dark Vinyl

Mirror galvanometers were originally developed in the 17th century to precisely measure very small changes in current. Unlike other instruments of the day, a mirror galvanometer could clearly show minute current variations by translating tiny movements of the mirror into large movements of the light reflected off of the mirror. Before clean electrical amplification became possible, this was the best means of measuring tiny differences in current. True mirror galvanometers are very sensitive instruments, but hobby servos can be used as a low-fidelity alternative, like with this project on Hackaday.io created by [robives].

Using a mirror galvanometer is by far the most common technique for laser projection shows – it’s really the only way to move the laser’s beam quickly enough to create the visual illusion of a solid line in real time. A mirror galvanometer works by using coils to attract magnets attached to the mirror, allowing the angle of the mirror to change when current is applied to the coils. This movement is extremely small, but is amplified by the distance to the projection surface, meaning the laser’s beam can move huge distances in an instance. If you’ve ever seen a laser show, it almost certainly used this technique. But driving galvos requires a beefy DAC, so we can’t blame [robives] for wanting to keep it digital.

[robives’s] project side-steps the need for galvanometers by using glow-in-the-dark vinyl and a UV laser. The result is a laser beam trail which lasts much longer, which means that solid lines are visible without the need for high-speed galvos. A build like this lets you experiment with laser projections without dealing with sensitive mirror galvos, and instead use components that you probably already have sitting on your workbench.


Filed under: laser hacks
Hack a Day 02 Dec 03:00

Arduino Powered Knife-Wielding Tentacle will Leave You in Stitches

Writing articles for Hackaday, we see funny projects, and we see dangerous projects. It’s rare to find a project which combines the two. This one somehow manages to pull it off. [Outaspaceman] is familiar with LittleBits, but he’s just starting to learn Arduino programming. He completed the blink tutorial, but blinking an LED just wasn’t enough fanfare for the success of his first Arduino program. He connected the Arduino Mega’s LED output to a pair of LittleBits which then switch a servo between two positions. A bare servo wouldn’t be much fun, so [Outaspaceman] connected a tentacle and a small Swiss army knife. Yes, a knife.

The tentacle in question is designed to be a finger puppet. There’s something about a tentacle waving a knife around that is so hilarious and absurd that we couldn’t help but laugh. We’re not alone apparently, as this video has gone viral with over 1 million views. It’s almost like a violent revenge of the most useless machine. For the technically curious, the tentacle’s seemingly random motion is analogous to that of the double pendulum.

Our readers will be happy to know that [Outaspaceman] has made it to the Arduino servo tutorial, and is now controlling the servo directly, no LittleBits needed. We just hope he has a good way to turn his creation off – without the need for stitches.


Filed under: Arduino Hacks

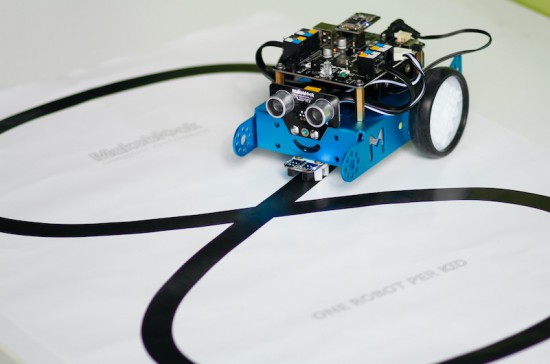
the easiest educational robot for kids, Mbot, goes AtHeart

It’s cute, it’s fun and easy to assemble, it’s mBot by Makebloc, the new educational robot joining Arduino AtHeart program!

mBot it’s an all-in-one solution for kids and beginners to enjoy the hands-on experience about robotics, programming, and electronics.

You can program it with drag-and-drop graphical programming software based on Scratch 2.0 and the magic happens: the robots can follow lines, kick balls and push objects, avoid walls and more. You can also switch from graphical to text-based programming in Arduino mode as it can be coded with Arduino IDE environment.

Watch the video of their successful Kickstarter campaign:

mBot supports wireless communication, standard Arduino boards like Arduino Uno, Leonardo boards, Arduino Nano, Arduino Mega 2560, Makeblock mCore (based on Arduino Uno).

The main control board’s design, mCore of mBot, is based on Arduino UNO: with intuitional color labels and easy-to-use RJ25 connectors, the board can get wired easily so students can then get more time to focus on creating all kinds of interactive stories and projects.

To help teachers, parents, and kids get started easier and faster the robot kit has two free tutorial e-books and online manuals are provided and increasing continually.

Take a look at mBot on Makeblock website and discover how to use 2.4GHz wireless module and Bluetooth module with mBot:

Arduino Blog 30 Nov 15:15

Video tutorial on using RobotGeek modules with the DynamixShield and Arduino Due

Robotic Wheatley from Portal 2

It’s been over 4 years since Portal 2 launched, but Wheatley, the AI character with a British accent, remains a captivating character. [Evie Bee] built a Wheatley replica complete with sound, movement, and one glowing eye.

The body of Wheatley is made out of blue insulation foam, also called XPS foam, laminated together with UHU Polyurethane glue. This formed a sphere, which was then cut into a detailed body. Papier mache clay was used to strengthen the thin foam.

The electronics for this build provide light, motion, and sound. The eye is moved by a total of 3 Arduino controlled servos: two for the movement of the eye, and one to allow it to open and close. Movement is controlled by two joysticks. Sound is provided by the Adafruit Sound Board, which connects to a speaker and a Velleman Sound to Light Kit. This kit controls the LEDs that light the eye, making it react to the voice of Wheatley.

You can watch this Wheatley rant at you after the break. Of course if you’re going to have a Wheatley you need a GLaDOS potato as well.


Filed under: robots hacks
Hack a Day 30 Nov 12:01

Start Gaming Early with IKEA High (Score) Chair

If you want your kid to be really great at something, you have to start them out early. [Phil Tucker] must want his kid to be a video gamer pretty badly. [Phil’s] build starts with a $20 IKEA high chair. He likes these chairs because at that price point, tearing into them isn’t a big risk. What’s more is you can buy extra trays so you can use it as a modular project with different trays serving different purposes.

The chair has two joysticks and two buttons, looking suspiciously like a video game controller. The current incarnation (see video, below) uses an Arduino Uno to trigger an Akai MPC1000 synthesizer via the MIDI interface.

Of course, you could control other MIDI devices or even program the Arduino to do other things (like act as a game controller). We’ve seen lots of IKEA hacks, including a laser cutter, a camera slide, and even a printer (not a 3D printer, although we covered that, too).


Filed under: Android Hacks, musical hacks

Party Like a Sci-Fi Billionaire with the Music-Sensing Light from Ex Machina

Now you can recreate the infamous dance scene from Ex Machina with some cardboard, LEDs, and Arduino.

Read more on MAKE

The post Party Like a Sci-Fi Billionaire with the Music-Sensing Light from Ex Machina appeared first on Make: DIY Projects, How-Tos, Electronics, Crafts and Ideas for Makers.

Ultrasonic Collision Avoidance Arduino and Raspberry Pi

Hi;

I am building and testing a telepresence wheeled rover bot that has two methods of control:

1. Web Interface (Manual Mode): This consists of a control panel on a web page served using WebIOPi on a Raspberry Pi which, when activated, sends commands to an Arduino Nano AT Mega328P via a two wire i2c interface (Forward, Back etc). 

read more