Posts with «arduino» label

Smart homes and pervasive technologies exhibition

Git Commit is an interactive installation and exhibition about smart homes, and user response to pervasive technologies entering our private spaces. The installation aims to further the research that Casa Jasmina, powered by Arduino and Genuino, is carrying out regarding social home environment from an open design and user centered perspective.

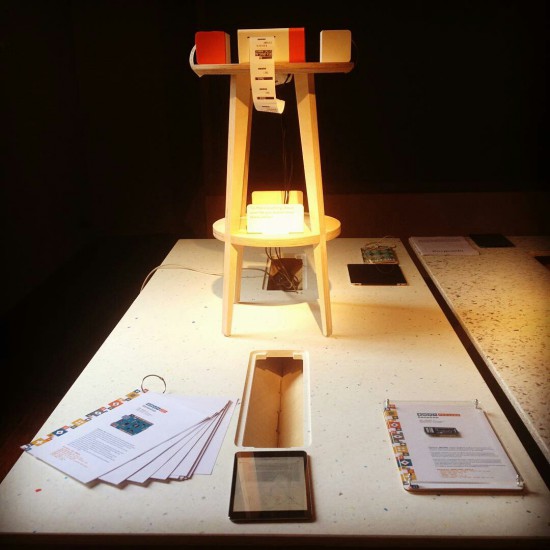
In order to deeply understand the impact of IoT in the house for the possible stakeholders, an interactive system of four mini-printers will be set up at Palazzo Clerici, a 17th century building located in the heart of the city of Milan, and firstly belonged to one of the oldest and most powerful Milanese families, the Visconti dei Consignori di Somma.

Each printer will be connected to Casa Jasmina GitHub repository where users will be able to respond to questions and spark new avenues to the project.

The feedback gained will inform new types of interactions and approaches to the future smart home, that will reflow in the Casa Jasmina design process.

Come and visit us and give us your input too! Check this page and explore the topics.

Hack Your Pebble Steel to Control Your Raspberry Pi

If you already have a Raspberry Pi running a Node.js server, you're already on your way to controlling your home with a smartwatch.

Read more on MAKE

The post Hack Your Pebble Steel to Control Your Raspberry Pi appeared first on Make: DIY Projects and Ideas for Makers.

These Middle Schoolers Built a Custom Arduino Board Game to Explore Ancient Egypt

A hidden sarcophagus, digital dice, mummy voice over, and desert sound effects. This board game looks like it's fun and educational.

Read more on MAKE

The post These Middle Schoolers Built a Custom Arduino Board Game to Explore Ancient Egypt appeared first on Make: DIY Projects and Ideas for Makers.

Open Source Robotics With WireBeings

Everyone needs a cute robotic buddy, right? [Matthew Hallberg] created WireBeings, an open source 3D printed robotic platform. Looking like a cross between Wall-E and Danbo, WireBeings is designed around the Arduino platform. We do mean the entire platform. You can fit anything from an Arduino micro to a Mega2560 stacked with 3 shields in its oversized head. There’s plenty of room for breadboards and custom circuits.

WireBeings is designed to be 3D printed. All the non-printable parts are commonly available. Gear motors, wheels, the ubiquitous HC-SR04 ultrasonic sensor, and a few other parts are all that is needed to bring this robot to life. Sketches are downloaded via USB. Once running, WireBeings can communicate via an HC-06 Bluetooth module.  If the Arduino isn’t enough power for whatever project you’re working on, no problem. [Matt] designed WireBeings to carry a smartphone. Just connect the robot and phone via Bluetooth, and let the phone’s processor do all the heavy lifting. What if you don’t have a spare phone? Check our report on hacks using prepaid Android Smartphones.

We could see WireBeings as the centerpiece for a “learn Arduino” class at a hackerspace. Start with the classic blinky sketch on one of the robot’s eyes. Build from there until the students have a fully functioning robot.

There is definitely room for improvement on the WireBeings project. [Matt] made the rookie mistake of going with a single 9-volt battery to power his creation. While a 9V is fine for the Arduino, those motors will quickly drain it. [Matt’s] planning on moving to a LiPo in the future. Why not stop by the project page and give him a hand?


Filed under: robots hacks
Hack a Day 13 Apr 12:00

Arduino Comes To The Raspberry Pi, Linux ARM Devices

Arduino is the perfect introduction to microcontrollers and electronics. The recent trend of powerful, cheap, ARM-based single board Linux computers is the perfect introduction to computer science, programming, and general Linux wizardry. Until now, though, Arduino and these tiny ARM computers have been in two different worlds. Now, finally, there are nightly builds of Arduino IDE on the Raspberry Pi and other single board Linux computers.

The latest Arduino build for ARM Linux popped up on the arduino.cc downloads page early this week. This is the result of an incredible amount of work from dozens of open source developers across the Arduino project. Now, with just a simple download and typing ‘install’ into a terminal, the Arduino IDE is available on just about every single board Linux computer without having to build the IDE from source. Of course, Arduino has been available on the Raspberry Pi for a very long time with sudo apt-get install arduino, but this was an older version that cannot work with newer Arduino boards.

Is this distribution of the Arduino IDE the same you would find on OS X and Windows? Yep, everything is the same:

While this is really just arduino.cc improving their automated build process and putting a link up on their downloads page, it does make it exceptionally easy for anyone to set up a high school electronics lab exceptionally easy. The Raspberry Pi is almost a disposable computing device, and combining it with Arduino makes for a great portable electronics lab.


Filed under: Arduino Hacks, linux hacks, Raspberry Pi

Use Fair speaker and donate to musicians!


Most of the music we listen to comes from convenient streaming services distributing music of thousands of artists from all over the world.  But only a small amount of money actually reaches the artists you like. A team of student (Nicolas Armand, Inês Araújo, Mette Mørch, Monika Seyfried)  used a MKR1000  to implement a donation service during the Interaction Design Programme at CIID with the support of Massimo Banzi and Dario Buzzini:

We wanted to bring some awareness to this issue with our project. So, with this in mind we envisioned Fair Speaker, a speaker that allows you to donate money to artists while you listen to music.

Just plug in your device, and start listening. You then set how much you want to donate the artist, compared to how much the usual streaming services pay them. For instance, Spotify pays around 0.0003$/min to the artist. This means that for them to get 1$, you’d have to listen to their music for 55,5 hours. If you don’t think that’s fair, you can set your own rate.

The speaker keeps track of how long you’ve been listening and how much money you’re donating. The system is powered by a Genuino MKR-1000, which is also used to connect wirelessly to the PayPal API, used to send your donation.

When you’re done, just press Pay and the money is sent to the Fair Speaker service, that then distributes it to the artists you selected when signing up.

Enjoy your music. Be fair to the ones who made it.

Watch the Fair Speaker in action:


Shoot Super Detailed Macro Photographs with an RTI Camera Rig

Using many light sources, reflectance transformation imaging (RTI) is a method for photographing that allows you to get 3D map of surfaces.

Read more on MAKE

The post Shoot Super Detailed Macro Photographs with an RTI Camera Rig appeared first on Make: DIY Projects and Ideas for Makers.

Listen to the hypnotic sound of a red crystal


Red is an optic-sound electronic object that uses simple light sources and optical elements to create audiovisual performance. The machine was named as a color because at the center of the work there is a red glass crystal and a flexible Fresnel lens. Dmitry Morozov aka :: vtol: : created it using Arduino with pure data and python scripts:

The project includes many reworked electronic devices – a CD-rom, an old scanner, reused electric motors. Multiple moving elements provide wide variability for rather primitive optical elements. It is accomplished by constant change of focal length between the light source, crystal and lens, as well as by changing the crystal’s tilt angle and mechanical distortion of the lens. The object works autonomously, by algorithm with many accidental events tied to feedback, with sensors defining the position of various mechanical elements in relation to the range of their movement. The sound part has up to 4 voices which depend on the activity of various elements. The sound is also in direct interaction with actual position of those elements, and basically is voicing the process of movement, brightness of light, and intensity of the piece.

Watch how it works in this hypnotic video:

Arduino Blog 11 Apr 21:59

Colorful Fan and LED Controller for 3D Printer

[Dave] just couldn’t take the ambient noise from his Lulzbot Mini anymore, so he built a fancy fan controller for it.

He measured some points on the printer’s Rambo controller board to see what actually got hot during a print. The hottest components were the motor drivers, so he taped a thermistor to them. He also placed one in the printer’s power supply. He replaced the main fan with a low noise model from Noctua (which have the most insanely fancy packaging you could imagine for a computer fan). The software on an Arduino Nano now idles the fan at an inaudible 650RPM, if an unacceptable temperature increase is detected, it increases the fan speed for a period, keeping everything nice and quietly cool.

The graphics display was added because, “why not?” A classic reason. The graphics runs on a hacked version of Adafruit’s library. It took him quite a while to get the graphics coded, but they add that extra bit of high-tech flair to keep the cool factor of the 3d printer up before they become as ubiquitous as toasters in the home. The code, fritzing board layout, 3D models, and a full build log is available at his site.


Filed under: 3d Printer hacks

This Week in Making: Marble Machines, Filament Tips, and More

This past week we celebrate Arduino Day with Makers like, saw a new marble machine, and started a conversation about how coding is taught.

Read more on MAKE

The post This Week in Making: Marble Machines, Filament Tips, and More appeared first on Make: DIY Projects and Ideas for Makers.