Posts with «arduino» label

BINARY IO is an Arduino-powered, four-button MIDI controller

Developed as part of a semester project, BINARY IO is a nifty little MIDI controller capable of counting from one to 15 using only four buttons. The device, which uses binary code as an input mechanism, is powered by an Arduino Uno and Max/MSP.

With a little practice, BINARY IO becomes quite intuitive and fun to play. As demonstrated by its creators Benjamin Weber and Jeremy Ondrey, users can piece together new music with sounds ranging from the piano to the xylophone to the drums.

Bringing the Windows hourglass cursor to life

You know that rotating hourglass that indicates when a Windows application is busy performing an operation? Well, interaction designer Wolfgang Huther decided to bring the iconic cursor into the real world with an Arduino-driven project he calls “The Microsoft Hourglass Machine.”

The wall-mounted display was brought to life using laser-cut acrylic parts, black sand, and some electronics.

Maker hacked his car’s dashboard to display Shower Thoughts

The Shower Thoughts subreddit is a collection of all those ideas or philosophical questions that race through your mind while in the bathroom. For example, “I like to think money wouldn’t change me; yet when I’m winning Monopoly I’m a terrible person,” or “12 years ago leaving CDs out in my car gave theives a reason to break in. Today, leaving CDs out is a deterrent.”

While most folks would simply browse Reddit on their phones or laptops, Harin De Mel decided to something a bit different. He managed to hack his vehicle’s dashboard to display some of the best thoughts from the last hour. Not a bad idea for when you’re stuck in traffic or sitting in the car waiting for someone to come outside, right?

The Maker sniffed the CAN bus on his 2012 Hyundai Genesis, and isolated the LCD from the rest of the network. He used Raspberry Pi and an Arduino, both of which are interfaced with an MCP2515 — one for the display, the other to receive signals from the original network. A Wi-Fi dongle on the Raspberry Pi enables Internet connectivity.

De Mel was also able to make the text scroll, which was accomplished through the CAN bus. However, Python script on the Raspberry Pi provided more control on how fast or frequently the message would come across the screen.

Now that I have a better understanding of how the LCD is controlled, I want to use the screen for more useful information. I have an in-dash Nexus 7 and would like to parse the information of the currently playing track to the car’s system as if it was an iPod. Frank Zhao was kind enough to leave a comment on my previous post pointing me in the direction of the Apple Accessories Protocol (AAP) which I will also begin to tinker with at some point in the future.

The code for the project is available on GitHub, and you can read more about the build on his blog. In the meantime, check out the video below to see it all in action.

Make masterpieces with a homemade CNC painting machine

Longtime artist Jeff Leonard has built a pair of Arduino-driven CNC painting machines with the motivation to grow his toolbox and expand the kinds of marks he could make simply by hand. By pairing the formal elements of painting with modern-day computing, the Brooklyn-based Maker now has the ability to create things that otherwise would’ve never been possible.

Machine #1 consists of a 5’ x 7’ table and is capable of producing pieces of art up to 4’ x 5’ in size. The device features a variety of tools, including a Beugler pinstriping paint wheel, a brush with a peristaltic pump syringe feed, an airbrush with a five-color paint feed system and five peristaltic pumps from Adafruit, a squeegee, and pencils, pens, markers and other utensils.

In terms of hardware, it’s equipped with three NEMA 23 stepper motors, three Big Easy Drivers, as well as an Arduino Mega and an Uno. There are two servos and five peristaltic pumps on the carriage–the first servo raises and lowers the tool, while the second presses the trigger on the airbrush. An Adafruit motor shield on the Uno controls the pumps, and the AccelStepper library is used for the Big Easy Drivers.

According to Leonard:

I am coding directly into the Arduino. There are many different codes that I call and overlap and use as a painter overlaps techniques and ideas. There is a lot of random built into the code, I don’t know what the end result will be when I start. Typically on any kind of CNC machining the end result has been made in the computer and the machine executes the instructions. I am building a kind of visual synthesizer that I can control in real-time. There are many buttons and potentiometers that I am controlling while the routines are running. I take any marks or accidents that happen and learn how to incorporate them into a painting.

I am learning Processing now and how to incorporate it into the image making.

Machine #2, however, is a bit different. This one is actually a standup XY unit that was made as a concept project. It paints using water on magic paper that becomes black when wet and disappears as it dries, used mainly as a way to practice calligraphy or Chinese brush painting. Not only does it look great, there’s no clean up either!

In terms of tools, the machine has a brush and an airbrush. Two NEMA 17 stepper motors are tasked with the XY motion. There are also three servos–one servo lifts and lowers the armature away from the paper since there is no Z-axis, another controls the angle of the brush, and the third presses the trigger of the airbrush. A peristaltic pump helps to refill the water cup, along with a small fan. The system is powered by an Arduino Uno with an Adafruit Motor Shield using the Adafruit Motor Shield Library v2.

As awesome as it all sounds, you really have to see these gadgets in action and their finished works (many of which can be found on Instagram).

Hack Your Car’s Dashboard to Display Reddit Shower Thoughts

Harin De Mel could have hacked his car to display something "useful", but where's the challenge in that? Shower thoughts, it is!

Read more on MAKE

The post Hack Your Car’s Dashboard to Display Reddit Shower Thoughts appeared first on Make: DIY Projects and Ideas for Makers.

Scubo is an omnidirectional robot for underwater exploration

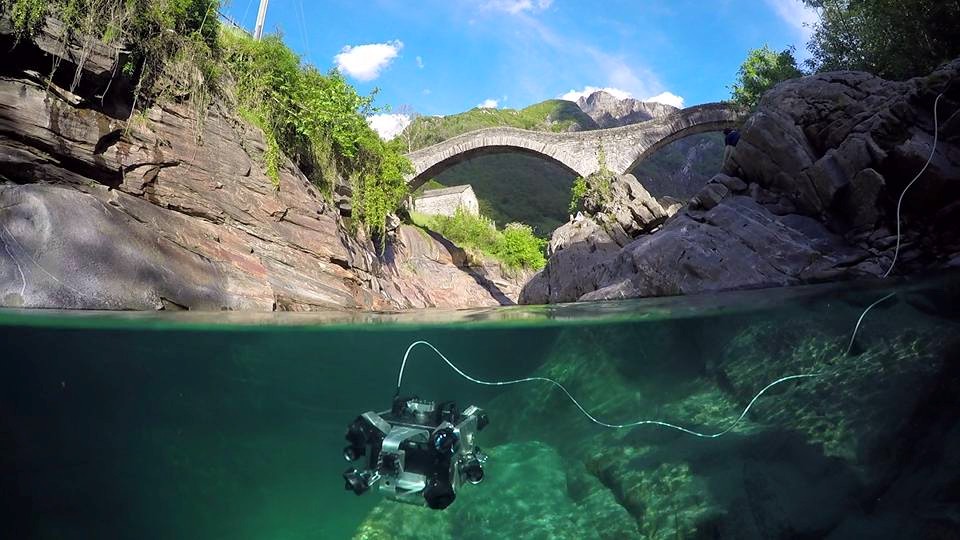
A team from ETH Zurich has created an incredible submersible robot called Scubo as a way to scan entire coral reefs. Equipped with six onboard webcams, the omnidirectional device is capable of exploring the deep sea from every angle. What’s more, users can take a virtual dive by throwing on a pair of VR glasses to make it feel as if they’re swimming with marine life.

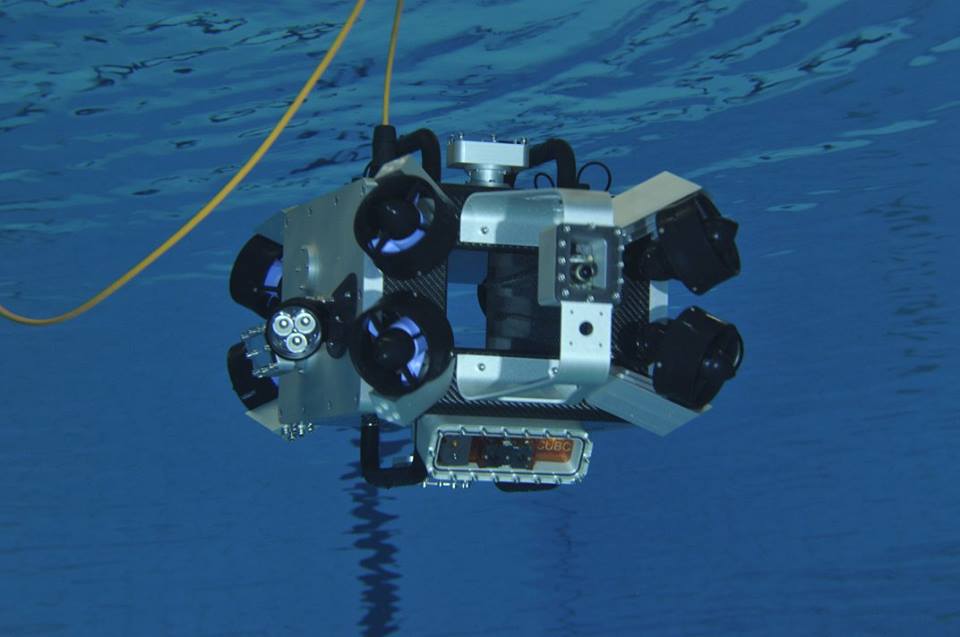
Scubo consists of an Arduino Due for hard real-time tasks, an Intel NUC for high-performance calculation, an IMU, and a pressure sensor — all housed inside a carbon cuboid. Eight thrusters are symmetrically mounted to the outside, one at each corner, while a tube goes through the box to ensure proper water flow and to keep the electronics cool. The system is neutrally buoyed and weight in the form of screws can be added to the thruster arms to adjust buoyancy and the center of gravity.

One of its creators Johann Diep tell us, “We chose to work with Arduino because it offers the required interface (I2C, SPI, etc.), it is easy to program (none of us ever worked with Arduino at the beginning), and there is a large community on the web that is very supportive with our questions.”

A tether connects Scubo to a computer outside the water and the power source, which allows the camera pictures to be viewed live and the batteries to be recharged with a steady current. According to the team, this highly extends the operation time, though the batteries would last approximately 120 minutes under standard conditions without recharging.

Scubo is based on ROS, and with the rosserial_arduino package, they are able to send or receive commands on a laptop from the Arduino. This enables them to steer the bot with a SpaceMouse joystick while monitoring all the sensor messages (pressure, leakage, temperature, voltage, etc.) at the same time.

It should be noted that Scubo isn’t only restricted to coral research either. In fact, the underwater machine was built with modularity and entertainment in mind as well. Users can easily attach their own sensors, lights and HD cameras via one of five universal ports.

We are confident that Scubo has great potential for the future. Since every necessary sensor is already implemented, Scubo can be programmed to scan a coral reef or any other place fully autonomous. Telepresence could be used in many aquariums or in the sea for entertainment. Because of the module ports different kinds of sensors and devices can be connected and used, for example to generate a geographical map of the sea floor or to inspect boats.

Whether corals in the Caribbean, the shore of Lake Zurich or even a virtual dive in an aquarium — Scubo not only convinces with its captivating technology but also with its modern design. Innovation starts when science meets entertainment.

Intrigued? You can read more about the project on its website, and check out its trailer video below.

8-bit volume control for Arduino tone()

Connor Nishijima has devised a neat trick to give the standard Arduino Tone() function 256 smooth volume levels using PWM at an ultrasonic frequency, without any extra components. This allows for programmatic control of square waves with nothing other than a speaker connected to an Arduino Uno.

Normally to simulate an analog voltage with a digital-only pin of a microcontroller you’d use Pulse Width Modulation. This works great for LEDs because your eyes can’t the 490 / 976Hz flicker of the standard analogWrite() function. But for audio things are a bit more difficult. Because your ears can easily detect frequencies between 20 – 20,000Hz, any PWM with a frequency in this range is out.

Luckily, the ATmega328P allows you to change the clock prescalers for ultrasonic PWM! We need to use Timer0, because it can drive PWM at a max frequency of 62,500Hz, which even if you cut that in half would still be above your hearing range. Now that we have ultrasonic PWM on Pins 5 & 6, we configure Timer1 to fire an Interrupt Service Routine at a rate of “desired frequency” * 2.

Finally, inside the Timer1 ISR routine, we incorporate our volume trick. Instead of digitalWrite()’ing the pin HIGH and LOW like the normal Tone() function does, we analogWrite() “HIGH” with our volume value (0 – 255) and analogWrite(0) for “LOW”. Because of how fast the PWM is running, the user doesn’t hear the 62.5KHz PWM frequency, and instead perceives a 50% percent duty cycle as a speaker driven with only 2.5 volts! While a few volume levels do produce subtle artifacts to the sound, it mostly delivers quality 8-bit volume control to replace the standard Tone() function.

When all is said and done, you’ll be able to customize your project with unique loudness as you play anything from the iconic Nintendo sound to R2-D2’s beeps and bops. In Nishijima’s case, he developed this Arduino volume-control scheme to make an incessant, inconsistent artificial cricket to hide in a friend’s vent for the next few months… You can read more on its Hackaday.io page, as well as find documentation and ready-to-use example sketches GitHub.

Arduino Blog 13 Jun 13:48

Turn Your Electronics Project into a Sellable Product

Do you dream of developing a hot, new hardware gadget and bringing it to market? Maybe your goal is to make the world better with your product, or perhaps you just want to get filthy rich selling your product. Developing a project prototype using an Arduino, Raspberry Pi, or other […]

Read more on MAKE

The post Turn Your Electronics Project into a Sellable Product appeared first on Make: DIY Projects and Ideas for Makers.

A DIY digital Arduino clock designed for and by teachers

Project-based lessons are a great way to introduce students to the world of electronics. Clearly Jenna Debois agrees, as she has built a DIY classroom clock based on an Arduino Nano. What’s even cooler is that it’s optimized for teachers! 

The device is made using laser-cut wood pieces, NeoPixels, a real-time clock module, and packs plenty of customizable features like:

  • An additional digit that keeps track of the block or period- an especially useful feature for rotating block schedules
  • The ability to program holidays into the code to prevent the block from advancing on days when school is not in session
  • LED digits that fade from green to red as the end of the period or block approaches so that a single glance can convey the remaining class time
  • A countdown timer triggered 6 minutes before the period ends that flashes between the time and the remaining time- a useful feature for signaling cleanup time
  • Other light effects that can be triggered during lunch, free periods, after school, or other special occasions

Debois not only created a step-by-step guide, but also shared all the documentation on GitHub and a detailed video of the build process.

Hackaday Prize Entry: 8-Bit Arduino Audio for Squares

A stock Arduino isn’t really known for its hi-fi audio generating abilities. For “serious” audio like sample playback, people usually add a shield with hardware to do the heavy lifting. Short of that, many projects limit themselves to constant-volume square waves, which is musically uninspiring, but it’s easy.

[Connor]’s volume-control scheme for the Arduino bridges the gap. He starts off with the tone library that makes those boring square waves, and adds dynamic volume control. The difference is easy to hear: in nature almost no sounds start and end instantaneously. Hit a gong and it rings, all the while getting quieter. That’s what [Connor]’s code lets you do with your Arduino and very little extra work on your part.

The code that accompanies the demo video (which is embedded below) is a good place to start playing around. The Gameboy/Mario sound, for instance, is as simple as playing two tones, and making the second one fade out. Nonetheless, it sounds great.

Behind the scenes, it uses Timer 0 at maximum speed to create the “analog” values (via PWM and the analogWrite() command) and Timer 1 to create the audio-rate square waves. That’s it, really, but that’s enough. A lot of beloved classic arcade games didn’t do much more.

While you can do significantly fancier things (like sample playback) with the same hardware, the volume-envelope-square-wave approach is easy to write code for. And if all you want is some simple, robotic-sounding sound effects for your robot, we really like this approach.

The HackadayPrize2016 is Sponsored by:

Filed under: Arduino Hacks, digital audio hacks, The Hackaday Prize