Posts with «arduino» label

Prototyping a smart bulb with JavaScript, Arduino + PubNub

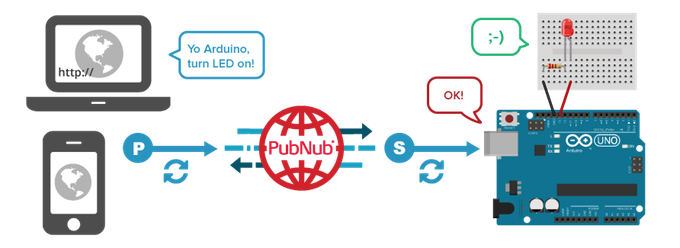
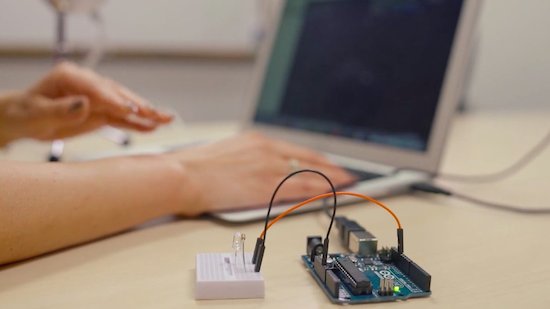
In this video, our friends at PubNub are going to create a smart home network that builds upon their previous Johnny Five tutorial. They again hack an Arduino Uno using JavaScript, but this time to create the simplest smart bulb. Because by “smart bulb,” we really just mean an LED.

The tutorial was developed by Tomomi Imura from PubNub and also uses Johnny-Five. No, not the robot from the movie Short Circuit. It is an open-source JavaScript robotics framework that lets you program an Arduino with Node.js. The bulb itself is remotely controlled via a web portal.

To establish the realtime communication between the Arduino and a web browser, the PubNub Data Stream Network (DSN) is used. PubNub provides global infrastructure and allows you to build and scale real-time apps and IoT devices quite easily.

The remote controller (web app) is written in JavaScript. This is a simple user interface that includes only one button. While a completed code sample is available on CodePen, this tutorial employs a simplified version so that it’s easier to follow along.


TBT: A tweet-shaming vending machine

Although not an official holiday in the US, National Junk Food Day is a perfect excuse to head over to your workplace’s vending machine and indulge in some chips and candy. But what if that vending machine actually tweet-shammed you for consuming those sweets? Two years ago, that is exactly what a group from UK-based Nottingham Hackerspace did by rigging their snack dispensary to keep its members accountable for what they ate.

The team had gotten a secondhand machine off of eBay and fitted it with an Arduino. They modified the payment system with a reader onto which members could tap their RFID cards every time they bought something, such as a Twix bar. Each card wirelessly transmitted the cardholder’s identity and their cash balance, and communicated with the Makerspace’s server, which then tweeted the candy purchase. For instance, “Daniel purchased a 50p confectionary from the vending machine.” (Since they switched the snacks often, it didn’t list specific bars or chips by name, though that could easily be programmed.)

Eventually, it annoyed too many members so the group decided to shut down the tweets. However, in theory, something like this could be done in an office that wanted to encourage its employees to eat healthier.

Simple Clock is Great Stepper Motor Project

You’d think that we’ve posted every possible clock here at Hackaday. It turns out that we haven’t. But we have seen enough that we’ve started to categorize clock builds in our minds. There are the accuracy clocks which strive to get every microsecond just right, the bizzaro clocks that aim for most unique mechanism, and then there are “hello world” clocks that make a great introduction to building stuff.

Today, we’re looking at a nice “hello world” clock. [electronics for everyone]’s build uses a stepper motor and a large labelled wheel that rotates relative to a fixed pointer. Roll the wheel, and the time changes. It looks tidy, it’s cyclical by design, and it’s a no-stress way to get your feet wet driving stepper motors. And it comes with a video, embedded below.

The clock is driven by the ubiquitous 28BYJ-48 stepper motors that can be found on eBay for a few bucks. They don’t have much torque, but all they have to do here is turn a cardboard disk. It’s the perfect match.

There is one caveat with these motors, though: they don’t have an integral number of steps per turn. If you have the “1:64” geared version, it’s actually geared 8910:567424. The upshot? Instead of 2,048 steps per turn, you need 2,037.8864. Get this wrong and you’re losing 14 minutes per day with a 12-hour wheel.

So between just driving the motors, and the low torque and the non-integral gearing, there’s more to learn here than you’d think. You can add a real-time-clock circuit if you want it precise. With all this room to expand, you can get it built and running in a weekend for a few bucks. And that makes it the perfect “hello world”.


Filed under: clock hacks

This Arduino machine will sort your Skittles by color

Do you just really hate yellow Skittles? Only love the red ones? Well, why waste your time sorting them out yourself when an automated machine can do it for you? As part of a recent tutorial, Dejan Nedelkovski has built what we calls the “Arduino Color Sorter” using a TCS3200 color sensor, two hobbyist servo motors, and an Arduino Nano.

How it works is fairly straightforward: The candies are stored within a plastic tube on top of the contraption and dropped onto a platform attached to the first servo. The motor then rotates the platform, bringing the Skittle to the color sensor. From there, the bottom servo moves into position while the top servo rotates again until the candy falls into the guide rail and into its respective bin.

So whether you’re tired of grouping your Skittles or need to meet the request of rockstars like Van Halen (no brown M&Ms!), you can find the Arduino Color Sorter’s 3D model, code and instructions here.


Turn your old cellphone into a smartwatch

Do you have an old cellphone lying around somewhere? Don’t know what to do with it? Time to blow off that dust and convert the ‘dumb’ device into a smartwatch? This is exactly what Tinkernut has done. His DIY wearable not only tells time, but connects wirelessly to his smartphone over Bluetooth and notifies him of incoming calls and text messages via light and vibration.

The build itself uses an LCD screen and vibrating motor from a Nokia 1100 along with an Arduino Pro Mini to drive the system. A 3.7V 1100mAh rechargeable battery powers the gadget. All the electronics are soldered together to a perfboard, and housed inside a 3D-printed case.

Have an obsolete phone you’d love to repurpose into modern-day tech? Tinkernut has put together a detailed three-video series that explains everything from extracting the display, to connecting it to the Arduino, to creating an app in the MIT App Inventor. Admittedly, this project kept things simple; however, there are plenty of other features you can add, including a pedometer to count steps or a real-time clock module so you can keep time without having the watch tethered to your mobile device.

Make a Smart(ish) Watch From An Old Cell Phone

Looking for a fun junk box hack? Have one of those old Nokia phones that (in contrast to your current smartphone) just won’t give up the ghost? Tinkernut has a nice hack for you: making a smart watch from an old cell phone. Specifically, this project details how to make a smart watch that displays time, date, incoming calls and texts from a Nokia 1100 cell phone display and a few other bits.

This 3-video series covers how to extract the display, connect it to an Arduino and conecting that to an Android phone over Bluetooth. We’ve seen a few similar smart(ish) watch builds, but this one covers the whole process well, including building the Android app in the MIT AppInventor. Sure, the final result is not as polished as an Apple Watch, but it’s a lot cheaper and easier to hack…


Filed under: wearable hacks
Hack a Day 20 Jul 00:00

Getting Started with Johnny-Five for IoT (Part 1)

Interested in the world of hardware hacking, but feeling left out because you just don’t have the time to learn another language? Or maybe you aren’t comfortable using Sketch to program? Have no fear, you can easily use JavaScript to program boards like Arduino and Genuino. Yes, just JavaScript!

In this series of video, PubNub’s Tomomi Imura shows you how to start hacking an Arduino with Node.js using Johnny-Five, a JavaScript Robotics Framework.

Part one of this tutorial covers:

  1. Setting up a board.
  2. Building the Hello World of hardware, a LED blink.
  3. Writing your Johnny-Five code to make it blink programmatically.

Enjoy the tutorial!


Build your own coin-operated Wi-Fi hotspot ticketing system

Reddit user “jeff122885” has come up with a fairly simple yet clever coin-operated ticketing system for his Wi-Fi network. The setup consists of a Ch-926 multi-coin acceptor, a MikroTik Groove, and an Arduino Uno with a microSD card module. The unique password for the hotspot is stored in the SD card and read by the Arduino.

Once the coins are deposited, the voucher code, Wi-Fi name, duration, cost, and instructions on how to connect are printed onto a receipt. You can see it all in action below!

Call for reviewers MegaPi motion controller

Hi again dear LMR members!


read more

Call for reviewers MegaPi motion controller

Hi again dear LMR members!


read more