Posts with «arduino uno» label

An Arduino charging dock with Edison indicator lights

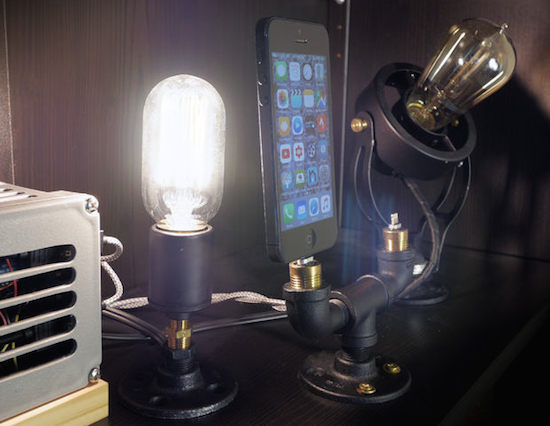
Bored with normal cell phone charging stations, “Makjosher” decided to make his own with pipe fittings and Edison bulbs.

Makjosher’s charging station resembles a retro-looking light fixture more than a cell phone charger, but it seems to perform both functions quite well. Using an Arduino Uno in conjunction with a current sensor, his charging station senses when a phone is getting “juice” and turns on an Edison bulb to, perhaps, celebrate the occasion. Though it’s shown here being used with an Apple device, there’s no reason a very slightly modified setup couldn’t be used to charge an Android phone, or really any other gadget as needed.

Makjosher gives a pretty good overview of his project in the video below, but if you want more specifics, you can check out his Instructables page here.

Relive some arcade memories with a desktop coin pusher

Remember Ryan Bates’ mini vending machine, the Venduino? Well, the Maker has now built a wooden coin pusher that’ll complement his earlier project quite nicely.

If you’ve seen a machine at an arcade with coins hanging off an edge, you probably thought, “Wow, if I just put one more quarter in, I’ll get like $10 back.” Although perhaps he could make money with it, Bates built his own as a fun distraction. His machine uses a cam mechanism to push a “dozer” back and forth so that when you drop a penny down the money input chute, it hopefully knocks a few coins into the area where you can collect them.

The mechanism is simple, but Bates used an Arduino along with a motor shield to drive dozer motor. It also monitors a tilt sensor to detect if someone tries to cheat. On the other hand, as he notes, it’s small enough that someone could take the device.

Although it’s apparently not ready as of this writing, Bates plans to have this game available as a kit on his website.

Arduino Blog 09 Sep 21:47

Convert a weed wacker toy into a metal detector

Evan Kale is back with another hack. This time, the YouTuber decided to convert a weed wacker-like toy into a metal detector with the help of an Arduino Uno.

As Kale explains, the project is based on a Colpitts Oscillator, which combines an LC circuit with a transistor amplifier for feedback. The frequency of oscillation is somewhere in the 100KHz range, which cannot be heard by humans. Enter the Arduino. When the trigger is pressed, an Arduino program translates the oscillation into an audible tone that is played out of the speaker. When the oscillation exceeds a certain threshold, it also emits a celebratory light show because… why not?

Kale walks through his entire build—along with the science of it all and how it works—in the video below. The schematics can be found on Imgur.

Unlock your door with a simple hand gesture

Gone are the days of fumbling with your keys! Adham Negm has come up with a way to open your door with a simple hand gesture while holding your smartphone.

To accomplish this, Negm uses an Arduino Uno, a servo motor to move the bolt, and a 1Sheeld to interface with the smartphone. The 1Sheeld reads the device’s accelerometer data, and then activates the servo when it recognizes a predefined gesture.

Sound like a hack you’d like to try for your room? You can find the entire project on Instructables.

Arduino Blog 05 Sep 21:36

Make a cat feeder with Arduino, a servo and two cans

YouTuber “Mom Will Be Proud” and his family have a cat. And like all pets, their feline friend requires fresh food every morning. But rather than disrupt your sleep or daily routine, why not build an automated feeder using some spare parts? This is exactly what the Maker did using an Arduino, a servo, a simple button, a power supply, and two cans–one for housing the electronics, the other for the food.

Mom Will Be Proud cut little openings into each container, and connected them to a servo that rotates one on top of the other without ever getting stuck. A broken IKEA timer and a piece of plastic are used for the button, which when pressed, turn the cans until its holes match up and the food is dispensed into a bowl.

You can see how it works below!

Genuino handbag will deter you from impulse buying

Do you or your significant other have trouble sticking to a budget? Well, say goodbye to overspending with the iBag2: a high-tech wearable device that helps curb your impulse buys.

The iBag2 is equipped with a Genuino Uno, a 10,000mAh power bank, and several other interesting components. There’s a timer connected to electromagnets that lock the bag according to your most vulnerable spending moments during the course of a day, an RFID system hooked up to LEDs and vibration motors that illuminate in blue and vibrate each time your wallet is taken out, as well as a built-in GPS unit that warns you when you’re near a pre-preogrammed “vulnerable spending zone.”

Aside from curtailing your expensive bad habit, the iBag2 will also reminds you every two hours via yellow lights and small vibrations when it’s time to reapply sunscreen (you know, in case you’re shopping outdoors), and a Bluetooth tracker that pings your phone if the bag is a certain distance away from you.

The wearable prototype was created by Finder.com in collaboration with New York-based fashion designer Geova Rodrigues. Need a handbag that  knows when and where you’re likely to overspend? You can check out the iBag2 here.

9-year-old creates an award-winning, life-saving asthma monitor

Not only can asthma be difficult to diagnose, it can be fatal if left undetected. As a result, many kids are over-diagnosed with the disease, especially those under five, and over-treated with inhalers which leads to reduced growth and immunity. At just age nine, Arnav Sharma discovered that the best way to manage asthma is to prevent attacks by understanding their triggers and following a treatment plan. His solution? The AsthmaPi kit.

Sharma’s inexpensive device consists of an Arduino Uno, a Raspberry Pi, a Sense HAT, a MQ-135 gas sensor and a Sharp optical dust sensor. Intended for parents of children suffering from asthma and those not sure about the diagnosis, the kit sends emails and text message reminders to take their medication and to visit their physician.

The sensors track and collect data about the current temperature, humidity, dust levels and the presence of hazardous gases, all of which can be used to better understand an individual’s triggers and to avoid severe attacks. It will also enable children and their parents with better self-management of asthma.

Although the kit was developed particularly with children in mind, it can be just as helpful for adults as well. With an idea this incredible from a nine-year-old, it’s no wonder he was the recipient of this year’s Tech4Good People’s Choice and Winner of Winners awards.

Maker creates a fun waveform generator with Arduino

Inspired by a project he found over on Instructables, Maker JoEtuuube has created an Arduino-based waveform generator using an 8-bit resistor ladder DAC that can precisely produce different common waveforms at frequencies between 1Hz and 20Khz in sine-wave, sawtooth, triangle and various ratios of square wave. It features a speaker and a small LCD display.

A neat thing about the LCD is that it’s actually a reverse-engineered display from a cheap pocket calculator. With his hack, JoEtuuube no longer punches each digit in directly; instead, he only taps the clear, +, = and 1 keys. He can then enter arbitrary numbers by typing in the right number of ones and adding them up. For example, 345 = 111 + 111 + 111 + 11 + 1.

The generator itself uses an Arduino Uno and runs off a 9V battery. In the video below, JoEtuuube provides a detailed walkthrough of the firmware and how everything works. You can also read more about it on Hackaday.

Monome + Raspberry Pi + Arduino + Python Step Sequencer

Created by “modulogeek,” the MonomePi is a step sequencer that uses a monome as an input controller and a toy glockenspiel as the output instrument.

The brain of the device is a Raspberry Pi 3, which runs a step sequencer program written in Python. Both the monome and an Arduino Uno are connected to the Pi via USB. The Arduino controls eight servos, each attached to a “mallet” made of LEGO bricks taped onto coffee sticks.

As modulogeek explains, the Arduino is programmed to receive serial commands from the Python program. A command is one byte or 8 bits, each bit representing ‘on’ (play the note) and ‘off’ (do nothing) states of each servo.

The monome is entirely controlled by the Python program, which sends serial commands that, for example, tell the monome which buttons need to light up or turn off. It also receives serial data from the monome, like which buttons are getting pressed and depressed.

You can see it below, as well as check out its GitHub page here.

Build a simple VU meter with an Arduino Uno and LEDs

If you’ve been looking for a simple audio Arduino project, you may want to check out this VU meter from YouTuber RZtronix. The Maker built the device using an Uno along with some LEDs, a couple wires, a breadboard, a sound sensor, and a 5V power supply.