Posts with «arduino uno» label

Check the traffic autonomously on a modified clock

Using an Arduino and 1Sheeld, Integreight embedded engineer Eslam Ali set his office clock up to preview the traffic going home.

If you work in a traffic-prone area, there’s always a debate at to whether you should go home at the normal time or wait a few minutes to leave and avoid the traffic. To help make that decision, Ali likes to check the traffic before heading out. This might be fairly simply using a computer or smartphone, but doing so autonomously would be even better.

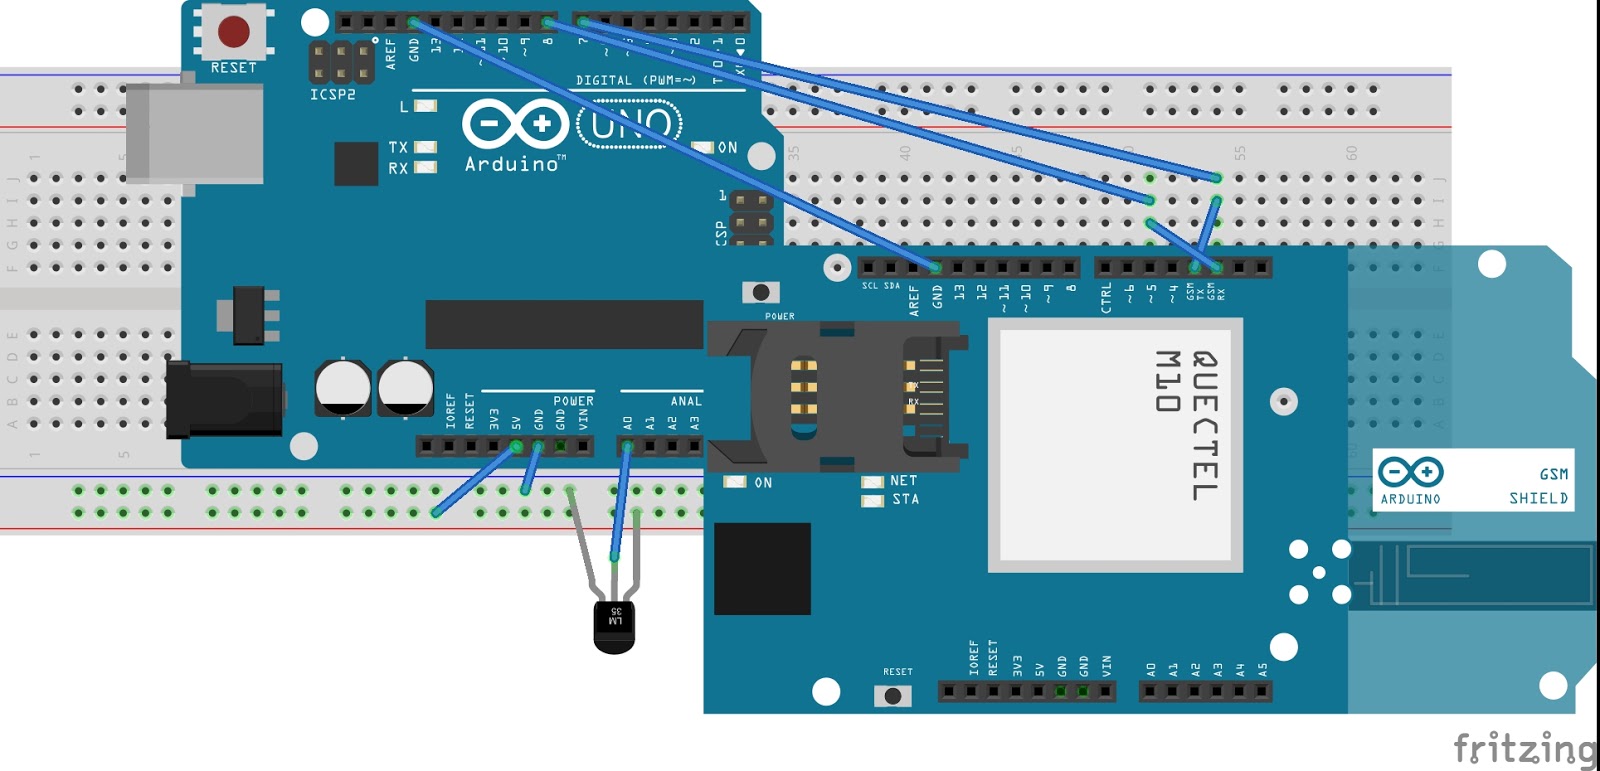
In a clever feat of automation, he embedded 12 RGB LEDs in a simple IKEA clock. These were then controlled by an Arduino Uno, using a 1Sheeld device to access the Internet through his smartphone. If traffic is bad, it displays as red, then blinks green when it’s time to go! A clever application in itself, something like this could be expanded for numerous uses, perhaps even involving animated lights.

Whenever it’s time to get off the office, I always check the traffic status to choose the best time to go home. But I couldn’t find a way to do that autonomously. So then…I was up to make a system that shows me the current traffic status with the help of a simple tool that is used probably in all the offices, a wall clock

In addition to the video below, you can see how to make one on 1Sheeld’s site or check out the discussion about this build on Reddit.

Arduino Blog 11 Oct 23:12

Temperature on GUI using visual studio and arduino

In this post, first we will interface LM35 with arduino uno and then  upload this data through serial communication. With the help of visual studio we can make computer gui application and though this gui application, we can do lot of stuffs like temperature logger, humidity monitoring. The

Stuff we require:

  1. Arduino uno with usb cable
  2. LM35
  3. Jumper wires
  4. Visual Studio (I had used VS 2012)
Make connections as follows:

LM35 interfacing with arduino


Simply provide, Vcc and GND to temperature sensor (LM35) and it's output should be connected to A0 of arduino. You can connect it to any channel from A0 to A5.

Calculation part:

There is little bit calculation. LM35 gives analog output. It's linearity is 10 mV/°C
which literally means for rise in temperature of 1°C, there be an increment of mV from output of lm35. It's graph is linear. It's temperature range is from: -55°C to +150°C.
Since, we are using LM35 it is calibrated in terms of degree celsius. There are other variants available like lm235 and lm335.

Arduino Code: 

The code is very simple

/*
Code Starts
*/


float val=0.0;

void setup() {
Serial.begin(9600);
}

void loop() 
{
val=analogRead(A0);
val=(0.4887*val);
Serial.println("VALUE OF TEMPERATURE IS: " + String(val) );
delay(1500);
}

/*
Code Ends
*/

Check out the video:


Visit this blog for more updates !!


Keep your cat entertained with an automated laser tower

As any cat owner can tell you, our feline friends love chasing the uncatchable dot of a laser pointer. Unfortunately, though, there is only so much time in the day that you can spend playing with them and catering to their natural instincts… so why not automate the process?

This is exactly what La Fabrique DIY decided to do using an Arduino Uno, two servos, a pan/tilt camera mount, and an Altoids tin to house the electronics. With some programming, the tower moves the laser “pseudo-randomly” to mimic the behavior of an insect.

So if you, like La Fabrique DIY, have a cat in a small apartment with not much room to hunt, head over to the project’s Imgur page to start building a distraction device for yourself!

An electro-mechanical drawing machine driven by music

We’ve been waiting to see what ::vtol:: (a.k.a. Dmitry Morozov) would come up with the next! The Moscow-based hacker artist has now created an electro-mechanical drawing machine.

The Electropollock, which pays homage to influential American painter Jackson Pollock, is driven by the sound of music. A special algorithm analyzes the tunes and then controls the electric valves, servo motors with brushes, and the special fan intended for spray painting. The intensity of ink supply, the rate of the moving paper, and the activity of the brushes all depend on the frequency and amplitude of the peaks in the music.

The machine features an old printer mechanism, an Arduino Uno, and is programmed using Pure Data. You can see how it works in the video below!

Temperature updation on thingspeak using sim900

Hello friends,

In this post we are going to discuss how to upload temperature on thingspeak channel using sim 900 and arduino uno. As I had already uploaded the data on thingspeak channel using sim 900 and terminal software.

Introduction:

This project is a wireless temperature logger on thingspeak channel using gsm module and arduino.
For temperature sensor, we are using lm35, that gives output in millivolt which can be easily calibrated in  terms of  °C. We have to use adc module, since it's an analog sensor. Once the raw data is converted into temperature, we can upload the data.

Now, we are ready to upload the data on thingspeak channel. Thingspeak provides api for uploading of data. Before this, we have to use activate GPRS on sim900. We also to provide APN for accessing the internet. After activating the GPRS, we have to use GET like this:

GET http://api.thingspeak.com/update?api_key=QZFXXXXXXXXXXX&field1=data

Replace this api with yours, and data is the data you want to be upload. You can upload a number of field like temperature, pressure, humidity, etc.
 

Stuff you need:

  1. SIM900A
  2. Arduino uno
  3. LM35 (it's output is in degree celsius)
  4. 12 volt adapter (for GSM module)
  5. Jumper wires
  6. Account on thingspeak


Connections:

Arduino                              GSM module
Pin no. 7     ======>         Tx
Pin no. 8     ======>         Rx
Gnd            ======>          Gnd

Output of LM35 is connected to A0 of arduino uno.


Download the code from here:


HAL 9000 reimagined as a useless machine

GeekCon participants add a switch and actuator to a HAL 9000 model for the world’s largest “leave-me-alone box.”

You’ve probably seen the silly boxes that when you flip a switch to turn it “on,” an arm comes out to turn itself “off” again. At this year’s GeekCon Makers conference, participants decided to make a useless machine, but in place of a simple box, they made a model of the HAL 9000 computer from 2001: A Space Odyssey.

Rather than the normal “useless” configuration, it turns itself “on” instead of “off” in an apparent nod to the fact that the computer didn’t want to be disconnected in the movie. One Arduino controls a projector for the “eye” assembly, while another takes care of the servos and audio. HAL’s sounds are stored on an SD card inside an Adafruit Music Shield.

Behind the eye, made out of round lamp and a red plastic diffuser, there is a projector. The projector is connected to Arduino TVout which only outputs a white filled circle that also changes its diameter based on microphone input. Having the circle moving according to the sounds gives HAL’s eye more realistic look.

The second Arduino was in charge of servos and audio. We divided the tasks to two Arduino Uno to avoid collisions in PINs requirements.

You can find more information on this project on its blog and in Hackaday’s recent writeup. If you just want to see the Arduino code, it’s available here.

(Photos: Rafael Mizrahi)

Build your own robotic vacuum from scratch

This dust buster-based robotic vacuum may or may not work as well as a Roomba.

If you’re fascinated by the idea of a robotic vaccum cleaner to keep you from having to do certain chores, you could buy an iRobot, or you could make your own instead. This particular DIY model uses four motors for locomotion, an Arduino Uno, an IR and ultrasonic sensors to avoid obstacles, as well as a (formerly) handheld vacuum cleaner to suck up debris.

The assembly sits on a wooden chassis, and as author B. Aswinth Raj is quick to point out, many variations on this robot could be made. Code is included and fairly short, so whether you’d like to copy this design or improve upon it, the bot should certainly give you some build ideas!

In this project we will use the power of embedded systems and electronics to make our own robot which could help us in keeping our home or work place neat and tidy. This robot is simple four wheeled vacuum cleaner which could smartly avoid obstacles and vacuum the floor at the same time. The idea is inspired by the famous vacuum cleaner iRobot Roomba…

You can find more detailed instructions, along with its code and a circuit diagram, on this CircuitDigest page.

The MR-808 is a robotic drum “synthesizer”

The MR-808 robotic drum machine looks like a gigantic Roland synthesizer, but plays with real instruments!

The Roland TR-808 was released in 1981 and was meant to replace a human drummer for practice purposes, but was instead used to produce music itself, helping to birth the electronic, techno, and hip hop genres. Moritz Simon Geist and the Sonic Robots collective, however, decided to turn this on its head, with a machine made to look like a gigantic ‘808, but containing real instruments.

With a variety of hardware, including an Arduino Uno and Mega, an audience can program the MR-808 using a tablet and get down to the grooves they create themselves!

In 2013 I [Geist] found Sonic Robots a loose group of friends, hackers, technicians and artists and we had the idea of reversing the concept of the ‘808 and putting the physical aspect back into this gorgeous drum machine. For the Installation MR-808 we began to replaced eleven sound with mechanical actuators like motors and solenoids, so that reals drums (snare, BD ..) could be played live.

You can read all about the device on the Sonic Robots page, as well as find more information on how it works here.

A community-made, Arduino-powered interactive town map

A group of students from Farmington, Connecticut partnered with artist Balam Soto and master teachers Earl Procko and Jim Corrigan to create a community-based sculpture project that allows people to explore the sights, sounds and history of their town through new media.

The installation runs on Arduino Uno and XBee, and is comprised of two panels which act as viewing screens for multiple visual projections. Visitors can interact with the display and manipulate the images using 24 buttons placed on the physical map. Plus, they are encouraged to record and add their own stories and memories of Farmington to the ever-growing multimedia library.

Permanently exhibited in Farmington’s public library, the Farmington Map Project was also the opportunity to introduce the students to physical computing, digital fabrication, woodworking, Arduino programming, and to the potential that Makerspaces have to offer for bringing ideas to life.

The project was created with the support of an Arts in Education Mini-Grant, funded by the Connecticut State Department of Education, the Department of Economic and Community Development, the Connecticut Office of the Arts, and the Connecticut Association of Schools, Farmington High School’s Fine and Applied Arts.

Interested? Check it out on Hackster.

Arduino-powered roller blinds

Tired of adjusting your blinds depending on outside lighting conditions? YouTuber “Dial” has the solution!

Perhaps you’ve seen hacks where people hook a servo up to blinds to flip them open and shut. If, however, you have the kind of blinds that need to be pulled all the way up to let light in, things become a little more tricky. Dial serves up an incredible solution in the video below, with a servo fixture that holds the balls on a blind’s roll up rope in a setup that could be described as the inverse of how a bicycle sprocket works.

This is interesting enough, but after finding that the rope needed 4x the force that the stepper was capable of, a gear train system was devised using Matthias Wandel’s gear generator. Making it even more impressive, only hand tools were used to complete this build, and it employs an Arduino Uno to automatically raise and lower the blinds depending on lighting conditions.

More info on the project’s parts as well as other useful websites are listed in the video description found here.