Posts with «arduino nano» label

Nerf-firing Rover

Primary image

What does it do?

Navigate via RC control, fires Nerf gun, supports autonomous control via Raspberry Pi

This rover makes use of the following:

CPPM RC radio input from openTx RC radio

Arduino Nano to handle communcations from RC, Raspberry Pi via USB (not attached  yet), I/O to servos via i2c, I/O to/from Roboclaw motor controller via serial (gets velocity from encoders on motors), and output to various DC-driven devices (headlight, gripper).

5.8ghz video transmitter for FPV roving

Cost to build

$600, 00

Embedded video

Finished project

Number

Time to build

50 hours

Type

wheels

URL to more information

Weight

read more

Control your DIY quadcopter with one hand

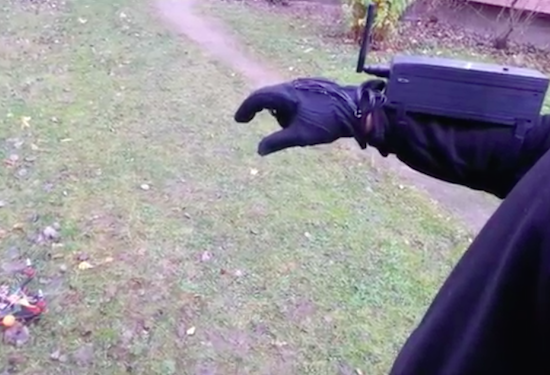
Back in 2014, Josef Holmner built his own DIY quadcopter with a flight time of 30 minutes. Impressively, he also developed a wearable controller that enabled him to maneuver his device through the air using just one hand.

As you can see in the video below, pitch and roll are dictated by the angle of his hand, yaw is handled by two push buttons in his palm, and throttle is achieved through the bending of his index finger.

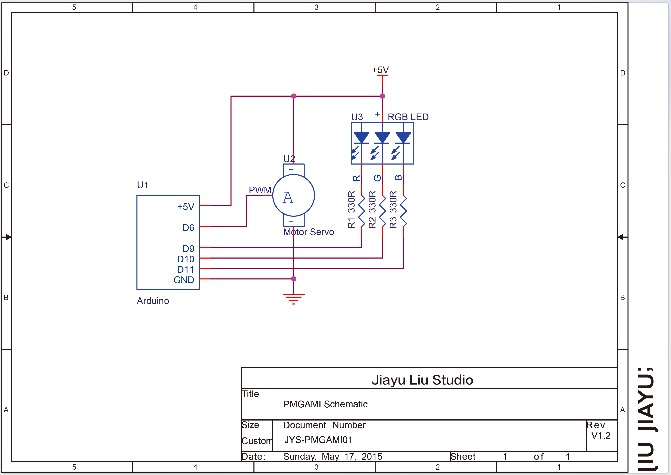
To get started, Holmner needed a transmitter and receiver, an Arduino Nano, a digital potentiometer, a flex sensor, a pair of push buttons, an IMU, and a glove, of course. The Maker had torn apart the transmitter, replaced the regular potentiometer with a digital one that could be controlled by the Arduino. After taking out the electronics from its original enclosure, he housed them inside a 3D-printed box, and reused the old battery holder by gluing it to the bottom of the case. Velcro straps are used to keep it around his forearm.

The flex sensor was sewn to the index finger, while the buttons were placed in the palm and the IMU set on the back of the hand. He also made a connector between the glove and the box, and added four LEDs that illuminate to show the angle of the glove.

Holmner has made the Arduino code and schematics available online. Be sure to see it in action!

Add biometric security to your next Arduino project

If you’ve ever wanted to add biometric security features to your Arduino project, you’re in luck. That’s because Nick Koumaris of educ8s.tv has put together a quick tutorial on how to integrate a fingerprint sensor module with an Arduino Nano and a 1.44” color TFT display.

The fingerprint sensor module is small, nicely built, and it uses some advanced DSP (Digital Signal Processing) chips inside. The sensor works like this. It is an optical sensor, which means it analyzes the photo of a finger. It then renders the image, makes some calculations, finds the features of that finger and then searches in its memory for a fingerprint with the same characteristics. It can achieve all that in less than a second! This module can store up to 1,000 fingerprints in its memory and its false acceptance rate is less than 0.001% which makes it pretty secure!

As you can see in the video below, the project requires a valid fingerprint in order to unlock. If it recognizes the user, which in this case is Koumaris or his girlfriend, the fingerprint icon on the display turns green along with a kind greeting, e.g. “Welcome, Nick!”

Arduino MetroPhones will help keep you and your bag safe

Walking the streets of a highly-populated city, or even a crowded event for that matter, comes with certain risks like pickpocketing. Mindful of this, Maker TVMiller has come up with a clever system to prevent bag thieves from unknowingly creeping up behind you. Called the “Arduino MetroPhones,” the device consists of a Nano, an ultrasonic sensor, a digital potentiometer, a coin-cell battery, and a few other components, all housed inside a 3D-printed case.

The metropolitan in its natural habitat; unaware, oblivious, purposefully deafened and subsequent prey. To increase perception thus safety, we wed an Arduino Nano and ultrasonic sensor to regulate volume to proximity to someone behind you; easily deactivated per environment and rechargeable. Beyond this proof of concept, intention for apparel or accessory (purse, back pack) embedding is ideal.

This prototype of a prototype is a mono-version. A stereo version would merely require dual channels. Thus, imagine, you plug your head phones in to your purse strap which is embedded with a MetroPhone with Bluetooth that streams to your smartphone..

Otto - build you own robot in two hours!

Primary image

What does it do?

Otto walks, dances, makes sounds and avoids obstacles, is completely open source, Arduino compatible, 3D printable, and with a social impact mission to create an inclusive environment for all kids.

Otto was inspired by another robot instructable BoB the BiPed and programmed using code from another open source biped robot called Zowi.

CC-BY-SA

Otto's differences are in the assembled size (11cm x 7cm x12cm), cleaner integration of components and expressions.

Cost to build

$49, 00

Embedded video

Finished project

Complete

Number

Time to build

2 hours

Type

URL to more information

Weight

250 grams

read more

Draw images and words in falling water

The Base42 team, which is part of the hacking community Tecnoateneu Vilablareixhas created a stunning water curtain with the help of 3D printing and Arduino. The installation, currently on display at the Temps de Flors flower show in Girona, uses 128 3D-printed nozzles and 64 3D-printed valves to dispense water in floral patterns.

The water curtain employs four Arduino Nanos to control the valves, which work in pairs to draw the flowers, words or other images. Meanwhile, an Arduino Mega provides a Wi-Fi connection to issue commands.

In terms of its mechanics, a tank at the base holds 500 liters of water, while a pump pushes that water to the top of the system at a rate of 80 liters per minute. From there, the water passes down through the 3D-printed nozzles, forming what appears as a 3m x 2m fluid screen. To create different patterns in the curtain, the nozzles can quickly adjust the direction of the water to one of two nozzles in a pair.

An Arduino-based Cellular Automata with OLED monitor

RuntimeProject made a tutorial to create a little cellular automata on a small 126×64 OLED using Arduino Nano.

He worked on one type of cellular automata, the Game of Life by John Conway, which has a grid of cells each having 2 states True or False/on or off/alive or dead. These cells are governed by 2 simple rules:

Rule 1: A cell which is dead and is surrounded by exactly 3 alive cells, will be born

Rule 2: A cell which is alive and has either 3 or 2 alive cells will remain alive, else it dies

The Arduino-based Cellular Automata works using 2 libraries the,  Adafruit GFX library  to handle all graphics and text displayed on the OLED;
Adafruit SSD1306 library which is the driver for the OLED.

You can read more info on how to make it on his blog and download the sketch on Github.

Make your DIY smart glasses running on Arduino

Jordan Fung is a 13-year-old maker and programmer based in Hong Kong. He recently developed Arduino-based smart glasses called Pedosa Glass, which are able to activate, in this first release, a flashlight and a timer:

The Pedosa Glass is powered by a single Arduino Nano running an “operating system” developed by me.
There is a tiny FLCOS display in the front. The AV signal from the Arduino will be displayed on it. It is equipped with 3 push buttons, in which 2 of them are control buttons and one of them be the home button, also equipped with a super-bright white LED for use as a flashlight.

In the picture below you can explore the electronic scheme:


Jordan is working hard to add new applications and features to the project but in the meanwhile he shared his work on a great tutorial on Instructables.

Visualizing air quality with interactive origami flowers

“Under the Dome – PMgami” is an installation created by designer Jiayu  Lui using Arduino Nano. Inspired by paper origami techniques, the digitally fabricated flowers move and change color according to the quality of air measured locally. The main aim of the installation is to obtain a more intuitive way to communicate pollution data and  the relationship between technology and nature.

In the gallery you can explore some other pictures and the schematic. Check the video below to see the installation in action!


Arduino Synth Guitar Really Rocks

[Gr4yhound] has been rocking out on his recently completed synth guitar. The guitar was built mostly from scratch using an Arduino, some harvested drum pads, and some ribbon potentiometers. The video below shows that not only does it sound good, but [Gr4yhound] obviously knows how to play it.

The physical portion of the build consists of two main components. The body of the guitar is made from a chunk of pine that was routed out by [Gr4yhound’s] own home-made CNC. Three circles were routed out to make room for the harvested Yamaha drum pads, some wiring, and a joystick shield. The other main component is the guitar neck. This was actually a Squire Affinity Strat neck with the frets removed.

For the electronics, [Gr4yhound] has released a series of schematics on Imgur. Three SoftPot membrane potentiometers were added to the neck to simulate strings. This setup allows [Gr4yhound] to adjust the finger position after the note has already been started. This results in a sliding sound that you can’t easily emulate on a keyboard. The three drum pads act as touch sensors for each of the three strings. [Gr4yhound] is able to play each string simultaneously, forming harmonies.

The joystick shield allows [Gr4yhound] to add additional effects to the overall sound. In one of his demo videos you can see him using the joystick to add an effect. An Arduino Micro acts as the primary controller and transmits the musical notes as MIDI commands. [Gr4yhound] is using a commercial MIDI to USB converter in order to play the music on a computer. The converter also allows him to power the Arduino via USB, eliminating the need for batteries.

[Thanks Wybren]


Filed under: Arduino Hacks, musical hacks