Posts with «arduino hacks» label

Open Laser Blaster Shells Out More Bang for the Buck

[a-RN-au-D] was looking for something fun to do with his son and dreamed up a laser blaster game that ought to put him in the running for father of the year. It was originally just going to be made of cardboard, but you know how these things go. We’re happy the design went this far, because that blaster looks fantastic.

Both the blaster and the target run on Arduino Nanos. There’s a 5mW laser module in the blaster, and a speaker for playing the pew pew-related sounds of your choice. Fire away on the blaster button, and the laser hits a light-dependent resistor mounted in the middle of the target. When the target registers a hit, it swings backward on a 9g servo and then returns quickly to vertical for the next shot.

There are some less obvious features that really make this game a hit. The blaster can run in 10-shooter mode (or 6, or whatever you change it to in the code) with a built-in reload delay, or it can be set to fully automatic. If you’re short on space or just get sick of moving the target to different flat surfaces, it can be mounted on the wall instead — the target moves forward when hit and then resets back to flat. Check out the demo video we loaded up after the break.

No printer? No problem — here’s a Node-RED shooting gallery that uses simple wooden targets.

21st Century Cheating: WiFi In A Calculator

Obviously, we would never endorse cheating on an exam, but sometimes a device is just too tempting to be left untouched. For [Neutrino], it was an old Casio calculator that happened to have a perfectly sized solar panel to fit a 128×32 OLED as replacement. But since the display won’t do much on its own, he decided to connect it to an ESP8266 and mount it all inside the calculator’s housing, turning it into a spy-worthy, internet-connected cheating device, including a stealthy user interface controlled by magnets instead of physical buttons. (Video, embedded below.)

To achieve the latter, [Neutrino] added two Hall effect sensors and a reed switch inside each end of the calculator. Placing a magnet — possibly hidden in a pen cap — near the reed switch will turn the display on, and placing another magnet near the Hall-effect sensors will navigate through the display’s interface, supporting two inputs with long, short, and multi-tap gestures each. To obtain information through WiFi, the ESP8266 connects to Firebase as backend, allowing to set up predefined content to fetch, as well as a possibility to communicate with your partner(s) in crime through a simple chat program.

As the main idea was to keep visible modifications to a minimum, one shortcoming is that charging the additional battery that powers the whole system would require an additional, external charging circuit. But [Neutrino] had a solution for that as well, and simply exposed two wires to the back, which could easily be mistaken for random solder splatters. And well, of course, requiring WiFi might also be tricky in some situations, so maybe you might want to consider a mobile network upgrade for yourself.

Hack a Day 07 May 12:00

Sun-Seeking Sundial Self-Calibrates in No Time

Sundials, one of humanity’s oldest ways of telling time, are typically permanent installations. The very good reason for this is that telling time by the sun with any degree of accuracy requires two-dimensional calibration — once for cardinal direction, and the other for local latitude.

[poblocki1982] is an amateur astronomer and semi-professional sundial enthusiast who took the time to make a self-calibrating equatorial ‘dial that can be used anywhere the sun shines. All this solar beauty needs is a level surface and a few seconds to find its bearings.

Switch it on, set it down, and the sundial spins around on a continuous-rotation servo until the HMC5883L compass module finds the north-south orientation. Then the GPS module determines the latitude, and a 180° servo pans the plate until it finds the ideal position. Everything is controlled with an Arduino Nano and runs on a 9V battery, although we’d love to see it run on solar power someday. Or would that be flying too close to the sun? Check out how fast this thing calibrates itself in the short demo after the break.

Not quite portable enough for you? Here’s a reverse sundial you wear on your wrist.

Celebrate Spring with a DIY Vibration Sensor

Is your heaving pile of electronic parts shrinking by the day as you finish old back-burnered projects and come up with new ones? Try an old pastime that never gets old: rolling your own sensors using household objects. [Nematic!] needs a way to sense vibration for an upcoming project. Instead of spending $1 plus shipping and waiting who knows how long for a spring vibration sensor to come in the mail, they made one in a matter of minutes.

A spring vibration sensor is a simple device that can be used as a poor man’s accelerometer, or simply to detect vibration. All you need is a length of conductive wire, a 10 kΩ resistor, and a way to pick up those good vibrations. For the purposes of demonstration, [Nematic!] is using an Arduino Nano in the short build video after the break.

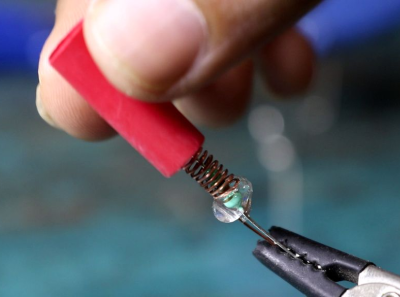
The wire is wound around the threads of a bolt to form a coil that’s just large enough for a resistor to fit inside. One end of the coil is connected to 5 V, and one leg of the resistor connects to an input pin. Together, they form a normally-open switch. When vibrations force the free ends of both to touch, the circuit is complete and the pin is pulled high.

If you make one of these and find the sensitivity is off, just twist up a new coil with stiffer or softer wire depending on the problem. Iterating doesn’t get much cheaper than wrapping wire around a bolt. We can’t wait to see how [Nematic!] will use this sensor. In the meantime, we’re planning to use one to detect when the dryer stops running and send a text.

Speaking of bargain basement sensors, did you know you can detect water leaks with two pennies, an aspirin, and a clothespin? These projects demonstrate the kind of ingenuity that can win you a pile of toys in our new Making Tech At Home contest, running now through July 28th, 2020.

A Flag-Waving Hat for All Occasions

When [Taste the Code] saw that his YouTube channel was approaching 1,000 subscribers, it was time to do something special. But celebration is no reason to be wasteful. This flag-waving celebratory hat has endless possibilities for the future.

The build is simple, which is just right for these strange times of scarcity. An Arduino Uno hot-glued to the back of the hat is directly driving a pair of 9g servos on the front. [Taste the Code] made the flags by sticking two stickers back to back with a bamboo skewer in between. The code is flavored such that the flags will wave in one of three randomly-chosen patterns — swing around, swing in reverse, and wild gesticulations.

After the novelty of the whole 1k subs thing wears off, [Taste the Code] can change the flags over to Jolly Rogers to help with social distancing. And someday in the future when things are really looking up, they can be changed over to SARS-CoV-2 victory flags, or fly the colors of a local sports team. We think it would be way cool to program some kind of real semaphore message into the flags, though the mobility might be too limited for that. Check out the build video after the break, which happens picture-in-picture as [Taste the Code] dishes out a channel retrospective and lays out a course for the future.

Even though YouTube messed with subscriber counts, we think it’s still worth making a cool counter. Here’s one with a Tetris twist.

Watch the Day Inch Along with a Tape Measure Clock

If we asked you to rattle off all the tools at your own personal disposal, you’d probably leave your timepieces off the list. But we say clocks are definitely tools — cool tools that come in countless forms and give meaning to endless days.

A clock form we hadn’t considered was that of an actual tool. So we were immeasurably delighted to see [scealux]’s clock made from a measuring tape. At least, the time-telling part of the clock is made from a measuring tape. The case isn’t really from a tape measure — it’s entirely printed, Bondo’d, sanded, and painted so well that it’s quite easy to mistake it for the real thing.

Tightly packed inside this piece of functional art is an Arduino Nano and a DS3231 precision RTC module, which we think is fitting for a tool-based clock. The Nano fetches the time and drives a stepper motor that just barely fits inside. There’s just enough tape wound around the printed hub to measure out the time in increments of one hour per inch. Take 1/16″ or so and watch the demo and brief walk-through video after the break.

Not all tools are sharp, and not all clocks are meant to be precise. Here’s a clock for the times that gives you the gist.

Build the Baddest Keypad on the Block with LEGO

Like so many of us, [EducatedAce] has been quelling the quarantine blues by resurrecting old projects and finding new challenges to fill the days. He’s just finished building this blocky macro keypad to hold a bunch of shortcuts for Photoshop, thus continuing and compounding the creative spree.

[EducatedAce] already had everything on hand except the Arduino Micro. Instead of standard key switches, this macro block uses 16 of the loudest, crunchiest tactile buttons out there — those big ones with the yellow stems that sound like small staplers.

And don’t worry — no LEGO or LEGO accessories were harmed in the making of this macro pad — the base plate and switch plate are 3D printed. [EducatedAce] has the STL files posted along with great build instructions if you want to wire one up for yourself.

This is a great project because it’s sturdy, it gets the job done without a lot of expense, and still looks like something you’d want on your desk. [EducatedAce] plans to rebuild it with uniformly colored bricks, but we think it looks great as-is, especially with those vented 1×2 pieces. If it were ours, we might use a different color for each row or column to help keep the shortcuts straight.

What? You’ve never printed your own interlocking building blocks before? Well, don’t limit yourself to 1:1 scale, otherwise the minifigs have won. Build a go-kart big enough for humans!

Servo-Powered 7-Segments Choreograph This Chronograph

Good clocks are generally those that keep time well. But we think the mark of a great clock is one that can lure the observer into watching time pass. It doesn’t really matter how technical a timepiece is — watching sand shimmy through an hourglass has its merits, too. But just when we were sure that there was nothing new to be done in the realm of 7-segment clocks, [thediylife] said ‘hold my beer’ and produced this beauty.

A total of 28 servos are used to independently control four displays’ worth of 3D-printed segments. The servos pivot each segment back and forth 90° between two points: upward and flat-faced to display the time when called upon, and then down on its side to rest while its not needed.

Circuit-wise, the clock’s not all that complicated, though it certainly looks like a time-consuming build. The servos are controlled by an Arduino through a pair of 16-channel servo drivers, divided up by HH and MM segments. The Arduino fetches the time from a DS1302 RTC module and splits the result up into four-digit time. Code-wise, each digit gets its own array, which stores the active and inactive positions for each servo. Demo and full explanation of the build and code are waiting after the break.

When it comes to 7-segment displays, we say the more the merrier. Here’s a clock that uses pretty much all of them.

KVM Uses Many Arduinos

The Arduino platform is one of the most versatile microcontroller boards available, coming in a wide variety of shapes and sizes perfect for everything from blinking a few LEDs to robotics to entire home automation systems. One of its more subtle features is the ability to use its serial libraries to handle keyboard and mouse duties. While this can be used for basic HID implementations, [Nathalis] takes it a step further by using a series of Arduinos as a KVM switch; although admittedly without the video and mouse functionality yet.

To start, an Arduino Uno accepts inputs from a keyboard which handles the incoming serial signals from the keyboard. From there, two Arduino Pro Micros are attached in parallel and receive signals from the Uno to send to their respective computers. The scroll lock key, which doesn’t do much of anything in modern times except upset Excel spreadsheeting, is the toggle switch between the two outputs. Everything is standard USB HID, so it should be compatible with pretty much everything out there. All of the source code and schematics are available in the project’s repository for anyone who wants to play along at home.

Using an Arduino to emulate a USB input device doesn’t have to be all work and no play, the same basic concept can also be used to build custom gaming controllers.

Model Rocket Launcher Is So Serious, It Has a Briefcase

What could be more thrilling than launching a complex rocket that you built yourself? For starters, launching it with literally anything better than the stock ignition system would be a step in the right direction. How about a briefcase full of fantastically fun overkill?

[FastEddy59] is in the middle of building a model rocket complete with a Thrust Vector Control (TVC) system to help with stabilization. Much to our delight, he’s designed an equally ambitious controller to spice up the launch sequence with security codes and a physical key. And what’s a launch controller without a giant emergency stop button to shut down everything? Incomplete, if you ask us.

Under the carbon fiber-wrapped acrylic hood, there’s an Arduino MEGA engine and an NRF24 LoRa module for transmission to the rocket. There’s even a DHT11 temperature sensor to verify that launch conditions are ideal. It’s still a work in progress with plenty of features to come, like fancier labels and plenty of launch-appropriate sound files for the hidden speaker. There’s a lot to this case, and [FastEddy59]’s video brief is ready and waiting on the pad after the break.

[FastEddy59] plans to hold the first launch in a few months, and we sincerely hope he outfits the rocket with a camera.