Posts with «actuators» label

Twitter-powered Digilympics

Samuel Cox, a maker who defined himself as a mix of “design, ideas and technology“, has invented a brand-new competition for digital citizens: Digilympics.

From his website:

2012 is not only the year of the Olympics, but also the launch of the first ever ‘Digilympics’, a twitter-powered race for sporting success where you determine the outcome. Four Lego athletes move down a physical racetrack as fans Tweet their team to move them further towards the finish line.

Starting today (07/18/2012), the Digilympics will be a two-week event as the four teams – UK, US, Canada and Japan – compete for the prestigious Digilympics Gold Medal.

The competition is open to anyone on the web, allowing them to Tweet their team to success using one of four unique Twitter accounts (UK_DigiUS_DigiCA_Digi &JP_Digi). Tweets in support of a particular account will move that country’s contestant physically along a running track.

After each race, the team victories are recorded and contestants go back to the starting line. At the end of the week the team who has won the most races will be given the Gold Medal online at digilympics.com

Under the hood, this funny race is enabled by a Processing sketch that seeks for Twitter replies on each account: a new reply triggers a motor-shield equipped Arduino board, which provides the movement to each athlet.

More information can be found here. And… let’s start twitting for your favourite team! ^^

[Via: Samuel Cox's Digilympics]

Wearable Fabric on the Arduino Store

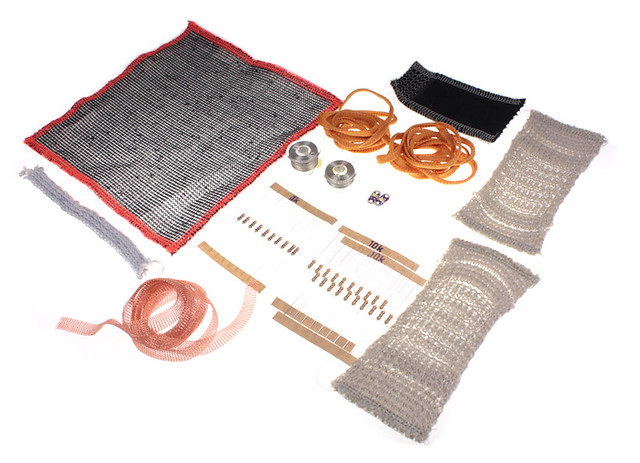
We are happy to announce the first wearable kit on the Arduino Store . This kit has been made by Plug’n'Wear specifically for us. All fabrics in this kit are produced in Italy, and strongly related to a textile family business. If you want to get deeper into the story of this product have a look at Riccardo Marchesi presentation (still in Italian, soon to be traslated!) at World Wide Rome 2012.

Read over for Kit’s features

This kit features:

  1. 1x Circular Stretch Sensor Designed by Hannah Perner-Wilson, this circular knit stretch sensor works perfect when you need to detect tension in many projects.
  2. 2x Textile push button to make easy digital inputs in cloth, scarfs o bags.
  3. 2x Spools of Conductive thread, ready to be hooked over a sewing machine
  4. 2x Soft potentiometer kit will let you import analog data into your wearable project: this kit includes 1 meter of knitted conductive tape and a metal ring. Watch it in action (see video)
  5. 10x 1k ohm resistor
  6. 10x 10k ohm resistor
  7. 1x Textile perfboard is going to change the way you think of wearable circuits. You can sew or even solder components (SMD & through-hole) on this . It can be easily cut or sewn with a standard sewing machine. Washable. Size: 15 cm x 15 cm (6″ x 6″) / Pitch: 2.54 mm (0.1″)
  8. 1x Knitted Coated Copper Tape. Small conductive tape made of coated copper fine wire (112 micron). Flexible, easy to cut, sewable with a standard sewing machine, It can be easily welded ( The coating will melt and tape will be soldered). The surface of this tape has a good insulation thrughout its lenght. Resistance: 107 Ohm/m. Width: 9 mm (0.35″)
  9. 1x Analog Textile Press Button, working with a resistive principle (resistance goes down when you press it). It works as a bend sensor as well. By connecting more sensors together it is possible to make a matrix analog switch. Sensitive area 40mm x 40mm (1.57″x1.57″)
  10. 2x LilyPad LED Bright White A simple, very bright, 250mcd, white LED LilyPad

source: [arduino store]

Arduino based Milling Machine

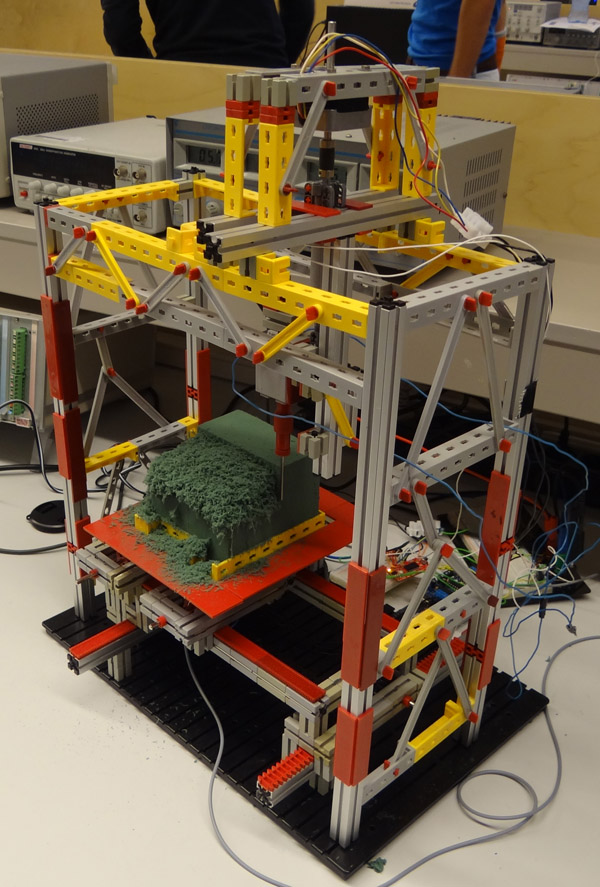
This is a working model of an Arduino based Milling Machine created using FischerTechnik. For those of you who are unaware of FischerTechnik, it is similar to the LEGOTM Building Blocks.

A group of four Mechanical Engineering students at the Delft University of Technology (Netherlands) created this project as part of their Mechatronics class in their Second year of Bachelor of Sciences (B.Sc.) Program.

Laurens Valk, one of the creators, explains the essence of Arduino in the project:

“The system uses the Adafruit motor shield to run two stepper motors, and the Sparkfun EasyDriver for the third stepper motor. The Arduino runs code that listens to Matlab commands over USB. We expanded that code a little to make it possible to add the third stepper motor and some other commands. Most of the actual code was programmed in Matlab, with the Arduino as the interface between computer and motors/sensors.”

We had a little chat with Laurens. Here is the excerpt:


When did you first hear about Arduino, and when did you first start using it?
I’ve seen a lot of Arduino projects over the years, but this was the first time we used it in a project. Personally, I usually build robots with MINDSTORMS NXT, but this felt like a good opportunity to combine mechanical work (the printer hardware) with real electronics (Arduino).
How did you end up making a Milling Machine/ 3D Printer for your project?

We chose to come up with our own design challenge and decided not to do the standard exercise. Initially we thought about making a (2D) plotter or scanner. Then quickly we started thinking about the same things, except in 3D. One of the projects that inspired us was the LEGO Milling Machine by Arthur Sacek. Both a scanner and printer would still be doable in 3D, but the time was limited, so we settled with the printer idea.

All construction had to be done in one workweek for logistical reasons. To make sure we were able to finish in time, we prepared much of the electronics and software outside the lab. We finished just in time, but unfortunately we could do only one complete print before we had to take it apart. Not surprisingly, it was very exciting to wait for the result of the one and only complete test run. We couldn’t see the result until we used the vacuum cleaner to remove the dust.

Here is a video showing the working of this machine. [And the Vacuum Cleaner Laurens is talking about]:

This gives an Insight into the many feats that an Arduino can accomplish.


An IBM Selectric II wishes to be a teletype

In his blog, Marc from Robot Dialogs presents a very nice hack involving a IBM Selectric II typewriter: by means of an Arduino board and several solenoids, the typewriter can be successfully connected to a computer to emulate a vintage teletype.

The complete story can be found here, together with several videos about its development.

[Via: Hack A Day]

Some advances in aerial vehicles: bat-inspired smart wings

Researchers from Centro de Automática y Robótica (Universidad Politécnica de Madrid) and from Brown University carried out a very deep research about the specific behavior of bat flight, whose ultimate goal is to replicate the capabilities of bat’s wings by means of an ad-hoc designed micro aerial vehicle (MAV).

From the home page of the project:

[...] this research is oriented towards the development of a biological inspired bat robot platform, that allows to reproduce the amazing maneuverability of these flying mammals. The highly maneuverability is achieved by reproducing the flapping and morphing capabilities of their wing-skeleton structure. This structure is composed by several joints and a membrane that generates the required lift forces to fly.

To mimmic the muscular system that moves the joints of the wing-bones, Shape Memory Alloys (SMA) NiTi wires are used as artificial-muscles. Several challenges in controlling this SMA-based actuation system are regarded in this research.

A lot of research work has already been carried out (see here for a list of publications) and a bat-like MAV prototype has been designed and implemented to both evaluate and validate the research outcomes. Among the other stuff, the core onboard electronic is made up of an arduino-based board, an IMU, a radio transceiver and a rechargeable LiPo battery.

More details on this project can be found here.

[Via: BaTboT project homepage]

Arduino Blog 06 Jun 13:52

MiniCom: an LCD-equipped remote shutter

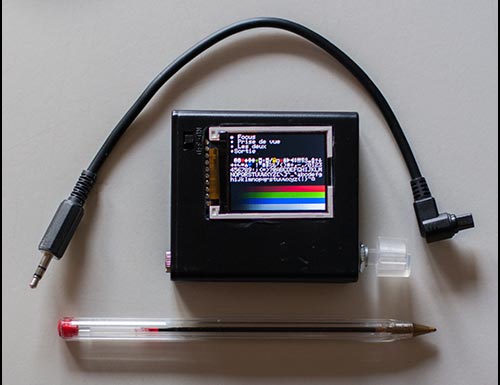
Pixel_k needed a simple remote shutter for his digital reflex camera, which had to be usable even in low-light situations, so he decided to build his own controller by exploiting an Arduino Pro Mini and a small LCD. The result is “MiniCom”:

The interface is limited to a single rotary knob you can push to validate your choices. It remains easy and intuitive to use even when it’s minus 20°C and it’s pitch black.
The output is a standard 3.5mm stereo jack, you can use different cables to control different brand of DSLRs.

Source code and a detailed description of the project can be found here.

[Via: Hack A Day and Knackes News]

Arduino Blog 04 Jun 10:28

Does Arduino dream of a playing tree?


With the help from Lindsey French, some houseplants in Chicago have enjoyed a concert generated by the vibrations of a cherry tree in western Massachusetts.


Attached to the cherry tree was a piezo sensor, which measured the tree’s vibrations. These were uploaded to the world wide web using an Ethernet Pro as a server, and a friend’s wireless router, configured to allow port forwarding. On the chicago end, a processing sketch gathered the data and wrote it to the serial port my laptop. An Arduino attached to the laptop output the data to transducers, which were attached to ceramic saucers (and later, a plywood shelf) as the medium for the vibrations. The Arduino and breadboard were housed in a custom laser-cut box, based off of a modified thingverse template.

Read here the full story.


Arduino Blog 11 May 16:05

KegDroid: Combining Arduino, Android, and NFC to Dispense Beer

Happy to see the KegBot Project adding a new fancy Android shell as casing.

“If you are looking for an exciting hardware project, KegDroid deserves a look. It is a sophisticated system that involves Android, Arduino, NFC, plumbing and — beer. Perhaps the final stroke of genius is to package the whole thing in a Droid body. Some how the little green fella looks at home on the bar. You have heard of desktop and laptop apps now we have bartop apps to add to the list

via [SlashDot]