Posts with «3d printer hacks» label

Motorized Music Box Cranks Out Stairway to Heaven

[Bokononestly] found a lil’ music box that plays Stairway to Heaven and decided those were just the kinds of dulcet tones he’d like to wake up to every morning. To each his own; I once woke up to Blind Melon’s “No Rain” every day for about six months. [Bokononestly] is still in the middle of this alarm clock project right now. One day soon, it will use a *duino to keep track of the music box’s revolutions and limit the alarm sound to one cycle of the melody.

[Bokononestly] decided to drive the crank of the music box with a geared DC motor from an electric screwdriver. After making some nice engineering drawings of the dimensions of both and mocking them up in CAD, he designed and printed a base plate to mount them on. A pair of custom pulleys mounted to the motor shaft and the crank arm transfer motion using the exact right rubber band for the job. You can’t discount the need for a hig bag ‘o rubber bands.
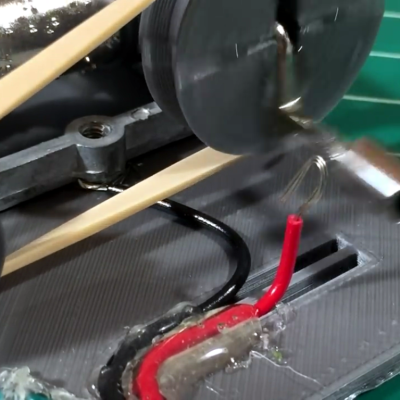
In order to count the revolutions, he put a wire in the path of the metal music box crank and used the body of the box as a switch. Check out the build video after the break and watch him prove it with the continuity function of a multimeter. A clever function that should at some point be substituted out for a leaf switch.

We’ve covered a lot of cool clock builds over the years, including one or two that run Linux. And say what you will about Stairway; it’s better than waking up to repeated slaps in the face.

[via r/engineering]


Filed under: 3d Printer hacks, Arduino Hacks

Colorful Fan and LED Controller for 3D Printer

[Dave] just couldn’t take the ambient noise from his Lulzbot Mini anymore, so he built a fancy fan controller for it.

He measured some points on the printer’s Rambo controller board to see what actually got hot during a print. The hottest components were the motor drivers, so he taped a thermistor to them. He also placed one in the printer’s power supply. He replaced the main fan with a low noise model from Noctua (which have the most insanely fancy packaging you could imagine for a computer fan). The software on an Arduino Nano now idles the fan at an inaudible 650RPM, if an unacceptable temperature increase is detected, it increases the fan speed for a period, keeping everything nice and quietly cool.

The graphics display was added because, “why not?” A classic reason. The graphics runs on a hacked version of Adafruit’s library. It took him quite a while to get the graphics coded, but they add that extra bit of high-tech flair to keep the cool factor of the 3d printer up before they become as ubiquitous as toasters in the home. The code, fritzing board layout, 3D models, and a full build log is available at his site.


Filed under: 3d Printer hacks

An e-Waste 3D Printer for Every Child?

The lofty goal of making sure every school kid has access to a laptop has yet to be reached when along comes an effort to put a 3D printer in the hands of every kid. And not just any printer – a printer the kid builds from a cheap kit of parts and a little e-waste.

The design of the Curiosity printer is pretty simple, and bears a strong resemblance to an earlier e-waste 3D printer we covered back in December. This one has a laser-cut MDF frame rather than acrylic, but the guts are very similar – up-cycled DVD drives for the X- and Z-axes, and a floppy drive for the Y-axis. A NEMA 17 frame stepper motor provides the oomph needed to drive the filament into an off-the-shelf hot end, and an Arduino runs the show. The instructions for assembly are very clear and easy to follow, although we suspect that variability in the sizes of DVD and floppy drives could require a little improvisation at assembly time. But since the assembly of the printer is intended to be as educational as its use, throwing a little variability into the mix is probably a good idea.

The complete kit, less only the e-waste drives and power supply, is currently selling for $149USD. That’s not exactly free, but it’s probably within range of being funded by a few bake sales. Even with the tiny print volume, this effort could get some kids into 3D printers early in their school career.


Filed under: 3d Printer hacks, green hacks

3D Printing Pen and CNC Machine Yields Cheap 3D Printer

3D printers are ubiquitous now, but they’re still prohibitively expensive for some people. Some printers cost thousands, but even more inexpensive options aren’t exactly cheap. [Daniel] decided that this was unacceptable, and set out to make a basic 3D printer for under $100 by including only the bare essentials needed for creating anything out of melted plastic.

3D printers are essentially four parts: a bed, filament, and a hot end and extruder. In a previous project, [Daniel] used parts from old CD drives to create a three-axis CNC machine which he uses for the bed. To take care of the hot end and extruder, he is using a 3D printing pen which he mounts to the CNC machine and voila: a 3D printer!

It’s not quite as simple as just strapping a 3D printing pen to a CNC machine, though. The pen and the CNC machine have to communicate with each other so that the pen knows when to place filament and the CNC machine knows when to move. For that, [Daniel] went with a trusty Arduino in order to switch the pen on and off. Once it’s working, it’s time to start printing!

[Daniel] does note that this is a design that’s relatively limited in terms of print size and resolution, but for the price it can’t be beat. If you’re interested in getting started with 3D printing, a setup like this would be perfect. 3D pens are a pretty new idea too, and it’s interesting to see them used in different ways like this.


Filed under: 3d Printer hacks

Leap Motion Wirelessly Controlling a Prosthetic Hand With an Arduino

The Leap Motion controller is a rather impressive little sensor bar that is capable of generating a massive 3D point cloud and recognizing hands and fingers to allow for gesture control based computing. It’s been out for a few years now but we haven’t seen many hackers playing with it. [Anwaarullah] has messed around with it before, but when it came time to submit something for India’s first Maker Faire, he decided to try doing an actual project with it.

Checking out the latest Leap Motion SDK, [Anwaarullah] realized many improvements had been made and he’d have to rewrite some of his original code to reflect the changes. This time around he’s opted to use the ESP8266 WiFi module instead of a Bluetooth one. He printed off a Raptor hand (from the wonderful folks at e-NABLE) and hooked it up with some RC servos to give him a nice robotic hand to control.

The actual code being sent to the Arduino is pretty simple. The Leap Motion SDK does all the complex stuff, and in the end, just sends a serial command of how many fingers it sees to the Arduino in order to control the hand.

For more info about the project, you can check out his original foray into Leap Motion Arduino control here. And for more examples of Leap Motion controlled things using Arduinos, why not control a cute animatronic desk lamp?


Filed under: 3d Printer hacks, Arduino Hacks

Open Source Tracked Robot Supports STEM in Africa

A lot of hacker projects start with education in mind. The Raspberry Pi, for example, started with the goal of making an affordable classroom computer. The Shrimp is a UK-based bare-bones Arduino targeted at schools. We recently saw an effort to make a 3D printed robotic platform aimed at African STEM education: The Azibot.

Azibot has 3D printed treads, a simple gripper arm, and uses an Arduino combined with Scratch. Their web site has the instructions on how to put together the parts and promises to have the custom part of the software available for download soon.

We’d bet most Hackaday readers won’t need the software, anyway. The robot clearly uses RC servos for the drive and the little arm at the front, so controlling it directly from the Arduino ought to be easy enough. If you don’t want to roll your own, Senegal-based Azibot is taking preorders for kits for $99. We were a little surprised you couldn’t kick in a little more when you ordered to subsidize other kits for schools in need.

We talked about another low-cost school aimed project, the Shrimp, If you think the needy schools won’t have 3D printers, maybe this 3D printer could come to the rescue.


Filed under: 3d Printer hacks, Arduino Hacks, robots hacks

Arduino Powered Rubber Band Sentry Turret Is Not a Lie

You know that guy in the next cube is sneaking in when you are away and swiping packs of astronaut ice cream out of your desk. Thanks to [Kevin Thomas], if you have an Arduino and a 3D printer, you can build a rubber band sentry gun to protect your geeky comestibles. You’ll also need some metric hardware, an Arduino Uno, and a handful of servo motors.

The video shows [Kevin] manually aiming the gun, but the software can operate the gun autonomously, if you add some sensors to the hardware.  The build details are a bit sparse, but there is a bill of material and that, combined with the 3D printing files and the videos, should allow you to figure it out.

We couldn’t help but wish for a first person view (FPV) camera and control via a cell phone, so you could snipe at those ice cream thieves while hiding in the broom closet. On the other hand, if you got the gun working, adding the remote wouldn’t be hard at all. You probably have a WiFi FPV camera on your quadcopter that finally came out of that tree and there’s lots of ways to do the controls via Bluetooth or WiFi.

Not that you don’t have options. But here at Hackaday HQ, we have lots of rubber bands and not so many green pigs. If you’d rather shoot paintballs, be careful you don’t accidentally repaint the insides of your cube.


Filed under: 3d Printer hacks, Arduino Hacks, weapons hacks

Prevent Failed Prints With A Filament Speed Sensor

If you have used a 3D printer for any length of time, you’ve probably experienced a failed print caused by a clogged nozzle. If you’re not around to stop the print and the nozzle stays hot and full of filament for hours, the clog gets even worse. [Florian] set out to solve this issue with an encoder that measures filament speed, which acts as an early warning system for nozzle clogs.

[Florian] designed a small assembly with a wheel and encoder that measures filament movement. The filament passes under the encoder wheel before it’s fed into the 3D printer. The encoder is hooked up to an Arduino which measures the Gray code pulses as the encoder rotates, and the encoder count is streamed over the serial port to a computer.

When the filament slows down or stops due to a nozzle clog, the Python script plays a notification sound to let you know that you should check your nozzle and that your print might fail. Once [Florian] works out some of the kinks in his setup, it would be awesome if the script could stop the print when the nozzle fails. Have any other ideas on how to detect print failures? Let us know in the comments.


Filed under: 3d Printer hacks

Astoundingly Great $60 3D Printer called Chimera Bests Your Printer

When most people think of 3D printing, they think of Fused Deposition Modelling (FDM) printers. These work by heating a material, squirting it out a nozzle that moves around, and letting it cool. By moving the nozzle around in the right patterns while extruding material out the end, you get a part. You’ve probably seen one of the many, many, many FDM printers out there.

Stereolithography printing (SLA) is a different technique which uses UV light to harden a liquid resin. The Chimera printer uses this technique, and aims to do it on the cheap by using recycled parts.

First up is the UV light source. DLP projectors kick out a good amount of UV, and accept standard video inputs. The Mitsubishi XD221u can be had for about $50 off eBay. Some modifications are needed to get the focus distance set correctly, but with that complete the X and Y axes are taken care of.

For the Z axis, the build platform needs to move. This was accomplished with a stepper motor salvaged from a disk drive. An Arduino drives the motor to ensure it moves at the right rate.

Creation Workshop was chosen as the software to control the Chimera. It generates the images for the projector, and controls the Z axis. The SLA process allows for high definition printing, and the results are rather impressive for such a cheap device. This is something we were just talking about yesterday; how to lower the cost of 3D printers. Obviously this is cheating a bit because it’s banking on the availability of cheap used parts. But look at it this way: it’s based on older technology produced at scale which should help a lot with the cost of sourcing this stuff new. What do you think?


Filed under: 3d Printer hacks
Hack a Day 10 Jun 22:01

3D Printed Fish Feeder

[Helios Labs] recently published version two of their 3D printed fish feeder. The system is designed to feed their fish twice a day. The design consists of nine separate STL files and can be mounted to a planter hanging above a fish tank in an aquaponics system. It probably wouldn’t take much to modify the design to work with a regular fish tank, though.

The system is very simple. The unit is primarily a box, or hopper, that holds the fish food. Towards the bottom is a 3D printed auger. The auger is super glued to the gear of a servo. The 9g servo is small and comes with internal limiters that only allow it to rotate about 180 degrees. The servo must be opened up and the limiters must be removed in order to enable a full 360 degree rotation. The servo is controlled by an Arduino, which can be mounted directly to the 3D printed case. The auger is designed in such a way as to prevent the fish food from accidentally entering the electronics compartment.

You might think that this project would use a real-time clock chip, or possibly interface with a computer to keep the time. Instead, the code simply feeds the fish one time as soon as it’s plugged in. Then it uses the “delay” function in order to wait a set period of time before feeding the fish a second time. In the example code this is set to 28,800,000 milliseconds, or eight hours. After feeding the fish a second time, the delay function is called again in order to wait until the original starting time.


Filed under: 3d Printer hacks, Arduino Hacks