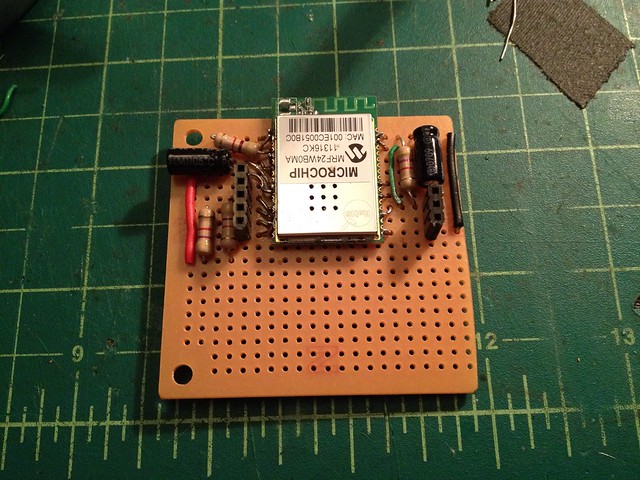
The shield most used in practice are those that expand the communication of the Arduino board and in particular those that allow to add a network connection to a TCP / IP.
The first shield of this kind were those based on Ethernet technology, which helps the Arduino to connect to a LAN based on Ethernet TCP / IP, and so to Internet.
The convenience of Wi-Fi is now known to all: no more cables to spread (which increases the cost and time of construction of any plant) and full freedom in the positioning of the different nodes of the wireless network.
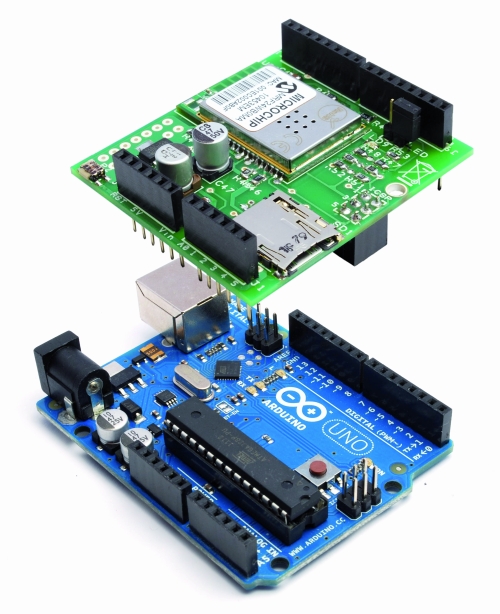
One of the first companies to focus on Wi-Fi was the AsyncLabs, who proposed a famous WiFi shield, including the appropriate libraries.
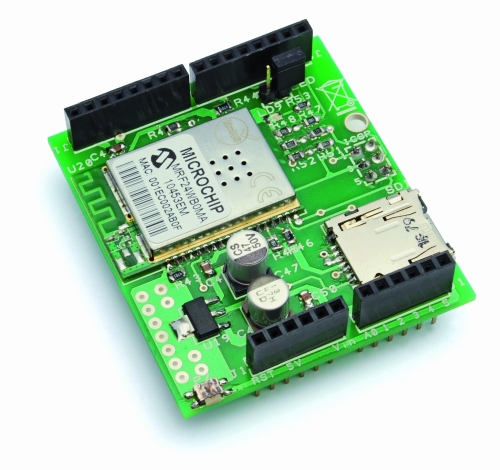
What we propose is a new solution for Wi-Fi: this is a shield that the hardware was inspired by that of AsyncLabs, but in addition, we have provided a slot for microSD memory.

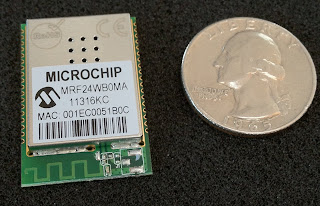
The basic component of the shield that we have made is a Wi-Fi module MRF24WB0MA manufactured by Microchip.
The device is a Wi-Fi IEEE 802.11 RF transceiver, with a data rate between 1 and 2 Mbps, and with an internal antenna.
The WiFi shield supports both types of wireless networks infrastructure (BSS) and ad-hoc (IBSS) and is also allowed to connect to secure networks (cryptographers and are supported 64 and 128-bit WEP, WPA/WPA2 and TKIP, AES and PSK).
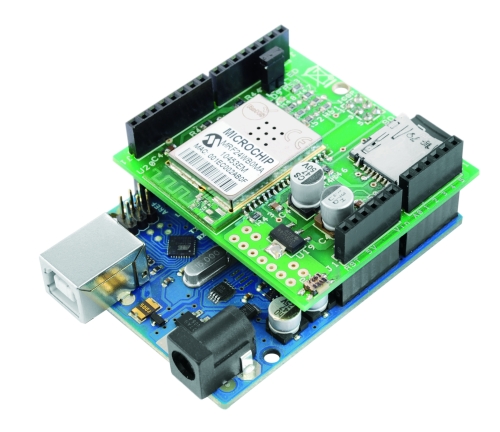
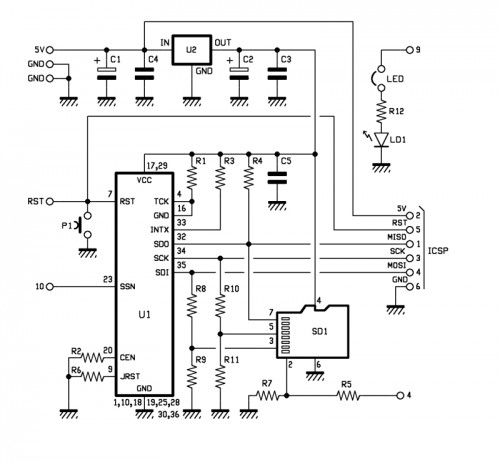
In our project is using the SPI connection for communication with the WiFi controller through the SDO, SCK and SDI (pin 32, 34 and 35) and, if necessary, can be reset using a button (P1 in the diagram).
Peculiarities of our shield is that it has a SD card slot (SD1 signed in the schematic), managed by Arduino always through the SPI port.
There is also a LED (LD1 signed) used to indicate whether the Wi-Fi is active or not, its management is implemented through a hardware port, so you usually can not be used by software. In the event that was needed precisely this port, you still have a jumper that, when opened, making it available again disconnect the LED pin I / O.
Finally, to complete the hardware of the shield there is a section dedicated to the power, consists of a 3.3 V voltage regulator (indicated with U2).
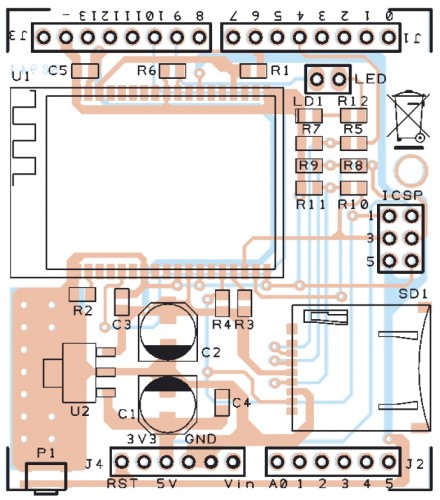
BOM
R1: 4,7 kohm (0805)
R2: 4,7 kohm (0805)
R3: 4,7 kohm (0805)
R4: 4,7 kohm (0805)
R5: 1 kohm (0805)
R6: 4,7 kohm (0805)
R7: 2,2 kohm (0805)
R8: 1 kohm (0805)
R9: 2,2 kohm (0805)
R10: 1 kohm (0805)
R11: 2,2 kohm (0805)
R12: 330 ohm (0805)
C1: 220 µF 6,3 VL (D)
C2: 220 µF 6,3 VL (D)
C3: 100 nF (0805)
C4: 100 nF (0805)
C5: 100 nF (0805)
LD1: Led (0805)
U1: MRF24WB0MA/RM
U2: TC1262-3.3 (SOT-223)
SD1: µSD-Card (MICROSDSOCK2)
P1: switch SMD
Varie:
- headers male 2 via
- headers M/F 6 via(2 pz.)
- headers M/F 8 via(2 pz.)
- headers M/F 3 via(2 pz.)
- Jumper
- PCB
The library supports various operating modes, which are Web Server, Web Client, Socket, UDP and WiServer.
The library is constantly evolving, so we have provided a space where they will be published on code.google.com various versions available.
Code Example for WiFi shield
Web Client
/******************************************************
 SoftwareDemo2WebClientWiFi
 Esempio codice Web Client tramite Wi-Fi
 Autori: Ingg. Tommaso Giusto e Ing. Alessandro Giusto
 Email:  tommro@libero.it
******************************************************/

// Inclusione Libreria per Server Web WiFi
#include <WiServer.h>

// Definizione Parametri Rete Wireless
#define WIRELESS_MODE_INFRA	1  // Infrastrutturata (basata su Access Point)
#define WIRELESS_MODE_ADHOC	2  // Ad-hoc (senza Access Point)

unsigned char local_ip[] = {192, 168, 1, 250};      // Indirizzo IP
unsigned char gateway_ip[] = {192, 168, 1, 91};	    // Indirizzo gateway IP
unsigned char subnet_mask[] = {255, 255, 255, 0};   // Subnet Mask
const prog_char ssid[] PROGMEM = {"Sitecom"};	    // SSID access point

// Selezione tipo di cifratura rete Wireless
unsigned char security_type = 0;  // 0 -> nessuna cifratura
                                  // 1 -> cifratura WEP
                                  // 2 -> cifratura WPA
                                  // 3 -> cifratura WPA2

// Password cifratura per WPA/WPA2 (max. 64 cratteri)
const prog_char security_passphrase[] PROGMEM = {"12345678"};

// Password cifratura per WEP 128-bit keys
prog_uchar wep_keys[] PROGMEM = {0x01, 0x02, 0x03, 0x04, 0x05, 0x06, 0x07, 0x08, 0x09, 0x0a, 0x0b, 0x0c, 0x0d,
				 0x00, 0x00, 0x00, 0x00, 0x00, 0x00, 0x00, 0x00, 0x00, 0x00, 0x00, 0x00, 0x00,
				 0x00, 0x00, 0x00, 0x00, 0x00, 0x00, 0x00, 0x00, 0x00, 0x00, 0x00, 0x00, 0x00,
				 0x00, 0x00, 0x00, 0x00, 0x00, 0x00, 0x00, 0x00, 0x00, 0x00, 0x00, 0x00, 0x00};

// Selezione tipo di rete Wireless infrastrutturata
unsigned char wireless_mode = WIRELESS_MODE_INFRA;

// Variabili per lunghezza SSID e password di cifratura
unsigned char ssid_len;
unsigned char security_passphrase_len;

// Definizione Parametri Google Search
// Indirizzo IP per server www.google.it
uint8 google_ip[] = {209, 85, 148, 106};

// Richiesta GET verso GOOGLE
GETrequest getGoogleSearch (google_ip, 80, "www.google.it", "/search?q=ElettronicaIn");

// Inizializzazione Scheda
void setup() {
  // Inizializzo WiServer (NULL indica non dobbiamo servire pagine Web)
  WiServer.init (NULL);
  // Inizializzo porta seriale
  Serial.begin (9600);
  WiServer.enableVerboseMode (false);

  // Inizializzazione richiesta GET (parametro indica funzione a cui verra' passata la risposta)
  getGoogleSearch.setReturnFunc (Gestione_Risposte_Web);
}

// Variabile memorizzazione riavvio (millisecondi) di esecuzione ricerca
long updateSearch = 0;

// Programma Principale
void loop() {
  // Se passato periodo di attesa esecuzione ricerca
  if (millis() >= updateSearch) {
    // Eseguo ricerca
    getGoogleSearch.submit();
    // Aggiorno tempo di riavvio (attensa di 1 ora)
    updateSearch = updateSearch + (1000 * 60 * 60);
  }

  // Avvio WiServer
  WiServer.server_task();

  // Attesa
  delay(10);
}

// Gestione diverse risposte provenienti dal WEB
void Gestione_Risposte_Web (char* data, int len) {
  // Stampo la risposta proveniente dal WEB su porta seriale
  int i;

  // Stampo i singoli caratteri della risposta proveniente dal WEB su porta seriale
  for (i = 0; i < len; i++) {
    Serial.print(*(data));
    data++;
  }
}
Web Server
/******************************************************
 SoftwareDemo1WebServerWiFi
 Esempio codice Web Server tramite Wi-Fi
 Autori: Ingg. Tommaso Giusto e Ing. Alessandro Giusto
 Email:  tommro@libero.it
******************************************************/

// Inclusione Libreria per Server Web WiFi
#include <WiServer.h>

// Definizione pin INPUT/OUTPUT
int Pin_Led_Rosso = 7;  // Led rosso uscita digitale 7

// Definizione Variabili Globali Stato Led
byte Stato_Led_Rosso = 0;  // Stato led rosso

// Definizione Parametri Rete Wireless
#define WIRELESS_MODE_INFRA	1  // Infrastrutturata (basata su Access Point)
#define WIRELESS_MODE_ADHOC	2  // Ad-hoc (senza Access Point)

unsigned char local_ip[] = {192, 168, 1, 250};      // Indirizzo IP
unsigned char gateway_ip[] = {192, 168, 1, 91};	    // Indirizzo gateway IP
unsigned char subnet_mask[] = {255, 255, 255, 0};   // Subnet Mask
const prog_char ssid[] PROGMEM = {"Sitecom"};	    // SSID access point

// Selezione tipo di cifratura rete Wireless
unsigned char security_type = 0;  // 0 -> nessuna cifratura
                                  // 1 -> cifratura WEP
                                  // 2 -> cifratura WPA
                                  // 3 -> cifratura WPA2

// Password cifratura per WPA/WPA2 (max. 64 cratteri)
const prog_char security_passphrase[] PROGMEM = {"12345678"};

// Password cifratura per WEP 128-bit keys
prog_uchar wep_keys[] PROGMEM = {0x01, 0x02, 0x03, 0x04, 0x05, 0x06, 0x07, 0x08, 0x09, 0x0a, 0x0b, 0x0c, 0x0d,
				 0x00, 0x00, 0x00, 0x00, 0x00, 0x00, 0x00, 0x00, 0x00, 0x00, 0x00, 0x00, 0x00,
				 0x00, 0x00, 0x00, 0x00, 0x00, 0x00, 0x00, 0x00, 0x00, 0x00, 0x00, 0x00, 0x00,
				 0x00, 0x00, 0x00, 0x00, 0x00, 0x00, 0x00, 0x00, 0x00, 0x00, 0x00, 0x00, 0x00};

// Selezione tipo di rete Wireless infrastrutturata
unsigned char wireless_mode = WIRELESS_MODE_INFRA;

// Variabili per lunghezza SSID e password di cifratura
unsigned char ssid_len;
unsigned char security_passphrase_len;

// Inizializzazione Scheda
void setup() {
  // Inizializzo pin usati come INPUT/OUTPUT
  pinMode (Pin_Led_Rosso, OUTPUT);

  // Inizializzo WiServer (Gestione_Richieste_Web per creare/trasmettere pagine HTML)
  WiServer.init (Gestione_Richieste_Web);
  // Inizializzo porta seriale
  Serial.begin (9600);
  WiServer.enableVerboseMode (false);

  // Spengo led rosso
  Led_Rosso_OFF();
}

// Programma Principale
void loop() {
  // Avvio WiServer
  WiServer.server_task();
}

// Gestione diverse richieste provenienti dal WEB
// INPUT:   URL pagina web richiesta
// OUTPUT:  Flag URL riconosciuto/non riconosciutoo
boolean Gestione_Richieste_Web (char* URL) {
  // Se URL richieso corrisponde a "/" (pagina index)
  if (strcmp (URL, "/") == 0) {
    // Secondo gli I/O creo e invio le pagine Web
    Invia_Pagina_Web();

    // Ritorno URL è stato riconosciuto
    return (true);
  }    // Chiusura if URL richieso corrisponde a "/" (pagina index)

  // Se URL richieso corrisponde a "?OPERATION=ACCENDI_ROSSO
  if (strcmp (URL, "/?OPERATION=ACCENDI_ROSSO") == 0) {
    // Accendo led rosso
    Led_Rosso_ON();
    Stato_Led_Rosso = 1;

    // Secondo gli I/O creo e invio le pagine Web
    Invia_Pagina_Web();

    // Ritorno URL è stato riconosciuto
    return (true);
  }    // Chiusura if URL richieso corrisponde a "?OPERATION=ACCENDI_ROSSO"

  // Se URL richieso corrisponde a "?OPERATION=SPEGNI_ROSSO"
  if (strcmp (URL, "/?OPERATION=SPEGNI_ROSSO") == 0) {
    // Spengo led rosso
    Led_Rosso_OFF();
    Stato_Led_Rosso = 0;

    // Secondo gli I/O creo e invio le pagine Web
    Invia_Pagina_Web();

    // Ritorno URL è stato riconosciuto
    return (true);
  }    // Chiusura if URL richieso corrisponde a "?OPERATION=SPEGNI_ROSSO"

  // Ritorno URL non riconosciuto
  return (false);
}

// Funzione che, secondo gli I/O, crea e invia le pagine Web
void Invia_Pagina_Web() {
  // Usando le funzioni WiServer.print trasmette al pagina Web da visualizzare
  WiServer.print ("<html>");
  WiServer.print ("<head>");
  WiServer.print ("<meta http-equiv=""refresh"" content=""10;url=http://");
  WiServer.print (local_ip[0], DEC);
  WiServer.print (".");
  WiServer.print (local_ip[1], DEC);
  WiServer.print (".");
  WiServer.print (local_ip[2], DEC);
  WiServer.print (".");
  WiServer.print (local_ip[3], DEC);
  WiServer.print ("/"" />");
  WiServer.print ("</head>");
  WiServer.print ("<p align=""center"">");
  WiServer.print ("Hello World!<br>");
  WiServer.print ("Esempio Web Server tramite librerie WiShield<br>");
  WiServer.print ("By Ingg. Tommaso Giusto e Ing. Alessandro Giusto<br>");
  WiServer.print ("(tommro@libero.it)<br>");

  // Se led rosso spento
  if (Stato_Led_Rosso == 0) {
    WiServer.print ("<form>Led rosso spento<br>");
    WiServer.print ("<method=GET>");
    WiServer.print ("<input type=submit name=OPERATION value=ACCENDI_ROSSO></form><br>");
  }    // Chiusura if led rosso spento
  // Se led rosso acceso
  else {
    WiServer.print ("<form>Led rosso acceso<br>");
    WiServer.print ("<method=GET>");
    WiServer.print ("<input type=submit name=OPERATION value=SPEGNI_ROSSO></form><br>");
  }    // Chiusura if led rosso acceso

  // Termino pagina HTML
  WiServer.print ("</html>");
}

// Accende il led rosso
void Led_Rosso_ON() {
  digitalWrite (Pin_Led_Rosso, LOW);
}

// Spegne il led rosso
void Led_Rosso_OFF() {
  digitalWrite (Pin_Led_Rosso, HIGH);
}


