Posts with «uno» label

Making a Vintage Star Wars AT-AT toy walk with an Arduino

Dave Stein is a software engineer during the day and a tinkerer on Arduino projects in his free time after work. He submitted on the blog his first Arduino project with the goal of powering his old AT-AT Walker toy (mid 1980s) with Arduino Uno and make it walk and perform some of the functions we see in the Star Wars movies.

AT-AT (All Terrain Armored Transport) are four-legged combat walkers 22.5mt (73.8ft) tall of the Galactic Empire, one of its most famous military symbols introduced  in “Star Wars V: The Empire strikes back”, and we may see them again in the next weeks on “Star Wars: The Force Awakens” the upcoming episode of the saga opening December 18th.

The AT-AT walker toy updated by Dave is controlled by a wired Xbox 360 controller that interfaces with a computer and transports a signal to the Arduino Uno for walker movement:

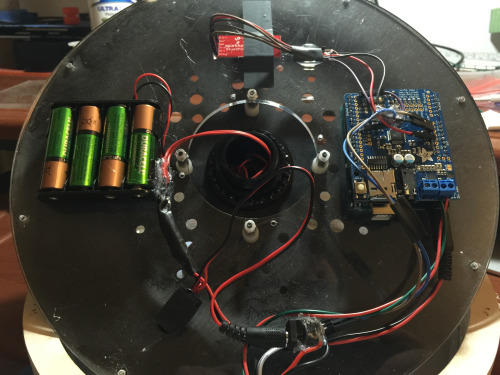
The left and right triggers move the walker forward and backward while the right stick moves the head horizontally. If you have ever played with this toy you may remember it was clumsy and difficult to move. In my project I wanted to learn about and conquer the difficulties of quadrupedal movement. The realization process for my project involved a massive amount of trial and error, research, and failures. I have to say that I failed many more times than I succeeded with configuring the servos with the Arduino. I went down many long roads to learn about prototyping with the breadboard, soldering, and redesigns of the final product. The most difficult part of the project aside from adjusting the gait of the walker for balance and movement was providing enough power to the servos without frying the microcontroller or any of the components. I was finally able to overcome these difficulties by implementing the Adafruit servo shield.

Check AtAt Project website for all info, parts list and upcoming tutorial!

Just imagine your ears were like wings

Wing is an interactive installation created by Dmitry Morozov  and commissioned by the Center for Art and Media (ZKM) in Karlsruhe, special for GLOBALE: Exo-Evolution exhibition, 2015. It’s a 2,5-meter wing that can be flapped by visitors thanks to compact dermal myLeaographic sensors (sensors measuring the electrical potential of muscles) installed  behind their ears and connected to an Arduino Uno:

The main idea of the project is an ironical and at the same time serious research on the topic of development of new instruments and prostheses as “extensions” of human body and accordingly its possibilities and potentials, which are being revealed by new technologies. At the same time, it’s an attempt to stimulate people to perceive and train the body in a different way, expanding the limits of self-control and self-organisation in order to adapt to the new conditions. At the same time, just like many spiritual practices aiming at the elevation of human soul through deep relaxation and control over seemingly uncontrollable muscles, this project uses the metaphor of flying as a reward for the ability to direct your mind to solving of non-standard tasks.

Explore tangible interfaces with a wooden sequencer

During the Physical Computing and Creative Coding course at School of Form a team composed by Ernest Warzocha, Jakub Wilczewski, Maciej Zelaznowski worked on a project starting from the keyword “the aesthetics of interaction”. With the help of their lecturers – Wies?aw Bartkowski and Krzysztof Golinski – they decided to rethink about typical button-like interface of audio sequencer and design a unique tangible interface for it.

The Wooden Sequencer runs on Arduino Uno and works by using familiarity of real objects and manipulating them similarly to the idea of Durell Bishop’s Marble Answering Machine:

Instead of regular buttons we created wooden discs (4×8 circles) that placed in holes generate audio sequence. Each line corresponds to different instrument and columns are responsible for time when sample is played. To know in which point at timeline our sequence plays there is hidden LED on top of each column that blink through wood and informs user which one is currently played.

To create good-looking round shapes of table we used CNC router at our university. After the milling process we connected all electronics with table and sensors for each hole. The core of our project is Arduino UNO with multiplexers and MP3 module. With rendered samples and build-in speakers our project doesn’t require computer plugged in.

Important and somehow unique in our sequencer is usage of IR reflective sensors to change played instrument sample. To decide which sample we want to play sensor recognizes different grayscale color and intensity of the reflected light at bottom of our discs – actually everything placed on table can generate sound. Creating grayscale-based controller is experimental way to interact with device. Furthermore, using grayscale palette might be great idea for MIDI instrument. For this project we used two colors to show the concept. It’s possible to add more but it’s more sensitive to non-constant background light.

Take a look at the video below and explore more pictures on Behance:

Arduino Pinout ASCII art ready to go

To enable easy documentation of pin assignments, BusyDuckMan created a couple of ASCII art of Arduino Uno and Mega boards marking ports, PWM and coms. You can now then simply copy and paste as a comment into your code and document in an easy way how the arduino is connected to other devices:

They can be pasted into code comments, (use /* and */ in the arduino IDE to create a block comment). They can also be useful in forums, when you need a quick arduino diagram, but don’t want to fire up an image editor.


Testing a Heart Pulse Alarm based on Arduino Uno

Murad is a student of Mechatronics and Engineering at Tafila Technical University in the town of Tafila, in Jordan. He made a submission to our blog presenting his DIY project of a Heart Pulse Alarm based on Arduino Uno.

The HPA (Heart Pulse Alarm) is a portable device prototyped to measure the pulse rate and the body temperature of who’s wearing it. If the device receives an unusual heart pulse, it will send a sms message to paramedics to act quickly. He designed the device to help people who have cardiac problems and they lack  the resources for personal and professional assistants in his country.

Check the bill of materials and code on his blog.


Arduino Blog 18 Nov 16:59
arduino  arduino uno  diy  featured  gps  heart-beat  sms  uno  

Slap my zombie hand for internet fame!

Halloween time is a great moment to explore nice interactive projects and get inspired for installations for other selfie occasions. To spice up the office Donnie Plumly, a creative technologist, decided to make and share with us a molded zombie arm that takes pictures and post them to Twitter.

He used a silicone arm (molded on his own hand ), a custom steel mount to clip to an office partition, and a vibration sensor hooked up to an Arduino Uno. Once the arm is slapped a photo will be taken using an IR Led and passed to the Eye-Fi card in the camera.

The photo is then saved into a Dropbox folder and, using If This Then That (IFTTT), posted to Twitter on the account @ZombieSelfie.

Donnie created also a very useful tutorial  on Instructable to make it yourself!

Better you team up if you want to win the game!

Team Game is an interactive installation to reflect about video games and controllers made by Caroline Buttet. It runs on an Arduino Uno or Genuino Uno controlling a flex sensor, a custom made potentiometer, and a light sensor with the help of Unity software and Uniduino plugin:

It’s a simple game in which you need to roll a ball from one side to another of the screen. The trick is, you need some custom controllers to play. And you also need 2 partners that will play with you so that you can progress through the 3 levels. Rather than playing against the others, you will have to team up in order to win!

See the game in action described by Caroline:

Learn more about Uniduino plugin and how to use it with Arduino:

Genuino Uno now available for online purchase!

We are happy to announce that Genuino Uno is now available for purchase on the Arduino Store (20 euro + tax).

In the last months we’ve been re-organizing manufacturing and starting today we are ready to provide the community with a series of Genuino boards.

Genuino and Arduino boards share the same components, characteristics and quality of manufacturing. They are actually the same boards under a different brand:

Thanks for your patience and stay tuned because in the next days we are going to release more Genuino boards!

Arduino Blog 22 Oct 17:15

Increasing citizen’s responses to the haze with Arduino Uno

Once in a while, South East Asia countries such as Singapore and Malaysia suffers from the haze, a fire-related large-scale air pollution problem that occurs regularly. Especially during dry season there are some persisting forest fires in Indonesia that spread to other countries nearby.

In 2015 the haze hit Singapore quite badly, causing schools to close down for one day. That’s why during Hyper Haze Hackathon taking place in Singapore, Tian Lye Teo and Ethan Lee Yong Sheng worked on and presented a low-cost solution based on Arduino Uno to tackle difficulty to communicate haze rising to illiterate elderly in the nation and won second prize !

Here’s how the two creators described the project:

The main problem we are trying to address is to help the elderly who are living alone in Singapore during the haze period. There are several factors that make this a suitable source of information for them. While the PSI* reading are widespread, they might not be accessible to these elders (no cellphone, TV, radio) or they do not understand the mainstream languages used by our medium (Chinese, English etc).

Furthermore, the PSI reading comes with 2 sets of readings (3hr and 24 hrs) and it is confusing to them what need to be done when PSI reached a certain number (“200 already? so what? aiyo… looks clear lei”).

The solution we came up with is this inexpensive Arduino device that fetch current PSI reading from a server. With the reading, the device will point at one of the five indicators that ranges from don’t need to “wear mask” to “die die cannot go out’.

The device actually cost about 20 dollars to build and implementation is ideally done at home. However, we understand that elders would not pay for this (“20 dollars?! I can eat 5 days meals with this”). We are hoping we can get in touch with some organisation(perhaps the govt) to install this at either the lift lobby at every floor or at the ground floor. We believe that even at its current stage, it is still very useful for the elders.

The ideal grand plan we had for this is to be able to link this to the pioneer generation card and from there, dispense a mask for the elder so that they can travel safe (something we felt the govt might help)

Please help spread this by sharing it and hopefully someone can help us achieve this little wish of two guys trying to give back to the pioneer generation who helped built the nation


*PSI (Pollutant Standards Index) is an index to provide  understandable information about daily levels of air quality and it’s the indicator used in Singapore to show how bad the haze is. The monitoring stations measure concentration levels of particulate matter (PM10), fine particulate matter (PM2.5), sulphur dioxide (SO2), nitrogen dioxide (NO2), ozone (O3), and carbon monoxide (CO). All of them determine the level of PSI.

Arduino Blog 20 Oct 22:30

Staying focused with a brain-sensing smart lamp

Clara is a smart lamp able to respond to your brain waves and subtly adjust your environment. The project, running on Arduino Uno, was created by  Marcelo Mejía Cobo, Belen Tenorio, and Josh Sucher for a class at the School of Visual Arts in NYC (US).

The team worked with the Neurosky MindWave Mobile, a Bluetooth EEG-reading headset in order to wirelessly detect “attention” and map the lamp’s color temperature and speaker volume accordingly:

At first, the lamp emits a warm, comforting glow, conducive to idea generation and creativity. But as you start homing in on a specific idea, the light becomes crisper and cooler, and the volume of the ambient noise flowing from the embedded speaker slowly increases, enhancing your ability to concentrate and block out external distractions.

In the picture below you can see the inside of the lamp with the Arduino Uno and Adafruit Music Maker shield:

Explore the Arduino Sketch on Github.

Arduino Blog 09 Oct 23:19