Posts with «uno» label

An Arduino flying start lap timer

Richard Garsthagen recently became the proud owner of a Razor Crazy Cart. Seeing as though he only had one, racing against others was a bit out of the question for now. Being the Maker that he is, he came up with a solution instead: an Arduino Uno-based lap timer.

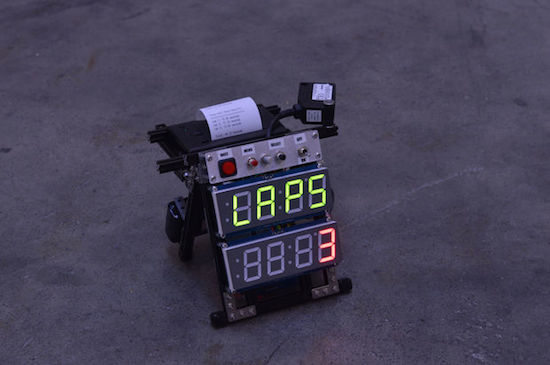
The lap timer uses an infrared light bridge to detect when something crosses the line, an Adafruit 7-segment display to show the time and lap count, as well as a SparkFun thermal printer that spits out the final results. The frame itself is constructed out of MakerBeam components, while power is supplied through an 11.2V LiPo battery.

Meanwhile, the Arduino software has two modes:

Race mode: This is started by clicking the left “race” button. This will start the laptimer. It uses a “flying start” principle. So there is no count down, just start racing, when the first time you cross the line, the timer will start. It will display the amount of laps still to go on the top 7-segment display and the time on the second 7-segment display.

Setup mode: When you click on the “menu,” 2nd button, you can setup how many laps you want to race. By turning the pot-meter you can select between one and nine laps.

While he may be using his timer for Crazy Cart, the system can come in handy whenever you’re unable to directly race someone else — whether that’s running or cycling around the house. Want one of your own? Race on over to its project page. In the meantime, check it out in the video below. (We gotta say, the 8-bit chiptunes were a nice touch!)

BINARY IO is an Arduino-powered, four-button MIDI controller

Developed as part of a semester project, BINARY IO is a nifty little MIDI controller capable of counting from one to 15 using only four buttons. The device, which uses binary code as an input mechanism, is powered by an Arduino Uno and Max/MSP.

With a little practice, BINARY IO becomes quite intuitive and fun to play. As demonstrated by its creators Benjamin Weber and Jeremy Ondrey, users can piece together new music with sounds ranging from the piano to the xylophone to the drums.

A DIY Arduino Nixie tube clock

Nixie tubes have a lot of fans because of their retro style. They are neon valve tubes, where 10 cathodes shaped like numbers from 0 to 9 are switched on by plasma when high voltage flows through them. Patented in the 1930s by H.P. Boswau, they were wildly popular in the ‘60s and remained so until LEDs became cheaper to manufacture in the ‘70s. Many Makers today are creating vintage-look clocks using, now rare, Nixies bought on eBay with the help of an Arduino or Genuino Uno to control them.

In the video below, Jozsef Kovecses built a Nixie clock with NTP time syncronization using a Genuino Uno, a Geeetech IduinoShield, DS1307 RTC, DC-to-DC converter, and Nixie tube modules to drive the tubes directly.

Arduino Blog 15 Jun 11:55

Make masterpieces with a homemade CNC painting machine

Longtime artist Jeff Leonard has built a pair of Arduino-driven CNC painting machines with the motivation to grow his toolbox and expand the kinds of marks he could make simply by hand. By pairing the formal elements of painting with modern-day computing, the Brooklyn-based Maker now has the ability to create things that otherwise would’ve never been possible.

Machine #1 consists of a 5’ x 7’ table and is capable of producing pieces of art up to 4’ x 5’ in size. The device features a variety of tools, including a Beugler pinstriping paint wheel, a brush with a peristaltic pump syringe feed, an airbrush with a five-color paint feed system and five peristaltic pumps from Adafruit, a squeegee, and pencils, pens, markers and other utensils.

In terms of hardware, it’s equipped with three NEMA 23 stepper motors, three Big Easy Drivers, as well as an Arduino Mega and an Uno. There are two servos and five peristaltic pumps on the carriage–the first servo raises and lowers the tool, while the second presses the trigger on the airbrush. An Adafruit motor shield on the Uno controls the pumps, and the AccelStepper library is used for the Big Easy Drivers.

According to Leonard:

I am coding directly into the Arduino. There are many different codes that I call and overlap and use as a painter overlaps techniques and ideas. There is a lot of random built into the code, I don’t know what the end result will be when I start. Typically on any kind of CNC machining the end result has been made in the computer and the machine executes the instructions. I am building a kind of visual synthesizer that I can control in real-time. There are many buttons and potentiometers that I am controlling while the routines are running. I take any marks or accidents that happen and learn how to incorporate them into a painting.

I am learning Processing now and how to incorporate it into the image making.

Machine #2, however, is a bit different. This one is actually a standup XY unit that was made as a concept project. It paints using water on magic paper that becomes black when wet and disappears as it dries, used mainly as a way to practice calligraphy or Chinese brush painting. Not only does it look great, there’s no clean up either!

In terms of tools, the machine has a brush and an airbrush. Two NEMA 17 stepper motors are tasked with the XY motion. There are also three servos–one servo lifts and lowers the armature away from the paper since there is no Z-axis, another controls the angle of the brush, and the third presses the trigger of the airbrush. A peristaltic pump helps to refill the water cup, along with a small fan. The system is powered by an Arduino Uno with an Adafruit Motor Shield using the Adafruit Motor Shield Library v2.

As awesome as it all sounds, you really have to see these gadgets in action and their finished works (many of which can be found on Instagram).

8-bit volume control for Arduino tone()

Connor Nishijima has devised a neat trick to give the standard Arduino Tone() function 256 smooth volume levels using PWM at an ultrasonic frequency, without any extra components. This allows for programmatic control of square waves with nothing other than a speaker connected to an Arduino Uno.

Normally to simulate an analog voltage with a digital-only pin of a microcontroller you’d use Pulse Width Modulation. This works great for LEDs because your eyes can’t the 490 / 976Hz flicker of the standard analogWrite() function. But for audio things are a bit more difficult. Because your ears can easily detect frequencies between 20 – 20,000Hz, any PWM with a frequency in this range is out.

Luckily, the ATmega328P allows you to change the clock prescalers for ultrasonic PWM! We need to use Timer0, because it can drive PWM at a max frequency of 62,500Hz, which even if you cut that in half would still be above your hearing range. Now that we have ultrasonic PWM on Pins 5 & 6, we configure Timer1 to fire an Interrupt Service Routine at a rate of “desired frequency” * 2.

Finally, inside the Timer1 ISR routine, we incorporate our volume trick. Instead of digitalWrite()’ing the pin HIGH and LOW like the normal Tone() function does, we analogWrite() “HIGH” with our volume value (0 – 255) and analogWrite(0) for “LOW”. Because of how fast the PWM is running, the user doesn’t hear the 62.5KHz PWM frequency, and instead perceives a 50% percent duty cycle as a speaker driven with only 2.5 volts! While a few volume levels do produce subtle artifacts to the sound, it mostly delivers quality 8-bit volume control to replace the standard Tone() function.

When all is said and done, you’ll be able to customize your project with unique loudness as you play anything from the iconic Nintendo sound to R2-D2’s beeps and bops. In Nishijima’s case, he developed this Arduino volume-control scheme to make an incessant, inconsistent artificial cricket to hide in a friend’s vent for the next few months… You can read more on its Hackaday.io page, as well as find documentation and ready-to-use example sketches GitHub.

Arduino Blog 13 Jun 13:48

Watch 24 colorful acrylic blocks dance to music

Lights synchronized to music, what’s not to love? YouTuber “Robert Robert” has done just that using 24 acrylic blocks, an Arduino Uno, four 12-pixel WS2812B addressable LED strips, an Adafruit electret microphone amplifier, a 12000mAh external battery pack, and some code.

The blocks are divided into two sets of 12, held together by threaded rods and nuts, with LED strips hot glued to the back. A 60cm x 40cm stainless steel shelf rests underneath to reflect the light back.

In terms of code, the project uses Adafruit’s NeoPixel library:

The first part of the code is Adafruit’s own mic code which calibrates the sound level so that whether you’re using a big speaker or, as in the video, a tiny iPad speaker, the mic remains sensitive. The second part of the code maps the sound level onto 12 if statements so that when quiet it idles with the NeoPixel library rainbow but then as the sound level gets higher more effects are triggered. Within each if statement I have then included a random() function so that the display stays interesting. You can edit each individual strip pixel to create patterns in an infinite variety of ways and using the random () function you can keep on building so you never get bored. The code works best with music with a wide dynamic range (soft and loud parts).

Togglit is a DIY automation kit for your home

A few years ago, Integreight set out to turn your smartphone into more than 40 different Arduino shields. Now, the creators of the 1Sheeld have launched an open-source, fully-customizable home automation kit that will enable you to control your door locks, light switches and power strips using that very same mobile device.

Togglit” can be assembled without any programming, wires, or hassle — only a screwdriver. For its debut at Maker Faire Bay Area, the connected interface was based on an Arduino Uno and 1Sheeld; however, the startup’s founder Amr Saleh notes that it can run on virtually any hardware platform, ranging from Raspberry Pi to other Wi-Fi products.

At the moment, Togglit is compatible with typical toggle light switches, standard deadbolts, as well as American and European power outlets. Ready to make your house smarter? The DIY kit is currently available for pre-order.

Detecting motion with an Arduino and two wires

Connor Nishijima has come with a unique way to detect motion using an Arduino Uno. The active media developer is polling an ADC pin with a pair of wires twisted tightly together — one plugged into A3, another plugged into ground — and generating readings whenever a large living object (like his two cats) is nearby.

“The closest I have ever come to explaining this is capacitive coupling. So what it is is the antenna is leaching a little bit of electricity off you, and you are leaching a little bit of electricity from the antenna. The differential that happens when you move around is what the Arduino is picking up.”

He’s calling this effect “Capacitive Turbulence,” and so far he’s only got it work on the Arduino, no luck using other boards with ADCs. You can watch him explain this magical phenomenon in more detail below!

Turn your SNES gamepad into a USB controller

If you grew up in the ‘90s, chances are you have an old SNES controller lying around somewhere. Well, thanks to a recent project from CompSci Studio, it may be time to blow off the dust and transform it into a modern-day USB gamepad using Arduino.

By following the instructions detailed in the video below, you’ll be able to use the retro controller to play arcade games like Super Meat Boy and Fez on either your Mac or PC. To get started, you’ll need an Uno, five jumper cables, and a simple Arduino sketch that creates an HID compliant joystick out of the SNES device.

Explore relations between nations daily with News Globus


News Globus is an unusual physical interface that piques the curiosity of people and asks them to explore the world by the news putting in relation  places of the world. It was designed by Bjorn Karmann, Charlie Gedeon, Mikio Kiura, Sena Partal wiring 20 regions to a Genuino board inside the sphere. When two regions are connected with the jack, the Genuino selects a country randomly from each region and queries the NY Times API for news containing both locations. A web server then selects a story and converts the headline and byline to a mp3 file which is played either from the headphone jack or the speaker at the  base of the globe:

The shape of the globe is an interesting artifact from the past which was combined with modern technologies and online services. Instead of allowing people to hear the news of one place, the audio jacks bring to mind the metaphor of the phone operator to get people to discover surprising connections between places near and far from each other.

Check the video to see it working:

The project was developed during the Interaction Design Programme at CIID with the help of Massimo Banzi and Dario Buzzini.

Arduino Blog 06 Apr 17:50