Posts with «uno» label

Log your hamster’s runs with Arduino

We’ve all seen hamsters in a cage, furiously running nowhere. Perhaps you’ve thought about the pointlessness of this activity, before going to the gym to lift weights up and down or run on a treadmill. From an outside perspective, both activities seem pointless, but when you realize the benefits, maybe tracking what “feats of strength” you’re able to accomplish, things become much more clear.

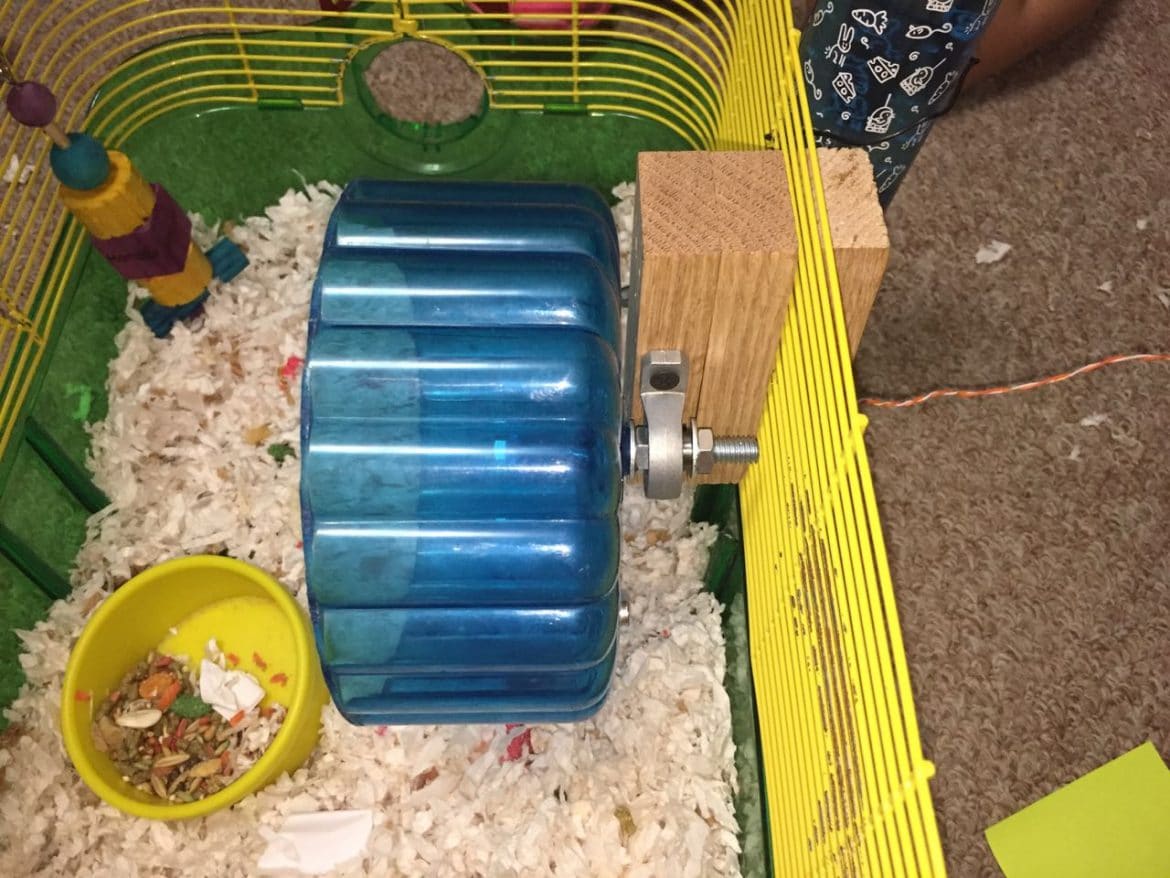
As seen on Hackaday, in order to track the activity of his daughter’s hamster, John Mueller implemented an Arduino Uno-based system that records revolutions using a magnet and a reed switch. Every time the magnet on the wheel passes the fixed switch, it triggers an Arduino input, recording how many revolutions, and thus how many miles the little guy runs each night. Results are quite impressive considering its size, recording over 3.5 miles on one occasion!

This type of encoder concept could be used in many different situations, such as logging bicycle speeds, or tracking motor stats.

Build your own Arduino balancing robot

If you’re familiar with the Segway or other vehicles that balance in what is known as an “inverted pendulum” configuration, you may think that while interesting, creating something similar would be too complicated or out of your budget. Though perhaps still not simple, Joop Brokking takes you through his design for this type of bot in the video seen here, making it accessible if you’d like to build your own.

The robot, which will cost about $80 in parts, uses two stepper motors for greater movement precision than could be had with normal DC models, and employs an Arduino Pro Mini, along with an MPU-6050 accelerometer/gyroscope for control. It can be driven around by a Wii U-style nunchuck, which transmits to the robot via an Arduino Uno and wireless transceiver module.

You can find more info and product links for this project on Brokking.net.

Ancient CRT monitor revived using an Arduino Uno

Hacker “MmmmFloorPie’s” senior project in college, in 1989, was a device based on the venerable Motorola 6800 chip that could record and play back sounds. It could also display these recorded waveforms on a monochrome CRT monitor. The monitor in question was purchased as a bare CRT for $20, and mounted in the cardboard box it was shipped in. Various risks aside, it’s quite an impressive setup.

As with many projects that seemed very cool at the time, this one sat in ‘FloorPie’s garage for many years, until it was finally powered up many years later. Naturally it didn’t work, but instead of giving up, an Arduino Uno shield was made in the form of the 68000 motherboard to send it the required signals.

Though it’s now much slower than the original, the CRT was brought back to life. You can find more about this build on Imgur or on ‘FloorPie’s Reddit post here.

Arduino Blog 16 May 16:03

EduExo is a DIY exoskeleton kit

You’ve seen exoskeletons in movies such as Aliens and Iron Man, and perhaps even heard about current experiments with human use. Unfortunately though, if you want to learn about this technology, the barrier to entry is very high.

EduExo, now available on Kickstarter, is an attempt by robotics researcher Volker Bartenbach to bring this technology to the masses. Based on an Arduino Uno, the device takes the form of an upper and lower arm cuff, along with a motor and force sensor to allow it to be used for haptic control.

It’s available for you to 3D print and assemble yourself, or for a larger pledge, you can receive all the parts needed to build it. Interested? Check out Bartenbach’s campaign!

Building a pool-playing robot prototype with Arduino

Building robots can be (relatively) easy if you’d like something to wander around your room and avoid obstacles, but for complicated control tasks, like shooting pool, things need more development. Engineer “Bvarv” has been working on just such a robot, which currently exists as a one-sixth scale model.

Though it’s not currently capable of playing the game, the device uses some interesting tricks, including a frame supported by a pattern of increasing-diameter pieces of wood, a custom bearing made out of slingshot ammunition, and limit switches to control the billiard bot’s orientation.

For this project, Bvarv employed a pair of Arduino Unos and a PixyCam vision system, along with some servos, belts, and gears. While we may still be a few years away from a full-scale robotic opponent, you can check out the entire build over on Instructables and follow along with his progress in the videos below.

Puzzle-locked geocache provides an extra challenge

Using an Arduino Uno and a servo motor, hacker “Cliptwings” came up with a surprise for treasure hunters!

Geocaching is a game where amateur adventurers find caches in different locations using a GPS receiver. Though this can be a fun way to get outside, once you find the storage box, the challenge is pretty much over. Cliptwings decided to take things in a different direction, and made his cache—which importantly contains a battery on the outside—lock until the retrieving party solves a hangman game.

Once this Arduino-based puzzle is solved, the gadget unlocks with a small servo, revealing the contents inside, most likely a logbook!

The number of this geocache is GC72AFD. The object of the cache is to play and win a game of hangman in order to open the container. An Arduino is used to store five random words. The player uses a knob to turn to a letter, then presses a button to see if it is contained in the word. When the player gets all the words correct, the box opens. If too many wrong words are guessed, access is denied and the box remains locked.

You can find more info on this device in the video below, or check out Dan Wagoner’s hangmanduino code, a modified version of which powers this box!

Anatomically Correct Plotter Avoids Back Scratch Fever

Everybody needs somebody sometimes, even if it’s just for when your back itches. But directing your itchy interlocutor to the correct spot can be a spatial relations challenge: “Right in the middle… no, down a bit… left… no, the other left! Harder! Wait, not that hard!” Why bother with all that messy interpersonal communication and human contact when you can build an automated, precision-guided back scratcher?

[VijeMiller] has aluminum extrusion tastes on a cardboard budget, but don’t let that put you off this clever build. The idea is pretty simple: a two-axis plotter that moves a rotary-action business end to any point within a V-shaped work envelope. The Arduino in the base talks to a smartphone app that lets you point to exactly the spot in need of attention on what for most of us would be an incredibly optimistic photorealistic map of the dorsal aspect of the body (mildly NSFW photo in the link above dips below the posterior border). Point, click, sweet relief.

The video below shows the rig in action, along with the Thespian skills we’ve come to know and love from [VijeMiller] with such classics as the fake floating 19th green, the no-idling-while-texting alert, and the more recent ker-sploosh fighting foam filled toilet. It does seem like he changed his name from [TVMiller] somewhere along the line, but he can’t throw us off the trail that easily.


Filed under: misc hacks
Hack a Day 08 May 03:00

An Arduino Final Countdown Timer

While playing a game called slither.io, Nathan Ramanathan was asked by his father to turn on a wet grinder for “exactly 45 minutes.” As explained, this device uses stones to grind rice into dough, producing material for delicious-looking Dosa cakes.

Deliciousness aside, Ramanathan would rather have the grinder stop automatically than wait around for it, and came up with his own Arduino Uno-based outlet timer controlled via smartphone over Bluetooth. As a bonus, it plays “The Final Countdown” by Europe when only a few seconds remain. 

His write-up includes some discussion about multitasking and the perils of using the delay() function, so be sure to check that out if you’d like more information. Also, when dealing with outlet/mains power, use extreme caution and get help from someone qualified if needed.

Multi-player retro gaming on an Arduino VGA console

When you’re introduced to an Arduino Uno, perhaps you want to take button inputs, control a few LEDs, or move a hobby servo motor. These boards are quite good at that, but with some creative coding, they can actually control a VGA monitor and even play low-resolution games like Pong, Snake or Tetris.

Using Sandro Maffiodo’s VGAx libraries, Instructables user Rob Cai built his own gaming setup, wiring the controls into two separate units. Now, while the base unit hooks up to the actual screen and takes inputs from player one, the second allows player two to participate as well.

I decided to split it in two units: one with a potentiometer and four buttons for the single player games, the other with one button and the second potentiometer for the second player. Thus in total you need 5 buttons, two potentiometers, a VGA connector (DSUB15 female) and, of course, an Arduino! Most importantly, there is no need of supporting IC or special shields!

Want to make one of your own? Check out the DIY VGA console in action below, and find more details on the project’s Instructables write-up. Smaffer’s VGAx libraries can be found here.

ArduECU is a waterproof and rugged Arduino electronic control unit

Now on Kickstarter, ArduECU is an IP69K-rated waterproof, rugged and impact-resistant electronic control unit (ECU) that enables your Arduino projects to withstand the elements and other harsh environments.

ArduECU is compatible with all 12V to 24V systems, and can be used in a wide range of applications such as vehicle diagnostics and control, stationary machines, remote monitoring, industrial automation, and agriculture to name just a few.

Based on an ATmega328, the ECU can be programmed with the Arduino IDE and also supports CoDeSys, meaning you can now configure your ArduECU with ladder logic, functional block, structured text, instruction list, or sequential function charts.

ArduECU comes in three models–one for basic projects, one for CAN bus vehicle and machine control applications, and another which converts an existing Arduino Uno into a weatherproof, custom-tailored ECU with an on-board prototyping area for your own creations and circuits. Each of these units will have expansion headers to leverage IoT and wireless capabilities, including Wi-Fi, Bluetooth, cellular and GPS, or to house future expansion shields with additional functionality at a later time.

Arduino Blog 05 Apr 20:10