Posts with «uno» label

Geared clock measures time linearly

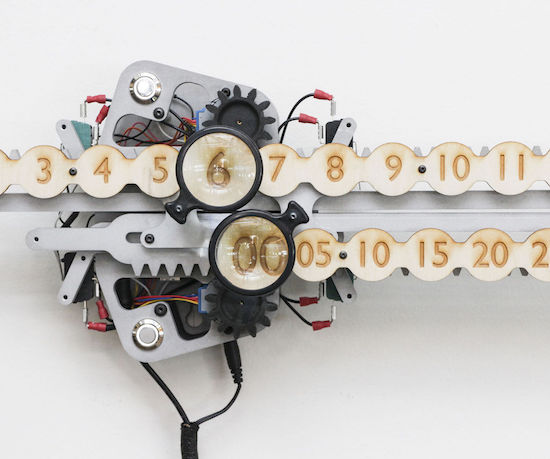
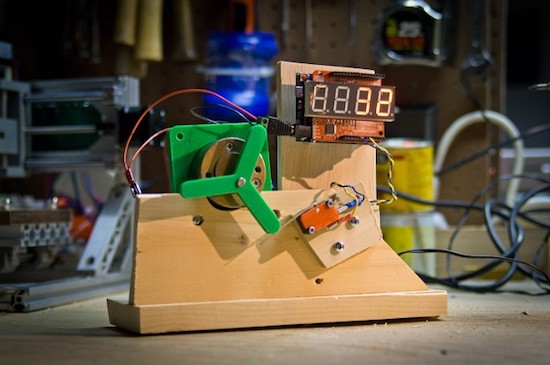
Jonathan Odom, a full-time designer at Instructables who goes by the name “JON-A-TRON,” decided to make a clock illustrating time’s linearity.  What he came up with was a beautifully crafted (robotically manufactured at the Pier 9 workshop, that is) clock that uses two rack and pinion assemblies to move a line of numbers for hours on top of another line signifying minutes.

The minute “hand” is divided up into five-minute intervals, which seems to him to feel less neurotic than being precise down to the exact minute. Magnifying glasses are used to magnify an hour and minute number, reminding onlookers to focus on the present.

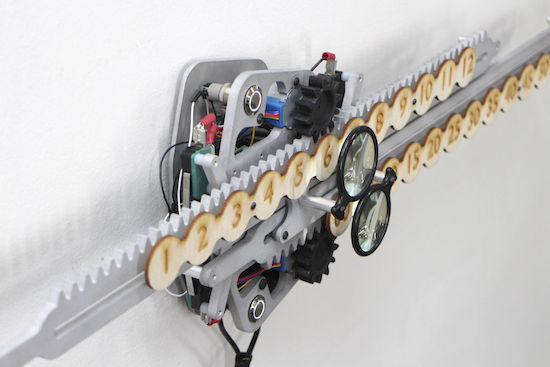
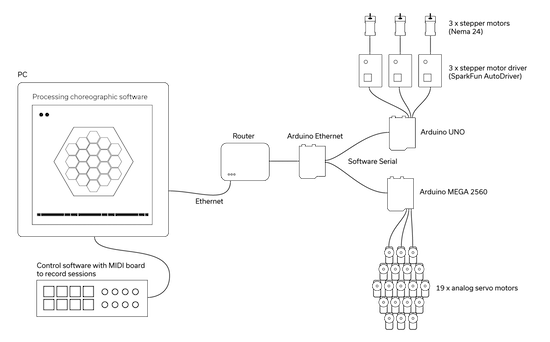
The clock is actuated using an Arduino Uno with a motor driver, controlling a stepper motor for each “hand.” It’s an incredible build, and nicely illustrated. Whether or not you have access to the tools needed to recreate this exact clock, perhaps this concept will inspire something similar!

Be sure to check out Odom’s clock Instructables write-up here and see a demo of it below!

Particle Flow makes granules tumble in interesting patterns

This Arduino-based project creates interesting tumbling patterns using a system that tilts a plane in a controlled manner while deforming its surface.

NEOANALOG, a “studio for hybrid things and spaces,” was commissioned to build the Particle Flow installation, which explores how granules tumble under the control of gravity. This mechanism takes the form of a large hexagon held in three corners by linkages pushed up and down by NEMA 24 stepper motors. As these rods are lifted, the granules inside the “arena” are steered over to the opposite side producing a zen-like experience.

Inside the main hexagon are 19 smaller hexagons, each controlled by servos to lift an individual section of the rolling surface up and down. Control of the entire system is accomplished via a PC running Processing, which sends commands via Ethernet to an Arduino Mega and the steppers to an Arduino Uno with three motor drivers. 

A moving slanted plane and a grid of motorized stamps control the elements to form infinite variations of behaviors and patterns. The result is a zen-like experience that is both: fascinating and contemplative. Software controlled motion follows a complex choreography and enables precise steering of physical particles in a variety of ways: from subtle to obvious, from slow to high paced, from random-like to symmetric.

Intrigued? Be sure to check out Creative Applications Network’s write-up on this piece as well as NEOANALOG’s page for more details.

Arduino-controlled 360° camera trap for animal photography

Using an Arduino, wildlife observer and hiking hacker Andrew Quitmeyer modified a spherical camera to take pictures when motion is detected.

If you’d like to photograph wildlife without actually being there to scare the animals off (or because you would eventually get bored), a great solution is a camera trap. These devices can trigger a camera when animals move nearby, hopefully capturing interesting images. Generally, you need to point your camera in the right direction, but Quitmeyer got around this by using a 360 camera instead to eliminate this placement bias.

In order to control the device, he rigged up his own system with PIR motion sensors and an Arduino Uno to prompt the camera as well as power it on and off. The hack looks effective, though voiding an expensive camera’s warranty like this will certainly scare a few Makers off!

You can see more about how this project was pulled off on Instructables, and find the Arduino code used on GitHub.

Testing microswitches with a (not quite) Useless Machine

Pete “Raster” Prodoehl shows how to test microswitches with an Arduino Uno.

As referenced in his write-up, Prodoehl needed a way to test microswitches that he’d be using for an exhibit. After all, when something is on display, the last thing you want is to have to replace components. Inspired by how Consumer Reports tests things, he decided to build his own setup with a counter and 3D-printed “pusher.”

What he found was that when you’re testing the life span of a component made to work over and over, your testing components have to also be robust enough to handle the very gradual abuse. It’s an interesting exercise, and something that engineers in manufacturing have to deal with constantly. Getting something to work once or even a times is neat, but getting it to function thousands of times for a test or otherwise takes a different way of thinking!

You can see more about this project on Prodoehl’s page here, and check out the video compilation below for a quick overview.

Build an Arduino-powered magnetic drawing machine

As touched on in this video by Charlotte Dann (aka “Charbytes”), she has magnets in her fingers.

This may or may not seem like a small detail, but either way it allows her to draw interesting shapes by passing them over a magnetometer mounted to an Arduino Uno. Dann’s sensor/Arduino package passes serial data to a computer, which does the “heavy lifting,” turning the input into beautiful colors on a computer screen.

It’s an interesting project, and the build process is nicely narrated in her video. A few highlights include a problem with “plastic weld” at 4:00, and a few electrical issues around 7:30 that she eventually solves. You can see more details on this project on its GitHub page, as well as check out Dann’s Twitter account to see what else she’s up to!

Easy ‘USB-ake’ Oven with Arduino Uno

After procuring a new Easy-Bake Oven, engineer Jason Cerundolo decided to convert it to run off of USB. According to his project write-up, “USB-C spec allows for 100 Watts of power to be transferred through the connector, and that is the power rating for the oven, so it should work.”

The biggest modification in this build was dividing the heating element into six segments in order to power it with 20V allowed over USB-C. Finding a suitable charger for this device was also a bit of a challenge, but after 20 minutes, it was able to reach 300° F, producing five strangely-shaped but likely still tasty cookies!

For the electronics, I used my USB-C breakout board with the FUSB302B PHY and an Arduino Uno. I wired I2C plus interrupt between the two. I connected VBUS from the breakout board to VIN on the Arduino to power it. Then, I connected +3V3 from the Arduino to the VDD on the breakout board to power the FUSB302B, as well as +5V to V_pullup on the breakout board. I also connected VBUS to the switch, then to the modified heating element and back to GND. To make the connections easier, I crimped spade connectors onto jumper wires. Finally, I plugged the modified light into pin 13 on the Arduino.

You can check out more about Cerundolo’s project, and find his code on GitHub.

“Smarten” a dumb switch without running wires

Using a pair of Arduino Unos and nRF24L01+ modules, this hacker can now remote control his lights.

After struggling with a wall switch that was just too far from his desk to turn off without getting up, “Guyfromhe” decided to take matters into his own hands and rig up a servo to do it for him. The servo is simply hot glued to the switch plate, and when it gets a command, it obediently switches the lights on or off. Though crude, it seems to get the job done, and it wouldn’t be too hard to imagine a good bracket setup.

An Arduino Uno controls the servo, and takes signals from another Arduino via an nRF24+ RF module. He chose this wireless device as a simple transmission method, and one that uses less power than an ESP8266 that he also tried out. The non-servo Arduino can potentially take signals from several sources, including a Raspberry Pi, laptop, or even a hacked Amazon Dash button.

You can see this makeshift system demonstrated in the video below, and read more about the build here.

Talk to the (low-cost robotic) hand!

Though this low-cost robotic hand by Maker “MertArduino” might not be the best platform for manufacturing, or even world domination, it does show off some interesting physical build techniques. The DIY device can mimic a human’s hand wirelessly via a pair of Arduino Unos and nRF24L01 modules.

For construction, the fingers and thumb are made out of springs and foam, and nylon cords are used to pull them closed with a small servo for each digit. Control is accomplished by flex sensors attached via zip ties to a glove. It’s a great demonstration of how you don’t actually need a 3D printer or other advanced CNC machinery to craft something really unique!

You can see the project in the video below, and check out more hacks on Mert Arduino’s YouTube channel!

WinchBot is a robotic arm composed of 3 winches and 5 servos

Using an Arduino Uno along with a Raspberry Pi for control, hacker “HomoFaciens” came up with this clever delta-style robot.

If you were going to make a robot with five servos, many Makers would make a robot arm with them and call it a day. HomoFaciens, however, who is known for making amazing machines with minimal tools and improvised materials, instead made something that seems to be a cross between a delta robot and a Skycam.

His device, called “WinchBot,” uses three winches attached to an equilateral triangle frame to move a slider on a central pivoting square rod. This allows the robot’s 5-axis “hand” to be positioned within the robot’s work area. The servos are then tasked with keeping everything in the correct orientation, as well as opening and closing the gripper as needed.

If you’d like more details than given in the very entertaining video seen here, be sure to check out the project’s write-up.

Heat up a small pool with this solar-powered system

Imgurian “ElectricYFronts” has created an Arduino-controlled solar heating system for his kids’ paddling pool.

Small semi-portable above ground pools can be fun, but are generally not heated. The “Solar Paddle” system, however, raises the temperature of the pool from a chilly 68 degrees Fahrenheit to a much warmer 83 degrees (20 to 28 Celsius). It does this by piping water into and out of the pool, then heating it in over 200 yards of black watering pipe on top of a shed.

Water is cycled via an impeller pump, which is powered by a solar panel along with a battery to keep power even over fluctuations. A few buttons and an LCD panel allow things to be changed around without opening up the Arduino Uno’s enclosure.

You can see more on how this heater was made on Imgur.