Posts with «uno» label

A cool infinity mirror-style bottle opener

In his quest to create “the coolest wall-mounted bottle opener in the entire world,” it would appear that YouTuber “Never Stop Seeking” has succeeded.

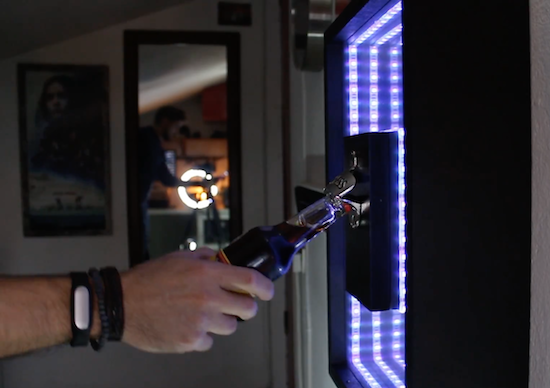
As seen below, the infinity mirror-style unit is made of plexiglass and two-way mirror film, and equipped with Arduino Uno-controlled RGB LED strips that are activated by a proximity sensor as you open a beer or soda. He even included a magnetic catch for his bottle caps!

Want to build one of your own? Good news, Never Stop Seeking plans on sharing more details along with a how-to video in the coming days.

This animatronic device turns speech into sign language

Using a couple Arduinos, a team of Makers at a recent McHacks 24-hour hackathon developed a speech-to-sign language automaton.

Alex Foley, along with Clive Chan, Colin Daly, and Wilson Wu, wanted to make a tool to help with translation between oral and sign languages. What they came up with was an amazing animatronic setup that can listen to speech via a computer interface, and then translate it into sign language.

This device takes the form of two 3D-printed hands, which are controlled by servos and a pair Arduino Unos. In addition to speech translation, the setup can sense hand motions using Leap Motion’s API, allowing it to mirror a person’s gestures.

You can read about the development process in Foley’s Medium write-up, including their first attempt at control using a single Mega board.

Remotely control a sumo bot with a gaming wheel

Using an Arduino Uno, Nano, and two Bluetooth modules, engineering student “Roboro” can now remotely control his sumo robot.

Like many hackers, Roboro had an old gaming controller that he wasn’t using, in this case an Xbox steering wheel and pedals. Naturally, he converted it into a controller for his sumo robot, which can now be driven manually. This involved wiring the wheel controls into an Uno; the smaller Nano was used onboard the bot.

Rewiring a controller is nothing new, but what is also quite interesting from a hack point of view is that the Arduinos communicate over Bluetooth. When initiated, the controller connects itself to the robot, which can then be driven around (as long as it doesn’t get stuck in the hardwood).

You can see more details of this build on Roboro’s project page.

Log high-altitude balloon data with this Arduino device

Wanting to see data from their high school’s HAB launch, 9th grader “Spaceshark” and a few of his classmates decided to build their own data tracker.

According to the project’s write-up, Spaceshark’s school has an astronomy club which sends HABs to the edge of space. Although the 360-degree video embedded here would be enough to satisfy most people’s curiosity, this team wanted more data!

Spaceshark’s group proceeded to create a data logger using an Arduino Uno, along with sensors to collect data on the satellite’s latitude and longitude coordinates. Altitude, wind speeds, time, and the satellites in view can also be recorded, saving readings on a microSD card for later analysis.

Since these type of balloons can reach heights of 100,000 feet, the fact that the boards used could get quite cold, as well as the question of whether or not the GPS used would work at that altitude, had to be considered. You can find more details of this build on its Instructables page here.

Power a 1980s MicroVox with an Arduino Uno

After digging through an extremely complete manual, Monta Elkins used an Arduino Uno to make a MicroVox speech synthesizer do his bidding.

The bad thing about obsolete gear is that it is generally very hard to hook up to modern equipment. The great thing for Makers, though, is that many of the devices from one’s childhood (or before) can now be driven with inexpensive tools such as Arduinos. Some of them, like the 1982-vintage MicroVox model that Elkins got his hands on, even include a manual with schematics and components listed.

After going over his new find and the enclosed manual, the video really hits a highlight around 13:45, when he powers it on to hear it burp out “ready” in a deep monotonous tone that may bring back memories of the robotic future you remember fondly. He finally hooks up the Uno just after that, and gets it to spit out an “interesting” catch phrase just after 16:30.

You can read more about the project on Hackaday and see other projects by Elkins on his YouTube channel here!

Arduino Blog 23 Feb 22:11

Make sure guests never miss your house with these numbers

If you’d like for someone to visit you, it’s quite helpful if you have the house number displayed somewhere on your premises. Rather than simply rely upon someone reading the numbers as they drove by, “Superbender” has decided to do something a bit different make his home stand out.

During the day, you can identify Superbender’s residence by the giraffe mailbox, but to help point the house out by night, he came up with the glowing Arduino Uno solution seen in the video here.

The numbers were cut on a scroll saw and RGB LED strips were added in the back to enable them to illuminate. The setup allows for one color per night, or the numbers can change every three seconds in “party mode.”

The software was tested on an Uno, then transferred to an ATmega328P in a DIY control board. You can read more about this project on Instructables and watch a demo of it below!

Bring some zen to your living room with this CNC end table

Why settle for a some boring furniture, when you can have your own sand and rock display powered by an Arduino Uno and stepper motors instead?!

According to his write-up, Instructables user “MakrToolbox” gets many ideas that never leave the pages of his Moleskin notebook. Although it has to be difficult to decide which ones gets to live in reality, this Zen Garden CNC End Table seems like it was a great build choice.

The table consists of a piece of plate glass covering a “garden” of sand and stones. On top of this is a metal ball that moves around via a joystick on the side of the table, traversing the sand and making interesting shapes, like a giant Etch A Sketch. The ball is pulled around with a magnetic servo-powered gantry system underneath.

Look like something you’d love to have in your living room? Be sure to check out the project’s page for more!

Homemade MDF desktop CNC router for €200

Using an Arduino Uno with a CNC shield,  Thimo Voorwinden has made his own CNC out of MDF for just over €200 ($212).

CNC routers really open up what the type of item you can make, but tend to be expensive. Voorwinden’s homemade version, however, features a work area of 200mm x 250mm x 100mm. As shown in the results video below, it’s accurate enough to cut two pieces of MDF so that they can nest securely inside of one another. Impressively, the whole assembly was created using basic tools.

Two interesting features on this build are that the workpiece is fastened down with wood screws into the Y-axis gantry, and that it employs an offset motor with a flexible shaft to transfer power to the cutting head. 12 bearing blocks and 8mm diameter steel rod are used to keep everything lined up.

You can see more of this project in Voorwinden’s write-up, including several other videos as well.

A DIY Laser Scanning Microscope

With a DVD pick-up, an Arduino Uno, a laser, and an LDR, Instructables user “Venkes” has managed to create a DIY Laser Scanning Microscope (LSM).

A laser microscope works by shining a beam of light on a subject in an X-Y plane. The intensity of the reflected light is then detected by a photoresistor (or LDR) and recorded. When the various points of light are combined, you get an image.

Obviously you need a very small laser beam. Since a DVD laser unit has to work with the extremely small bit markings on these disks and has coils to steer the lens built-in, this seems like a logical choice to use with a custom microscope. Though it took quite a bit of effort to make, it’s capable of 1300x magnification to attain a resolution of 65,6536 pixels (256 x 256) in an area of .05 x .05mm. Results start around 3:00 in the video below.

More details of this impressive build can be found on the project’s Instructables page.

Teleknitting: TV-based string art

Have you ever wondered what television would look like if transposed onto string and wrapped around another object? If so, you’re not the only one, as shown in this teleknitting sculpture.

Although it’s hard to say where the idea for this piece came from, Moscow-based artist ::vtol::’s teleknitting installation resolves a TV signal down into one pixel by lowering its resolution in eight steps. This process is displayed as video on an Android tablet, and the results are transferred to thread via a unique dying mechanism involving “dye arms.”

This multi-colored string is then wrapped around an object (or objects) rotating on a pedestal, the height of the string being controlled by the TV signal’s volume.

As you can see below, the character Bender from Futurama along with an alligator bearing an accordion act as the items being wrapped in TV-string. You can find more details of this build on ::vtol::’s website, along with a number of his other Arduino-based interactive projects.