Posts with «ultrasound» label

Mini Ultrasonic Levitation Kit is an Exercise in Sound Minimalist Design

For those that haven’t heard, ultrasonic levitation is a process by which two or more ultrasonic transducers are set opposite to each other and excited in such a way as to create a standing wave between them. The sound is, as the name implies, ultrasonic — so outside the range of human hearing — but strong enough so that the small, light objects can be positioned and held fixed in mid-air where there’s a pressure minimum in the standing wave. [Olimex] has created a small ultrasonic levitation kit that exemplifies this phenomena.

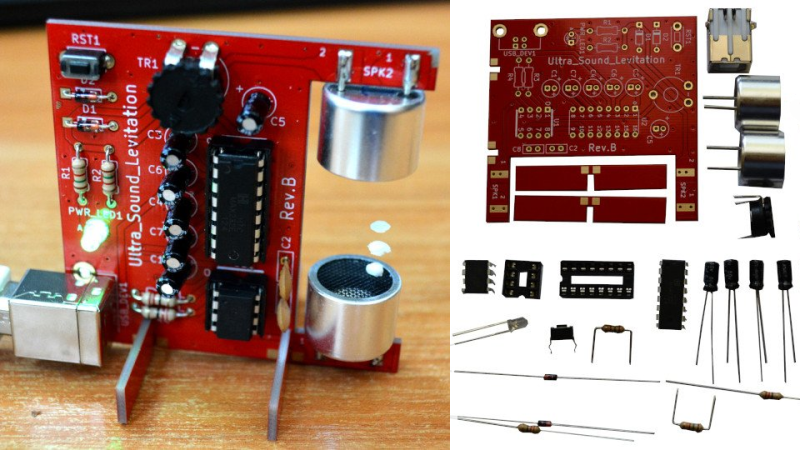
The kit itself is made using through-hole components, with an ATTiny85 as the core microcontroller to drive two TCT40-16T ultrasonic speakers, and a MAX232 to provide a USB interface. Two slotted rectangular PCB pieces that solder connect to the main board, provide a base so that the device stands upright when assembled. The whole device is powered through the USB connection, and the ultrasonic speakers output in the 40KHz range providing enough power to levitate small Styrofoam balls.

The project is, by design, an exercise in minimalism, providing a kit that can be easily assembled, and providing code that can be easily flashed onto the device, examined and modified. All the design files, including the bill of materials, KiCAD schematics, and source code are provided under an open source hardware license to allow for anyone wanting to know how such a project works, or to extend it themselves, ample opportunity. [Olimex] also has the kit for sale for those not wanting to source boards and parts themselves.

We’ve featured ultrasonic levitation devices before, from bare bones system driven by a NE555 to massive phased arrays.

Lessons Learned From An Art Installation Build

Art installations are an interesting business, which more and more often tend to include electronic or mechanical aspects to their creation. Compared to more mainstream engineering, things in this space are often done quite a bit differently. [Jan Enning-Kleinejan] worked on an installation called Prendre la parole, and shared the lessons learned from the experience.

The installation consisted of a series of individual statues, each with an LED light fitted. Additionally, each statue was fitted with a module that was to play a sound when it detected visitors in proximity. Initial designs used mains power, however for this particular install battery power would be required.

Arduinos, USB power banks and ultrasonic rangefinders were all thrown into the mix to get the job done. DFplayer modules were used to run sound, and Grove System parts were used to enable everything to be hooked up quickly and easily. While this would be a strange choice for a production design, it is common for art projects to lean heavily on rapid prototyping tools. They enable inexperienced users to quickly and effectively whip up a project that works well and at low cost.

[Jan] does a great job of explaining some of the pitfalls faced in the project, as well as reporting that the installation functioned near-flawlessly for 6 months, running 8 hours a day. We love to see a good art piece around these parts, and we’ve likely got something to your tastes – whether you’re into harmonicas, fungus, or Markov chains.

A Concept for a Robot that I am planning to build

A Concept for a Robot that I am planning to build

WALTER - The Arduino Photovore Insect Robot

Primary image

What does it do?

Navigate around and seeking light

[Please excuse my English]

Cost to build

Embedded video

Finished project

Complete

Number

Time to build

Type

URL to more information

Weight

read more

WALTER - The Arduino Photovore Insect Robot

Primary image

What does it do?

Navigate around and seeking light

[Please excuse my English]

Cost to build

Embedded video

Finished project

Complete

Number

Time to build

Type

URL to more information

Weight

read more

WALTER - The Arduino Photovore Insect Robot

Primary image

What does it do?

Navigate around and seeking light

[Please excuse my English]

Cost to build

Embedded video

Finished project

Complete

Number

Time to build

Type

URL to more information

Weight

read more

WALTER - The Arduino Photovore Insect Robot

Primary image

What does it do?

Navigate around and seeking light

[Please excuse my English]

Cost to build

Embedded video

Finished project

Complete

Number

Time to build

Type

URL to more information

Weight

read more

Otto - build you own robot in two hours!

Primary image

What does it do?

Otto walks, dances, makes sounds and avoids obstacles, is completely open source, Arduino compatible, 3D printable, and with a social impact mission to create an inclusive environment for all kids.

Otto was inspired by another robot instructable BoB the BiPed and programmed using code from another open source biped robot called Zowi.

CC-BY-SA

Otto's differences are in the assembled size (11cm x 7cm x12cm), cleaner integration of components and expressions.

Cost to build

$49, 00

Embedded video

Finished project

Complete

Number

Time to build

2 hours

Type

URL to more information

Weight

250 grams

read more

Blackboard digitization for under $40

Digital White/Black Boards or “Smart Boards” are very useful in modern classrooms, but their high cost often makes it difficult to convince administrators from loosening their purse strings. Cooper Union’s 2nd annual HackCooper event in New York wanted students to design and build hardware and software projects that both solve real problems and spark the imagination. At the 24 hour hackathon, the team of [harrison], [david] and [caleb] decided to put together a low-cost and simple solution to digitizing classroom black board content.

A chalk-holder is attached to two strings, each connected over a pulley to a weight. The weights slide inside PVC pipes at the two sides of the black board. Ultrasonic sensors at the bottom of each tube measure the distance to the weights. The weights sit in static equilibrium, so they serve the purpose of keeping the string taut without negatively interfering with the writer.

With a couple of calibration points to measure the extent of displacement of each weight, board width can be determined, making it easy to adapt to different sizes of boards. Once calibrated, the system can determine position of the chalk over the board based on some trigonometrical calculations. Since they had just 24 hours to hack the system together, they had to use a hand operated radio with a couple of buttons to provide user control. Pressing the “Write” button starts transmitting chalk movements to the digital screen. A second button on the radio remote serves to “Erase” the digital screen. After receiving the chalk position data, they had to do a fair amount of processing to eliminate noise and smooth out the writing on the digital screen.

A server allows the whole class to receive the chalk board data in real time. After each “Erase” command, the chalk board state is saved and logged on the server, thus allowing previous content to be viewed or downloaded. If only text is written, optical character recognition can be used to further digitize the content.

What makes the project really useful is the low cost. The sensors cost a dollar. The other parts – PVC pipe, weights/pulleys, Arduino and the Radio key fob – were all bought for under 40 dollars. For some additional cost (and maybe more time in their case) they could have automated the detection of when the chalk was actually doing the writing. The team have made their code available on Github. For a Chalk board at the other end of the cost spectrum, check this one out. Video below.


Filed under: Arduino Hacks