Posts with «solenoid» label

Play Robotic Bongos using your Household Plants

[Kirk Kaiser] isn’t afraid to admit his latest project a bit strange, being a plant-controlled set of robotic bongos. We don’t find it odd at all.  This is the kind of thing we love to see. His project’s origins began a month ago after taking a class at NYC Resistor about creating music from robotic instruments. Inspired to make his own, [Kirk] repurposed a neighbor’s old wooden dish rack to serve as a mount for solenoids that, when triggered, strike a couple of plastic cowbells or bongo drums.

A Raspberry Pi was originally used to interface the solenoids with a computer or MIDI keyboard, but after frying it, he went with a Teensy LC instead and never looked back. Taking advantage of the Teensy’s MIDI features, [Kirk] programmed a specific note to trigger each solenoid. When he realized that the Teensy also had capacitive touch sensors, he decided to get his plants in on the fun in a MaKey MaKey kind of way. Each plant is connected to the Teensy’s touchRead pins by stranded wire; the other end is stripped, covered with copper tape, and placed into the soil. When a plant’s capacitance surpasses a threshold, the respective MIDI note – and solenoid – is triggered. [Kirk] quickly discovered that hard-coding threshold values was not the best idea. Looking for large changes was a better method, as the capacitance was dramatically affected when the plant’s soil dried up. As [Kirk] stood back and admired his work, he realized there was one thing missing – lights! He hooked up an Arduino with a DMX shield and some LEDs that light up whenever a plant is touched.

We do feel a disclaimer is at hand for anyone interested in using this botanical technique: thorny varieties are ill-advised, unless you want to play a prank and make a cactus the only way to turn the bongos off!


Filed under: Arduino Hacks, musical hacks
Hack a Day 17 Apr 03:00

Making a Player Piano Talk MIDI

[Ramon] was always fascinated with pianos, and when he came across a few player piano rolls in an antique shop, a small kernel of a project idea was formed. He wondered if anyone had ever tried to convert a player piano into a full MIDI instrument, with a computer tickling the ivories with a few commands. This led to one of the best builds we’ve ever seen: a player piano connected to a computer.

[Ramon] found an old piano in Craigslist for a few hundred dollars, and once it made its way into the workshop the teardown began. Player pianos work via a vacuum, where air is sucked through a few pin points in a piano roll with a bellows. A series of pipes leading to each key translate these small holes into notes. Replicating this system for a MIDI device would be impossible, but there are a few companies that make electronic adapters for player pianos. All [Ramon] would have to do is replicate that.

The lead pipes were torn out and replaced with 88 separate solenoid valves. These valves are controlled via a shift register, and the shift registers controlled by an ATMega. There’s an astonishing amount of electronic and mechanical work invested in this build, and the finished product shows that.

As if turning an ancient player piano into something that can understand and play MIDI music wasn’t enough, [Ramon] decided to add a few visuals to the mix. He found a display with a ratio of 16:4.5 – yes, half as tall as 16:9 – and turned the front of the piano into a giant display. The ten different styles of visualization were whipped up in Processing.

The piano has so far been shown at an interactive art exhibit in Oakland, and hopefully it’ll make it to one of the Maker Faires next year. There are also plans to have this piano output MIDI with a key scanner underneath all the keys. Very impressive work.

Video below.


Filed under: musical hacks
Hack a Day 26 Dec 00:00

Glockentar: Epic Instrument Mashup

What happens when you want to play two instruments at the same time, but only have two hands? You let electronics do the work for you, of course.

Read the full article on MAKE

MR-808 Brings Vintage Drum Machine to Life

Moritz Simon Geist has made a physical version of the famed TR-808 drum machine.

Read the full article on MAKE

MAKE » Arduino 09 Nov 20:00
arduino  drum machine  max  msp  music  solenoid  tr-808  

A closer looks helps you build your own DiWire Bender

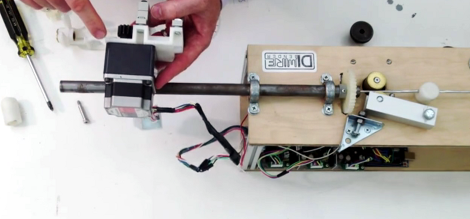
Whether or not you’re actually going to build this CNC wire bender, we think you’ll love getting a closer look at how it’s put together. The team over at PENSA got such a strong response from a look at the original machine that they decided to film a video (embedded after the break) showing how the thing was put together. They’ve also posted a repository with code, bom, etc.

In the image above [Marco] shows off the portion that actually does the bending. It’s designed to mount on the pipe through which the straightened wire is fed. The 3d printed mounting bracket really makes this a lot easier. The assembly provides a place to attach the solenoid which moves a bearing in and out of position. That bearing presses against the wire to do the bending, but must be moved from one side of the wire to the other depending on the direction of the next bend. This is a lot easier to understand after watching the demo video which is also embedded after the break.


Filed under: cnc hacks
Hack a Day 21 Jun 12:01

Motion sprinkler chases away defecating dogs

Don’t want dogs pooping on the front lawn? You could put up a sign, your could chase them away like a crotchety old miser, or you could build a motion detecting sprinkler system. It’s pretty hard to line up for a doody when you’re getting sprayed in the face (or worse) with cold water.

The setup is pretty simple. The bump-in image above shows the view from a webcam. The server monitoring the video is running software that detects motion between one frame and the next. When it sees something in the right position it signals an Arduino to trigger the solenoid which has been holding back the water. Check out the movie after the break which shows [Phil Tucker] tramping across the grass to trigger the  trap.

Sprinkler hacks are always a lot of fun. This variable-range sprinkler is still one of our favorites.


Filed under: home hacks

Spelling Words with Rising Bubbles

Inspired by a Jeep’s falling water display, Matt Bell created an Arduino-based bubble display, which turns Jeep’s idea on its head. Matt’s latest version makes a few key improvements that help with the bubble size and steadies the speed at which the bubbles rise. For consistent bubble movement, Matt recommends using mineral oil and keeps each “bubble channel” (as I like to call it) in its own vinyl tube. We’re looking forward to seeing the improvements that the next version brings! [via Arduino]

More:


MAKE » Arduino 14 May 12:00