Posts with «solenoid» label

Dymo Rides Again With This Dot-Matrix Label Embosser

For a five-year-old future Hackaday scribe, there could be no greater day than that on which a Dymo label maker appeared in the house. With its spinny daisy-wheel to choose a character and its squeezy handle to emboss the letter into the plastic tape, there would follow a period of going nuts kerchunking out misspelled labels and slapping them on everything. Plus the things look like space guns, so there would have been a lot of pew-pewing too.

This Dymo dot-matrix label maker bears no resemblance to our long-lost label blaster, but it’s pretty cool in its own right. The product of collaborators [Felix Fisgus] and [Timo Johannes] and undertaken as a project for their digital media program, the only thing the labeler has in common with the Dymos of old is the tape. Where the manual labelers press the characters into the tape with a punch and die, their project uses a dot-matrix approach. Messages are composed on an old PS/2 keyboard through an Arduino and a 16×2 LCD display, and punched onto the tape a dot at a time. The punch is a large darning needle riding on the remains of an old CD drive and driven by a solenoid. When it comes time to cut the label, servo driven scissors do the job. It’s a noisy, crazy, Rube Goldberg affair, and we love it. Check it out in action in the video below.

We applaud [Felix] and [Timo] for carrying the torch of embossed label making. It’s a shame that we’ve turned to soulless thermal printers to handle most of our labeling needs; then again, we’ve seen some pretty neat hacks for those too.

Opening A Ford With A Robot and the De Bruijn Sequence

The Ford Securicode, or the keyless-entry keypad available on all models of Ford cars and trucks, first appeared on the 1980 Thunderbird. Even though it’s most commonly seen on the higher-end models, it is available as an option on the Fiesta S — the cheapest car Ford sells in the US — for $95. Doug DeMuro loves it. It’s also a lock, and that means it’s ready to be exploited. Surely, someone can build a robot to crack this lock. Turns out, it’s pretty easy.

The electronics and mechanical part of this build are pretty simple. An acrylic frame holds five solenoids over the keypad, and this acrylic frame attaches to the car with magnets. There’s a second large protoboard attached to this acrylic frame loaded up with an Arduino, character display, and a ULN2003 to drive the resistors. So far, everything you would expect for a ‘robot’ that will unlock a car via its keypad.

The real trick for this build is making this electronic lockpick fast and easy to use. This project was inspired by [Samy Kamkar]’s OpenSesame attack for garage door openers. In this project, [Samy] didn’t brute force a code the hard way by sending one code after another; (crappy) garage door openers only look at the last n digits sent from the remote, and there’s no penalty for sending the wrong code. In this case, it’s possible to use a De Bruijn sequence to vastly reduce the time it takes to brute force every code. Instead of testing tens of thousands of different codes sequentially, this robot only needs to test 3125, something that should only take a few minutes.

Right now the creator of this project is putting the finishing touches on this Ford-cracking robot. There was a slight bug in the code that was solved by treating the De Bruijn sequence as circular, but now it’s only a matter of time before a 1993 Ford Taurus wagon becomes even more worthless.

Modified Uke Keeps the Beat with a Solenoid

A classic one-man band generally features a stringed instrument or two, a harmonica in a hands-free holder, and some kind of percussion, usually a bass drum worn like a backpack and maybe some cymbals between the knees. The musician might also knock or tap the sound-boards of stringed instruments percussively with their strumming hand, which is something classical and flamenco guitarists can pull off with surprising range.

The musician usually has to manipulate each instrument manually. When it comes to percussion, [JimRD] has another idea: keep the beat by pounding the soundboard with a solenoid. He built a simple Arduino-driven MOSFET circuit to deliver knocks of variable BPM to the sound-board of a ukulele. A 10kΩ pot controls the meter and beat frequency, and the sound is picked up by a mic on the bridge. So far, it does 3/4 and 4/4 time, but [JimRD] has made the code freely available for expansion. Somebody make it do 5/4, because we’d love to hear [JimRD]  play “Take Five“.

He didn’t do this to his good uke, mind you—it’s an old beater that he didn’t mind drilling and gluing. We were a bit skeptical at first, but the resonance sweetens the electromechanical knock of the solenoid slug. That, and [JimRD] has some pretty good chops. Ax your way past the break to give it a listen.

Got a cheap ukulele but don’t know how to play it? If you make flames shoot out from the headstock, that won’t matter as much. No ukes? Just print one.


Filed under: Arduino Hacks, Musical Hacks

Music Box Plays “Still Alive” Thanks to Automated Hole Puncher

Custom hole punch and feed system

Most projects have one or two significant aspects in which custom work or clever execution is showcased, but this Music Box Hole Punching Machine by [Josh Sheldon] and his roommate [Matt] is a delight on many levels. Not only was custom hardware made to automate punching holes in long spools of paper for feeding through a music box, but a software front end to process MIDI files means that in a way, this project is really a MIDI-to-hand-cranked-music-box converter. What a time to be alive.

The hole punch is an entirely custom-made assembly, and as [Josh] observes, making a reliable hole punch turns out to be extremely challenging. Plenty of trial and error was involved, and the project’s documentation as well as an overview video go into plenty of detail. Don’t miss the music box version of “Still Alive”, either. Both are embedded below.

As [Josh] mentioned on his project page, he was inspired by a tutorial video showing how to punch music by hand. It led to this tool to take a MIDI file and cut the music paper out on a laser cutter, whereas [Josh] and [Matt] were inspired to automate the entire process in their own way.

For those of you who don’t think science should stop there, why not automate the creation of the music itself with the output of this Bach-emulating Recurring Neural Network?

Thanks to [Tim Trzepacz] for giving us a heads up on this delightful project!


Filed under: musical hacks

Reed Organ MIDI Conversion Tickles All 88 Keys

What did you do in high school? Chances are it wasn’t anywhere near as cool as turning a reed organ into a MIDI device. And even if you managed to pull something like that off, did you do it by mechanically controlling all 88 keys? Didn’t think so.

A reed organ is a keyboard instrument that channels moving air over sets of tuned brass reeds to produce notes. Most are fairly complex affairs with multiple keyboards and extra controls, but the one that [Willem Hillier] scored for free looks almost the same as a piano. Even with the free instrument [Willem] is about $500 into this project. Almost half of the budget went to the solenoids and driver MOSFETs — there’s a solenoid for each key, after all. And each one required minor surgery to reduce the clicking and clacking sounds that don’t exactly contribute to the musical experience. [Willem] designed custom driver boards for the MOSFETs with 16 channels per board, and added in a couple of power supplies to feed all those hungry solenoids and the three Arduinos needed to run the show. The video below shows the organ being stress-tested with the peppy “Flight of the Bumblebee”; there’s nothing wrong with a little showing off.

[Willem]’s build adds yet another instrument to the MIDI fold. We’ve covered plenty before, from accordions to harmonicas and even a really annoying siren.


Filed under: musical hacks

Robo-Flute Whistles MIDI

We aren’t sure this technically qualifies as music synthesis, but what else do you call a computer playing music? In this case, the computer is a Teensy, and the music comes from a common classroom instrument: a plastic recorder. The mistaken “flute” label comes from the original project. The contraption uses solenoids to operate 3D printed “fingers” and an air pump — this is much easier with a recorder since (unlike a flue) it just needs reasonable air pressure to generate sound.

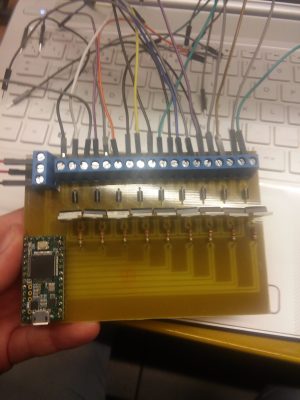
A Teensy 3.2 programmed using the Teensyduino IDE drives the solenoids. The board reads MIDI command sent over USB from a PC and translates them into the commands for this excellent driver board. It connects TIP31C transistors, along with flyback diodes, to the solenoids via a terminal strip.

On the PC, a program called Ableton sends the MIDI messages to the Teensy. MIDI message have three parts: one sets the message type and channel, another sets the velocity, and one sets the pitch. The code here only looks at the pitch.

This is one of those projects that would be a lot harder without a 3D printer. There are other ways to actuate the finger holes, but being able to make an exact-fitting bracket is very useful. Alas, we couldn’t find a video demo. If you know of one, please drop the link in the comments below.

We have seen bagpipe robots (in fact, we’ve seen several). We’ve also seen hammering shotguns into flutes, which is certainly more melodious than plowshares.


Filed under: Arduino Hacks, ARM, musical hacks

Enjoy The Last Throes of Summer With a Nice Pool Automation Project

[Ken Rumer] bought a new house. It came with a troublingly complex pool system. It had solar heating. It had gas heating. Electricity was involved somehow. It had timers and gadgets. Sand could be fed into one end and clean water came out the other. There was even a spa thrown into the mix.

Needless to say, within the first few months of owning their very own chemical plant they ran into some near meltdowns. They managed to heat the pool with 250 dollars of gas in a day. They managed to drain the spa entirely into the pool, but thankfully never managed the reverse. [Ken] knew something had to change. It didn’t hurt that it seemed like a fun challenge.

The first step was to tear out as much of the old control system as could be spared. An old synchronous motor timer’s chlorine rusted guts were ripped out. The solar controler was next to be sent to its final resting place. The manual valves were all replaced with fancy new ones.

Rather than risk his fallible human state draining the pool into the downstairs toilet, he’d add a robot’s cold logical gatekeeping in order to protect house and home. It was a simple matter of involving the usual suspects. Raspberry Pi and Arduino Man collaborated on the controls. Import relay boards danced to their commands. A small suite of sensors lent their aid.

Now as the soon-to-be autumn sun sets, the pool begins to cool and the spa begins to heat automatically. The children are put to bed, tired from a fun day at the pool, and [Ken] gets to lounge in his spa; watching the distant twinkling of lights on his backyard industrial complex.


Filed under: home hacks, robots hacks

Avoid Procrastination with this Phone Lock Box

Smart phones are great. So great that you may find yourself distracted from working, eating, conversing with other human beings in person, or even sleeping. [Digitaljunky] has this problem (not surprising, really, considering his name) so he built an anti-procrastination box. The box is big enough to hold a smart phone and has an Arduino-based time lock.

The real trick is making the box so that the Arduino can lock and unlock it with a solenoid. [Digitaljunky] doesn’t have a 3D printer, so he used Fimo clay to mold a custom latch piece. A digital display, a FET to drive the solenoid, and a handful of common components round out the design.

The software uses C++ classes to keep everything organized. You can download the code on Github. Usage is simple (see the video below). Lock your phone away and get some work done while you wait for the Arduino to unlock the box.

We thought the use of clay instead of the customary 3D printed part makes it easier to duplicate the project. Of course, you could 3D print a piece, and if you really want to blend both worlds, you can always 3D print in clay. Of course, if you wanted a simpler solution, you could just write locking software for the phone. The box, on the other hand, could lock up anything tempting, not just a phone.


Filed under: Arduino Hacks
Hack a Day 13 Nov 03:00

New Project: Convert a Pinball Score Reel into a Clock

Solenoids (a type of electromagnet) are at the heart of pinball machines, and at one time, many other machines. They work by inducing a magnetic field using a coil of copper wire. This makes them ideal for pushing or pulling mechanical things fast and with force. They have become unnecessary […]

Read more on MAKE

The post Convert a Pinball Score Reel into a Clock appeared first on Make: DIY Projects, How-Tos, Electronics, Crafts and Ideas for Makers.

48 Solenoids Transform This 1960s Typewriter into a Computer Printer

Several years ago, Chris Gregg, a Tufts University lecturer and computer engineer, received a letter from his friend Erica. This wouldn’t be so unusual, except that it was typed on an actual typewriter, not a printer. Gregg is a fan of vintage typewriters, but, as with myself, makes many mistakes, […]

Read more on MAKE

The post 48 Solenoids Transform This 1960s Typewriter into a Computer Printer appeared first on Make: DIY Projects, How-Tos, Electronics, Crafts and Ideas for Makers.