Posts with «robot» label

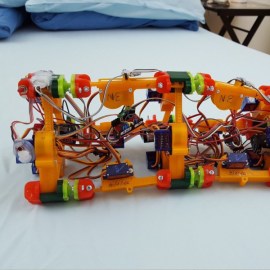
Tiny Open Source Robot

We watched the video introduction for this little open source robot, and while we’re not 100% sure we want tiny glowing eyes watching us while we sleep, it does seem to be a nice little platform for hacking. The robot is a side project of [Matthew], who’s studying for a degree in Information Science.

The robot has little actuated grippy arms for holding a cell phone in the front. When it’t not holding a cellphone it can use its two little ultrasonic senors to run around without bumping into things. We like the passive balancing used on the robot. Rather than having a complicated self-balancing set-up, the robot just uses little ball casters to provide the other righting points of contact.

The head of the robot has plenty of space for whatever flavor of Arduino you prefer. A few hours of 3D printing and some vitamins is all you need to have a little robot shadow lurking in your room. Video after the break.


Filed under: robots hacks
Hack a Day 08 Mar 00:00

Fail of the Week: Battery Pack Jack Wired Backwards

Last Saturday I had a team of teenage hackers over to build Arduino line-following robots from a kit. Everything went well with the mechanical assembly and putting all the wires on the correct pins. The first test was to check that the motors were moving in the proper direction. I’d written an Arduino program to test this. The first boy’s robot worked fine except for swapping one set of motor leads. That was anticipated because you cannot be totally sure ahead of time which way the motors are going to run.

The motor’s on the second robot didn’t turn at all. As I checked the wiring I smelled the dreaded hot electronics smell but I didn’t see any smoke. I quickly pulled the battery jack from the Arduino and – WOW! – the wires were hot. That didn’t bode well. I checked and the batteries were in the right way. A comparison with another pack showed the wires going into the pack were positioned properly. I plugged in another pack but the motors still didn’t run.

I got my multimeter, checked the voltage on the jack, and it was -5.97 V from center connector to the barrel. The other pack read 6.2 V. I had a spare board and pack so swapped those and the robot worked fine. Clearly the reverse polarity had zapped the motor control ICs. After that everyone had a good time running the robots on a course I’d laid out and went home pleased with their robots.

After they left I used the ohmmeter to check the battery pack and found the wiring was backwards, as you can see in the feature photo. A close inspection showed the wire with a white line, typically indicating positive, indeed went to the positive battery terminal. I shaved the barrel connector down to the wires and the white line wire was connected to the outside of the barrel. FAIL!

This is a particularly bad fail on the part of the battery pack supplier because how hard is it to mess up two wires? You can’t really fault the robot kit vendor because who would expect a battery pack to be bad? The vendor is sending me a new battery pack and board so I’m satisfied. Why did I have an extra board and pack, actually an entire kit? For this exact reason; something was bound to go wrong. Although what I had imagined was for one of the students to break a mechanical part or change wiring and zap something. Instead, we were faced with a self-destructing kit. Prudence paid off.


Filed under: Arduino Hacks, Fail of the Week, Hackaday Columns

Robot Does the Worm to Get Around

Walking, jumping, rolling, flying, swimming – robotic locomotion is limited only by the imagination of the inventor. [Roger Rabbit] apparently has a pretty vivid imagination, because he’s building robots that move like worms.

Version 1 of [Roger]’s robot is only semi-vermiform and is more of tube climber. It has a pair of 3D-printed pantographs that expand and contract with servos and move along the robot’s axis on a stepper-driven lead screw. An Arduino reads sensors and coordinates the expansion of the pantographs to grip the internal diameter of a pipe and push the worm-bot along. It’s a slow but effective way to get around in the limited confines of a pipe.

The next iteration, dubbed [Wolly],  is much more worm-like and not restricted to pipe-running. It has four expandable triangular frames connected to each other with rack-and-pinion backbones. The first frame contracts, the racks push it forward, it expands, the next contracts, and soon it’s doing the worm across the floor. Still slow, but pretty neat to watch, and you can see how it can be steered. It might even be able to roll around its long axis, and it’d make a decent tube climber as well.

This creepy autonomous worm-bot seems very similar to [Wolly], but aside from that we haven’t covered too many robots like these. There’s a lot of thought and effort in these worm-bots, and we’re keen to see where [Roger] takes this unique robot body plan.


Filed under: robots hacks
Hack a Day 11 Feb 09:01

Intel Edison Arduino Expansion ---> dymanixel motors

I was wondering what the best method to control DYNAMIXEL AX-18A motors from an Intel Edison with arduino expansion board would be, I have teh Arbotix-M, the UartSBee, the Edison with Arduino Expansion Board, and the Arduino Uno. I really want to make it so that I can use the Intel Edison w/ expansion board, and send that to the Arbotix-M. Can you help me?


17 Year-old programs a robot to teach itself to walk!!

Hi everyone! 

My name is Gregory, but you can call me Greg. I am a 17 year-old high school student who is building a very interesting robot(I am also doing all of the designing and prototyping. I am building a six-legged robot, called a "hexapod", that is able to teach itself to walk.

read more

raspberry + arduino / webiopi + firmata (python)

Im buildin internet controlled rc car with arduino, arduino motor shield and raspberry.
So how to use firmata and webiopi at the same time.

read more

Robot Listens to Commands–Literally

Where you might see a can, [Adam Kumpf] sees a robot. [Adam’s] robot (named [Canny]) doesn’t move around, but it does have expressive eyebrows, multicolored eyes, and a speaker for a mouth. What makes it interesting, though, is the fact that it receives audio commands via the headphones it wears. You can see [Canny] in action in the video below.

The headphones couple audio tones to [Canny’s] microphone using AFSK (audio frequency shift keying). [Canny] uses an opamp to bring the microphone level up and then uses a 567 PLL IC to decode the audio tones. [Adam] selected two clever frequencies for the mark and space (12345 Hz and 9876 Hz). In addition to being numerically entertaining, the frequencies are far enough apart to be easy to detect, pass through the headphones with no problem, and are not harmonically related.

The 567 IC detects only one of the tones. Ignoring one tone is not always great for noise rejection, but for this use should be more than adequate and cuts the parts count down. To avoid false commands, the data contains markers, lengths, and checksums. The 567 feeds the Arduino, which handles all the robot control.

How do you create the sounds that go to the headphones? You use a Web page. Of course, you could generate the low baud rate tones in other ways, too. AFSK modems are common in Ham radio circles, and there are certainly plenty of modem designs. Then again, there is something pleasing about the simplicity of this circuit. The appeal of [Canny] doesn’t hurt any, either.


Filed under: Arduino Hacks, robots hacks
Hack a Day 10 Dec 09:01

the easiest educational robot for kids, Mbot, goes AtHeart

It’s cute, it’s fun and easy to assemble, it’s mBot by Makebloc, the new educational robot joining Arduino AtHeart program!

mBot it’s an all-in-one solution for kids and beginners to enjoy the hands-on experience about robotics, programming, and electronics.

You can program it with drag-and-drop graphical programming software based on Scratch 2.0 and the magic happens: the robots can follow lines, kick balls and push objects, avoid walls and more. You can also switch from graphical to text-based programming in Arduino mode as it can be coded with Arduino IDE environment.

Watch the video of their successful Kickstarter campaign:

mBot supports wireless communication, standard Arduino boards like Arduino Uno, Leonardo boards, Arduino Nano, Arduino Mega 2560, Makeblock mCore (based on Arduino Uno).

The main control board’s design, mCore of mBot, is based on Arduino UNO: with intuitional color labels and easy-to-use RJ25 connectors, the board can get wired easily so students can then get more time to focus on creating all kinds of interactive stories and projects.

To help teachers, parents, and kids get started easier and faster the robot kit has two free tutorial e-books and online manuals are provided and increasing continually.

Take a look at mBot on Makeblock website and discover how to use 2.4GHz wireless module and Bluetooth module with mBot:

Arduino Blog 30 Nov 15:15

Watch a fin-propelled underwater robot prototype

The robotic prototype swimming under water propelled by fins, it was developed at the Control Systems and Robotics Laboratory of the Technological Educational Institute of Crete, in Heraklion (Greece) and it’s controlled by an Arduino Mega:

Each fin is comprised of three individually actuated fin rays, which are interconnected by an elastic membrane. An on-board microcontroller generates the rays’ motion pattern that result in the fins’ undulations, through which propulsion is obtained. The prototype, which is fully untethered and energetically autonomous, also integrates an IMU/AHRS unit for navigation purposes, a wireless communication module, and an on-board video camera. The video contains footage from experiments conducted in a laboratory test tank to investigate closed loop motion control strategies, as well as footage from sea trials.

the Arduino runs a custom-developed real time firmware that implements two Central Pattern Generator (CPG) networks to generate the undulatory motion profile for the robot’s fins. The robot  contains a  7.4V lipo battery powering also a Bluetooth module for wireless communication and a video camera to record footage of the missions.


Open Source Tracked Robot Supports STEM in Africa

A lot of hacker projects start with education in mind. The Raspberry Pi, for example, started with the goal of making an affordable classroom computer. The Shrimp is a UK-based bare-bones Arduino targeted at schools. We recently saw an effort to make a 3D printed robotic platform aimed at African STEM education: The Azibot.

Azibot has 3D printed treads, a simple gripper arm, and uses an Arduino combined with Scratch. Their web site has the instructions on how to put together the parts and promises to have the custom part of the software available for download soon.

We’d bet most Hackaday readers won’t need the software, anyway. The robot clearly uses RC servos for the drive and the little arm at the front, so controlling it directly from the Arduino ought to be easy enough. If you don’t want to roll your own, Senegal-based Azibot is taking preorders for kits for $99. We were a little surprised you couldn’t kick in a little more when you ordered to subsidize other kits for schools in need.

We talked about another low-cost school aimed project, the Shrimp, If you think the needy schools won’t have 3D printers, maybe this 3D printer could come to the rescue.


Filed under: 3d Printer hacks, Arduino Hacks, robots hacks