Posts with «projects» label

Better you team up if you want to win the game!

Team Game is an interactive installation to reflect about video games and controllers made by Caroline Buttet. It runs on an Arduino Uno or Genuino Uno controlling a flex sensor, a custom made potentiometer, and a light sensor with the help of Unity software and Uniduino plugin:

It’s a simple game in which you need to roll a ball from one side to another of the screen. The trick is, you need some custom controllers to play. And you also need 2 partners that will play with you so that you can progress through the 3 levels. Rather than playing against the others, you will have to team up in order to win!

See the game in action described by Caroline:

Learn more about Uniduino plugin and how to use it with Arduino:

DIY Connected objects for happy connected people

What happens when a creative technologist wants his family to know he’s thinking about them? He creates a project with Arduino Yún! IMissYou is a simple project transforming a picture in a connected object thanks to a capacitive layer made with Bareconductive Paint and inserted behind the photo. The ‘touch’ is detected by the Arduino through the glass of the frame by a spike in the values (with a basic Capsense library), sent to the internet via wi-fi and delivered to a phone with Pushover.

Martin Hollywood, the Arduino user who made  the project, wrote us:

Looking at the photograph of my family that I have on my desk one day, I missed them and wanted to be home. I touched the photo and realised that somewhere between those was the germ of the idea…

I wanted my family to know I was thinking of them, but I didn’t want to create two products; think GoodNight Lamp – I do love that project. In any case, there was no guarantee they would even notice a ‘blinking’ photo frame responding to my signal. Making the Receive a PUSH notification seemed like a no brainer, but the last time I developed for mobile was iOS 1! There are a number of service apps out there: Pusher, Pushingbox but I decided on Pushover. It had a 7 day trial period and good API support (I’ve since bought a license).

Take a look at his blog for more details and if you want to give him some tips to make it a real product.

A door-stopper becomes an amazing game with Arduino

Developed by Robin Baumgarten during a 48-hour game jam,  Line Wobbler is a one-dimensional dungeon crawler game running on Arduino Uno. Robin was inspired watching a cat interacting with a door stopper and having fun!

The game is played using a unique wobble controller made out of a door-stopper spring and a several meter long ultrabright LED strip display. All the movement is controlled by bending the Wobble controller left and right, while enemies are attacked by wobbling:

Using a spring, an accelerometer and a rigid surface, the Wobble controller is a tactile and surprisingly precise joystick with a unique ‘wobble’ action (pull it back and let go to make it oscillate back and forth rapidly). It is this wobble action that is core to the experience and the game we have created for it. Initially made out of a shoe-tree, I’m now using door-stopper springs, since they’re easier to use. Fun fact: the original inspiration for the controller came from this cat video.

Since it was created, it’s been exhibited during Experimental Gameplay Workshop at GDC 2015, at Burning Man 2015 and other city around the world (London, Chicago and Oslo). Line Wobbler won also two prizes at the AMAZE Awards 2015 in Berlin and has been nominated as a finalist for the IndieCade 2015 awards last October!

Visualizing air quality with interactive origami flowers

“Under the Dome – PMgami” is an installation created by designer Jiayu  Lui using Arduino Nano. Inspired by paper origami techniques, the digitally fabricated flowers move and change color according to the quality of air measured locally. The main aim of the installation is to obtain a more intuitive way to communicate pollution data and  the relationship between technology and nature.

In the gallery you can explore some other pictures and the schematic. Check the video below to see the installation in action!


A spider quadrobot built with Prusa and Arduino Pro Mini

It takes 14 steps, a Prusa i3 3D printer and a lot of soldering to build Spider Robot v3.0, a quad robot running on Arduino Pro Mini.  That’s what told us  RegisHsu, a maker who shared his project’s tutorial on Instructables and the 3d printable files on Thingiverse.

It took 12 months of work to build the robot and it reached the fourth generation of  design, that you can explore on his blog  if you are interested in its history:

This is my first project for the 4 legs robot and it took me about 1 year development.
It is a robot that relies on calculations to position servos and pre-programmed sequences of legs. I’m doing this is because of it could be fun and educational for 3D design/printing and robot control.

The robot allows cool customizations like adding IR detection:

A High altitude balloon sensing the earth’s atmosphere

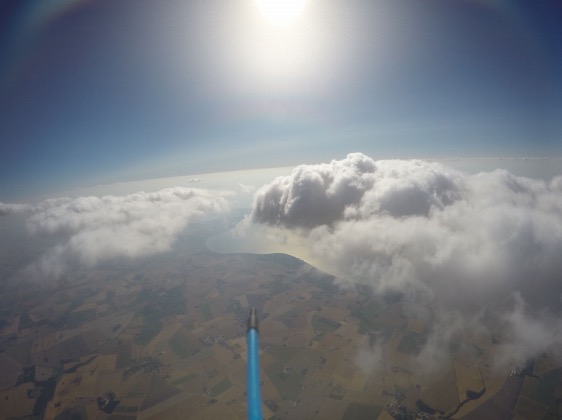
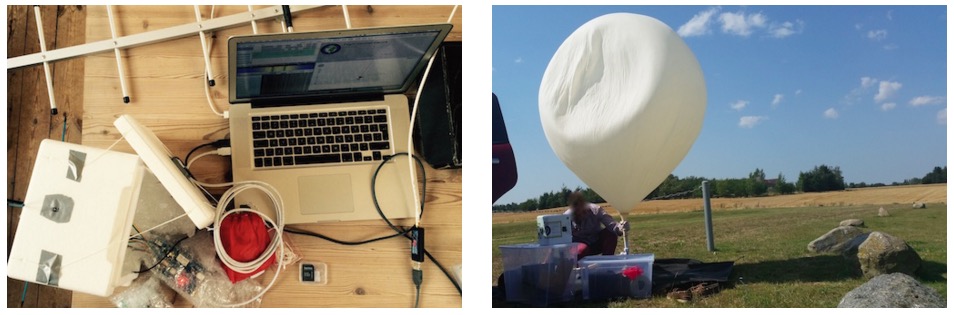
The project Emanuel Bombasaro submitted to the Arduino blog is about a high altitude balloon he launched on August 21st over Denmark. The balloon, called Titan 1, is made of a helium-filled latex balloon,  a payload box holding the flight computer, sensors and a parachute (36” diameter). A GoPRO camcorder mounted inside the payload box and capturing an image every second.

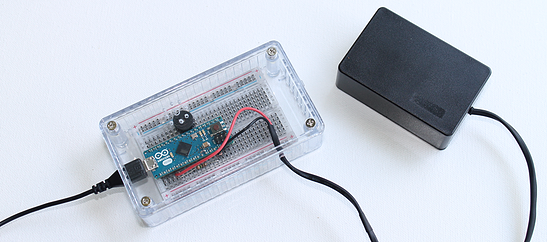
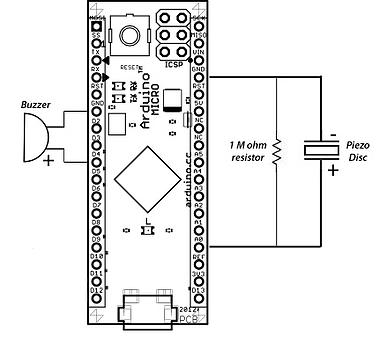
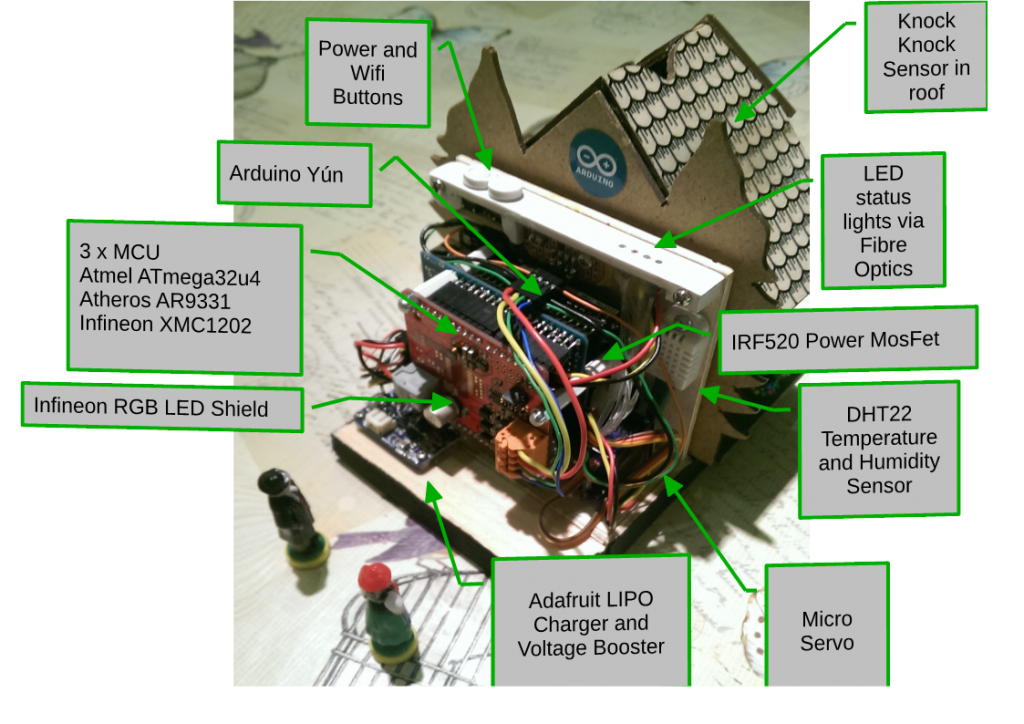
The flight computer is an Arduino Mega which logs position (GPS), pressure, temperature, humidity, luminosity, earth magnetic field, acceleration and spin, measured by a variety of sensors:

At 1:10 we jump from cloud level (~3200m) towards reaching the peak altitude of 35393m. Immediately the moon appears on the right and is visibile again and again. 2:05 the fragments of the bursted balloon can be seen and up it goes back to earth. 3:00 we drop down to cloud level (~3200m) and soon after hit the ground.

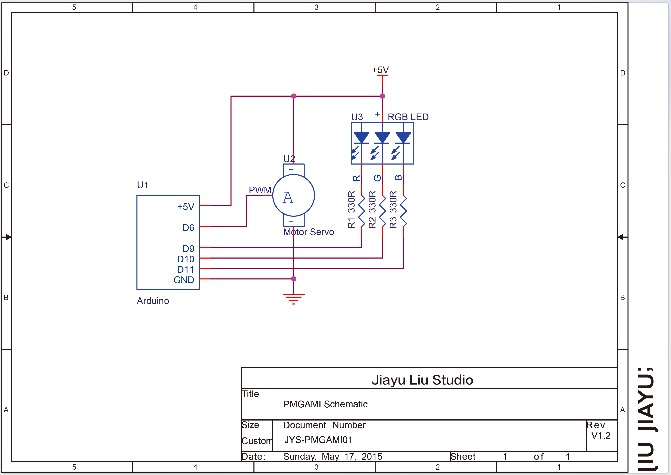
This is the list of modules and sensors connected to the Arduino Mega:

  • MTX2 Radiometrix
  • MTX2 434 MHz Radio Module.
  • HX1 VHF Narrow Band FM 300 mW Transmitter, 144.800 MHz, used for APRS.
  • MAX-M8 GPS module used for position (longitude, latitude and altitude) and time acquisition.
  • DS18B20 Temperature sensor on HABuino showing the temperature of the flight computer compartment. This temperature should remain most near to 20 ” C. Any temperature variation will e?ect the transmission frequency of the radio module.
  • MCP9808 Maximum accuracy digital temperature sensor measuring air temperature.
  • HTU21DF Temperature and humidity sensor measuring air temperature and relative humidity of the air.
  • MPL3115A2 Precision altimeter mainly used for measuring atmospheric pressure, but also temperature and altitude is detected.
  • TSL2561 Light to digital converter BST-BMP180 Pressure sensor mainly used for measuring atmospheric pressure, but also temperature and altitude is detected.
  • L3GD20 3D gyroscope
  • LSM303DLHC 3D accelerometer and 3D magnetometer module
  • LSH20 Saft LSH 20 battery used as power supply with 3.6 V and 13.0 A h. The power feeds into the low input voltage synchronous boost converter TPS61201 on the HABuino shield.

Check the detailed documentation with Flight Computer Software sketch on this Design Mission PDF document.

You can also explore the Flight Data Report showing the collected mission data graphically on this PDF.

Arduino Blog 09 Sep 21:58

A tribute to 5-bit Baudot code

Julian Hespenheide is an interaction designer based in Germany who submitted to Arduino blogpost a writing machine called émile. It’s an interactive installation created in collaboration with Irena Kukric, David Beermann, Jasna Dimitrovskais and using Baudot code - a binary 5-bit code, predecessor of ASCII and EBCDID – intended for telecommunication and electronic devices, representing the entire alphabet.

It runs on Arduino Uno and  translates the bauds (/?b??d/, unit symbol Bd) into moving objects that are being sent over physical tracks in order to illustrate  a simple computational process of 5-bit binary information transmission:

The machine was built in six days with four people. In our group we came to the conclusion, that not every process in a computer is really transparent and it already starts when you type a simple letter on a keyboard. To unwrap this “black box” of data transmission, we set our goal to build a small writing machine where you can literally see bits rolling around. After some research we got back to the beginnings of Telefax machines and data transmission using Baudot-code. We then quickly designed punchcards and mapped them to a slightly altered baudot code table and cut them with a laser cutter from 5mm plywood.
Whenever a marble hits a switch, a short timer goes off and waits for input on the other switches. If no other marbles are hitting those switches, we finally translate the switches that have been hit into the corresponding letter.

Take a look at the machine in action:


A DIY Seizure Alarm based on Arduino Micro

Chad Herbert’s son Daniel was diagnosed with Benign Rolandic Epilepsy in 2014. It’s a type of epilepsy the Epilepsy Foundation says accounts for about 15 percent of all Epilepsies in children and the good news is that most children grow out of it.

The bad news is that Daniel’s most affected by his condition at night or early morning while he sleeps. That’s why Chad invested in a sleep monitor/alarm for his bed that detects when he’s having a full tonic-clonic seizure.

At the same time though, he decided to work on a DIY version of a seizure alarm  running on Arduino Micro. The starting point was Arduino’s “Knock” example project with the sketch code originally created in 2007 by David Cuartielles and modified by Tom Igoe in 2011:

While shopping around for the exact type of monitor/alarm my wife and I wanted, I found out a few things:

  • They are hard to find. I believe the one we ended up with was manufactured by a company in Great Britain.
  • They are expensive. The one we ended up getting cost in the $400-$500 range.
  • The one we have isn’t totally cumbersome, but it’s not easy to pack up and take with you somewhere.

Figuring these things out, I decided to search for a way to build a simple seizure alam that’s both relatively inexpensive and easy to transport. I’m sure there are people out there who have children that suffer from seizures that simply cannot afford equipment such as this even though they truly need it. Thanks to the folks in the Arduino community, I was able to accomplish both things I was setting out to do.

Discover how it was made on his blog.


A traditional weather house gets a smart upgrade

The “Enchanted Cottage” is a project by Andy Clark with the aim of upgrading a traditional  german “wetter haus”  with a new mechanism and electronics running on Arduino Yún:

The mechanics were replaced with a servo and 3D printed parts designed to make the movement linear rather than arcing as in the traditional approach. The figures were fitted with magnets so that they could move without any obvious form of propulsion.
The electronics were based on an Arduino Yún, custom prototyping shield and an Infineon RGB LED driver shield. The whole thing is powered by a rechargable LiPo battery and a module from AdaFruit. Because the Arduino was deep in the middle of the house, I used fibre optics to bring the light to the top panel. A sensor was added into the roof so you could simply tap it to get it to update the forecast for you.

The project was build over a period of 16 weeks, the mechanical aspects were completed first and the 3D printing took several goes to get it right. The electronics build was fairly straightforward but fitting everything onto the proto shield was challenging and the high clearance for the Yún was also a challenge. The software was written as I went along with demo programs created to test each part. Getting the Yún to work on low power was fairly straightforward but getting a secure and validated HTTPS connection took a few attempts. tried to put as much of the processing into the Python script so that the C++ code was just handling the control. All in all a challenging project that pushed the Yún to it’s limits.

Learn more about the project on Andy’s blog.

Arduino Blog 07 Aug 18:06

This Arduino Basic Kit has everything a newbie maker could ask for

It's easy to think about tinkering around with Arduino, but take more than 30 seconds to look at the platform, and suddenly it becomes daunting: not only do you need an Arduino itself, but to get started you need resisters, wires, LEDs, screens and a host of other components that are almost always sold separately. Have no fear, newbies: there's a new Arduino Basic Kit in town, and it has all the spare parts a beginner could want.

Source: 123D Circuits

Engadget 29 Jul 04:31
arduino  build  diy  maker  misc  projects