Posts with «news» label

Arduino on mBed

Sometimes it seems like Arduino is everywhere. However, with a new glut of IoT processors, it must be quite a task to keep the Arduino core on all of them. Writing on the Arduino blog, [Martino Facchin], Arduino’s chief of firmware development, talks about the problem they faced supporting two new boards from Nordic.

The boards, the Nano 33 BLE and Nano 33 BLE Sense are based on an ARM Cortex M4 CPU from Nordic. The obvious answer, of course, is to port the Arduino core over from scratch. However, the team didn’t want to spend the time for just a couple of boards. They considered using the Nordic libraries to interact with the hardware, but since that is closed source, it didn’t really fit with Arduino’s sensitivities. However, in the end, they took a third approach which could be a very interesting development: they ported the Arduino core to the Mbed OS. There’s even an example of loading a sketch on top of Mbed available from [Jan Jongboom].

On the one hand, this has two big advantages: in theory, Arduino can now run on anything that supports Mbed, which is quite a lot. Second, even though the system retains the simplicity of Arduino, the entire Mbed system is available to Arduino developers and vice versa.

On the other hand, you could argue that if you have Mbed, you don’t really need Arduino. While much is made about Arduino’s simplicity, it is really a C++ program with two predefined functions and an IDE that builds your code without as much explicit help as you’d expect. However, the wide variety of code that supports Arduino should be of interest since you could just use it from either an Arduino or Mbed program without much effort.

This might make some of our favorite Mbed labs projects more popular. If you want to see our take on an Mbed project, you can turn it into a signal generator.

Thanks [halherta] for the tip.

Hack a Day 30 Aug 12:00
arduino  arduino hacks  arm  mbed  news  nordic  

New Teensy 4.0 Blows Away Benchmarks, Implements Self-Recovery, Returns to Smaller Form

Paul Stoffregen did it again: the Teensy 4.0 has been released. The latest in the Teensy microcontroller development board line, the 4.0 returns to the smaller form-factor last seen with the 3.2, as opposed to the larger 3.5 and 3.6 boards.

Don’t let the smaller size fool you; the 4.0 is based on an ARM Cortex M7 running at 600 MHz (!), the fastest microcontroller you can get in 2019, and testing on real-world examples shows it executing code more than five times faster than the Teensy 3.6, and fifteen times faster than the Teensy 3.2. Of course, the new board is also packed with periperals, including two 480 Mbps USB ports, 3 digital audio interfaces, 3 CAN busses, and multiple SPI/I2C/serial interfaces backed with integrated FIFOs. Programming? Easy: there’s an add-on to the Arduino IDE called Teensyduino that “just works”. And it rings up at an MSRP of just $19.95; a welcomed price point, but not unexpected for a microcontroller breakout board.

The board launches today, but I had a chance to test drive a couple of them in one of the East Coast Hackaday labs over the past few days. So, let’s have a closer look.

First Impressions
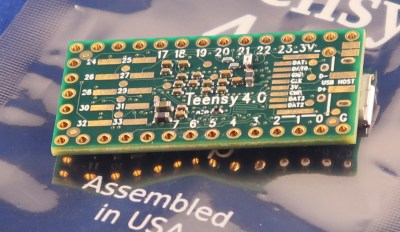
The board looks superficially similar to the older 3.2, at least from the top. There’s the usual dual row of pin headers you can plug into a breadboard, a micro-USB connector, and reset button. A new red LED near the USB connector gives you some status information, while the traditional “Arduino LED” is orange. Flip the board over, and you start to see some of the extra power this board wields. Besides ten more GPIO pins, there are pads for an SD card interface using 4-bit SDIO, and D+ and D- lines for the second 480 Mbps USB interface. The unmarked round pads are test points used in manufacturing and are no-connects from the end-user’s perspective.

Teensy 3.2 Everything Killer?

When doing hardware reviews it’s crucial to choose the right comparison hardware. I think the best comparison in this case is between the two boards that share the same form factor; the Teensy 4.0 and the 3.2. I’ve chosen not to make the comparison with the Teensy 3.5 and 3.6, which are priced a little higher, in a larger form factor, and have SD card slots soldered on.

Incredibly, the Teensy 4.0 is priced at $19.95, as opposed to the $19.80 Teensy 3.2. What does that extra fifteen cents buy? First, there’s performance. The 4.0’s 600 MHz clock vs the 72 MHz on the 3.2 doesn’t tell the whole story. The Cortex M7 on the 4.0 is a dual-issue superscalar processor capable of executing up to two 32-bit instructions per clock cycle; initial tests showed this happening between 40-50% of the time on Arduino-compiled code. Additionally, the Cortex-M7 is the first ARM microcontroller with branch prediction. While on the Cortex M4, a branch always takes 3 clock cycles, after a few passes through a loop, for instance, the Cortex M7 can begin executing correctly-predicted branches in a single clock. This is technology originally pioneered in supercomputers that you can use in your next Halloween costume.
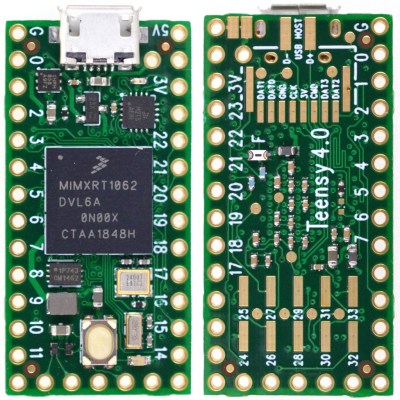
Then, there’s floating-point. Veteran embedded programmers may have a bias against floating-point code, and with good reason. Without native floating-point instructions, these operations must be emulated, and run very slowly. The same thing happens with double-precision operations on a processor which only supports single-precision instructions. While Cortex-M4 processors support single-precision floating-point, the Cortex-M7’s include native double-precision instructions, so if you need the extra precision afforded by doubles, you’re not going to take a huge performance hit: basically, doubles seem to execute in only twice as many cycles as floats.

The Cortex-M7 on this board also supports tightly-coupled memory (TCM), which provides fast access like a cache, but without the non-determinism that can complicate hard real-time applications — one of the problems with other high-power microcontrollers. The 64-bit ITCM bus can fetch 64-bits, while two dedicated 32-bit buses (DTCM) can fetch up to two instructions from the TCM each cycle – these buses are separate from the main AXI bus used to communicate with other memory and peripherals. The Teensyduino environment automatically allocates code and statically allocated memory into the DTCM area, which can be up to 512K in size, although you can override the default behavior with some command-line switches. Memory that isn’t accessed by the tightly-coupled buses is optimized for access by the peripherals using DMA.

Spec Sheet

Despite its size, there’s a lot to this board and the chip it carries, so here’s condensed spec list:

  • ARM Cortex-M7 at 600 MHz
  • 1024K RAM (512K is tightly coupled)
  • 2048K Flash (64K reserved for recovery & EEPROM emulation)
  • 2 USB ports, both 480 MBit/sec
  • 3 CAN Bus (1 with CAN FD)
  • 2 I2S Digital Audio
  • 1 S/PDIF Digital Audio
  • 1 SDIO (4 bit) native SD
  • 3 SPI, all with 16 word FIFO
  • 3 I2C, all with 4 byte FIFO
  • 7 Serial, all with 4 byte FIFO
  • 32 general purpose DMA channels
  • 31 PWM pins
  • 40 digital pins, all interrupt capable
  • 14 analog pins, 2 ADCs on chip
  • Cryptographic Acceleration
  • Random Number Generator
  • RTC for date/time
  • Programmable FlexIO
  • Pixel Processing Pipeline
  • Peripheral cross triggering
  • Power On/Off management

The board consumes around 100 mA with a 600 MHz clock. Although I didn’t try it myself with the evaluation boards I have here, Paul notes that it can be overclocked for a performance boost. It also supports dynamic clock scaling: the instruction clock speed is decoupled from the peripherals, so that baud rates, audio sample rates, and timing functions continue to function properly if you change the CPU speed.

For the ultimate in power savings, you can shut the board off by adding a pushbutton to the On/Off pin. Pressing the button for more than five seconds disables the 3.3 V supply; a subsequent brief press will turn it back on. This doesn’t affect the real-time-clock (RTC) functionality, however: connecting a coin cell to the VBAT terminal will keep the time and date counter going.

Hands-On Benchmarks

Higher is better
Board CoreMark
Teensy 4.0 2313.57
Teensy 3.6 440.72
Sparkfun ESP32 Thing 351.33
Teensy 3.5 265.50
Teensy 3.2 218.26
Metro M4 Grand Central 214.85
Arduino Due 94.95
Arduino Zero 56.86
Arduino Mega 7.03

To see how fast this thing really is, Paul ported the CoreMark embedded-processor benchmark to the Arduino environment. (Note that CoreMark seems to be a registered trademark of the Embedded Microprocessor Benchmark Consortium (EEMBC)). This synthetic benchmark tests performance managing linked lists, doing matrix multiplies, and executing state machine code. He reports the following scores for a number of boards (larger numbers are better).

I was able to verify the Teensy 4.0 and 3.2 numbers; my 3.6 must have sprouted legs and walked off somewhere, and I didn’t have any of the other boards handy for testing. Using my numbers (nearly identical to those above), the 4.0 is around ten times as fast as the 3.2.

Since the CoreMark code is a “synthetic” benchmark, Paul wanted to test the new board in a more realistic scenario. In another GitHub repo, he has some code to do an RSA signature with a 2048-bit key. This is a processor-intensive operation, believe me — I had to implement it once in Lua (don’t ask!). Here are the scores for the same boards (lower numbers are better).

Lower is better
Board Seconds
Teensy 4.0 0.085
Teensy 3.6 0.474
Sparkfun ESP32 Thing 0.518
Metro M4 Grand Central 0.840
Teensy 3.5 0.909
Teensy 3.2 1.325
Arduino Due 1.901
Arduino Zero 9.638

Again, I was able to verify the numbers for the Teensy 3.2 and 4.0 boards. In this case, the 4.0 is around fifteen times as fast as the 3.2.

If you have any of these, or other Arduino-compatible boards lying around, clone one or both of these repos, open the respective *.ino file from either one, and test them out. Feel free to report results in the comments below.

15 Seconds to Sanity

One of the new features of the Teensy 4.0 is the automatic recovery process, which restores the board to a known good state without the need for a PC connection. If you press and hold the reset button for 15 seconds, the red LED will flash to indicate you’ve entered restore mode. Once you release the button, the red LED will illuminate while the flash memory is erased and re-written with the traditional Arduino “blink” program. Once the re-write is complete, the blink program is run and the orange LED begins blinking, just like on every Arduino-compatible for the past decade and a half. It’s DFU mode without the need for host computer or known-working binary. These used to be key components for hardware-based restore and now they’re part of the board itself.

Why would you want to do this? In a nutshell, because USB itself is a train-wreck. On top of an insanely sprawling and complex protocol, there are charge-only cables sans data pins lurking in your junk box, operating system bugs waiting to trip you up (looking at you, Windows 7), and a whole host of other issues that cause serious head-scratching when things stop working. This can be especially confusing with native-USB boards like the Teensy 4.0; while the built-in USB functionality is amazingly powerful, and can be used in a wide variety of ways, when something stops working, you’re not always sure how to get back on track. Now, you are – just press the button.

What Can You Do with a 600 MHz Microcontroller?

Paul envisions this Teensy 4.0 being used for polyphonic audio synthesis, running moderately complex machine learning algorithms, and real-time audio analysis. In many cases, the first level of processing on data-intensive input devices can now be moved from a host computer to the external microcontroller, narrowing the bandwidth required to the host system. And for projects driving a display, the built-in pixel processing pipeline can also accelerate graphics operations, offloading this work from the CPU.

There will be some fraction of hackers that will still wonder why we need a 600 MHz microcontroller; another fraction will have already needed it yesterday. In between, most users will take some time to figure out what doors this opens up. The reality is that our tools constrain not only our current designs, but also, to some extent, our imagination. A 15x performance improvement over the current tiny development board you may be using could enable some new and exciting applications, and you, dear reader, are the one who makes them happen. So, drive home a different way from work tonight, sleep on the sofa instead of the bed, or use whatever other tricks you have to shock your brain into creativity and figure out what you could really do with this thing. It’s a lot more than you can do with a 555. For that matter, it’s a lot more than most computers could do in the 90s.

Arduino Enters the Cloud

Love it or hate it, for many people embedded systems means Arduino. Now Arduino is leveraging its more powerful MKR boards and introducing a cloud service, the Arduino IoT Cloud. The goal is to make it simple for Arduino programs to record data and control actions from the cloud.

The program is in beta and features a variety of both human and machine interaction styles. At the simple end, you can assemble a dashboard of controls and have the IoT Cloud generate your code and download it to your Arduino itself with no user programming required. More advanced users can use HTTP REST, MQTT, Javascript, Websockets, or a suite of command line tools.

The system relies on “things” like temperature sensors, LEDs, and servos. With all the focus on security now, it isn’t surprising that the system supports X.509 authentication and TLS security for traffic in both directions.

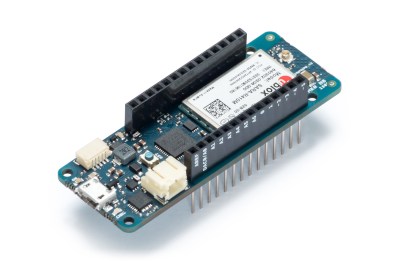
Honestly, we tried it and the web-based IDE couldn’t find our MKR1000 board under Linux. That could be a misconfiguration on our part, but it is frustrating how little information you get from many web-based tools. It decided we had multiple Arduinos connected (we didn’t). Then removing a multiport serial adapter made it see no Arduinos even though there was an MKR1000 Vidor attached.

Naturally, there are plenty of options when it comes to putting devices on the cloud. However, if you are only using Arduino boards, this one is going to be pretty seamless — assuming it works for you.

Hack a Day 07 Feb 16:30

Flash: Arduino Vidor FPGA Instructions Hit France

If you speak French and you have an Arduino Vidor 4000, you are in luck because there’s some good news. The good news is there’s finally some inside information about how to configure the onboard FPGA yourself. The bad news though is that it is pretty sparse. If your high school French isn’t up to the task, there’s always Google Translate.

We knew some of this already. You’ll need Quartus, the FPGA design tool from Altera — er, Intel — and we know about the sample project on GitHub, too. Instead of using conventional Verilog or VHDL, the new information uses schematic capture, but that’s OK. All the design entry winds up in the same place, so it should be easy to adapt to the language of your choice. In fact, in part 2 they show both some schematics and some Verilog. Google Translate does have a little trouble with code comments, though. If you want something even stouter, there’s an example that uses Verilog to output a video frame.

The real question has been: how do you get the bitstream into the FPGA without surgery on the board? There’s a Java application (Zip download) that builds a .H file for you. Including that in your sketch will cause the Arduino to load the FPGA for you. There are still not a lot of details about how that works — we think there’s almost an FPGA bootloader that stays loaded and then gets the rest of the configuration like this.

In addition, there is a warning at the end:

Under no circumstances should you reconfigure the PA20 port of the SAMD21 output. This one is already used as output by the FPGA.

We can imagine that there are other gotchas, so if you start experimenting you are taking some chance of blowing up or bricking your Arduino.

Still, this is great news! We’ve been itching to play with the onboard FPGA and this should answer enough questions to work out the rest of the details. All the examples, including a DVI output example, are linked on one download page.

If you are wanting to learn more about the hardware, we covered it. We also have some FPGA boot camps that would help you get started with FPGAs in general.

Hack a Day 14 Oct 15:00
arduino  arduino hacks  fpga  max10  news  quartus  vidor  

A New Tilt on RC Car Controllers

If you are a lover of all-things remote-conteolled, it’s likely that you know a thing or two about controllers. You’ll have one or two of the things, both the familiar two-joystick type and the pistol-grip variety. But had you ever considered that there m ight be another means to do it? [Andrei] over at ELECTRONOOBS has posted a guide to a tilt-controlled RC car. It is a good example of how simple parts can be linked together to make something novel and entertaining, and a great starter project for an aspiring hacker.

An Arduino Nano reads from an accelerometer over an I2C bus, and sends commands over a wireless link, courtesy of a pair of HC-12 wireless modules.  Another Nano mounted to the car decodes the commands, and uses a pair of H-bridges, which we’ve covered in detail, to control the motors.

The tutorial is well done, and includes details on the hardware and all the code you need to get rolling.  Check out the build and demo video after the break.

We’d love to see this idea turned up to 11 by using a more capable base vehicle, and finer controls on the steering– A Honda Civic perhaps?

[Thanks to Baldpower for the tip!]

Hack a Day 03 Oct 06:00

Arduino Gets Command Line Interface Tools That Let You Skip the IDE

Arduino now has an officially supported command-line interface. The project, called arduino-cli, is the first time that the official toolchain has departed from the Java-based editor known as the Arduino IDE. You can see the official announcement video below.

Obviously this isn’t a new idea. Platform IO and other command-line driven tools exist. But official support means even if you don’t want to use the command line yourself, this should open up a path to integrate the Arduino build process to other IDEs more easily.

The code is open source, but they do mention in their official announcement that you can license it for commercial use. We assume that would mean if you wanted to build it into a product, not just provide an interface to it. This seems like something Arduino expects, because a lot of the command line tools can produce json which is a fair way to send information to another application for parsing.

The command line interface doesn’t just build a sketch. You can do things like install and manage libraries. For example, to create a new sketch:

arduino-cli sketch new HackadayPgm

You can update the installed platforms, list the connected boards, and search for board support:

arduino-cli core update-index

arduino-cli board list

arduino-cli core search mkr1000

If you don’t already have the board support, you can install it and verify that it is there:

arduino-cli core install arduino:samd

arduino-cli core list

That last step will give you the FQBN or unique name for the core. So to compile and upload you have this mouthful:

arduino-cli compile --fqbn arduino:samd:mkr1000 Arduino/HackadayPgm

arduino-cli upload -p /dev/ttyACM0 -fqbn arduino:samd:mkr1000 Arduino/HackadayPgm

Unlike, say, PlatformIO, this is clearly better for building into a tool, even if it is a makefile. We’d like to see a .build.json file or something that allows you to just issue short commands that do the right thing in a working directory. Of course, you could build that with a little shell scripting. Hmm….

It is nice to see the release of an official method and we hope this will lead to more editors being able to handle Arduino seamlessly.

Video of the Arduino FPGA Board Demo at Maker Faire

This week, Arduino announced a lot of new hardware including an exceptionally interesting FPGA development board aimed at anyone wanting to dip their toes into the seas of VHDL and developing with programmable logic. We think it’s the most interesting bit of hardware Arduino has released since their original dev board, and everyone is wondering what the hardware actually is, and what it can do.

This weekend at Maker Faire Bay Area, Arduino was out giving demos for all their wares, and yes, the Arduino MKR Vidor 4000 was on hand, being shown off in a working demo. We have a release date and a price. It’ll be out next month (June 2018) for about $60 USD.

But what about the hardware, and what can it do? From the original press releases, we couldn’t even tell how many LUTs this FPGA had. There were a lot of questions about the Mini PCIe connectors, and we didn’t know how this FPGA would be useful for high-performance computation like decoding video streams. Now we have the answers.

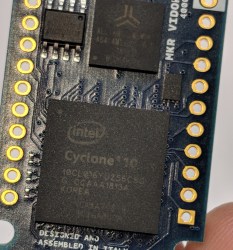
The FPGA on board the Arduino Vidor is an Altera Cyclone 10CL016. This chip has 16k logic elements, and 504 kB memory block. This is on the low end of Altera’s FPGA lineup, but it’s still no slouch. In the demo video below, it’s shown decoding video and identifying QR codes in real time. That’s pretty good for what is effectively a My First FPGA board.

Also on board the Vidor is a SAMD21 Cortex-M0+ microcontroller and a uBlox module housing an ESP-32 WiFi and Bluetooth module. This is a really great set of chips, and if you’re looking to get into FPGA development, this might just be the board for you. We haven’t yet seen the graphic editor that will be used to work with IP for the FPGA (for those who don’t care to write their own VHDL or Verilog), but we’re looking forward to the unveiling of that new software.

Arduino Just Introduced an FPGA Board, Announces Debugging and Better Software

Today ahead of the Bay Area Maker Faire, Arduino has announced a bevy of new boards that bring modern features and modern chips to the Arduino ecosystem.

Most ambitious of these new offerings is a board that combines a fast ARM microcontroller, WiFi, Bluetooth, and an FPGA. All this is wrapped in a package that provides Mini HDMI out and pins for a PCIe-Express slot. They’re calling it the Arduino MKR Vidor 4000.

Bringing an FPGA to the Arduino ecosystem is on the list of the most interesting advances in DIY electronics in recent memory, and there’s a lot to unpack here. FPGA development boards aren’t new. You can find crates of them hidden in the storage closet of any University’s electronics lab. If you want to buy an FPGA dev board, the Terasic DE10 is a good starter bundle, the iCEstick has an Open Source toolchain, and this one has pink soldermask. With the release of the MKR Vidor, the goal for Arduino isn’t just to release a board with an FPGA; the goal is to release a tool that allows anyone to use an FPGA.

The key to democratizing FPGA development is Arduino’s work with the Arduino Create ecosystem. Arduino Create is the company’s online IDE that gives everyone the ability to share projects and upload code with Over-the-Air updates. The MKR Vidor will launch with integration to the Arduino Create ecosystem that includes a visual editor to work with the pre-compiled IP for the FPGA. That’s not to say you can’t just plug your own VHDL into this board and get it working; that’s still possible. But Arduino would like to create a system where anyone can move blocks of IP around with a tool that’s easy for beginners.

A Facelift for the Uno WiFi

First up is the brand new Arduino Uno WiFi. While there have been other boards bearing the name ‘Arduino Uno WiFi’ over the years, a lot has changed in the world of tiny radio modules and 8-bit microcontrollers over the past few years. The new Arduino Uno WiFi is powered by a new 8-bit AVR, the ATMega4809. The ATMega4809 is a new part announced just a few months ago, and is just about what you would expect from the next-generation 8-bit Arduino; it runs at 20MHz, has 48 kB of Flash, 6 kB of SRAM, and it comes in a 48-pin package. The ATMega4809 is taking a few lattices of silicon out of Microchip’s playbook and adds Custom Configurable Logic. The CCL in the new ATMega is a peripheral that is kinda, sorta like a CPLD on chip. If you’ve ever had something that could be more easily done with logic gates than software, the CCL is the tool for the job.

But a new 8-bit microcontroller doesn’t make a WiFi-enabled Arduino. The wireless power behind the new Arduino comes from a custom ESP-32 based module from u-blox. There’s also a tiny crypto chip (Microchip’s ATECC508A) so the Uno WiFi will work with AWS. The Arduino Uno WiFi will be available this June.

But this isn’t the only announcement from the Arduino org today. They’ve been hard at work on some killer features for a while now, and now they’re finally ready for release. What’s the big news? Debuggers. Real debuggers for the Arduino that are easy to use. There are also new boards aimed at Arduino’s IoT strategy.

The Future of Arduino

As you would expect in the world of embedded development, the future is IoT. Last week, Arduino announced the release of two new boards, the MKR WiFi 1010 and the MKR NB 1500. The MKR WiFi 1010 features a SAMD21 Cortex-M0+ microcontroller and a u-blox module (again featuring an ESP-32) giving the board WiFi. The MKR NB 1500 is designed for cellular networks and features the same SAMD21 Cortex-M0+ microcontroller found in the MKR WiFi 1010, but also adds a u-blox cellular module that will connect to LTE networks using Narrowband IoT, but the module does also support Cat M1 networks.

But IoT isn’t the only thing Arduino has been working on. On the leadup to the World Maker Faire this weekend, I had the opportunity to speak with Fabio Violante, CEO of Arduino, and Massimo Banzi, Co-founder of Arduino, and what I heard was remarkable. There’s going to be an update to the Arduino IDE soon, and real debugging is coming to the Arduino ecosystem. This is a significant development in Arduino’s software efforts, and when Fabio was appointed CEO last July, this was the first thing he wanted to do.

Also on deck for upcoming bits of hardware is a slow upgrade from ARM Cortex-M0 parts to Cortex-M4 parts. While this change isn’t exactly overdue, it is a direct result of the ever-increasing power of available microcontrollers. The reason for this change is the growing need for more compute power on embedded platforms, and simply the fact that more powerful chips are cheaper now.

Massimo, Fabio, and the rest of the Arduino team will be showing off their latest wares at Maker Faire Bay Area this weekend, and we will be posting updates. The FPGA Arduino — the MKR Vidor 4000 — will be on display running a computer vision demo, and there will, of course, be fancy new boards on hand. We’ll be posting updates so keep your eye on Hackaday!

Hack a Day 18 May 16:03

Programming Linux Devices With Arduino And The Cloud

Back in the olden days, when the Wire library still sucked, the Arduino was just a microcontroller. Now, we have single board computers and cheap microcontrollers with WiFi built in. As always, there’s a need to make programming and embedded development more accessible and more widely supported among the hundreds of devices available today.

At the Embedded Linux Conference this week, [Massimo Banzi] announced the beginning of what will be Arduino’s answer to the cloud, online IDEs, and a vast ecosystem of connected devices. It’s Arduino Create, an online IDE that allows anyone to develop embedded projects and manage them remotely.

As demonstrated in [Massimo]’s keynote, the core idea of Arduino Create is to put a connected device on the Internet and allow over-the-air updates and development. As this is Arduino, the volumes of libraries available for hundreds of different platforms are leveraged to make this possible. Right now, a wide variety of boards are supported, including the Raspberry Pi, BeagleBone, and several Intel IoT boards.

The focus of this development is platform-agnostic and focuses nearly entirely on ease of use and interoperability. This is a marked change from the Arduino of five years ago; there was a time when the Arduino was an ATmega328p, and that’s about it. A few years later, you could put Arduino sketches on an ATtiny85. A lot has changed since then. We got the Raspberry Pi, we got Intel stepping into the waters of IoT devices, we got a million boards based on smartphone SoCs, and Intel got out of the IoT market.

While others companies and organizations have already made inroads into an online IDE for Raspberry Pis and other single board computers, namely the Adafruit webIDE and Codebender, this is a welcome change that already has the support of the Arduino organization.

You can check out [Massimo]’s keynote below.

Who Owns Arduino?

Who owns Arduino? We don’t mean metaphorically — we’d say that’s the community of users and developers who’ve all contributed to this amazing hardware/software ecosystem. We mean literally. Whose chips are on the table? Whose money talks? It looks like it could be ARM!

The Arduino vs Arduino saga “ended” just under a year ago with an out-of-court settlement that created a private holding company part-owned by both parties in the prior dispute over the trademark. And then, [Banzi] and the original founders bought out [Musto]’s shares and took over. That much is known fact.

The murky thing about privately held companies and out-of-court settlements is that all of the details remain private, so we can only guess from outside. We can speculate, however, that buying out half of the Arduino AG wasn’t cheap, and that even pooling all of their resources together, the original founders just didn’t have the scratch to buy [Musto] out. Or as the Arduino website puts it, “In order to make [t]his a reality, we needed a partner that would provide us with the resources to regain full ownership of Arduino as a company… and Arm graciously agreed to support us to complete the operation.” That, and the rest of the Arduino blog post, sure looks like ARM provided some funds to buy back Arduino.

We reached out to [Massimo Banzi] for clarification and he replied:

“Hi arm did not buy nor invest in arduino. The founders + Fabio Violante still own the company. As I wrote in the blog post we are still independent, open source and cross platform.”

We frankly can’t make sense of these conflicting statements, at least regarding whether ARM did or didn’t contribute monetary resources to the deal. ARM has no press release on the deal as we write this.

Announcing a partnership without details isn’t a new activity for Arduino. Recently we wrote about open questions on the Arduino Foundation. [Banzi] was willing to speak with Hackaday at length about that topic, suggesting more details were just weeks away but we have yet to see follow-through on that.

What we can tell is that [Banzi] and Arduino want us to know that they’re still independent. The Arduino post mentions independence and autonomy eight times in a 428-word post. (The lady doth protest too much?) They’re very concerned that we don’t think that they’ve been snapped up by ARM.

And there’s also good reason to believe that Arduino will remain autonomous even if ARM owns a big stake. ARM sells its intellectual property to a number of silicon manufacturers, who then compete fiercely by offering different peripheral sets and power budgets, and they’re very serious about providing them all with a level playing field.

Anyway, the various ARM chips are nice to work with from a hacker perspective. If the AVR-based UNO was the last non-ARM Arduino board ever made, we’d only shed a tiny little tear. On the other hand, if you’re an MSP430 or PIC fanboy or fangirl, we wouldn’t be holding your breath for a light-blue board sporting your favorite silicon but that is just conjecture.

So we have seemingly conflicting information on the details of this deal, but also promises of openness and transparency. On one hand we’re pleased that ARM is the apparent silent partner, but on the other hand we’re left confused and wanting more. Who owns Arduino?


Filed under: Arduino Hacks, Business, Current Events, Featured, news