Posts with «news» label

The best gadgets for students under $50

The little things can get you when you’re in college. You arrive on campus, fresh and ready to go, but before you know it, you’re a few weeks into the new semester and you have a long list of small things you forgot to pack and need to buy ASAP. We at Engadget also know from experience that there are unassuming gadgets that can make your collegiate life easier. To help you get ahead of the game, we’ve compiled the best school gadgets under $50 so you can buy the most crucial ones before you even step on campus.

Anker PowerExtend Cube USB-C power strip

Basic, two-receptacle wall outlets just don’t cut it anymore now that we all have a small army of devices that we rely on every day. A power strip like Anker’s PowerExtend will become a necessity for students as it gives them more power options than what comes standard in their dorm rooms. This cube has two USB-A ports, one 30W USB-C port and three AC outlets, giving you more ways to keep your laptop, phone, tablet, headphones and other devices charged up. The five-foot cable is another perk as it prevents you from needing to hug the wall of the library in order to get things done. Also, it weighs just 9.2 ounces so you can bring it with you whenever you need your own personal charging station.

Buy PowerExtend strip at Amazon - $40

Incase Bionic accessories organizer

Staying organized is key to staying sane while in school, and that’s true for both your digital and physical essentials. For the latter, Incase’s Bionic Accessory Organizer is just the right size to act as both a pencil case and an “everything else” holder. It has a number of pen loops inside for those that prefer to take handwritten notes, but it also has a bunch of variously sized pockets that can easily hold things like your portable hard drive, an extra phone charger and even a compact wireless mouse. And unlike those cheap pencil cases you’ll find at the dollar store, this one’s made of ocean-recycled material that’s the equivalent of seven plastic bottles.

Buy Bionic accessory organizer at Incase - $50

Lention 4-in-1 USB-C hub

Your brand new laptop might be blazing fast and super light, but it’s probably lacking in the port department. Such is the trade-off companies make when creating powerful thin-and-light machines, leaving us stuck living the dongle life. But it doesn’t have to be so painful if you get the right adapter for your laptop. Lention’s 4-in-1 USB-C hub is a great option for students. It’s compact, measuring 3 x 1.4 inches, and it includes three USB-A ports and one USB-C port. That should let you connect accessories like mice and keyboards, and even access files on a thumb drive when you’re working on a group project. The USB-C port is charging only, but that’s not necessarily a downside — you can use it with your laptop’s power adapter and USB-C cable to power your machine while using the adapter at the same time.

Buy Lention 4-in-1 hub at Amazon - $20

Anker PowerLine II USB-C to Lightning cable (10-foot)

As a student, there’s nothing worse than realizing your iPhone is down to 2 percent battery when you’re in the middle of submitting an assignment online. The charging cable that came with your phone has probably served you well, but having a second, longer cable can allow you to power up in dire situations even when the closest outlet is across the room. We’ve been fans of Anker’s Powerline series for a long time, and this 10-foot USB-C to Lightning cable is worth investing in. Not only is it MFi-certified so it will work well with all Apple devices, but its length gives you much more flexibility than your standard three-foot cable does. It also supports fast charging if you have an appropriately powerful adapter to use it with. And for those who don’t have iPhones, Anker has a 10-foot USB-C to C cable that should serve your handsets well, too.

Buy Powerline II USB-C to Lightning cable at Amazon - $23

Apple AirTag

We’re all familiar with the icy cold panic that rushes through us when you realize you’ve misplaced your keys, wallet, phone or other valuables. There are plenty of gadgets that can help you find those items, but AirTags are arguably the best for those who live in Apple’s ecosystem. Like most Apple accessories, setting up AirTags is as easy as placing them in close proximity to your iPhone and figuring out how you want to attach them to your belongings (and you don’t have to shell out a lot of money for fancy keyrings to do so). After that, if you do lose your stuff, you can use your phone to force the AirTag to emit a loud chime. And if you’re still within Bluetooth range, Apple’s Precision Finding feature can literally guide you back to your belongings. If you don’t have an iPhone, you can skip the AirTags and opt for one of Tile’s many Bluetooth trackers to get a similar experience.

Buy AirTag at Amazon - $29

SanDisk Dual Drive Go

While you may be used to saving your assignments in the cloud, it can’t hurt to have local copies as backups. SanDisk’s Dual Drive Go is a tiny thumb drive with both USB-C and USB-A connectors, so you can download and save important programs, files, photos and other documents from almost any device. It works with laptops, tablets and smartphones, and it even has a companion app that can automatically backup your files so you always have the most up-to-date version on hand. We appreciate the dual USB connectivity, the device’s tiny size and it’s affordable price — you can grab a 256GB model for only $30 to $40.

Buy SanDisk Dual Drive Go at Amazon - $30

Amazon Echo Dot (4th-gen)

The Echo Dot is Amazon’s most popular smart speaker for a reason — it’s small, it sounds pretty good for its size and it does a lot more than just play music. Students will like the fact that it doesn’t take up too much space on their desks and they can ask Alexa to play music from Spotify, Apple Music and others whenever they want to have an impromptu dorm-room dance party. And since it plugs into a wall outlet, they never have to remember to charge the Echo Dot like they would with a portable speaker. Also, when an assignment stumps them, students can consult Alexa for help. Are we suggesting they ask Alexa for the answers to all their homework conundrums? Not exactly... but the voice assistant’s answers could give them a good starting point for further research.

Buy Echo Dot at Amazon - $50

Anozer tablet stand

Whether you’re studying, attending a virtual class or watching a movie, it’s crucial to have your device of choice at a comfortable viewing angle. Anozer’s phone and tablet stand is a sturdy yet unassuming solution — it’s height- and angle-adjustable, its metal-weighted base with rubber feet helps it stay in place, and it can be folded flat so it’s easily portable. We also appreciate its silicone covered pad and rubber hooks that keep your phone or tablet from slipping and sliding around. It’s a must-have for anyone that primarily uses mobile devices to complete their schoolwork.

Buy Anozer stand at Amazon - $15

Manta Sleep Mask

Sleep can be hard to come by in college. Sometimes you may have to cram late into the night to prepare for an exam, but other times you’ll be subjected to the whims of others as they galavant around your dorm room as if classes and projects simply don’t exist. When you need to shut out the world in the hopes of catching a few ZZZs, Manta’s sleep mask could be a lifesaver. We like its adjustable eye cups that block out nearly 100 percent of light, limiting any visual distractions around you. The headband is adjustable as well, you can tighten or loosen the mask to your liking. And if it becomes indispensable to you, Manta sells different types of eye cups that you can switch out when you want relief from migraines or a bit more TLC for your skin. We also recommend completing the “do not disturb” bundle with a good pair of earplugs that block out audible annoyances when you’re trying to sleep.

Buy Manta sleep mask at Amazon - $30

RAVPower 20,000mAh charger

It goes without saying that a portable way to recharge your phone is essential nowadays. But a battery pack that’s capable of charging all of your devices, including your laptop, is even better. RAVPower’s 20,000mAh portable charger does just this — it’s 60W output allows it to juice up machines like a MacBook Pro from 0 to 60 percent in just one hour. And if you’ve got your laptop covered, it can power your tablet, smartphone, headphones and other gadgets quickly as well. Just before publishing this article, RAVPower’s charger went up in price to $54, but even if it’s a bit more expensive than our original threshold, we still think it’s worth the investment.

Buy 20,000mAh 60W portable charger at RAVPower - $54

USB desk fan

Dorm rooms can be insufferably hot throughout the school year, and there are few things worse than sweating when you’re trying to study. A gadget to help circulate air is a necessity and this USB desk fan is small and quiet enough to work in almost any environment. It doesn’t take up much space on a desk and its nearly 4-foot-long cable makes it easy to plug into a power source — probably your laptop since it’s likely to be close by while studying, but it could also be a USB adapter connected to an AC outlet or even a portable battery pack. The fan also has three speeds and the head can be angled to direct air at your face or anywhere else you want it.

Buy desk fan at Amazon - $12

Brita filter bottle

The environmental reasons for carrying a reusable water bottle are clear, and hydration is important for everyone — not only students. Brita’s is a good option because it’s made of BPA-free plastic, comes in 26-ounce and 36-ounce capacities, has a leak-proof lid and uses a filter straw to make the water you drink from it just like the water you’d get from a larger Brita container. And no, you won’t have to spend too much on replaceable filters either. The company recommends changing your bottle’s filter every two months, and a pack of three filters will run you only about $12.

Buy Brita water filter bottle at Amazon - $20

The best laptops for college students

We’re all contending with a return to normalcy, and going back to school can feel strange yet exciting. Whether you’re heading to a physical campus, taking classes online or a mix of both, a laptop is likely going to be the control center for your studies.

And things have changed quite a bit over the last year or so. We’ve seen the introduction of Apple’s M1-powered MacBooks and Microsoft just announced Windows 11. With ARM-based computers harkening a future where the line between mobile and desktop computing is blurry and Windows 11 working to bridge that gap by supporting Android apps, the laptop market is the most exciting it’s been in years.

But that might lead to more questions for shoppers. What should you look out for if you want an ARM-based PC? Will they run Windows 11 when that update is available? What are some key specs you should add to your must-have list this year? We compiled this guide to help you make the right choice, alongside a list of this year’s best laptops.

What to look for in a laptop for school (and what to avoid)

First: Windows on ARM still isn’t worth it. Snapdragon laptops may look and feel classy, offer excellent battery life and cellular connections, but they’re typically too expensive, especially considering their limited app compatibility and finicky software. Apple’s M1 MacBooks, on the other hand, are great for almost everyone, barring those who need external GPUs, niche software or more than 16GB of RAM.

Over on the Intel side of things, almost every notebook released this year packs an 11th-generation Core processor. You’ll likely be able to find a cheaper version of a product with a 10th-generation chip, and it should still serve you well. And don’t forget about AMD’s Ryzen, either — they’re plenty powerful and no longer just for the bargain bin. If you're eagerly awaiting the arrival of Windows 11 devices, don't expect to see them before the semester begins. They're more likely to show up in the fall around Microsoft's usual hardware event in October.

Across the industry, companies have shifted to taller aspect ratios for their screens. The Surface Laptops sport 3:2 panels, and many Dell and HP models offer 16:10. While the older 16:9 format is nice for watching videos, you’ll probably appreciate a taller option when you’re writing an essay. Some devices, like Dell’s XPS and Samsung’s Galaxy Book Pro, come with OLED panels, which will be nice for working with photos and videos. They usually cost more and take a toll on battery life, though, so you’ll need to weigh your priorities.

Fortunately, there’s a diverse selection of laptops around, so you should be able to find a suitable one regardless of your preferences. Here are our favorite notebooks for your return to academia.

Apple MacBook Air M1

With its swift performance, slim fanless design and excellent battery life, the MacBook Air M1 is a no-brainer for any Apple user. You’ll appreciate familiar features like the Retina display, solid keyboard and trackpad. Plus thanks to the company’s excellent Rosetta 2 emulator software, you won’t notice a huge performance difference when relying on Intel apps.

The big news though, is the ARM-based M1 allows the laptop to run iPhone and iPad apps too. While not every app will be available on macOS, the potential for more options on your desktop here is great. Now you just have to make sure you can keep the distractions at bay — which should be easy with the upcoming Focus modes on macOS Monterey, which rolls out later this year.

Unfortunately for those looking for more internal storage or something to run their bespoke video streaming setup, the MacBook Air M1 tops out at 256GB storage while both the Air and the Pro only go up to 16GB of RAM. The MacBook Pro M1 also lacks support for multiple monitors and an external GPU. Those with more demanding workflows might need to look to Windows or an Intel-powered MacBook to ensure app compatibility.

Buy MacBook Air M1 at Amazon - $999

Dell XPS 13

Dell’s XPS series has been our favorite for years. Despite a somewhat plain design that some might call “classic,” the XPS 13 still stands out for nailing pretty much everything a laptop should have. Great performance? Check. Gorgeous screen? Check. Comfortable keyboard? Check. Throw in a long-lasting battery and a pair of Thunderbolt 4 ports in the latest versions, and you’ve got a powerful workhorse for all your classes (and more).

The company shifted to a 16:10 aspect ratio in 2020, and recently added a 4K OLED option. That means you’ll see greater contrast ratios and deeper blacks for maximum display goodness. The OLED configuration will cost you $300 more than the Full HD LCD option, but those who want the best viewing experience may not mind the premium. We also recommend you spend a little more and get at least the Core i3 model with 8GB of RAM instead of the meager 4GB that the base model offers.

Buy XPS 13 at Dell - $930

Microsoft Surface Laptop 4

If you’re looking for an excellent typing experience, look no further than the Surface Laptop 4. Microsoft has killed it with the keyboards on its recent Surface Laptops and this one’s no different. Though they’re not as deep and springy as ThinkPads, the buttons here are deliciously responsive and have ample travel. The roomy trackpad is solid, too.

Of course, it’s important that the Surface Laptop 4 deliver on everything else, or we wouldn’t recommend it. The 15-inch version that we tested offered breezy performance, respectable battery life and a lovely 3:2 Pixelsense screen which supports Microsoft’s Surface Pen input. Though its design is a little staid, the Surface Laptop 4 still has a clean, professional design and a luxurious aluminum case that's sturdy enough to withstand being stuffed in your backpack. Plus, at 3.4 pounds, it won't burden your shoulders too much.

The best thing about the Surface Laptop 4 is that its base model, which comes equipped with AMD’s Ryzen 5 processor and 8GB of RAM, starts at $1,000. That rivals the Dell XPS 13, making it a better buy for the value-conscious: You get more screen, more power and more RAM for the money. Both the Surface and the XPS are great options, but the latter offers an OLED panel and thinner bezels that make it look more modern.

Buy Surface Laptop 4 at Microsoft - $999

Samsung Galaxy Book Pro

For those whose priority is light weight, the Galaxy Book Pro series should be at the top of your list. At just 2.36 pounds for the clamshell and 3.06 pounds for the convertible model, the 15-inch Galaxy Book Pro is one of the lightest 15-inch laptops around. It’s also super thin at 0.46 inches thick, and despite its compact size it manages to house three USB-C ports (one of them supporting Thunderbolt 4), a microSD card reader and a headphone jack.

It also packs an Intel Core i5 or i7 processor and at least 8GB of RAM, along with a 68Whr battery that delivers a similar runtime to the Dell XPS 13 and Surface Laptop 4. That’s particularly impressive given the Galaxy Book Pro has a Super AMOLED screen, which offers sumptuous image quality, high contrast ratio and deep blacks. Unfortunately, Samsung is still stuck on a 16:9 aspect ratio, which will feel outdated in a year or two, but it’s not a deal breaker.

The Galaxy Book Pro’s keyboard isn’t as comfortable as the Surface Laptop 4’s but it’s pleasant enough, and the trackpad is enormous. We’re more concerned about the odd webcam software that makes you look dark and splotchy, so if looking your best on video calls is of concern you might want to consider something else. Plus, the $1,100 base model comes with an Intel Core i5 chip, 8GB of RAM and 512 GB of storage, making it a competitive offering against the Dell and Surface laptops. Awful camera aside, there’s plenty to love about the Galaxy Book Pro, especially for those looking to lighten their loads.

Buy Galaxy Book Pro at Samsung - $999

Acer Chromebook Spin 713

If you’re considering saving a few hundred bucks by opting for Chrome OS, the Acer Chromebook Spin 713 might be the right choice. Sure, there are cheaper Chromebooks out there, but it’s one of few machines with a 3:2 aspect ratio and has a utilitarian design that makes it perfect for butterfingers.

That price also gets you an 11th-generation Intel Core i5 processor, 8GB of RAM and sturdy 360-degree hinge so you can set it up in a variety of modes. The 13.5-inch screen is also more pixel-dense than most 1080p displays of the same size. Though the Spin 713 only clocked about 8 hours on our battery test, that’s enough to get you through a work day. If $700 feels too expensive for a Chromebook, you could also wait till it inevitably goes on sale to save a bit more. There are sleeker, more powerful Chromebooks available, but Acer’s Spin 713 offers a good mix of performance and a modern screen for the money.

Buy Acer Chromebook Spin 713 at Best Buy - $700

Acer Aspire 5

If price is your utmost concern, then we recommend the Acer Aspire 5. It’s a 15-inch Windows laptop with an AMD Ryzen 3 3200U processor with 4GB of RAM and 128GB of storage that costs between $400 and $450. Yes, that’s less memory than anything else on this list, but it also costs much less than any of our non-Chromebook suggestions.

There’s plenty of ports here — including an Ethernet socket — and the aluminum chassis should make this laptop feel more expensive than it is. You’ll also appreciate its reliable performance, comfortable keyboard and 1080p display. For the price, the Aspire 5 offers everything you need to get through the school day, making it a great bargain.

Buy Aspire 5 at Acer starting at $399

Making Minty Fresh Music With Markov Chains: The After Eight Step Sequencer

Step sequencers are fantastic instruments, but they can be a little, well, repetitive. At it’s core, the step sequencer is a pretty simple device: it loops through a series of notes or phrases that are, well, sequentially ordered into steps. The operator can change the steps while the sequencer is looping, but it generally has a repetitive feel, as the musician isn’t likely to erase all of the steps and enter in an entirely new set between phrases.

Enter our old friend machine learning. If we introduce a certain variability on each step of the loop, the instrument can help the musician out a bit here, making the final product a bit more interesting. Such an instrument is exactly what [Charis Cat] set out to make when she created the After Eight Step Sequencer.

The After Eight is an eight-step sequencer that allows the artist to set each note with a series of potentiometers (which are, of course, housed in an After Eight mint tin). The potentiometers are read by an Arduino, which passes MIDI information to a computer running the popular music-oriented visual programming language Max MSP. The software uses a series of Markov Chains to augment the musician’s inputted series of notes, effectively working with the artist to create music. The result is a fantastic piece of music that’s different every time it’s performed. Make sure to check out the video at the end for a fantastic overview of the project (and to hear the After Eight in action, of course)!

[Charis Cat]’s wonderful creation reminds us of some the work [Sara Adkins] has done, blending human performance with complex algorithms. It’s exactly the kind of thing we love to see at Hackaday- the fusion of a musician’s artistic intent with the stochastic unpredictability of a machine learning system to produce something unique.

Thanks to [Chris] for the tip!

New Part Day: Arduino Goes Pro with the Portenta H7

The Consumer Electronics Show in Las Vegas is traditionally where the big names in tech show off their upcoming products, and the 2020 show was no different. There were new smartphones, TVs, and home automation devices from all the usual suspects. Even a few electric vehicles snuck in there. But mixed in among flashy presentations from the electronics giants was a considerably more restrained announcement from a company near and dear to the readers of Hackaday: Arduino is going pro.

While Arduino has been focused on the DIY and educational market since their inception, the newly unveiled Portenta H7 is designed for professional users who want to rapidly develop robust hardware suitable for industrial applications. With built-in wireless hardware and the ability to run Python and JavaScript out of the box, the powerful dual-core board comes with a similarly professional price tag; currently for preorder at $99 USD a pop, the Portenta is priced well outside of the company’s traditional DIY and educational markets. With increased competition from other low-cost microcontrollers, it seems that Arduino is looking to expand out of its comfort zone and find new revenue streams.

That’s a Lot of Pins

The Portenta H7 is obviously a far cry from the relatively dinky 8-bit Arduinos that we’ve all got filling up our parts drawers. Developed for high performance edge computing applications, the new board is powered by a 32-bit STM32H747XI that utilizes both an ARM Cortex M7 and an M4 running at 480 MHz and 240 MHz respectively. The two cores can work independently, allowing for example one core to run interpreted Python while the other runs code compiled in the Arduino IDE. When they need to work together, the cores can communicate with each other via a Remote Procedure Call (RPC) mechanism.

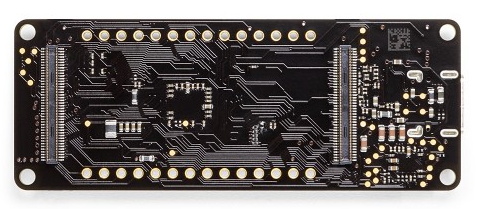
The new 80-pin connectors on the Portenta

Outwardly, the new board doesn’t look far removed from the modern Arduino form factor we’re used to. The USB connector has been upgraded to a Type-C, but the Portenta still retains the dual rows of pads ready for hand-soldered headers — that’s their more recent pinout that they call the Arduino MKR form factor.

If you look on the back of the board however, you’ll see that they’ve added two 80-pin high density connectors. According to the product page, these are intended to allow the Portenta to simply be plugged into a device as a removable module. The idea being that devices in the field can easily have their Portenta swapped out for an upgraded model. Some digging into the product page documentation section turns up a schematic that lists the connectors as Hirose DF40C-80DP-0.4V(51).

The base model Portenta features 8 MB SDRAM and 16 MB NOR flash, but it can be custom ordered with up to 64 MB of memory and 128 MB of flash should you need it. It’s also possible to delete various interfaces from the board when ordering, so if you don’t want network connectivity or the NXP SE050C2 crypto chip, they can simply be left off. However as of this writing it is unclear as to what minimum order quantity is necessary to unlock this level of customization, or or how much these modifications will change the unit cost.

Year of the Arduino Desktop?

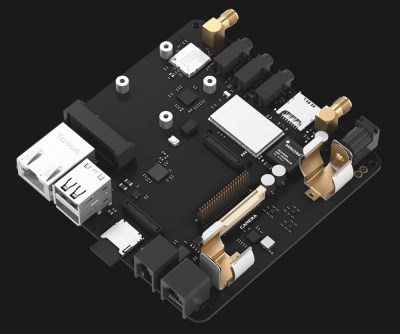
The Portenta Carrier Board

The Portenta H7 is an impressive enough piece of hardware on its own, but when it’s plugged into the optional Carrier Board, things really start to get interesting. The Carrier Board provides full size connectors for all of the onboard peripherals, and according to documentation, turns the Portenta into an eNUC-class embedded computer. There’s even support for DisplayPort to connect a monitor, and miniPCI for expansion cards.

With a fully loaded Portenta H7 slotted into the Carrier Board, it would seem you have the makings of a low-power ARM “desktop” computer. Albeit one that wouldn’t outperform the Raspberry Pi Zero, and which costs several times more.

The Arduino press release and product page doesn’t make any mention of what kind of software or operating system said computer would run, so presumably that’s left as an exercise for the customer. While not particularly well suited to it, the ARM Cortex-M family of processors is capable of running the Linux kernel, so spinning up a “real” OS image for it should be possible. Of course with a maximum of just 64 MB of RAM, you’ll want to keep your performance expectations fairly low.

Where Does Portenta Fit?

We can’t even speculate what a maxed out Portenta would cost, and there’s no pricing or release date for the Carrier Board. But even at $99, the base model Portenta H7 would be a tough sell for hackers and makers who are used to buying dual-core ESP32 boards at 1/10 of the price, or the Teensy 4.0 which has a 600 MHz Cortex-M7 at 1/4 of the price. Which is fine, since this board isn’t intended for the traditional core Arduino audience.

Seeing the carrier board, we can’t help but notice some parallels here with the Raspberry Pi Compute Module. With connections broken out to a SODIMM header, the idea of the Computer Module was to help bridge the gap between the DIY community and the commercial one by offering up a Raspberry Pi in a more rugged form factor that would be easier to integrate into end-user products. But since it wasn’t any cheaper than the stock Pi, there wasn’t a whole lot of incentive to switch over. We haven’t seen consumer products advertising “Raspberry Pi Inside!” so it’s hard to tell if there has been any meaningful adoption from industry.

One has to wonder why any company that has the resources to integrate such an expensive board into their products wouldn’t just come up with their own custom design around the Portenta’s STM32H747XI chip, which even in single quantities, can currently be had for less than $15. The difference may end up coming down to the world-renowned community that surrounds the Arduino brand, and the company’s efforts to modernize their toolchain.

The Arduino IDE Finally Grows Up

While the Arduino has a very vocal fan club, there are always a few people less than thrilled with the ubiquitous ecosystem. While fans may just dismiss it as sour grapes, there are a few legitimate complaints you can fairly level at the stock setup. To address at least some of those concerns, Arduino is rolling out the Arduino Pro IDE and while it doesn’t completely address every shortcoming, it is worth a look and may grow to quiet down some of the other criticisms, given time.

For the record, we think the most meaningful critiques fall into three categories: 1) the primitive development environment, 2) the convoluted build system, and 3) the lack of debugging. Of course, there are third party answers for all of these problems, but now the Pro IDE at least answers the first one. As far as we can tell, the IDE hides the build process just like the original IDE. Debugging, though, will have to wait for a later build.

We were happy to see a few things with the new IDE. There’s some autocompletion support, Git is integrated, and there’s still our old friend the serial monitor. The system still uses the Arduino CLI, so that means there isn’t much danger of the development getting out of sync. The actual editor is Eclipse Theia. People typically either love Eclipse or hate it, however, it is at least a credible editor. However, Theia uses Electron which makes many people unhappy because Electron applications typically eat a lot of resources. We’ll have to see how taxing using the new Pro IDE is on typical systems with normal workloads.

On the future feature list is our number one pick: debugging. They are also promising support for new languages, third party plugins, and synchronization with the Web-based editor. All good features.

This is just an alpha preview release, but it is a great start. Our only question is will existing users really care? Most people already write code in another editor. Many use an external build system like PlatformIO. Eclipse already has a plug in for Arduino that supports debugging with the right hardware. So while new users may appreciate the features, advanced users may be wondering why this is so late to the party.


Hack a Day 21 Oct 12:00

Your Arduino SAMD21 ADC is Lying to You

One of the great things about the Arduino environment is that it covers a wide variety of hardware with a common interface. Importantly, this isn’t just about language, but also about abstracting away the gory details of the underlying silicon. The problem is, of course, that someone has to decode often cryptic datasheets to write that interface layer in the first place. In a recent blog post on omzlo.com, [Alain] explains how they found a bug in the Arduino SAMD21 analogRead() code which causes the output to be offset by between 25 mV and 57 mV. For a 12-bit ADC operating with a reference of 3.3 V, this represents a whopping error of up to 70 least-significant-bits!

Excerpt from the SAMD wiring_analog.c file in the Arduino Core repo.

While developing a shield that interfaces to 24 V systems, the development team noticed that the ADC readings on a SAMD21-based board were off by a consistent 35 mV; expanding their tests to a number of different analog pins and SAMD21 boards, they saw offsets between 25 mV and 57 mV. It seems like this offset was a known issue; Arduino actually provides code to calibrate the ADC on SAMD boards, which will “fix” the problem with software gain and offset factors, although this can reduce the range of the ADC slightly. Still, having to correct for this level of error on a microcontroller ADC in 2019 — or even 2015 when the code was written — seems really wrong.

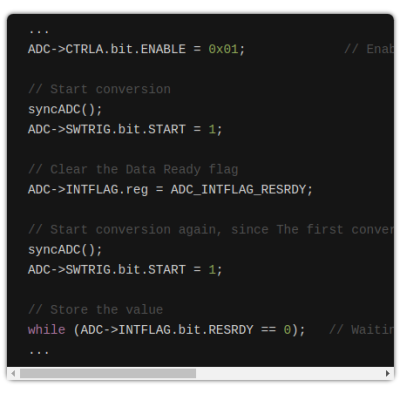
After writing their own ADC read routine that produced errors of only between 1 mV and 5 mV (1 to 6 LSB), the team turned their attention to the Arduino code. That code disables the ADC between measurements, and when it is re-enabled for each measurement, the first result needs to be discarded. It turns out that the Arduino code doesn’t wait for the first, garbage, result to finish before starting the next one. That is enough to cause the observed offset issue.

It seems odd to us that such a bug would go unnoticed for so long, but we’ve all seen stranger things happen. There are instructions on the blog page on how to quickly test this bug. We didn’t have a SAMD21-based Arduino available for testing before press time, but if you’ve got one handy and can replicate these experiments to verify the results, definitely let us know in the comments section below.

If you don’t have an Arduino board with a SAMD21 uC, you can find out more about them here.

Hack a Day 30 Aug 16:01

Arduino on mBed

Sometimes it seems like Arduino is everywhere. However, with a new glut of IoT processors, it must be quite a task to keep the Arduino core on all of them. Writing on the Arduino blog, [Martino Facchin], Arduino’s chief of firmware development, talks about the problem they faced supporting two new boards from Nordic.

The boards, the Nano 33 BLE and Nano 33 BLE Sense are based on an ARM Cortex M4 CPU from Nordic. The obvious answer, of course, is to port the Arduino core over from scratch. However, the team didn’t want to spend the time for just a couple of boards. They considered using the Nordic libraries to interact with the hardware, but since that is closed source, it didn’t really fit with Arduino’s sensitivities. However, in the end, they took a third approach which could be a very interesting development: they ported the Arduino core to the Mbed OS. There’s even an example of loading a sketch on top of Mbed available from [Jan Jongboom].

On the one hand, this has two big advantages: in theory, Arduino can now run on anything that supports Mbed, which is quite a lot. Second, even though the system retains the simplicity of Arduino, the entire Mbed system is available to Arduino developers and vice versa.

On the other hand, you could argue that if you have Mbed, you don’t really need Arduino. While much is made about Arduino’s simplicity, it is really a C++ program with two predefined functions and an IDE that builds your code without as much explicit help as you’d expect. However, the wide variety of code that supports Arduino should be of interest since you could just use it from either an Arduino or Mbed program without much effort.

This might make some of our favorite Mbed labs projects more popular. If you want to see our take on an Mbed project, you can turn it into a signal generator.

Thanks [halherta] for the tip.

Hack a Day 30 Aug 12:00
arduino  arduino hacks  arm  mbed  news  nordic  

New Teensy 4.0 Blows Away Benchmarks, Implements Self-Recovery, Returns to Smaller Form

Paul Stoffregen did it again: the Teensy 4.0 has been released. The latest in the Teensy microcontroller development board line, the 4.0 returns to the smaller form-factor last seen with the 3.2, as opposed to the larger 3.5 and 3.6 boards.

Don’t let the smaller size fool you; the 4.0 is based on an ARM Cortex M7 running at 600 MHz (!), the fastest microcontroller you can get in 2019, and testing on real-world examples shows it executing code more than five times faster than the Teensy 3.6, and fifteen times faster than the Teensy 3.2. Of course, the new board is also packed with periperals, including two 480 Mbps USB ports, 3 digital audio interfaces, 3 CAN busses, and multiple SPI/I2C/serial interfaces backed with integrated FIFOs. Programming? Easy: there’s an add-on to the Arduino IDE called Teensyduino that “just works”. And it rings up at an MSRP of just $19.95; a welcomed price point, but not unexpected for a microcontroller breakout board.

The board launches today, but I had a chance to test drive a couple of them in one of the East Coast Hackaday labs over the past few days. So, let’s have a closer look.

First Impressions

The board looks superficially similar to the older 3.2, at least from the top. There’s the usual dual row of pin headers you can plug into a breadboard, a micro-USB connector, and reset button. A new red LED near the USB connector gives you some status information, while the traditional “Arduino LED” is orange. Flip the board over, and you start to see some of the extra power this board wields. Besides ten more GPIO pins, there are pads for an SD card interface using 4-bit SDIO, and D+ and D- lines for the second 480 Mbps USB interface. The unmarked round pads are test points used in manufacturing and are no-connects from the end-user’s perspective.

Teensy 3.2 Everything Killer?

When doing hardware reviews it’s crucial to choose the right comparison hardware. I think the best comparison in this case is between the two boards that share the same form factor; the Teensy 4.0 and the 3.2. I’ve chosen not to make the comparison with the Teensy 3.5 and 3.6, which are priced a little higher, in a larger form factor, and have SD card slots soldered on.

Incredibly, the Teensy 4.0 is priced at $19.95, as opposed to the $19.80 Teensy 3.2. What does that extra fifteen cents buy? First, there’s performance. The 4.0’s 600 MHz clock vs the 72 MHz on the 3.2 doesn’t tell the whole story. The Cortex M7 on the 4.0 is a dual-issue superscalar processor capable of executing up to two 32-bit instructions per clock cycle; initial tests showed this happening between 40-50% of the time on Arduino-compiled code. Additionally, the Cortex-M7 is the first ARM microcontroller with branch prediction. While on the Cortex M4, a branch always takes 3 clock cycles, after a few passes through a loop, for instance, the Cortex M7 can begin executing correctly-predicted branches in a single clock. This is technology originally pioneered in supercomputers that you can use in your next Halloween costume.

Then, there’s floating-point. Veteran embedded programmers may have a bias against floating-point code, and with good reason. Without native floating-point instructions, these operations must be emulated, and run very slowly. The same thing happens with double-precision operations on a processor which only supports single-precision instructions. While Cortex-M4 processors support single-precision floating-point, the Cortex-M7’s include native double-precision instructions, so if you need the extra precision afforded by doubles, you’re not going to take a huge performance hit: basically, doubles seem to execute in only twice as many cycles as floats.

The Cortex-M7 on this board also supports tightly-coupled memory (TCM), which provides fast access like a cache, but without the non-determinism that can complicate hard real-time applications — one of the problems with other high-power microcontrollers. The 64-bit ITCM bus can fetch 64-bits, while two dedicated 32-bit buses (DTCM) can fetch up to two instructions from the TCM each cycle – these buses are separate from the main AXI bus used to communicate with other memory and peripherals. The Teensyduino environment automatically allocates code and statically allocated memory into the DTCM area, which can be up to 512K in size, although you can override the default behavior with some command-line switches. Memory that isn’t accessed by the tightly-coupled buses is optimized for access by the peripherals using DMA.

Spec Sheet

Despite its size, there’s a lot to this board and the chip it carries, so here’s condensed spec list:

  • ARM Cortex-M7 at 600 MHz
  • 1024K RAM (512K is tightly coupled)
  • 2048K Flash (64K reserved for recovery & EEPROM emulation)
  • 2 USB ports, both 480 MBit/sec
  • 3 CAN Bus (1 with CAN FD)
  • 2 I2S Digital Audio
  • 1 S/PDIF Digital Audio
  • 1 SDIO (4 bit) native SD
  • 3 SPI, all with 16 word FIFO
  • 3 I2C, all with 4 byte FIFO
  • 7 Serial, all with 4 byte FIFO
  • 32 general purpose DMA channels
  • 31 PWM pins
  • 40 digital pins, all interrupt capable
  • 14 analog pins, 2 ADCs on chip
  • Cryptographic Acceleration
  • Random Number Generator
  • RTC for date/time
  • Programmable FlexIO
  • Pixel Processing Pipeline
  • Peripheral cross triggering
  • Power On/Off management

The board consumes around 100 mA with a 600 MHz clock. Although I didn’t try it myself with the evaluation boards I have here, Paul notes that it can be overclocked for a performance boost. It also supports dynamic clock scaling: the instruction clock speed is decoupled from the peripherals, so that baud rates, audio sample rates, and timing functions continue to function properly if you change the CPU speed.

For the ultimate in power savings, you can shut the board off by adding a pushbutton to the On/Off pin. Pressing the button for more than five seconds disables the 3.3 V supply; a subsequent brief press will turn it back on. This doesn’t affect the real-time-clock (RTC) functionality, however: connecting a coin cell to the VBAT terminal will keep the time and date counter going.

Hands-On Benchmarks

Higher is better
Board CoreMark
Teensy 4.0 2313.57
Teensy 3.6 440.72
Sparkfun ESP32 Thing 351.33
Teensy 3.5 265.50
Teensy 3.2 218.26
Metro M4 Grand Central 214.85
Arduino Due 94.95
Arduino Zero 56.86
Arduino Mega 7.03

To see how fast this thing really is, Paul ported the CoreMark embedded-processor benchmark to the Arduino environment. (Note that CoreMark seems to be a registered trademark of the Embedded Microprocessor Benchmark Consortium (EEMBC)). This synthetic benchmark tests performance managing linked lists, doing matrix multiplies, and executing state machine code. He reports the following scores for a number of boards (larger numbers are better).

I was able to verify the Teensy 4.0 and 3.2 numbers; my 3.6 must have sprouted legs and walked off somewhere, and I didn’t have any of the other boards handy for testing. Using my numbers (nearly identical to those above), the 4.0 is around ten times as fast as the 3.2.

Since the CoreMark code is a “synthetic” benchmark, Paul wanted to test the new board in a more realistic scenario. In another GitHub repo, he has some code to do an RSA signature with a 2048-bit key. This is a processor-intensive operation, believe me — I had to implement it once in Lua (don’t ask!). Here are the scores for the same boards (lower numbers are better).

Lower is better
Board Seconds
Teensy 4.0 0.085
Teensy 3.6 0.474
Sparkfun ESP32 Thing 0.518
Metro M4 Grand Central 0.840
Teensy 3.5 0.909
Teensy 3.2 1.325
Arduino Due 1.901
Arduino Zero 9.638

Again, I was able to verify the numbers for the Teensy 3.2 and 4.0 boards. In this case, the 4.0 is around fifteen times as fast as the 3.2.

If you have any of these, or other Arduino-compatible boards lying around, clone one or both of these repos, open the respective *.ino file from either one, and test them out. Feel free to report results in the comments below.

15 Seconds to Sanity

One of the new features of the Teensy 4.0 is the automatic recovery process, which restores the board to a known good state without the need for a PC connection. If you press and hold the reset button for 15 seconds, the red LED will flash to indicate you’ve entered restore mode. Once you release the button, the red LED will illuminate while the flash memory is erased and re-written with the traditional Arduino “blink” program. Once the re-write is complete, the blink program is run and the orange LED begins blinking, just like on every Arduino-compatible for the past decade and a half. It’s DFU mode without the need for host computer or known-working binary. These used to be key components for hardware-based restore and now they’re part of the board itself.

Why would you want to do this? In a nutshell, because USB itself is a train-wreck. On top of an insanely sprawling and complex protocol, there are charge-only cables sans data pins lurking in your junk box, operating system bugs waiting to trip you up (looking at you, Windows 7), and a whole host of other issues that cause serious head-scratching when things stop working. This can be especially confusing with native-USB boards like the Teensy 4.0; while the built-in USB functionality is amazingly powerful, and can be used in a wide variety of ways, when something stops working, you’re not always sure how to get back on track. Now, you are – just press the button.

What Can You Do with a 600 MHz Microcontroller?

Paul envisions this Teensy 4.0 being used for polyphonic audio synthesis, running moderately complex machine learning algorithms, and real-time audio analysis. In many cases, the first level of processing on data-intensive input devices can now be moved from a host computer to the external microcontroller, narrowing the bandwidth required to the host system. And for projects driving a display, the built-in pixel processing pipeline can also accelerate graphics operations, offloading this work from the CPU.

There will be some fraction of hackers that will still wonder why we need a 600 MHz microcontroller; another fraction will have already needed it yesterday. In between, most users will take some time to figure out what doors this opens up. The reality is that our tools constrain not only our current designs, but also, to some extent, our imagination. A 15x performance improvement over the current tiny development board you may be using could enable some new and exciting applications, and you, dear reader, are the one who makes them happen. So, drive home a different way from work tonight, sleep on the sofa instead of the bed, or use whatever other tricks you have to shock your brain into creativity and figure out what you could really do with this thing. It’s a lot more than you can do with a 555. For that matter, it’s a lot more than most computers could do in the 90s.

Arduino Enters the Cloud

Love it or hate it, for many people embedded systems means Arduino. Now Arduino is leveraging its more powerful MKR boards and introducing a cloud service, the Arduino IoT Cloud. The goal is to make it simple for Arduino programs to record data and control actions from the cloud.

The program is in beta and features a variety of both human and machine interaction styles. At the simple end, you can assemble a dashboard of controls and have the IoT Cloud generate your code and download it to your Arduino itself with no user programming required. More advanced users can use HTTP REST, MQTT, Javascript, Websockets, or a suite of command line tools.

The system relies on “things” like temperature sensors, LEDs, and servos. With all the focus on security now, it isn’t surprising that the system supports X.509 authentication and TLS security for traffic in both directions.

Honestly, we tried it and the web-based IDE couldn’t find our MKR1000 board under Linux. That could be a misconfiguration on our part, but it is frustrating how little information you get from many web-based tools. It decided we had multiple Arduinos connected (we didn’t). Then removing a multiport serial adapter made it see no Arduinos even though there was an MKR1000 Vidor attached.

Naturally, there are plenty of options when it comes to putting devices on the cloud. However, if you are only using Arduino boards, this one is going to be pretty seamless — assuming it works for you.

Hack a Day 07 Feb 16:30

Flash: Arduino Vidor FPGA Instructions Hit France

If you speak French and you have an Arduino Vidor 4000, you are in luck because there’s some good news. The good news is there’s finally some inside information about how to configure the onboard FPGA yourself. The bad news though is that it is pretty sparse. If your high school French isn’t up to the task, there’s always Google Translate.

We knew some of this already. You’ll need Quartus, the FPGA design tool from Altera — er, Intel — and we know about the sample project on GitHub, too. Instead of using conventional Verilog or VHDL, the new information uses schematic capture, but that’s OK. All the design entry winds up in the same place, so it should be easy to adapt to the language of your choice. In fact, in part 2 they show both some schematics and some Verilog. Google Translate does have a little trouble with code comments, though. If you want something even stouter, there’s an example that uses Verilog to output a video frame.

The real question has been: how do you get the bitstream into the FPGA without surgery on the board? There’s a Java application (Zip download) that builds a .H file for you. Including that in your sketch will cause the Arduino to load the FPGA for you. There are still not a lot of details about how that works — we think there’s almost an FPGA bootloader that stays loaded and then gets the rest of the configuration like this.

In addition, there is a warning at the end:

Under no circumstances should you reconfigure the PA20 port of the SAMD21 output. This one is already used as output by the FPGA.

We can imagine that there are other gotchas, so if you start experimenting you are taking some chance of blowing up or bricking your Arduino.

Still, this is great news! We’ve been itching to play with the onboard FPGA and this should answer enough questions to work out the rest of the details. All the examples, including a DVI output example, are linked on one download page.

If you are wanting to learn more about the hardware, we covered it. We also have some FPGA boot camps that would help you get started with FPGAs in general.

Hack a Day 14 Oct 15:00
arduino  arduino hacks  fpga  max10  news  quartus  vidor