Posts with «mega» label

An RFID-powered seating chart for your wedding

Seating charts at weddings and other formal events are usually handled by small cards at each table, but Gabrielle Martinfortier had other plans. 

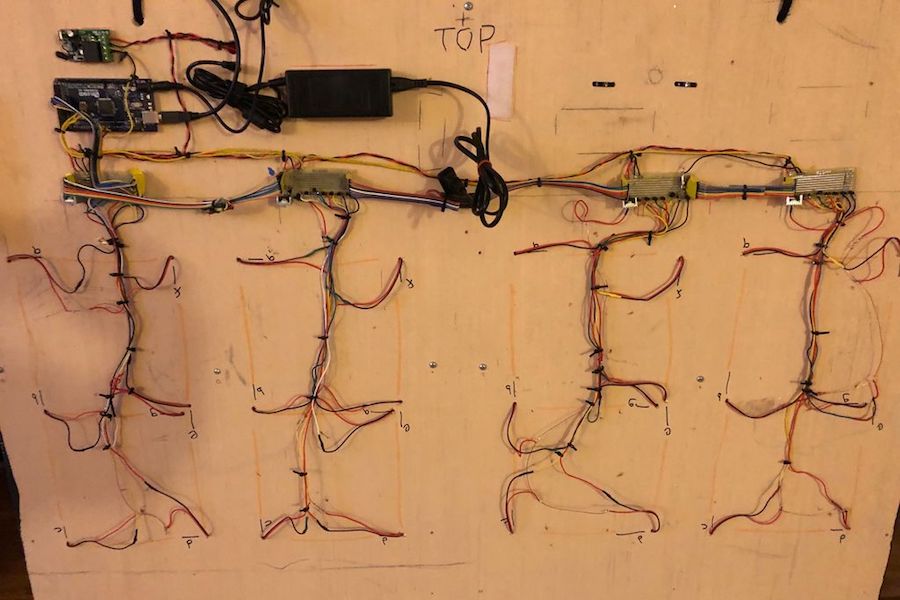
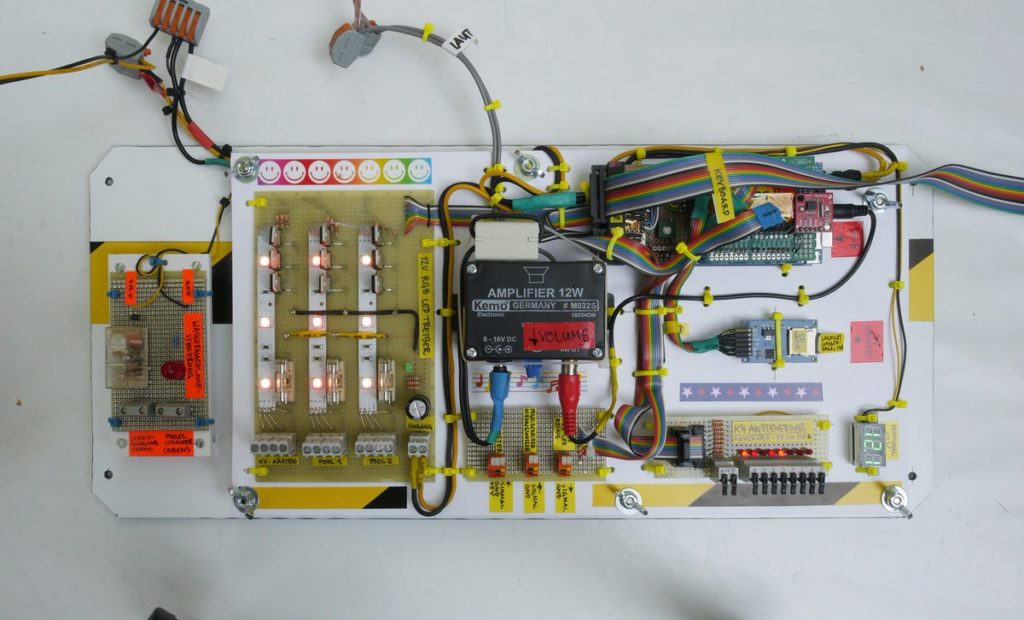
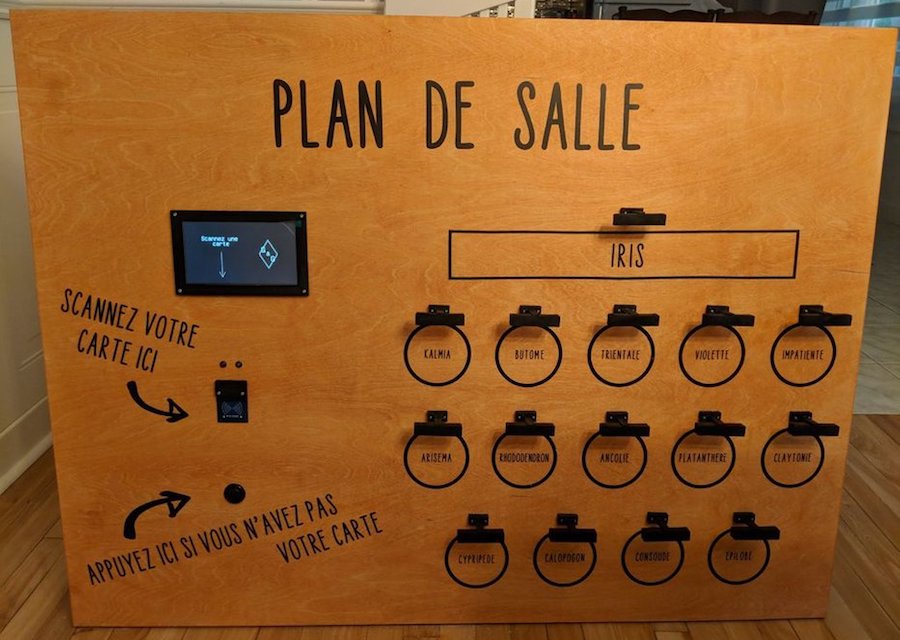
For her big event, she along with help from her now-husband and friends constructed a seating arrangement on a 3’ x 4’ wood canvas, equipped with a 7” TFT display and an RFID reader. An Arduino Mega serves as the brains of the device, taking advantage of its expanded IO capabilities to control an LED assembly over each table on the chart.

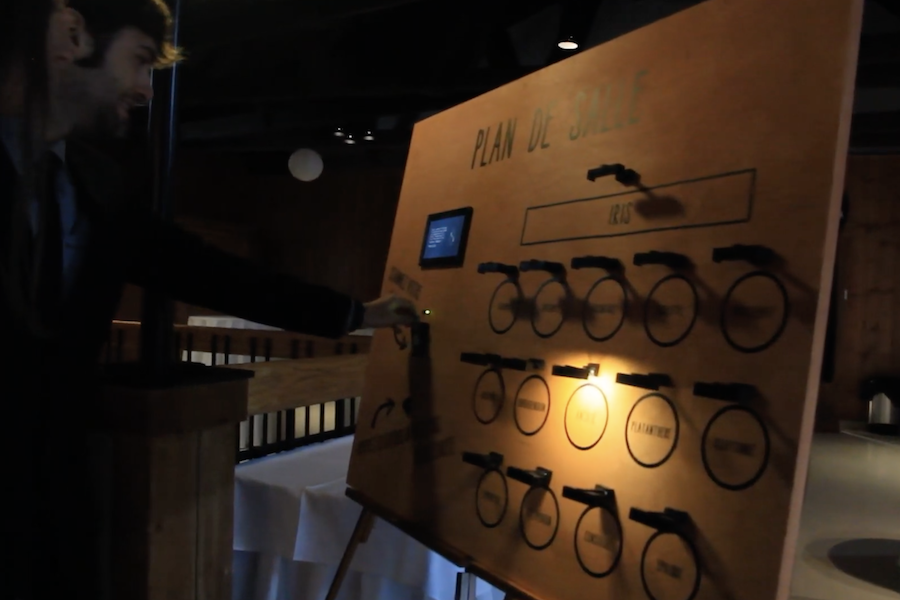
Wedding guests simply had to present the card they received with the invitation, then their proper table was lit. As seen in the video below, this eliminated seating confusion, and provided a bit of extra entertainment for those involved. 

I wanted to make something special for my wedding tables chart, and I thought this was a good way of making it personal, as it reflects my love (addiction) for electronic projects.

So the plan was to make a big wood panel with the plan of the room on it, including, of course, the tables and their names (they are plant names, in French). The guests received a card with an RFID sticker on it along with their invitation. On the back of the card was written (in French) something like “This card is of great importance, keep it safe and carry it on you at the wedding.” I didn’t want them to know what it was for until the wedding.

The chart has several elements  a TFT display, an RFID reader, a green LED and a red LED, a push button and one strip of 3 LEDs for each table. When the RFID tags are scanned, the green LED turns on if it is recognized, and a personalized message is displayed on the screen, including the name of the table where the guest is seated. In addition, the LED strip associated with the table is turned on, shedding light on the table on the room’s plan. If the card is misread or unrecognized, the red LED is turned on with an “access denied” message on the screen. The button is for those who did not succeed in not losing or forgetting the card. It displays a message on the screen, asking them to go to the bar and say something like “I am not reliable,” in exchange of which they get a backup chart to find their seat.

I changed a few things along the way: I wanted to paint the wood panel but changed my mind because I was scared I’d make a mess and have to start over with a new panel. Since I have a circuit machine I decided to make the writings and drawings with vinyl.

I also had a 20×04 character LCD screen in the beginning, but I upgraded to a 7″ TFT screen because it’s bigger and not as limiting in terms of message length.

This robot is eggsactly what you need to cook breakfast

Normally, boiling an egg involves heating water in a saucepan, then dropping an egg inside to be properly heated. James Bruton, however, now has a bit of help in the form of his breakfast-making robot. 

The device uses two servos, along with a motor/encoder/screw assembly to rotate and lower the egg into place. It then takes it out after six minutes, and tips it out into a secondary container.

As of now, temperature is manually controlled, but it’s tracked with a DS18B20 temperature sensor to initiate the egg lowering procedure. An Arduino Uno takes care of the lifting screw assembly, while an Arduino Mega handles everything else.

Hunt the Wumpus comes to Arduino!

Hunt the Wumpus is a text-based survival/horror game developed in 1973. As such, it’s perhaps due for an update, and Benjamin C. Faure was able to do so using an Arduino Mega to run a graphical version on an 8×8 MAX7219 LED display.

The game consists of moving your character through the 64-LED randomly generated world, avoiding pits and bats, attempting to face the Wumpus to fire your one arrow. Navigation is aided by “wind” and “stench” lights, indicating either a pit or the foul Wumpus is nearby. The game is also enhanced with a few LED animations and a small piezo speaker. 

On startup, the game will generate an 8×8 map for the player that contains bats, pits, and a Wumpus. The player must pay attention to their senses to ensure they don’t fall into a pit or run into a Wumpus. Running into a bat might not be instant death, but they can carry you over a pit or even straight to the Wumpus.

If the player wishes to win, they must pinpoint the location of the Wumpus. Then, they must take one step towards the Wumpus (so that they are facing the proper direction) and fire their only arrow. If they hit the Wumpus, they win! If they miscalculated, however, they will meet a grisly fate.

A demo can be seen below, while code for the project is available on GitHub.

High school play gets a simulated sports scoreboard

Maker “DJ’s Fantasi” is the technical director at his local high school’s theater arts program, and when the director of their winter production of Disney’s High School Musical requested a scoreboard prop, he excitedly set to work. 

The resulting build consists of four 7-segment displays, lit up by strips of non-programmable LEDs. 

Numbers on the device are shown with the help of an Arduino Mega, which takes input via a single-channel remote. Seven I/O pins are used to indicate each segment to be displayed, and another four multiplex the signal into the required four digits.

While a more general input device could be used, this particular scoreboard was especially set up for this musical, sequencing through numbers that correspond to the performance on command.

More details on this impressive project can be found here.

Arduino and Pi Share Boardspace

A Raspberry Pi Zero (W) and Arduino are very different animals, the prior has processing power and connectivity while the latter has some analog to digital converters (ADCs) and nearly real-time reactions. You can connect them to one another with a USB cable and for many projects that will happily wed the two. Beyond that, we can interface this odd couple entirely through serial, SPI, I2C, and logic-level signaling. How? Through a device by [cburgess] that is being called an Arduino shield that supports a Pi0 (W). Maybe it is a cape which interfaces with Arduino. The distinction may be moot since each board has a familiar footprint and both of them are found here.

Depending on how they are set up and programmed, one can take control over the other, or they could happily do their own thing and just exchange a little information. This board is like a marriage counselor between a Raspberry Pi and an Arduino. It provides the level-shifting so they don’t blow each other up and libraries so they can speak nicely to one another. If you want to dig a bit deeper into this one, design files and code examples are on available.

Perhaps we’ll report on this board at the heart of a pinball machine retrofit, a vintage vending machine restoration, or maybe a working prop replica from the retro bar in Back to the Future II.

OpenLH robot automates biological exploration

If you’d like an easy way to accomplish repetitive biological experiments, the OpenLH presents a great option for automating these tasks. 

The heart of the system is the Arduino Mega-controlled uArm Swift Pro robot, which is equipped with a custom end effector and syringe pump. This enables it to dispense liquids with an average error of just .15 microliters.

A Python/Blockly interface allows the OpenLH to be set up for creative exploration, and because of the arm’s versatility, it could later be modified for 3D printing, laser cutting, or any number of other robotic duties. 

Liquid handling robots are robots that can move liquids with high accuracy allowing to conduct high throughput experiments such as large scale screenings, bioprinting and execution of different protocols in molecular microbiology without a human hand, most liquid handling platforms are limited to standard protocols.

The OpenLH is based on an open source robotic arm (uArm Swift Pro) and allows creative exploration. With the decrease in cost of accurate robotic arms we wanted to create a liquid handling robot that will be easy to assemble, made by available components, will be as accurate as gold standard and will cost less than $1,000. In addition the OpenLH is extendable, meaning more features can be added such as a camera for image analysis and real time decision making or setting the arm on a linear actuator for a wider range. In order to control the arm we made a simple Blockly interface and a picture to print interface block for bioprinting images.

We wanted to build a tool that would be used by students, bioartists, biohackers and community biology labs around the world.

The OpenLH can be seen in the video below, bioprinting with pigment-expressing E. coli bacteria.

Arduino Mega is the brains of this ant-like hexapod

Six-legged robots are nothing new, but if you’d like inspiration for your own, it would be hard to beat this 22 servo-driven, 3D-printed hexapod from Dejan at How To Mechatronics. 

The ant-inspired device features three metal geared servos per leg, as well as a pair to move the heat, another for the tail, and a micro servo to activate the mandibles.

To control this large number of servos, Dejan turned to the Arduino Mega, along with a custom Android app and Bluetooth link for the user interface. While most movements are activated by the user, it does have a single ultrasonic sensor buried in its head as “eyes.” This allows it to lean backwards when approached by an unknown object or hand, then strike with its mandibles if the aggressor continues its advance. 

As the name suggests, the hexapod has six legs but in addition to that, it also has a tail or abdomen, a head, antennas, mandibles and even functional eyes. All of this, makes the hexapod look like an ant, so therefore we can also call it an Arduino Ant Robot.

For controlling the robot I made a custom-built Android application. The app has four buttons through which we can command the robot to move forward or backwards, as well as turn left or right. Along with these main functions, the robot can also move its head and tail, as well as it can bite, grab and drop things and even attack.

You can see it in action and being assembled in the video below, and build files are available here.

Teenager automates his family’s holiday lights with an Arduino Mega

As first reported by the Des Moines Register, this year 14-year-old Josiah Davenport decided to animate 3,500 Christmas lights on his family’s home with the help of an Arduino Mega. The lighting pattern is synchronized with the Trans-Siberian Orchestra’s “Wizards in Winter,” which passersby can listen to by tuning in to 89.5 FM on their car radios. 

This ambitious installation was started back in July, and took around 100 hours of research, programming, and assembly. How the lights look at night can be seen in the first video below, while the second and third outline how everything was assembled.

Davenport notes that it’s been a fun endeavor, but is happy to see it come together, hoping that it brings a smile to people’s faces this holiday season! You can read more about the project in his local newspaper’s article here.

Bit clicks away to illustrate complex interrelationships

Aseen here, Bit by Jonghong Park at the University of the Arts Bremen is a beautiful visualization of how everything is linked together using the Markov chain principle. This installation uses an Arduino Mega for control, rotating arms that hold a pair of microswitches around coaxial gear-shaped cylinders.

In the sequence, one arm turns, then lobes on these “gears” that represent a two-bit number push the microswiches. This number is used to choose the following stepper to be turned in the sequence. The next selected arm then rotates in the same manner. This predictable cycle continues on and on clicking in a way that’s related, but not without careful observation.

The installation ‘bit’ represents a natural random process based on the principle of a Markov chain. Each machine consists of “information” engraved on the read head and an “event” caused by the operation of the motor. Machines are linked together based on a Markov chain algorithm to influence events, and eventually we can predict which of the four machines will move in the next turn. The movements of these four machines are shown as a random process, but in fact they are sequence of events. Like an invisible chain, all things and events in our world are connected.

Each of the four machines has its own state, which have been named ( 0,0 / 0,1 / 1,0 / 1,1 ), respectively. Each machine is equipped with a wooden read head with binary information on the surface and a microswitch to read the current state of the read head. The microswitch is connected to the stepper motors located in the center of the machine. A machine whose state is called moves the stepper motors by 1/240 of a degree. The microswitch turns on / off (1/0) along the surface of the read head each time the motor moves and calls the next machine corresponding to the state (2-Bit) of the current position of the read head. At this time, the machine corresponding to the measured state goes through the same process and calls another machine or itself.

These four machines symbolize another system separate from ours. We observe machines separate from the world as if we were watching computer simulations. The binary digits recorded in the read head are the smallest units of unspecified information possible, called bits. The bit, as the smallest particle that can make up the world and not simply as a digital recording unit, symbolizes the basis of this world. The things that we call noise, the information that we think of as meaningless, the information from which we cannot find the pattern, and the information that we cannot decode are called “chance”. When this information can be observed from outside our own world, we have proven through the Markov chain that all events are linked together.

The interplay concept is certainly interesting, and it’s pleasing to watch in the video below from a purely aesthetics point of view as well.

Arduino Mega controls this amazing water organ

Earlier this year, artist Niklas Roy was invited to participate in the Drehmoment art festival that takes place in the south-west of Germany. The “catch” to this festival is that each artist was invited to team up with a local company to take advantage of their products and resources. Of these was cleaning equipment brand Kärcher, known for their pressure washers.

With this company’s backing, Roy put together a musical water fountain powered by eight pressure washers, dubbing it the “Wasserorgel von Winnenden,” or “Water Organ of Winnenden”—the location of Kärcher’s headquarters. 

The installation is controlled by an Arduino Mega, along with supporting electronics including a Music Maker Shield and solid state relays to activate the pressure washers. During the festival, passerby were invited play some tunes using a 3D-printed keyboard made to withstand the elements and less-than-gentle interactions.

The brain of the Wasserorgel was an Arduino MEGA 2560, stacked with an Adafruit Music Maker Shield. The MIDI synthesizer of the shield generated the instrument sounds based on the input coming from a self-built, 3D-printed keyboard. The keyboard was designed solid enough to withstand weather and the misguided enthusiasm of drunk people at 3 ‘o clock at night. The program on the Arduino translated the keystrokes into water and light effects by switching 12V RGB LEDs via darlington transistors and the eight pressure sprayers via solid state relays. Five of the pressure sprayer fountains were installed on top of the main basin, one was installed on top of an existing fountain and two were installed on the roof of the Kronenplatz-building.

You can find more information in Roy’s project write-up, and see it in action below!