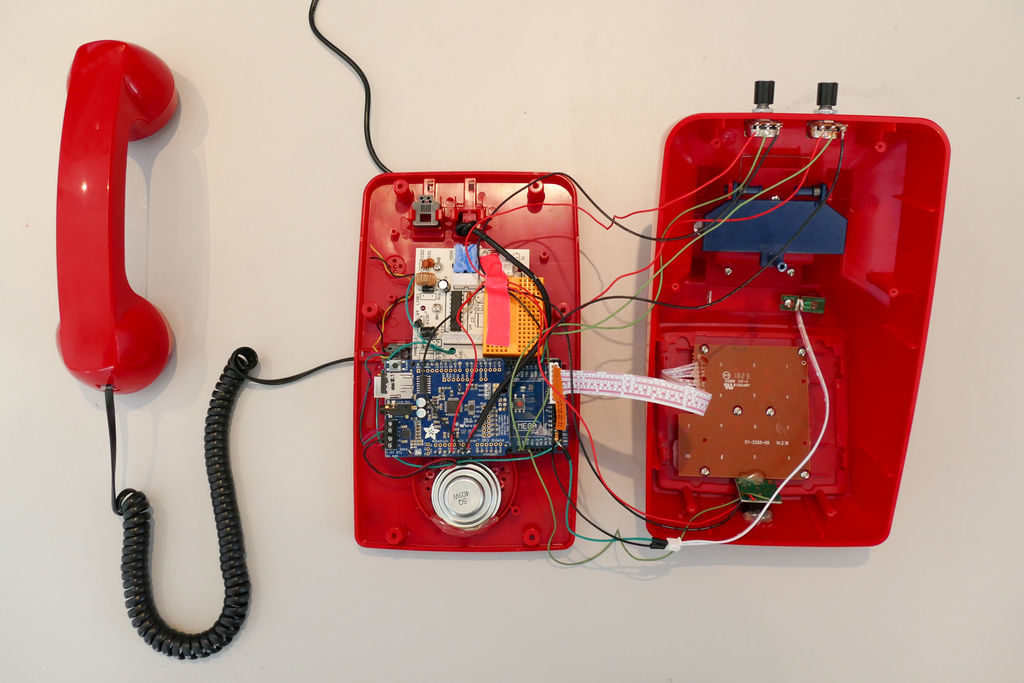
If you’ve ever thought that your life needs a little more hold music in it, then this Greatest Holdies phone from FuzzyWobble could be just the thing.
The heavily modified device uses the shell of an old-style desk phone, but adds an Arduino Mega, a Music Maker Shield, and an ultrasonic rangefinder for “enhanced” abilities.
Now, when someone comes near the phone, it rings automatically, treating the person curious enough to pick it up to a selection of hold music. Users can choose the tune playing via the phone’s keypad, which is wired into the Arduino, along with the original headset switch that detects when the phone has been picked up.
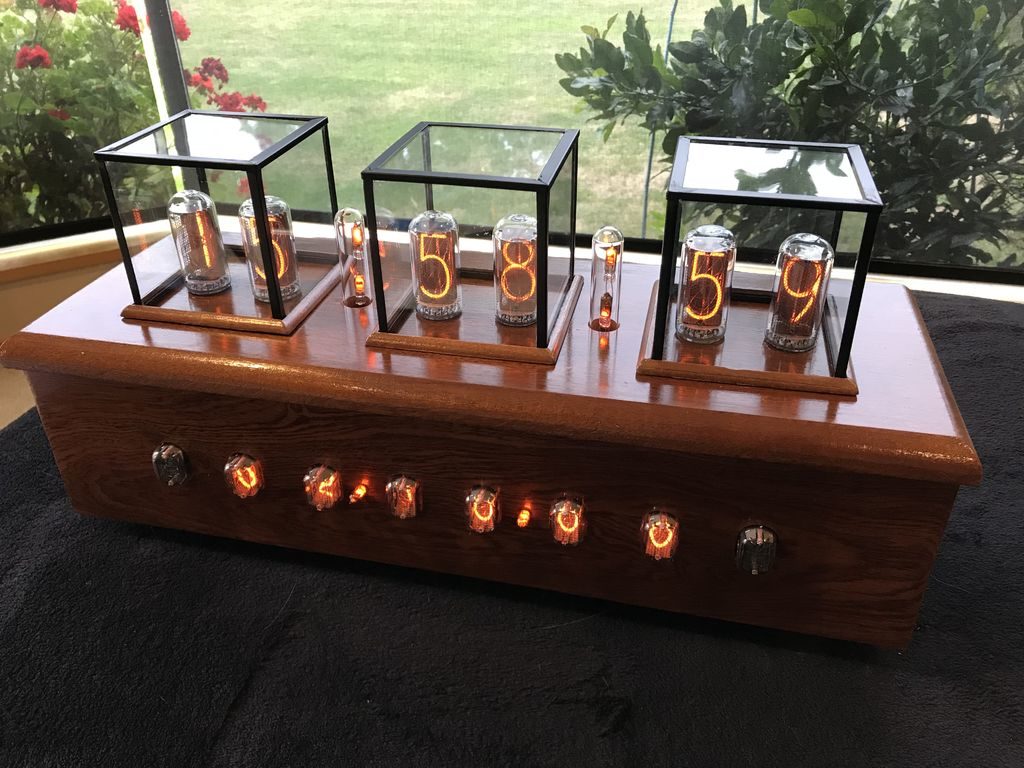
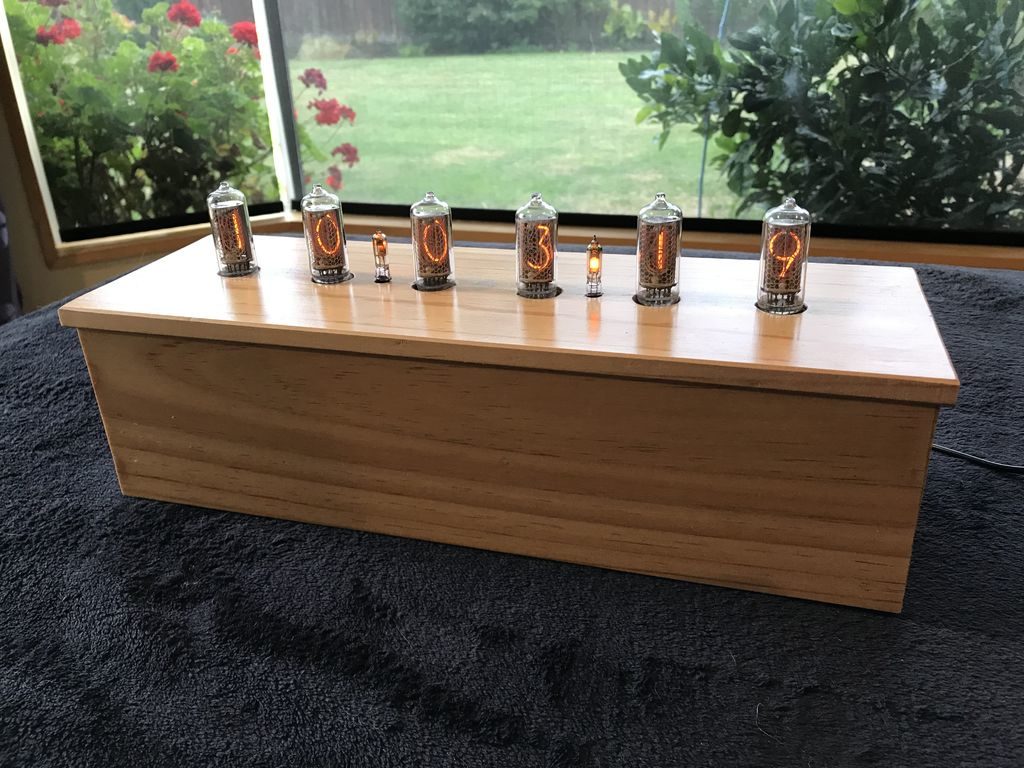
Nixie tubes require electricity in the range of 180VDC, making them challenging to work with. Maker Christine Thompson, however, decided to take Nixie art to a new level, creating a clock with three different types of tubes!
This clock, or perhaps more accurately “info display,” shows the time and date with six IN-18 tubes mounted on the top. In the front, six IN-12A and two IN-15A tubes are also available to show time, date, pressure, temperature, and humidity.
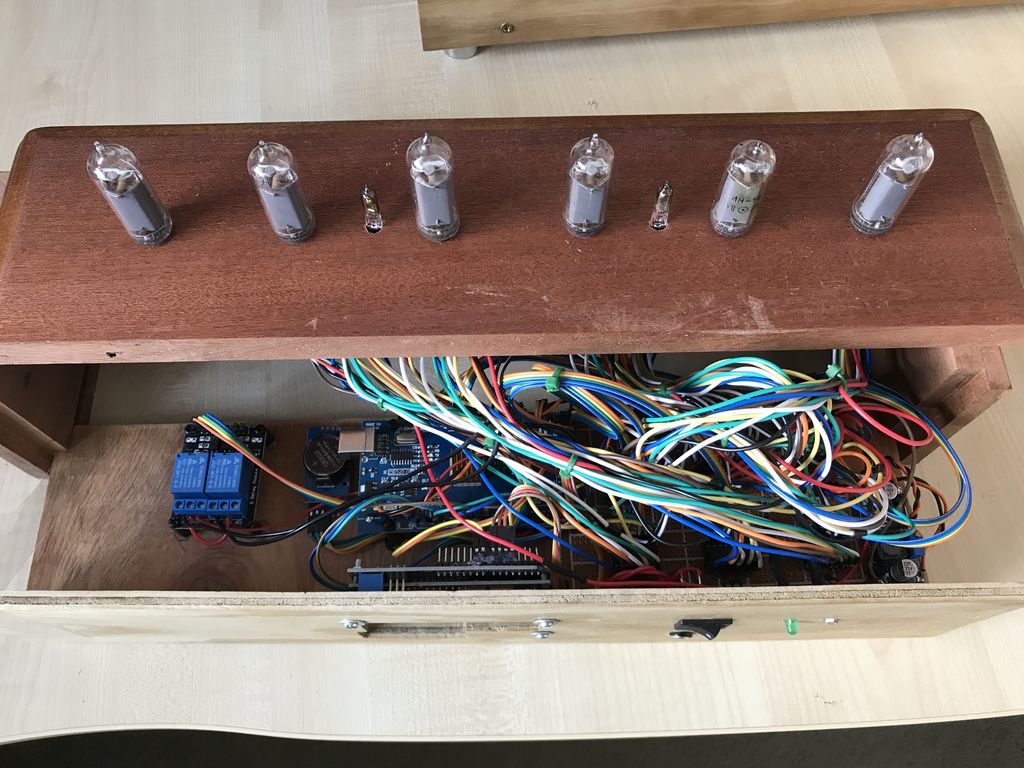
A pair of Arduino Mega boards are used to control this retro-inspired contraption, along with an array of wiring, perf board, and other components, stuffed inside a very nice wooden enclosure.
This is my first Nixie styled clock I have constructed. The clock actually consists of two clocks, the first being a 6 x IN-18 tube clock which is mounted on the clock’s top and displays both time and date. The second clock, this time based on 6 x IN-12A and 2 x IN-15A nixie tubes displays at the front of the clock and can display, time, date, pressure (with units and trend), temperature (both Centigrade and Fahrenheit) and, humidity (with units and trend). The time and date are separated with two single neon lamp-based separators, while only one of these lamps is displayed, to represent a decimal point, when the pressure, humidity or temperature is displayed. Both these clocks use “Direct/Static Drive” to power the displays and are based on two Arduino Mega 2560 boards. The fourteen tubes are driven by 12V to 170V DC to DC boost power supplies and 14 x K155 IC chips. The clock also powers two sets of Neon Lamps which switch off while the clock goes through its cathode cleaning cycle which happens at 19, 39 and 55 minutes past each hour. This cathode cleaning cycle consists of all six tubes displaying the digits 0 through 9 in sequence 6 times.
In addition the clock will sound a chime at 15, 30, 45 and 60 minutes. At the 60 minute chime the hour chime is also sounded. The chimes are standard MP3 files using a simple MP3 player controlled by the Arduino mega. In order to save on tube life all tubes are switched off automatically when the light level in the room dims to a predefined level, this is achieved using a LRD resistor located at the back of the clock. To help dissipate any heat build up both Arduino Mega ICs have copper heat fins attached and a 5V fan draws air out of the clock, cool air entering through a hole in the bottom plate.
The user can adjust the time, date, chimes, and chimes volume using one of two 16×2 LCD displays, located at the back of the clock. The BME280 temperature, humidity, and pressure sensor is mounted on the back of the clock so as to not be affected by the clock’s internal temperature.
A demo is seen in the video below, while more info and Arduino code can be found in the project’s write-up.
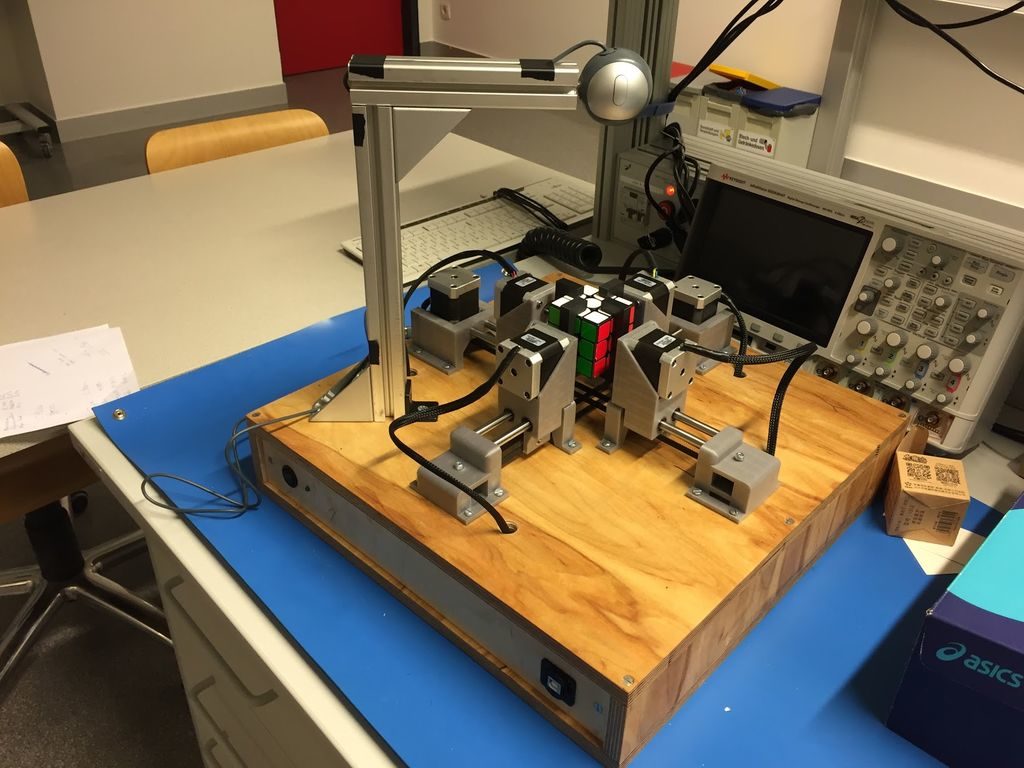
Rubik’s Cubes seem to have been most popular in the 1980s, but never really went away. As such, if you have one lying around your house unsolved, why not ‘simply’ construct a machine to do this for you?
One possibility is the Q-Bot, outlined here. While it won’t break any world records, it’s a solid-looking assembly that appears to be relatively easy to build.
The Q-Bot features six NEMA 17 stepper motors, four of which turn one face at a time. When needed, the other two use timing belts to alternatively pull opposed stepper motor pairs back, allowing the other two to rotate the entire assembly. An Arduino Mega is utilized to control the steppers via a custom shield, with a computer running the Kociemba’s Algorithm.
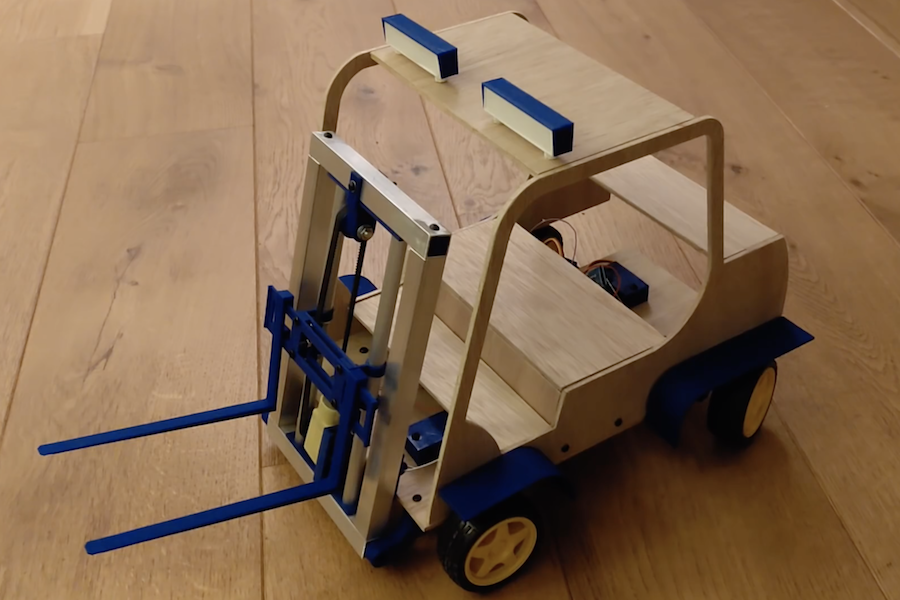
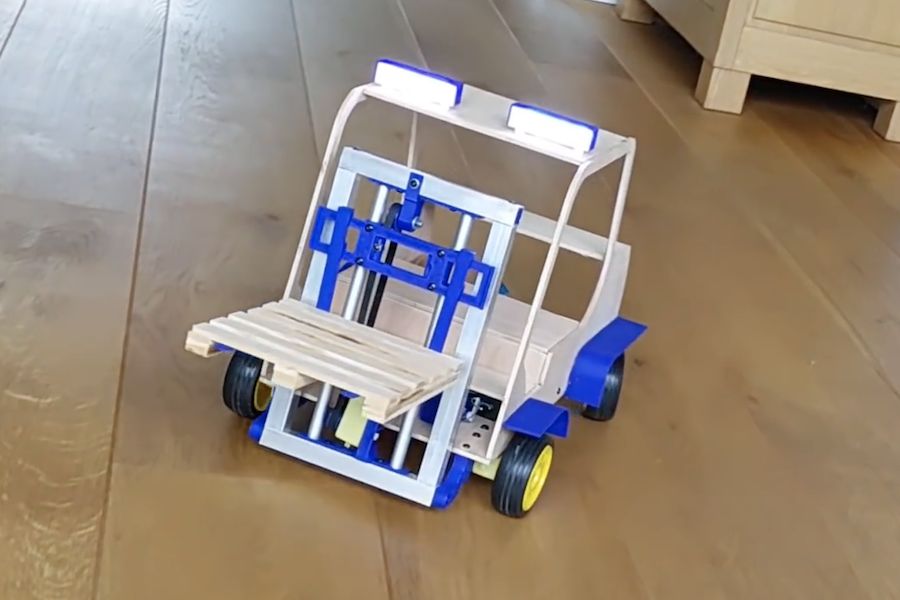
Remote control cars are interesting, but as Leon van den Beukel shows in the video below, an RC forklift can be even more challenging and fun to create.
His project was constructed using a variety of hand and automated techniques, resulting in a build that can easily manipulate tiny pallets. Forks are lifted into the air via a motor and belt assembly, and tilted with a small servo.
The device uses an Arduino Mega for control, and is linked to an Android phone over Bluetooth for user interface. Code, along with STL files and drawings, are available on GitHub and the custom Android control app can be found here.
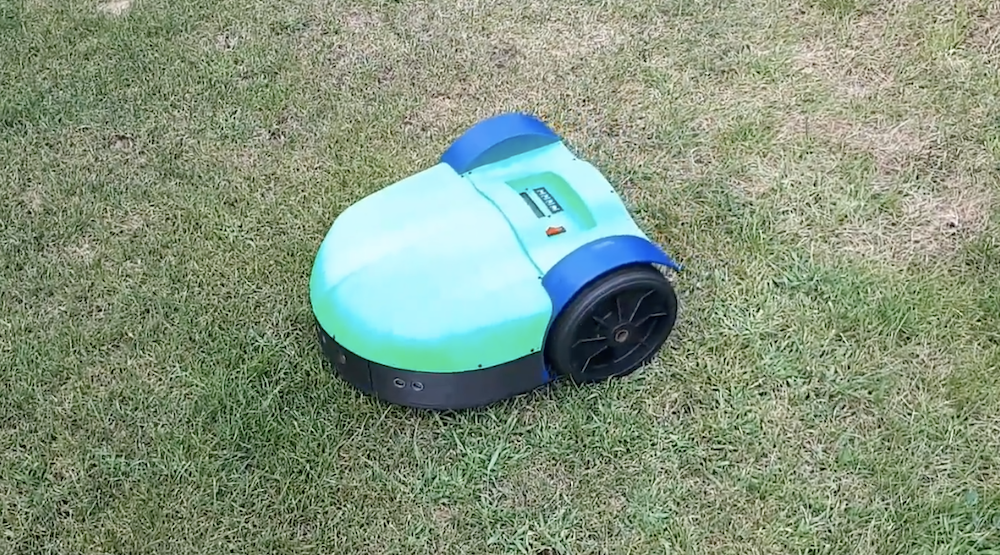
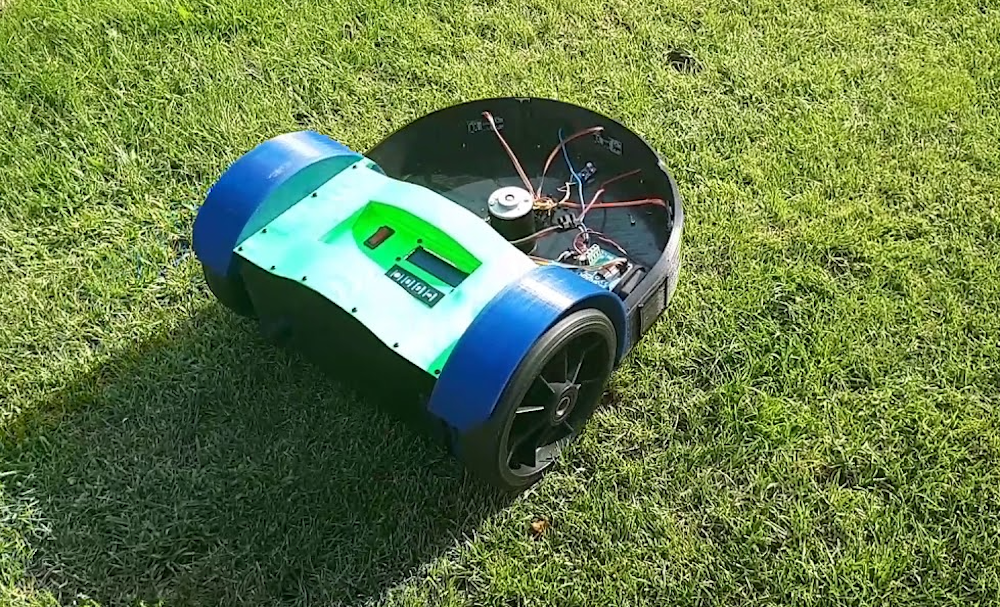
Do you enjoy mowing your lawn? No? Well now you can ‘simply’ print a robot to do it for you, based on German mechanical engineer Philip Read’s design. His Roomba-esque device uses a pair of gearmotors for movement, an array of three ultrasonic sensors for obstacle avoidance, and a perimeter wire/sensor to keep it within the designated boundary.
An Arduino Mega is employed as the main processing unit for the robotic mower, however a separate Nano onboard helps measure battery voltage as well as current when charging. Meanwhile, an Arduino Uno along with a motor driver are used to control the perimeter wire setup.
Extensive build info is available on the project’s write-up, and a short demo can be seen in the video below.
Fully autonomous robot lawn mower. The mower project includes the mower itself a boundary wire control station and an optional charging station. The mower navigates within the boundary wire which is positioned (pinned) around the perimeter of the garden. Once the mower senses the perimeter wire, it stops reverses and moves off in a new direction. The mower also has 3 sonar sensors to detect objects in the mowers path. Once the mowers battery is exhausted, the mower uses the boundary wire to navigate itself back to the charging station. All this can be customised in the Arduino software or completely re-written to your personal preferences.
Commercial mowers with this specification cost upwards of 600€ ($680).
Obviously, you’ll want to use such a device in an area devoid of kids or pets
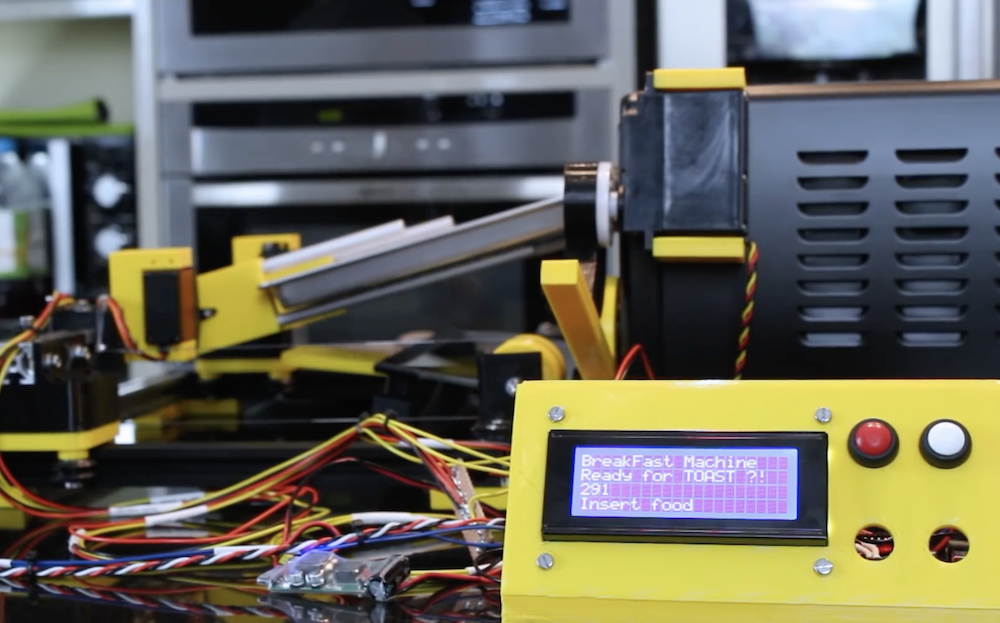
As seen in our earlier post, James Bruton has been working on a breakfast-making robot, and has now moved from boiling eggs to making toast… or apparently hot dogs/sausages as shown in the video’s demo.
What he’s come up with uses a one degree-of-freedom gantry assembly to move servo-powered forks into position. These can then manipulate a cooking tray as needed to heat food up, flipping it out into a hand-held container when done. Two other servos take care of turning the device on and opening the door.
The control setup looks extremely similar to the previous build, with control via buttons, an Arduino Mega, and a small LCD display. Bruton notes that the Mega is used here because of its multiple serial ports, which will be useful to link everything together in the future.
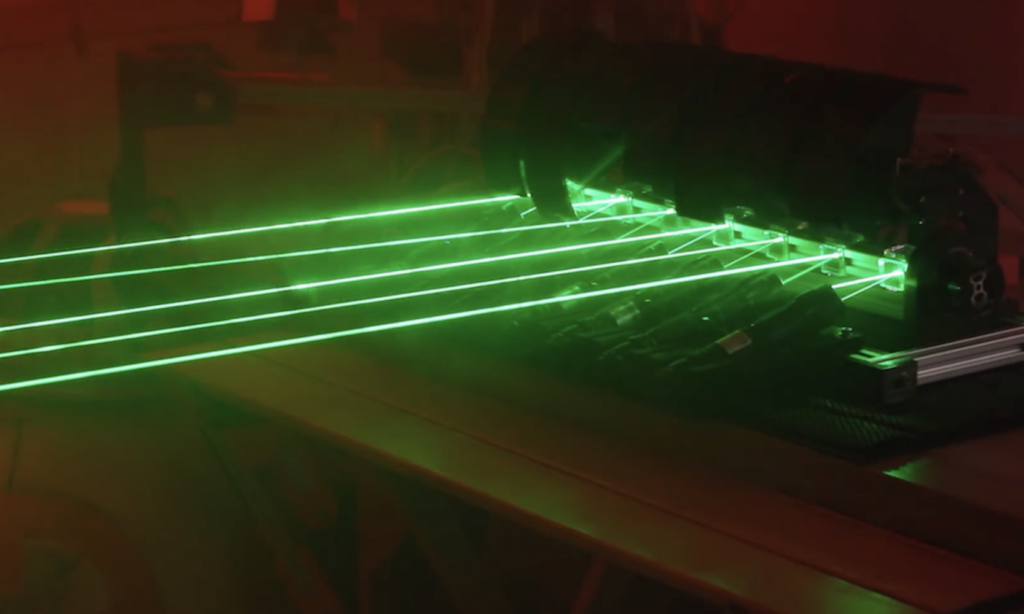
If you’d like to visualize your music, VU meters make an excellent tool. While they are generally built into audio equipment, maker James Bruton had the idea to construct his own using lasers. His setup features an MSGEQ7 module to separate sound frequencies, sending data on seven different ranges to an ArduinoMega board.
The Arduino then uses this information to selectively lower seven shutters via servos. When lowered, these shutters hide part of the lines formed by lasers and a spinning mirror assembly to indicate each sound frequency’s intensity.
The resulting machine not only effectively projects a visual of the music playing on a nearby wall, but also looks like some sort of mythical beast or contraption, progressively waving its appendages while emitting eerie green light!
Although this kind of project can be fun, be sure to wear the proper safety equipment when dealing with powerful lasers!
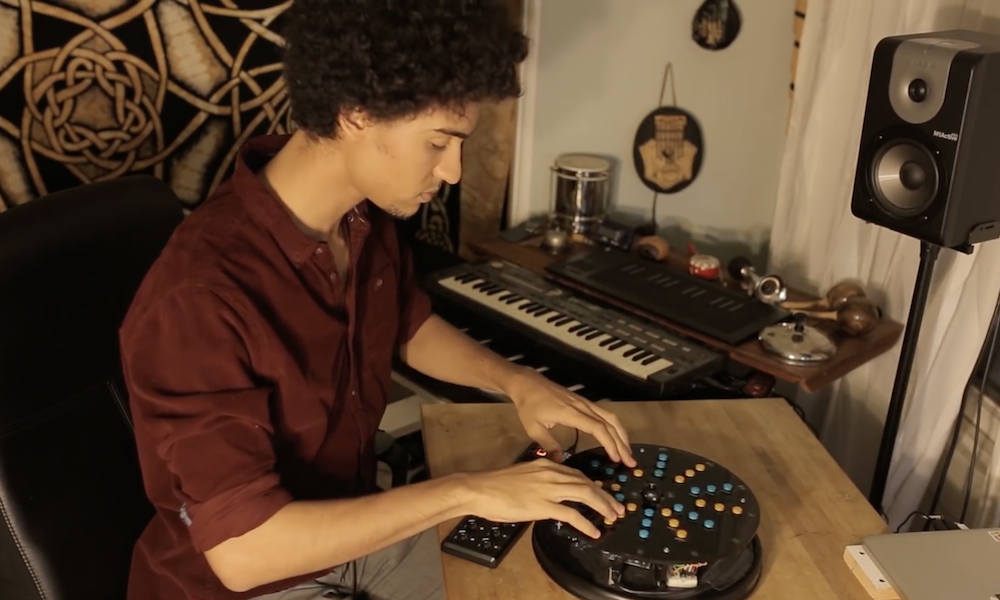
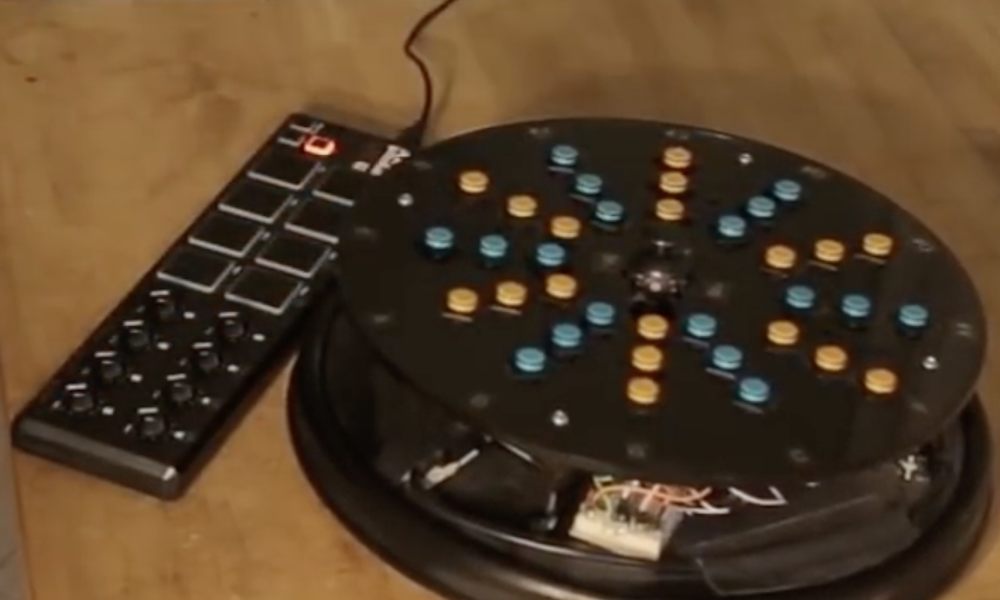
According to musician/maker Ruben Dax, “Few things make him happier than being able to create things that create things.” As seen in the video below, what he’s created is a very strange cylindrical instrument with an array of buttons and what appears to be an auxiliary loop controller.
What he creates with it is music that starts off as simple “plink-plonk” sounds, but builds up into something of an orchestral arrangement.
The DIY device utilizes an Arduino Mega for control, with a bunch of pushbuttons and a dual-axis joystick for inputs. Button info is then sent to his computer over Bluetooth, which takes care of actual MIDI generation.
As cool as this is, a new gadget is in the works, which uses a Leonardo and other hardware for plug-and-play functionality. Whether this will interfere with the instrument’s unique rotating action remains to be seen!
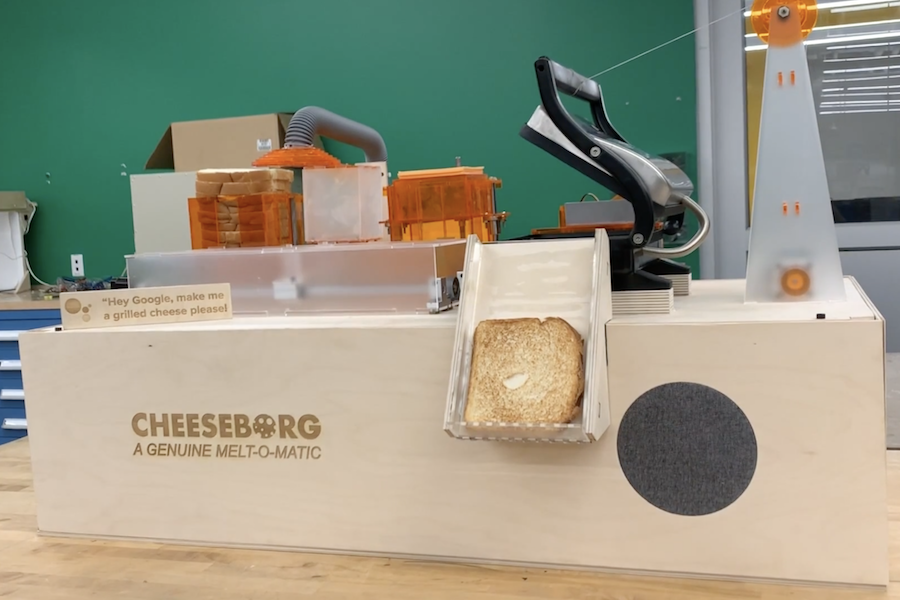
Do you like grilled cheese? Would you rather not make it yourself? If so, then the Cheeseborg by Taylor Tabb, Mitchell Riek, and Evan Hill could be the perfect device for you!
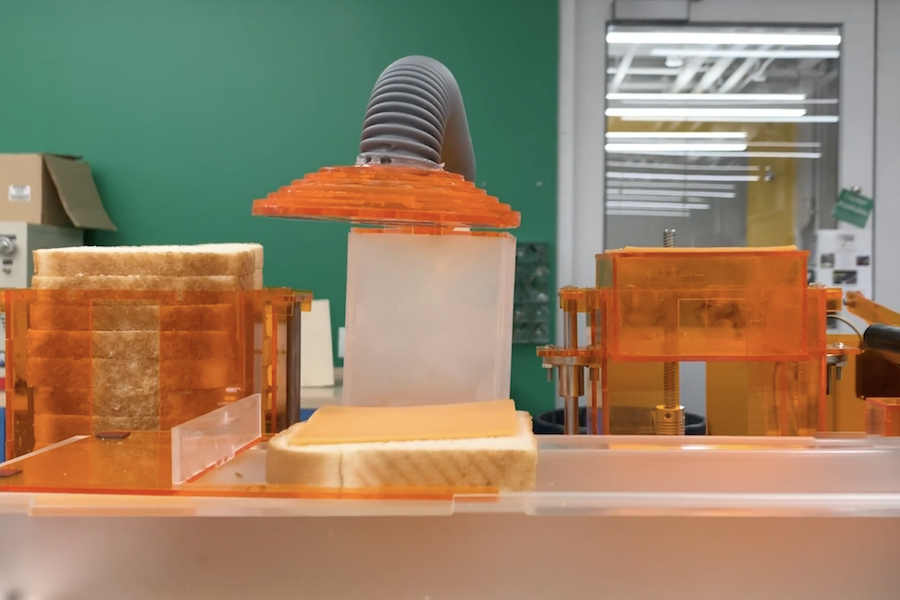
This assembly line-like robot first stacks bread-cheese-bread using a vacuum gripper, and passes the unheated sandwich onto the grill via a pusher mechanism. Butter spray is first added to the bottom of the grill, then the top of the sandwich when present in order to coat both sides. Upon heating, the finished sandwich is pushed into a “food slot” for consumption.
Electronics are controlled using an Arduino Mega, while Google assistant running on a Raspberry Pi allows for voice activation. So the next time you’re hungry, all you have to do is ask, “Hey Google, make me a grilled cheese please!”
Our goal was to make an easy snack even easier. The design combines 7 individual subsystems enabling the assembly, cooking, and serving of a perfect, repeatable, tasty grilled cheese.
A big learning was how challenging it is to manipulate bread and cheese repeatedly. After several iterations, we converged on a vacuum lift mechanism, inspired by industrial robotic manipulation of small electronics. Due to the porosity of bread and the gloss of cheese, it was very challenging to find a mechanism working for both, but vacuum certainly seemed to do the trick!
For the actuation of of the electromechanical subsystems, we use stepper motors and servos combined with linkages, lead screws, linear bearings, a winch, and other mechanical components. For buttering (not pictures) we have a delightful spray butter can attached to an acrylic stand beside the grill.
Beyond the mechanisms, which are controlled by an Arduino Mega, the system is enabled with Google Assistant SDK running on an Raspberry Pi 3B, so the whole thing can be activated just by saying “Hey Google, make me a grilled cheese please!” From there, the machine stacks the bread, cheese, bread, then slides over the platform toward the grill as the buttering station sprays the bottom of the grill. Once the sandwich is placed on the grill, the butter sprays again (to coat the top of the sandwich). Then the grill closes, and cooks for the precise amount of the time for the perfect gooey grilled cheese! Then the grill opens and the sandwich is kicked to the serving slot for a hungry friend to enjoy.
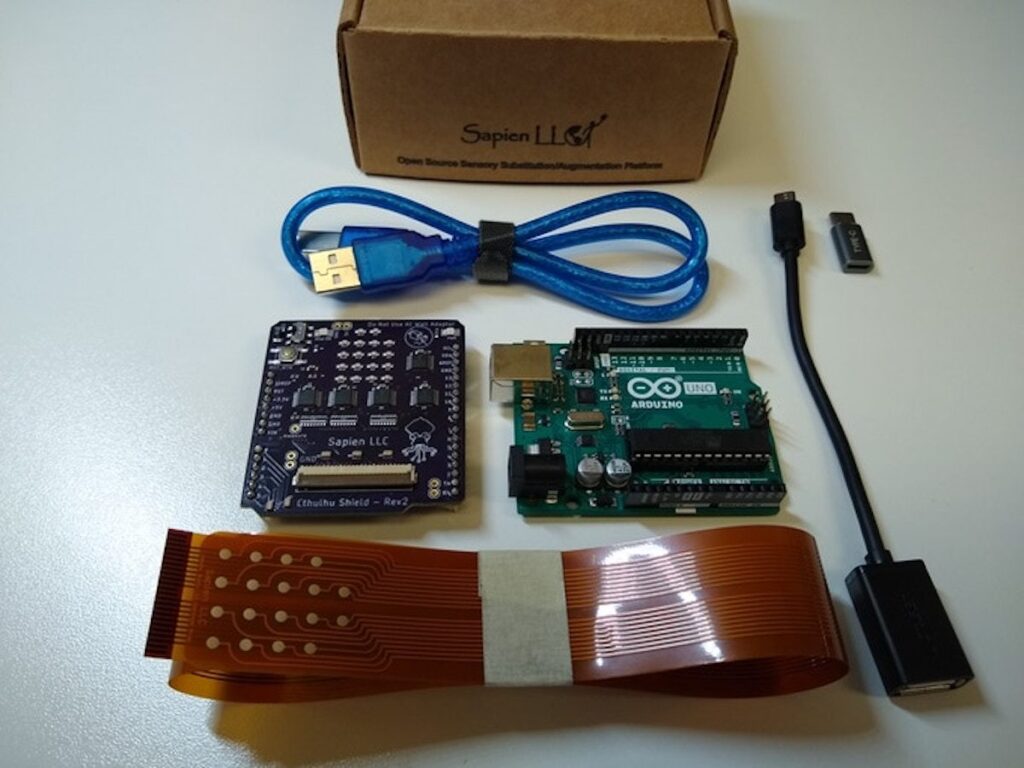
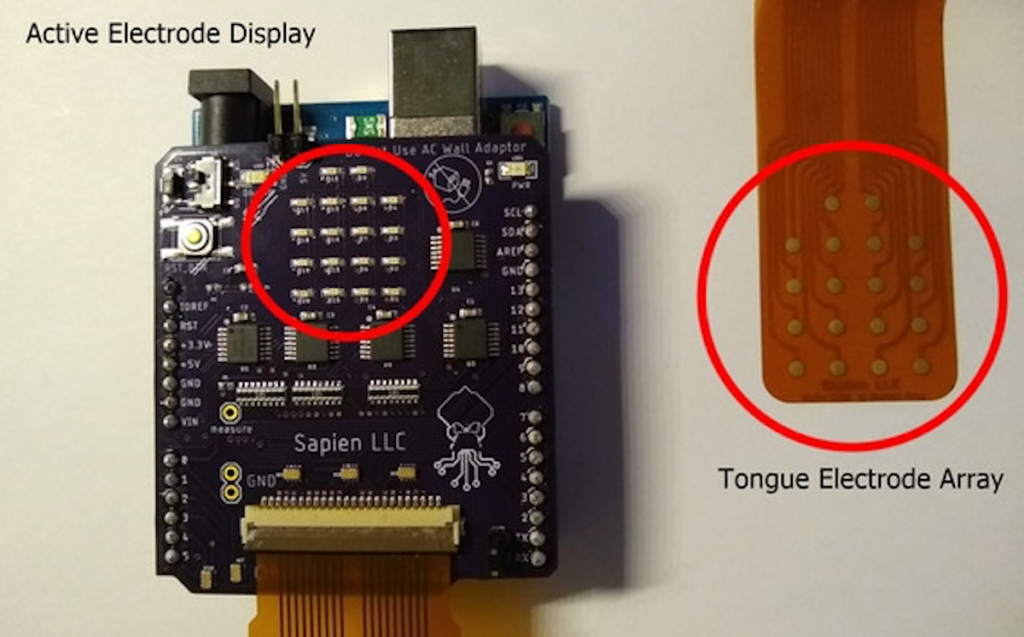
Whether one of your senses is weak or non-existent, or you would simply like a way to augment your perception and control options, the Cthulhu Shield can be applied in either situation.
The device takes the form of an Arduino Uno or Mega shield, with a strange flexible electrode setup that is placed directly on the user’s tongue.
When these electrodes are fired, they activate nerve fibers on the tongue, producing a feeling like that of carbonated bubbles popping. This can then be used to convey information to the user, whether this is visual, sound, or even Internet updates or other non-traditional stimuli. Importantly, it can also be utilized as an interface for tongue computer control.
The Cthulhu Shield lets anyone experiment and make devices that can expand your sensory experience!
We’ve made android apps and example programs that will let you use the Cthulhu Shield and your smartphone to ‘see’ and ‘hear’ with your tongue without needing to write a single line of code!
For those of you interested in making your own projects, we’ve written an easy to use Arduino library and provided example code to get you started on projects including tongue-heat-vision, tongue-based GPS directions, and soon, tongue-ultrasonic hearing. But don’t limit yourselves to the examples we’ve provided, the only limit to what you can make is your imagination!
Finally, we designed the Cthulhu to be used as a tongue based computer interface (because if you already have something in your mouth, why not use it to control your computer)? Write your own code to hotkey video game actions, send text messages, or control a wheelchair or mobility device with your tongue.
If you’d like to get your hands on one, the Cthulhu Shield is now being funded on Kickstarter, while code and board schematic are available on GitHub.