What’s the fastest keyboard? Few subjects are as divisive in the geek community. Clicky or squishy? QWERTY or Dvorak? Old-school IBM or Microsoft Natural? The answer: none of the above.
 The fastest normal-keyboard typists (Dvorak or Qwerty) can get around 220 words per minute (wpm) in bursts. That sounds fast, and it’s a lot faster than we type, but that’s still below the minimum speed allowable for certified court reporters or closed captioners. The fastest court reporters clock in around 350 to 375 wpm for testimony. But they do this by cheating — using a stenotype machine. We’ll talk more about stenography in a minute, but first a hack.
The Hack
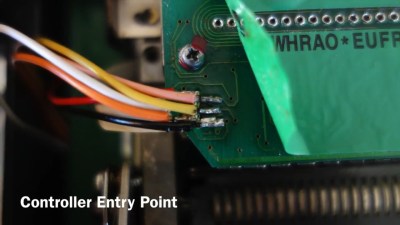
[Kevin Nygaard] bought a used Stentura 200 stenotype machine off Ebay and it wasn’t working right, so naturally he opened it up to see if he could fix it. A normal stenotype operates stand-alone and prints out on paper tape, but many can also be connected to an external computer. [Kevin]’s machine had a serial output board installed, but it wasn’t outputting serial, so naturally he opened it up to see if he could fix it. In the end, he bypassed the serial output by soldering on an Arduino and writing a few lines of code.
 The serial interface board in [Kevin]’s machine was basically a set of switches that made contact with the keys as they get pressed, and a few shift registers to read the state of these switches out over a serial connection. [Kevin] tapped into this line, read the switch state out into his Arduino, and then transmitted the correct characters to his computer via the Arduino’s serial over USB. (Video demo) As hardware types like to say, the rest is a simple matter of software.
Stenography 101
We’re big keyboard lovers. Maybe one third of Hackaday’s content is typed out on one or another vintage IBM Model M. No self-respecting geek who types for a living doesn’t have a near-religious keyboard preference. [Kevin]’s simple hack brought to our attention that we’ve never covered stenography. (Not steganography.) Frankly, we’re ashamed, and we’re fixing that right now.
 The secret to the speed of steno is the use of a chorded, anatomically designed keyboard with an accompanying phonetic mnemonic shorthand system. Basically, one mashes down keys that correspond to sound of the word, and they’re interpreted according to a mnemonic system with a user-extensible dictionary. In short, it’s machine-assisted typing.
Many words are a single chord, and there are millions of possible chords, so there’s plenty of open space to add one’s own key combinations as the need arises.
But because stenography is a niche market, and because steno machines are designed to be used professionally by closed-captioners and court reporters, stenotype machines cost thousands of dollars. The software that runs them isn’t cheap either and is written for a very specific purpose, and is of course proprietary. In short, the market caters only to professionals, and there’s not much room for the steno enthusiast, until recently.
Plover: Open Software
 Plover is free and open-source stenography software (Github), and is aiming to be the steno gateway drug. Specifically, Plover can turn a normal keyboard (with n-key rollover to support chording) into an emulated steno keyboard through software, allowing entry into the world of stenography for a hundred bucks instead of a few thousand.
Plover will also work with professional stenotypes that support serial output, like the one that [Kevin] modified that sent us down this rabbit hole in the first place. So once you’re hooked on steno, you can use your hard-earned dictionary with improved hardware if you want.
Note that the n-key rollover requirement is binding, and that’s where the $100 comes from. You can easily chord 20 keys on a stenotype machine because each finger has two buttons underneath it, and the chording systems are designed to take extensive use of hitting them two at a time. Some gaming keyboards have sufficient rollover capability, but it’s not a feature that’s demanded by the unwashed masses. In short, n-key rollover is going to cost you a little bit, or you can DIY. (Hint, hint.)
If you’ve played around with alternative keyboards (or just keyboard mappings) before, you’ll know that the Achilles’ Heel is how they handle the command and control characters that your favorite editor or IDE requires you to use. We had this hand-held device that made it nearly impossible to type control-x control-s, so it was goodbye keyboard or goodbye Emacs.
This is not a problem with a steno device, because you can define your own chord mappings. But you don’t have to stop with control characters or even Unicode. Map chords to commonly-used variable names. Map chords to entire flow-control structure skeletons (if-then-else). Think of steno strokes as being typing macros and you’ll get the idea.
The lead behind Plover, [Mirabai Knight], has a ton of info on getting started, including a live browser demo (a must-try!) and a video demonstrating Python (among other things) where you can see how chording works with coding. If you want to see how [Mirabai] transcribes live for clients using Plover and Vim, this video and its side pane are a great peek behind the curtains.
Open Steno Project: The Hardware
The Open Steno Project is an umbrella project on top of Plover to reduce the hardware and theory-learning hurdles. They list three keyboard options.
The Ergodox seems just to be a fancy ergonomic split keyboard, but one that would be particularly suited to stenography.
The Stenosaurus (Silicon-Valley-style empty sign-up page alert) looks sexy. That Stenosaurus is run by [Josh Lifton], the original coder heavyweight behind Plover who recently crowdfunded a batch of lightweight and quiet keyswitches, gives us hope. But hope and $4.35 will buy you a double-pump soy vanilla-whip latte; we like to see work in progress.
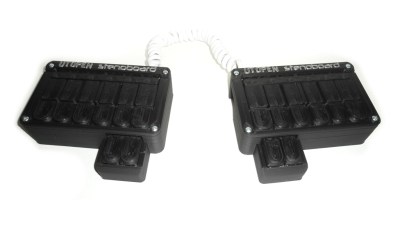
 In contrast, the Stenoboard is an open project with actual designs, a 3D-printed case, code, and project examples. The firmware runs on an Arduino. StenoSpeak, an application based on the Stenoboard just won the second prize at the AT&T Connect Ability Hackathon, demonstrating that there’s other reasons to learn steno besides transcription. If you’re looking for some prior art for your own implementation, or a place to jump in and contribute, Stenoboard is a good bet.
Conclusion
We’re surprised that we found so few DIY projects on the steno front. The hardware is fundamentally simple, with obvious directions for improvements and personalizations. A stenotype is extremely costly to purchase, but cheap to DIY. The software side is well-established and open source. In short, the ball is set up for a quick hardware field goal.
On Hackaday.io and the blog, there are tons of projects for making improved keyboards — many of them are chorded. But so far all of them ignore the stenotype, the current state of the art in high speed typing that’s been around since the late 1800s. We want to see this change, and we think the tide is high and the planets aligned and so on. Fly, winged monkeys, fly!
Filed under:
Arduino Hacks,
Featured,
peripherals hacks 


