Posts with «instructables» label

PIXIE is an Arduino-based NeoPixel watch

Not looking for a smartwatch? PIXIE is an Arduino-based NeoPixel wearable device that not only keeps time, but will also keep your geek cred intact.

You won’t find any numbers on this watch; instead, PIXIE uses LEDs to reveal the time–hours in blue, minutes in red, and seconds in green. Beyond that,  a capacitive touch switch on its strap will activate a flashlight mode.

In terms of electronics, PIXIE is equipped with an Arduino Pro Mini, an Adafruit NeoPixel Ring, a real-time clock module, and a few other components–all housed inside a simple cardboard box with a piece of transparent plexiglass.

Sound like you’d like around your wrist? Check out its Instructables page here.

Capture time-lapses with a steel and aluminum camera slider

Using an Arduino, along with a stepper motor and ball bearings, YouTuber GreatScott! has created a very smooth camera slider.

Time-lapse sequences can be interesting on their own, but if you can add motion to the camera, this adds a really neat element. To give a little extra flair to his video production, GreatScott! built his own motorized slider using stainless steel and aluminum parts. Movement is accomplished via an Arduino Nano controlling a stepper motor, and ball bearings are used to keep the shots smooth. You can see the results and process in the two-part video sequence below.

In this project, I will show you how I repurposed two old camera tripods in order to create a motorized camera slider. The mechanical system consist mostly of aluminium and stainless steel which makes the slider sturdy and pretty decent looking. The electrical system consists of an Arduino Nano with LCD, rotary encoder, limit switches and stepper motor.

Besides the videos seen here, check out GreatScott!’s Instructables writeup as well.

Build your own robotic arm out of cardboard

From our Chairigami Maker Faire booth furniture to Google VR headsets, we’ve seen various use cases for cardboard. Added to that list is a robotic arm, courtesy of Uladz Mikula.

According to the Maker, the design can be replicated in two hours using Arduino and four servo motors. Aside from the electronics, the project also calls for a piece of hardboard for the base and three clips.

The arm, which Mikula calls “CARDBIRD,” can be controlled in one of two ways: either from a PC using a Processing program or remotely via an IR pult/receiver. Ready to build your own? Check over to its Instructables page!

An Arduino charging dock with Edison indicator lights

Bored with normal cell phone charging stations, “Makjosher” decided to make his own with pipe fittings and Edison bulbs.

Makjosher’s charging station resembles a retro-looking light fixture more than a cell phone charger, but it seems to perform both functions quite well. Using an Arduino Uno in conjunction with a current sensor, his charging station senses when a phone is getting “juice” and turns on an Edison bulb to, perhaps, celebrate the occasion. Though it’s shown here being used with an Apple device, there’s no reason a very slightly modified setup couldn’t be used to charge an Android phone, or really any other gadget as needed.

Makjosher gives a pretty good overview of his project in the video below, but if you want more specifics, you can check out his Instructables page here.

A room light controller with its own light display

Hansi (aka “Natural Nerd”) wasn’t content simply controlling his room’s lighting, so he had his control box illuminate along with it!

In order to control lighting intensity, you could hook up a potentiometer directly, but Hansi decided to instead connect four potentiometers to an Arduino Nano to control an external light source. These four inputs are attached to analog pins on the Arduino, which control a strip of RGB LEDs inside of a partially translucent box. When the knobs are turned, the number of LEDs on display increase or decrease, in different colors depending on which it turned. An external light can then be controlled along with the beautiful controller display.

This Instructable will show you how I made a control panel that has three 12 volt power output ports which can be controlled with knobs at the front. I will be connecting the lighting in my basement to the three outputs, so that it can be controlled through the panel.

The panel has a nice and ambient light pulsation when it’s passive, and when you turn the knobs, the internal light indicates how much the knob is turned, with a separate color for each knob.

Intrigued? You can check out the project’s page on Instructables, and find the Arduino code here.

An Arduino flying start lap timer

Richard Garsthagen recently became the proud owner of a Razor Crazy Cart. Seeing as though he only had one, racing against others was a bit out of the question for now. Being the Maker that he is, he came up with a solution instead: an Arduino Uno-based lap timer.

The lap timer uses an infrared light bridge to detect when something crosses the line, an Adafruit 7-segment display to show the time and lap count, as well as a SparkFun thermal printer that spits out the final results. The frame itself is constructed out of MakerBeam components, while power is supplied through an 11.2V LiPo battery.

Meanwhile, the Arduino software has two modes:

Race mode: This is started by clicking the left “race” button. This will start the laptimer. It uses a “flying start” principle. So there is no count down, just start racing, when the first time you cross the line, the timer will start. It will display the amount of laps still to go on the top 7-segment display and the time on the second 7-segment display.

Setup mode: When you click on the “menu,” 2nd button, you can setup how many laps you want to race. By turning the pot-meter you can select between one and nine laps.

While he may be using his timer for Crazy Cart, the system can come in handy whenever you’re unable to directly race someone else — whether that’s running or cycling around the house. Want one of your own? Race on over to its project page. In the meantime, check it out in the video below. (We gotta say, the 8-bit chiptunes were a nice touch!)

Grow lettuce for life with the Arduino 101

Did you know that if you take a head of romaine lettuce and eat all but the bottom, then place it in a bowl of water, it will regrow? This fun fact actually inspired Instructables user Evandromiami to develop a deep water culture hydroponic system that would optimize the process for him.

The lettuce is grown on top of a five-gallon plastic bucket filled with water under full spectrum lights, while an Arduino 101 monitors the light, humidity, temperature, water, and pH levels measured by a set of sensors. The system is controlled over Bluetooth, which enables the Maker to adjust settings and receive notifications on an LCD screen. All the electronics, including the Curie-based board, are tucked away inside a power strip and the entire hydroponic farm lives inside an A/C closet. 

The Arduino 101-driven project continues to be a work in progress, but Evandromiami has already begun to expand into other veggies like tomatoes. Ready to get into the world of hydroponics? Check out the Maker’s entire write-up here.

Build your own life-size, multipurpose robot with Arduino

If you’ve always wanted a bot for a friend, personal assistant or butler, you’re in luck. John Choi, a Carnegie Mellon University computer science and arts student, has managed to build his own life-size robotics platform for about $2,000. Sure, a price tag like that may not seem “cheap” but in comparison to other research-grade platforms out there, it’s a bargain.

Ideal for Makers, students, educators, artists and researchers alike, the Multipurpose Mobile Manipulator Mk 1 is capable of playing the piano, drawing pictures, preparing meals, watering plants, and engaging in toy sword duels, among many other things.

The Multipurpose Mobile Manipulator is divided into three major parts: the base, the arms, and the chest. The base contains motors for mobility and batteries to power the robot, enabling it to navigate around. The arms contain adaptable grippers, shoulder and elbow joints, and an extensible limb for grabbing and moving things with its environment. Meanwhile, the chest connects all of these together with control electronics and serves as a platform for an intelligent laptop-for-a-face. An Arduino Mega at its heart makes interfacing with sensors and actuators super easy, while the robot’s functionality can also be expanded by simply attaching new electronics and sensors to its mounting areas.

The open-source platform is compatible with Windows, Mac and Linux, and supports Python 2.7 and Arduino libraries. According to Choi, libraries for Unity, Processing, ROS, MATLAB, C++, and Scratch are also in the works.

Those interested in building their own should check out Choi’s incredibly-detailed 80-step tutorial, and watch the robot take on some tasks below. Prepare to be amazed!


The Arduino GRANDE is six times larger than an Uno

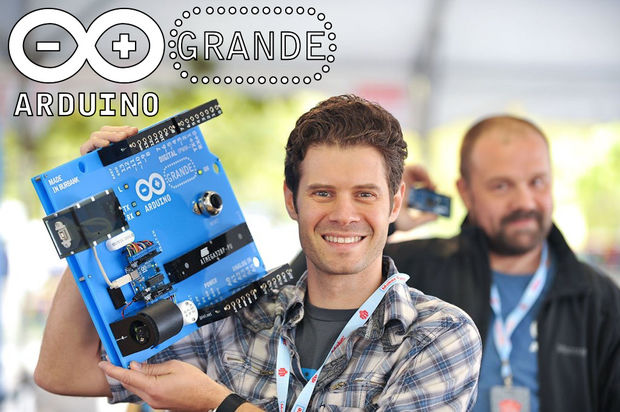
While countless Makers love Arduino, none may love the boards as much as our friend John Edgar Park. In the spirit of Maker Faire Bay Area, we decided to take another look at what is surely the largest one we’ve ever come across. Introducing the “Arduino GRANDE.”

I love Arduino! But the boards are so tiny that they can be difficult to hug. And not so easy to see, either, if you’re a student sitting at the back of a classroom. So why not solve both problems by building a really huge, fully-functioning Arduino that’s six times larger than real life?


Bringing this fully-functional device to life required 3D modeling software, laser-cut acrylic, a few LEDs and buttons, some wiring and connectors, and a tiny (in comparison at least) Arduino Uno for a brain. After making its original debut several years ago, Park has now published a how-to tutorial of his project.

The first step I took in building this was to build a 3D model in Rhino. I based it on the Arduino Uno dimensions, and then started creating the parts based upon my real-world materials and scale. (Since I’m using an Epilog Zing 16 laser cutter with a bed size of 16″ x 12″, my maximum dimensions were dictated for me. So, this is actually a 5.6x larger-than-real-life Arduino.)

The chip is just for show, but the power jack will eventually hide the batteries, and the USB port will be made functional by the addition of a panel mount USB jack.

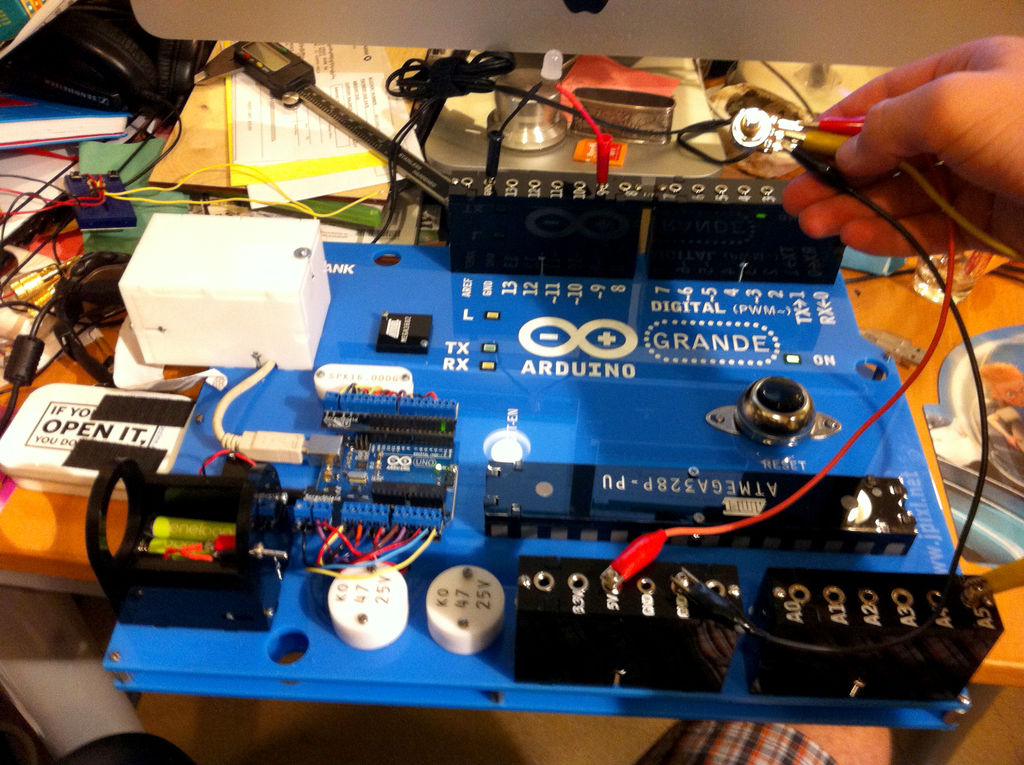
Insert the banana jacks into the female header blocks and then thread the nuts on to hold them in place. A dab of Loctite will prevent them from loosening up later.

On each banana jack, solder a length of wire sufficient to route through the board to the real Arduino. Push the wires through to the underside of the board at the header location, then insert and assemble the header blocks with screws and nuts which will be held captive in the acrylic t-slots.

The reset button (originally sold as a doorbell) needs to have two long lengths of wire soldered to it, which are then fed through the board to route to the real Arduino. The same goes for the panel mount rectangular LEDs.

Attach a real Arduino Uno to the board, and then run all of the header, reset, and LED wiring to it, and plug in the USB cable. You can use a ScrewShield to prevent wires from falling out. Full disclosure, I’m one of the creators of the ScrewShield and will make a little bit of money if you buy one.

Hide a 4xAAA battery pack inside the [cardboard] barrel plug, and then run it through a switch to GND and Vin on the Uno to power the Arduino GRANDE.

You can now upload a test sketch and try things out! I wired banana plugs to resistors, 10mm LEDs, potentiometers, speakers, buzzers, servo motors, and other typical components to plug into the GRANDE.

As for what the GRANDE’s applications, the possibilities are endless! It can be used as an an interactive, educational tool for Arduino classes, carried around like a boombox playing chiptunes, or even expanded upon with GRANDE scale shields! You can check out the entire project on Instructables.

An Arduino-Powered Laser Engraver That You Can Build

A teenage maker created this impressive laser engraver for around $220

Read more on MAKE

The post An Arduino-Powered Laser Engraver That You Can Build appeared first on Make: DIY Projects, How-Tos, Electronics, Crafts and Ideas for Makers.