Posts with «featured» label

What if kids could hack a ball? (Prototyped with Arduino!)

Hackaball is a smart and responsive ball that children can program to invent and play games. It was recently backed by more than 1000 people and reached the goal!

As many other projects on Kickstarter, Hackaball was initially prototyped with Arduino using sensors that detect motions like being dropped, bounced, kicked, shaken or being perfectly still.


We got in touch with its team and asked them to tell us a bit more about the creation process:

Our early versions of the ball worked with the Arduino Uno board, progressing to a breadboard Arduino and then making our own SMD designs with the Uno. In the latests prototypes we used the Arduino Leonardo and our current version runs on the Arduino Mega. Our production version will run on an ARM chip.

We hope to offer Arduino Compatibility as one of our stretch goals in the Kickstarter, so that people can buy a board and put their own code on it using the Arduino software, effectively moving one step up from the app in terms of hacking the ball and making it do what you want it to do. We also believe many adults would love an interactive ball that they can control and design their own interactions – its packed full of features! Hopefully it will also allow kids who’ve outgrown our app to experiment with our technology in a more challenging way, bringing longevity to the product.

We’ve approached the kids who’ll play with Hackaball as the future Makers. The idea of hacking and getting close to technology starts with how the ball first arrives in your home. Kids open the packaging to find the ball is broken: Hackaball has crash-landed on earth and needs to be put back together again. After their first achievement, making the ball, kids are challenged to play games, change existing ones, fix broken games and create new ones from scratch.

We specifically designed the ball and packaging to be gender neutral – making it feel accessible to both boys and girls from the very beginning. We also expanded on the ability of the ball to include both hard and soft skills – from the tactile and linear computational thinking, to the storytelling and imagination-driven game creation, teaching a new generation of Makers to combine technology and creativity. We think that the kids who play with Hackaball would move on to Arduino in their teens!


You still have some days to back the project and help them reach the stretch goals, making Hackaball even more hackable!

Arduino Blog 19 Mar 20:54

Bruce Sterling interviews Massimo Banzi on Casa Jasmina and more!

During the first opening of Casa Jasmina, Bruce Sterling found a moment to discuss about IoT, Casa Jasmina and Arduino future plans with Massimo Banzi. Check out this exclusive video were two of the minds behind the Casa Jasmina project dialogate about the future:


Getting Started with Intel Edison Mini Breakout Board

Let’s start exploring a bit more about Intel Edison. As you may already know, Intel provides 2 different hardware platforms to work with Edison development board: the core module is called Intel Edison Compute Module, while the 2 extension boards are called Intel Edison Arduino Board and Intel Edison Breakout Board respectively. We refer to them as the Arduino module and mini-breakout board, respectively. The tutorial of this week is called Getting Started with Intel Edison Mini Breakout Board:

It is probably more common to use the Arduino module, since it’s easy to use and has many useful features, most notably the pin headers. However, the mini-breakout’s main advantage comes from its size and possible use as a wearable.

In this tutorial, you’ll get more familiar the mini-breakout board, learn how to use it for basic tasks, and then build a small “blink” example based on this knowledge.

Follow the link and explore

Build Arduino-based IoT apps with Temboo Conditions features

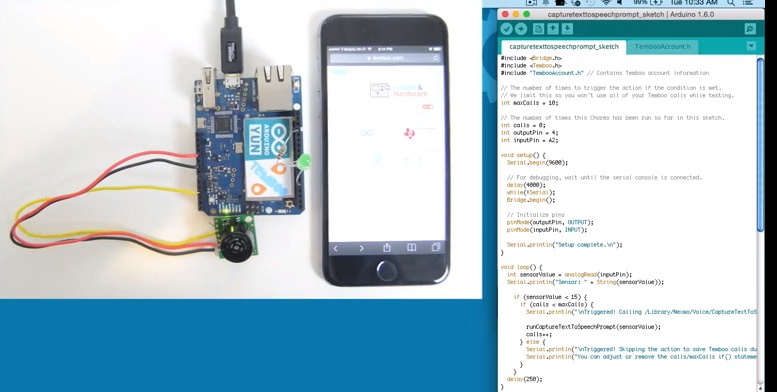
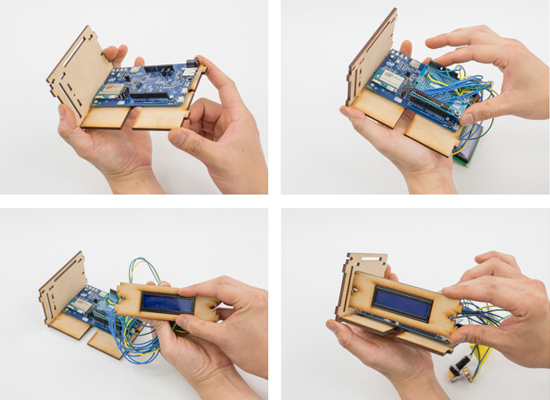
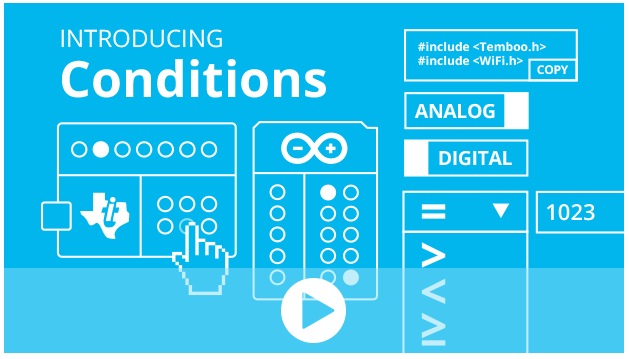
Last week Temboo just added new Conditions features to its IoT Mode interface, making it even easier to connect your Arduino to the Internet of Things! Now, the functionality of Temboo’s Device Coder has been extended to all 2000+ Choreos in the Temboo Library, meaning that data collected from sensors attached to an Arduino Yún can be used to trigger any cloud process, and responses from the cloud can be used to trigger all sorts of hardware actions on your board.

Using IoT Mode on the Temboo website, you can automatically generate ready-to-run Arduino code to execute Choreos from your board without having to write a single line of code yourself—just specify which board and shield you’re using and what Choreo you’d like to run, and all the necessary code will be generated immediately in your browser. And you can also now visually specify what sort of hardware inputs and outputs you would like to use: the code to connect them to your Choreo will be generated as well.

The visual interface includes a pin selector tool that lets you choose which pins you want to activate and how you want them to interact with the Choreo you are running. The pin selector identifies the pins on your board that are available, and also indicates whether those pins are configured to work with digital or analog I/O. Like the generated code itself, the pin selector interface will change to reflect the board and shield you’ve chosen to work with.

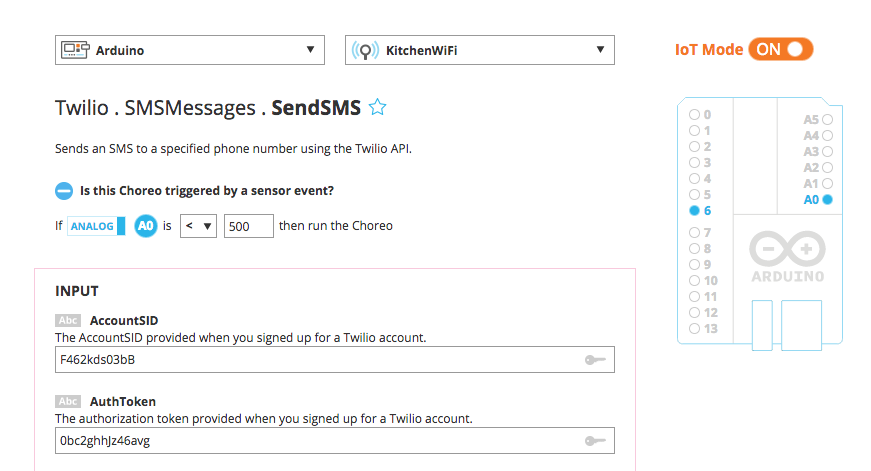
Conditions make it quick and easy to build a massive range of IoT applications, like a thermometer that sends SMS alerts, or a motor that runs when it receives an email. Just specify how you want your pins to interact with the web services you are using, and thanks to Conditions, what you specify will be reflected in a complete, production-ready program generated instantly in your browser. Try it out, and email hey@temboo.com to let them know what you think!

Arduino Blog 12 Mar 07:58
arduino  cloud  featured  iot  sensors  temboo  yún  

Arduino IDE 1.6.1 released

A new version of the Arduino IDE (1.6.1) is available at the download page!
A month ago we released the version 1.6.0 of the Arduino IDE. We then received lots of feedback: issues on Github, emails on the developers mailing list and, most important, forum messages. We fixed a lot of issues, here is a brief list:

  • Better Yún discovery mechanism (thanks Ron Guest)
  • Better SoftwareSerial library (thanks Matthijs Kooijman)
  • Native dialogs on MacOSX on the Java 7+ experimental version
  • Improved library name matching, so IRemote library won’t conflict with RobotIRremote library (thanks Paul Stoffregen)
  • Fixed bug on Windows when attempting to open a sketch by double clicking it

As usual, the complete list of fixes and credits is available here.

Don’t forget to report any issue you find, either on Github or on the Arduino forum: your help is very much appreciated. It doesn’t matter if you are not a tech specialist: every feedback adds value.

We are already working on release 1.6.2, with some very useful features and user experience improvements. Stay tuned!

Arduino Blog 10 Mar 15:18

Encrypting messages with Cuckoo and Arduino Yún

Jochen Maria Weber is a Researcher and Designer at the intersection of Interaction- and Industrial Design. He shared with us Project Cuckoo, a project running on Arduino Yún and looking at our interactions with intercepted social networks and how alternative ways of communicating might change them:

Twitter, Facebook, Google+ and co. collect our data and are forced to have a backdoor for state surveillance. Therefore Cuckoo encrypts messages into randomly generated words, meanings and noise in order to scatter them over multiple communication networks simultaneously. Each letter of an original message gets translated into complex forms of certain length forming new sentences. Those sentences get posted to aforementioned social networks, next to randomly generated noise-sentences for distraction. The encryption method can be changed with every new message. Any receiving Cuckoo-unit following the respective social network accounts can filter and decrypt the important posts according to their encryption method and time stamp. Cuckoo combines social networks to build a hidden one on top of their infrastructure. An egg in the others’ nests.

Cuckoo uses an Arduino YUN to connect wirelessly as a stand-alone device to the internet. It also does the en- and decryption of all messenges and made it comfortable to connect to Twitter, Skype and Tumblr API with Temboo.

Take a look at the video on Cuckoo’s website.

Arduino Blog 06 Mar 23:14

Play your emotional state with Social Vibes and twitter

Social Vibes’ is a Masters Degree (MSc.) project, in Interactive Media by Cian McLysaght, at the University of Limerick, Ireland. They shared with us their project, running on Arduino Uno, composed by a physical artifact designed and created specifically for an installation adopting the fundamental sound mechanisms used in a vibraphone, know also as a ‘Vibe’:

The instrument consists of twelve musical tones of different pitches. The music created on the instrument is derived from a continuous stream of input via multiple users on Twitter and the explicit interaction from Twitter users, tweeting the instrument directly to the project’s, “@vibe_experiment” Twitter account. Data associated with the emotional status of Twitter users, is mined from the Twitter network via Twitter’s open source, application programming interface (API).

For example if a user tweets “The sun is out, I’m happy”, the code I’ve written will strip out key words and strings associated with the user’s emotional state, within the tweets, ie “I’m happy”, and translate this to a musical notation. Mining Twitter’s API, allows a continuous stream of data. These emotional states are then mapped to specific notes on the physical musical instrument, located in a public space. The tempo of the musical expression will be entirely based upon the speed and volume of the incoming tweets on the Twitter API.

Twitter users who are both followers and non followers of the musical instrument’s Twitter account (@vibe_experiment) can tweet directly to the instrument and this direct interaction will be given precedence, allowing user’s who tweet directly to have their emotional state ‘played’. This allows users to hijack or take over the instrument and experiment with it in a playful manner, but also allows those with musical knowledge the potential to compose simple musical arrangements. When users are not tweeting the instrument directly, then the instrument will revert to mining the Twitter API.

To entice users to interact and observe the action of the instrument there is a live streaming broadcast of the instrument via Twitcam on the Vibe’s Twitter account. This is a live streaming broadcast of the instrument via Twitcam on the @vibe_experiment account. Twitcam, is Twitter’s built in live-streaming platform. This simply requires a webcam and a valid Twitter account.

The instrument constantly tweets back updates to it’s own Twitter account to not only inform people of the general status but also to engage users to interact directly with the ‘Vibe’.

Making a lasercut Movie Recommender with Intel Edison

Some days ago we posted on Intel Makers Community an educational tutorial focused on Intel Edison. Our team explored Internet Queries to build a lasercut Movie Recommender and help you find a good movie title  extracted from The Open Movie Database starting from the 50s to the 10s and according to your favourite genre:

Pressing the button will activate the Movie Recommender and the search begins. After the magic is done, the curtain will open to reveal the movie that fits the criteria.

So get this project done, make some popcorn, dim the lights, and get ready to watch a sci-fi movie from 1988… “My Stepmother is an Alien”?!

Follow the link and create your DIY Movie Recommender!

Take a look at the video below to see how it works!

Arduino Blog 02 Mar 20:55

Open Source 3D Printed Rocket Engine controlled by Arduino

Fubar Hackerspace (New Jersey) member Graham has been working on an open source liquid fuel rocket engine with regenerative cooling and precise flow control built on Arduino Uno.  In order to test it he’s also built a cool rig for testing propellant flow control:

My project is building Open Source 3D Printed Rocket Engines with Arduino microcontrollers. As an individual interested in building liquid fueled rocket engines as a hobby I quickly realized there were almost no resources online or forums to share or learn from others. I decided to combine my interests in Software, hardware and open source projects to develop and build a functioning liquid fueled rocket engine. However, unlike most other projects it had to be open source and easily re-produced.

In order to ensure it was as open source as possible I used the Arduino Uno board and IDE to develop software to safely control the engine. To meet the easily reproducible requirement I decided that 3D printing was the right approach rather than labor/time intensive traditional machining.

The end result is an engine that can easily be reproduced or modified. This gives others interested in this hobby a starting point for best practices, safety, etc… so that future projects aren’t starting out from scratch.

All of my design files and software are on GitHub  and a detailed description of the write-up is on the FUBAR labs makerspace wiki 

Here’s the video of the testing of the 3D Printed GOX/Ethanol Injector:

Arduino Blog 27 Feb 09:58

Open Source 3D Printed Rocket Engines controlled by Arduino

Fubar Hackerspace (New Jersey) member Graham has been working on an open source liquid fuel rocket engine with regenerative cooling and precise flow control build on Arduino Uno.  In order to test it he’s also built a cool rig for testing propellant flow control:

My project is building Open Source 3D Printed Rocket Engines with Arduino microcontrollers. As an individual interested in building liquid fueled rocket engines as a hobby I quickly realized there were almost no resources online or forums to share or learn from others. I decided to combine my interests in Software, hardware and open source projects to develop and build a functioning liquid fueled rocket engine. However, unlike most other projects it had to be open source and easily re-produced.

In order to ensure it was as open source as possible I used the Arduino Uno board and IDE to develop software to safely control the engine. To meet the easily reproducible requirement I decided that 3D printing was the right approach rather than labor/time intensive traditional machining.

The end result is an engine that can easily be reproduced or modified. This gives others interested in this hobby a starting point for best practices, safety, etc… so that future projects aren’t starting out from scratch.

All of my design files and software are on GitHub  and a detailed description of the write-up is on the FUBAR labs makerspace wiki 

Here’s the video of the testing of the 3D Printed GOX/Ethanol Injector:

Arduino Blog 27 Feb 09:58